Skip to content
toastedrecipes.com
  • Home
  • Appetizers
  • Desserts
  • Salads
  • Breakfast
  • Dinner
  • Privacy Policy
  • Contact
  • About

Chef Theo

Spicy Shrimp and Avocado Rice Bowl Delightful Meal

May 27, 2025 by Chef Theo
Cooking starts with gathering the right ingredients. For a Spicy Shrimp and Avocado Rice Bowl, you need fresh and vibrant items for flavor and nutrition. Here’s what you need: - 1 lb shrimp, peeled and deveined - 1 tablespoon olive oil - 1 teaspoon smoked paprika - 1/2 teaspoon cayenne pepper (adjust to taste) - 1 teaspoon garlic powder - Salt and pepper to taste - 2 cups cooked jasmine rice - 1 ripe avocado, diced - 1 cup cherry tomatoes, halved - 1/4 cup red onion, finely chopped - 2 tablespoons fresh cilantro, chopped - Juice of 1 lime - Sriracha sauce (for drizzling, optional) Each ingredient plays a role in making this dish delicious. The shrimp give protein and a nice texture. The spices bring heat and depth, while the avocado adds creaminess. Fresh veggies like cherry tomatoes and red onion add crunch and color. You can find the full recipe in detail on the provided link. Enjoy the process of choosing fresh, high-quality ingredients. They make a big difference in the taste and look of your dish! 1. Marinate the shrimp with spices and olive oil: In a bowl, mix shrimp with olive oil, smoked paprika, cayenne pepper, garlic powder, salt, and pepper. Toss it well and let it sit for about 15 minutes. This step adds flavor and spice, making the shrimp taste great. 2. Cook the shrimp to perfection: Heat a skillet over medium-high heat. Add the marinated shrimp in a single layer. Cook each side for 2-3 minutes. The shrimp will turn pink and opaque when done. Remove them from the heat and set them aside. 3. Prepare the jasmine rice and season it: In a large bowl, fluff your cooked jasmine rice. Squeeze fresh lime juice over it and add salt to taste. Mix well to ensure every grain is seasoned. This gives the rice a bright flavor that balances the shrimp. 1. Create the bowl base with seasoned rice: Start with a generous layer of the seasoned jasmine rice at the bottom of your bowl. This will be the base for our delightful meal. 2. Layer on the shrimp and fresh toppings: Next, place the cooked shrimp on top of the rice. Add in diced avocado, halved cherry tomatoes, and chopped red onion. Each topping adds freshness and color to your bowl. 3. Garnish appropriately for presentation: Finally, sprinkle fresh cilantro on top. If you like some heat, drizzle sriracha sauce over everything. This finishing touch makes your dish look inviting and adds extra flavor. - Best serving practices for an appealing dish: Serve your spicy shrimp and avocado rice bowl in a deep bowl. This allows the layers to shine. The colors from the avocado and tomatoes pop against the shrimp and rice. - Recommended accompaniments or drinks: Pair this meal with a light drink like iced tea or a refreshing lemonade. A wedge of lime on the side adds a nice touch. You can squeeze it over the bowl for extra zest. For the full recipe, check out the detailed instructions above. Enjoy your cooking! - How to know when shrimp is cooked: Shrimp cooks fast. Look for a pink color and an opaque look. When shrimp curls into a C shape, it’s ready. Avoid overcooking; it will become rubbery. - Adjusting spice levels for personal preference: Start with less cayenne pepper if you want a milder dish. You can always add more later. Taste the shrimp before serving. This lets you find the right heat for you. - Ideas for a beautiful layer presentation: Use a deep bowl to show off layers. Start with rice, then add shrimp, avocado, and tomatoes in sections. This creates a nice view. - Enhancing the visual appeal with garnishes: Fresh cilantro adds color. Lime wedges not only look good; they also add flavor when squeezed. A drizzle of sriracha can make it pop. - Quick tips for cooking rice perfectly: Rinse jasmine rice before cooking. This removes extra starch and keeps rice fluffy. Use a 1:1.5 rice-to-water ratio for best results. - Shortcuts for meal prep and high-quality flavors: Marinate shrimp ahead of time. You can store it in the fridge. Pre-chop vegetables for quick assembly. This saves time when you’re ready to eat. These tips can help you create a stunning and tasty Spicy Shrimp and Avocado Rice Bowl. For the complete recipe, check the Full Recipe section. {{image_2}} You can switch proteins in this dish. For example, chicken works well. Just cut it into bite-sized pieces and cook the same way as shrimp. Tofu is a great choice too. Use firm tofu, press it, and cut it into cubes. It will soak up the flavors nicely. If you want to try something new, replace the rice. Quinoa is a great substitute. It has a nutty flavor and is packed with protein. You can also use cauliflower rice if you want a low-carb option. Just sauté it lightly before adding it to your bowl. To make this dish gluten-free, check your spices. Most are fine, but some sauces may have gluten. Use gluten-free sriracha if you want extra heat. For a low-carb version, use cauliflower rice as mentioned before. This keeps the flavors while cutting carbs. If you want a vegan meal, skip the shrimp and use chickpeas instead. They add a nice texture and protein. Just season them well like the shrimp to pack in the flavor. Spicing things up can make this dish even better. Try using chili powder or cumin for a different taste. Fresh herbs like basil or mint can also bring a fresh twist. You can add seasonal vegetables to your bowl. Bell peppers, zucchini, or corn will add color and crunch. Fruits like mango or pineapple add a sweet touch that contrasts well with the spice. For the full recipe, be sure to check out the detailed instructions! To keep your spicy shrimp and avocado rice bowl fresh, use these methods: - Refrigerator Storage: Place leftovers in an airtight container. This helps keep the shrimp and rice tasty. Store it in the fridge for up to three days. - Freezing Leftover Components: You can freeze the shrimp and rice separately. Use freezer-safe bags or containers. They will last for about one month in the freezer. To reheat your meal without losing flavor: - Best Practices: Heat shrimp and rice in a skillet over low heat. This helps keep the shrimp moist. Stir often to prevent sticking. - Safe Reheating Times: Reheat for about 5-7 minutes. Ensure the shrimp reaches an internal temperature of 165°F. This is safe for eating. How long does your dish stay fresh? - Freshness Duration: The spicy shrimp and avocado rice bowl stays fresh for three days in the fridge. - Signs of Spoilage: Look for any off smells or changes in color. If the shrimp or rice looks slimy, it’s time to toss it out. How can I make my shrimp less spicy? To lessen the spice, reduce or omit cayenne pepper. You can also add more lime juice or avocado to balance the heat. Consider serving with a dollop of sour cream for a cool contrast. Can I use frozen shrimp for this recipe? Yes, you can use frozen shrimp. Just thaw them first. To thaw, place them in cold water for about 15 minutes. Pat them dry before marinating. What is the best rice to use for this dish? Jasmine rice works great for this bowl. It is fluffy and fragrant. You can also use basmati or brown rice if you prefer a different flavor or texture. Each serving has about 450 calories. It includes 20 grams of protein and 18 grams of healthy fats. This meal is rich in vitamins from the avocado and tomatoes. Allergens present: - Shrimp (shellfish) - Possible gluten from sriracha sauce (check labels) How to adjust the recipe for larger or smaller servings: To serve more people, simply double the ingredients. For fewer servings, halve them. Suggestions for scaling ingredients up or down: Keep the ratio of shrimp to rice about 1:2. This ensures each bite has ample shrimp flavor without overpowering the rice base. Adjust toppings like avocado and tomatoes to your taste. For the full recipe, check the earlier sections. Enjoy making this delicious dish! This blog post covered a delicious shrimp bowl recipe, highlighting important steps and tips. You learned about key ingredients, preparation, and storage. We also explored fun variations and answered common questions. In summary, cooking can be simple and enjoyable. With a few tips, you can create a tasty dish that's perfect for any occasion. Enjoy making your shrimp bowl and feel free to experiment with flavors!

Are you ready to spice up your dinner routine? The Spicy Shrimp and Avocado Rice Bowl is a delicious dish that combines tender shrimp with creamy avocado and seasoned rice. …

Read more

Categories Dinner

Cheesy Garbage Bread Delight Irresistible Quick Dish

May 27, 2025 by Chef Theo
- 1 large loaf of Italian bread - 1 cup shredded mozzarella cheese - ½ cup grated Parmesan cheese - 1 cup mixed veggies (bell peppers, onions, mushrooms, and spinach) - ½ cup cooked and crumbled sausage or ground turkey - 1 tablespoon garlic powder - 1 tablespoon Italian seasoning - 2 tablespoons olive oil - Salt and pepper to taste - Fresh parsley for garnish When I make Cheesy Garbage Bread Delight, I start with a large loaf of Italian bread. This bread has a soft inside and a crusty outside. It holds all the cheesy goodness well. I use both mozzarella and Parmesan cheese to create a creamy mix. The mozzarella melts beautifully, while the Parmesan adds a sharp flavor. I love to add veggies for more taste. Bell peppers, onions, mushrooms, and spinach work well together. You can also add crumbled sausage or ground turkey for extra protein. For flavor, garlic powder and Italian seasoning are key. They bring the dish to life. A drizzle of olive oil adds richness, while salt and pepper balance everything. I finish with fresh parsley for a pop of color. These ingredients come together to make a quick and tasty dish. You can find the full recipe at the end of this article. - Preheat the oven to 375°F (190°C). - Slice the Italian bread horizontally. Hollow out the interior, leaving about half an inch of crust. To hollow out the bread, use a sharp knife. Be careful not to cut through the crust. This step creates a sturdy shell for our cheesy filling. - Sauté mixed veggies and optional meat in olive oil. - Stir in cheeses and seasonings until combined. In a skillet, heat the olive oil over medium heat. Add the mixed veggies and any meat you like, such as sausage or turkey. Cook until the veggies soften, about five to seven minutes. Remove from heat and mix in the mozzarella, Parmesan, garlic powder, Italian seasoning, salt, and pepper. This filling is where the magic happens. The combination of cheese and veggies creates a creamy, flavorful mix that fills our bread perfectly. - Fill the hollowed bread with the cheesy mixture. - Bake until golden and bubbly, about 15-20 minutes. Take your cheesy mix and pack it tightly into the hollowed bread. Place the stuffed loaf on a baking sheet lined with parchment paper. Bake it until the cheese melts and the bread turns golden brown. This usually takes about 15 to 20 minutes. The aroma during baking is irresistible! You can almost taste the cheesy goodness before it’s done. Enjoy this fun and easy dish with friends or family. For the complete instructions, check out the Full Recipe. - Use fresh ingredients for better flavor. Fresh veggies and cheese make a big difference. - Hollow out the bread carefully to maintain structure. Keep enough crust to hold the filling. - Serve with marinara sauce for dipping. This adds a nice touch of flavor. - Garnish with parsley for added freshness. It makes the dish look and taste great. - Overfilling the bread can cause spillage. Aim for a snug fit without overflowing. - Not preheating the oven enough may affect baking. Always let the oven heat fully before baking. {{image_2}} Cheesy Garbage Bread Delight is fun to customize! You can change it up in many ways. Here are some tasty variations you can try. Want a veggie delight? Replace the sausage with more vegetables or tofu. Use any mix you like. Bell peppers, zucchini, and carrots all work well. This option is colorful and healthy. Plus, the cheese pairs well with all those fresh flavors. If you love heat, add jalapeños or red pepper flakes. Just sprinkle them into the filling. This will give your bread a spicy kick. Be careful not to add too much, as it can get fiery! This twist makes every bite exciting. Don’t be afraid to experiment with different cheeses! Cheddar, gouda, or feta can add unique flavors. Each cheese brings its own taste and texture. Mixing cheeses can also make your dish creamier or sharper. Try different combos to find your favorite! These variations keep Cheesy Garbage Bread Delight fresh and fun. Enjoy making your own version! For the full recipe, check out the details above. Keep your cheesy garbage bread delight in an airtight container in the fridge. This way, it stays fresh for up to three days. Make sure it cools before sealing to avoid moisture build-up. For the best taste, reheat in the oven. Set your oven to 350°F (175°C) and bake for about 10 minutes. This keeps the bread crunchy and the cheese melty. You can also use a microwave for a quick fix, but it may lose some crispiness. If you have extra cheesy garbage bread, wrap slices tightly in plastic wrap. Then place them in a freezer bag. This method helps keep them fresh for up to three months. To enjoy, thaw in the fridge overnight before reheating. Cheesy Garbage Bread Delight is a fun and cheesy stuffed bread. You can fill it with many tasty ingredients. Common choices include mozzarella cheese, mixed veggies, and sausage. The best part? You can customize it however you like! Yes, you can prepare this dish in advance. Bake it, then store it in the fridge. When you're ready to eat, just reheat it and enjoy. This makes it a great choice for busy days or parties. Cheesy Garbage Bread Delight works well as an appetizer. It pairs nicely with salads or soups. You can also serve it with a side of marinara sauce for dipping. This adds extra flavor and fun to your meal. For the full recipe, check out the [Full Recipe]. You learned how to make Cheesy Garbage Bread Delight. This dish uses Italian bread, cheese, and your choice of add-ins. Stick to fresh ingredients for the best taste. Remember to hollow out the bread carefully and fill it just right. You can even mix things up with spices or different cheeses. Store leftovers in the fridge or freeze for later. Enjoy this tasty dish with your favorite dip or as a fun food for gatherings. Experiment and make it your own!

Looking for a quick and tasty dish that will impress your friends? Meet Cheesy Garbage Bread Delight! This fun recipe is all about gooey cheese and endless flavor possibilities. Picture …

Read more

Categories Appetizers

Cheesy Pepperoni Calzone Flavorful and Satisfying Meal

May 27, 2025 by Chef Theo
To make the Ultimate Cheesy Pepperoni Calzone, gather these ingredients: - 2 cups all-purpose flour - 1 teaspoon instant yeast - 1 teaspoon sugar - 1 teaspoon salt - 3/4 cup warm water - 1 tablespoon olive oil - 1 cup marinara sauce (for dipping) - 1 1/2 cups shredded mozzarella cheese - 1 cup sliced pepperoni - 1/2 teaspoon Italian seasoning - 1/4 teaspoon crushed red pepper flakes (optional) - 1 egg (for egg wash) These ingredients create a rich flavor and a satisfying meal. Each component plays a key role in the taste and texture of the calzone. You can customize your calzone by adding extra toppings like bell peppers, mushrooms, or even a sprinkle of parmesan cheese. Feel free to mix and match to find your favorite combo. Using high-quality ingredients makes a big difference. Fresh mozzarella melts beautifully and adds a creamy texture. You can also use store-bought dough if you want to save time. However, making your own dough adds a special touch. Check out the Full Recipe for detailed steps to bring this dish to life! 1. First, grab a mixing bowl. Add 2 cups all-purpose flour, 1 teaspoon instant yeast, 1 teaspoon sugar, and 1 teaspoon salt. Mix these dry ingredients well. 2. Next, slowly add 3/4 cup warm water and 1 tablespoon olive oil. Stir with a wooden spoon until a dough forms. 3. Now, place the dough on a floured surface. Knead it for about 5-7 minutes. You want it to be smooth and elastic. 4. Put the kneaded dough in a greased bowl. Cover it with a kitchen towel. Let it rise in a warm spot for 30-45 minutes until it doubles in size. 1. Once the dough has risen, punch it down gently. Divide it into two equal pieces. 2. Roll each piece into a 10-inch circle on a floured surface. 3. On one half of each dough circle, sprinkle 3/4 cup shredded mozzarella cheese. Layer it with 1 cup sliced pepperoni. Add 1/2 teaspoon Italian seasoning and 1/4 teaspoon crushed red pepper flakes if you want some heat. 4. Fold the other half of the dough over the filling. Pinch the edges together to seal it tightly. 1. Preheat your oven to 450°F (230°C). Line a baking sheet with parchment paper to prevent sticking. 2. Brush the top of each calzone with a beaten egg for that golden finish. 3. Bake the calzones for 12-15 minutes or until they turn golden brown. 4. Allow them to cool for a few minutes before slicing. Serve with warm marinara sauce for dipping. For the complete recipe, check out the Full Recipe. To get that nice, crispy crust, use a hot oven. Preheat your oven to 450°F (230°C) before baking. This heat helps create a great texture. For a golden-brown color, brush the top with an egg wash. Just beat an egg and gently apply it on the dough before baking. This gives your calzone a shiny look. To make the filling extra flavorful, mix in some Italian seasoning and crushed red pepper flakes. These spices add a kick to your calzone. You can also experiment with garlic powder or fresh herbs for more taste. One common mistake is overstuffing the calzone. It might look tempting, but too much filling can cause it to burst. Stick to a reasonable amount for the best results. Another mistake is not allowing enough rising time for the dough. Let it rise until it doubles in size. This step is key for a light and airy texture. Using cold ingredients is also a no-no. Always use warm water for the dough. Cold ingredients can make it hard for the dough to rise and affect the final taste. For the full recipe, check out the Ultimate Cheesy Pepperoni Calzone. {{image_2}} You can play with the fillings in your calzone to match your taste. If you want a vegetarian calzone, try adding mushrooms, onions, or peppers. These veggies add flavor and keep it light. For a spicy kick, you can toss in some sliced jalapeños. They bring heat that pairs well with the cheese. If you want to switch up the cheese, consider using ricotta or provolone. Ricotta gives a creamy texture, while provolone adds a sharp flavor. Mixing cheeses can create a delightful surprise in every bite. Remember, the filling is your choice, so have fun experimenting! When it comes to sauce, you have options. You can use homemade marinara or store-bought marinara. Homemade sauce can be fresher, but store-bought is quick and easy. Both options work well for dipping. You might also want to try other dipping sauces. Garlic butter is rich and flavorful. Ranch dressing can add a cool creaminess. Pair your calzone with these sauces to find your favorite combination. Each option enhances your calzone experience, making it even more delicious. For the complete recipe, check out the Full Recipe section! To keep your leftover calzones fresh, store them in the fridge. Wrap each calzone in plastic wrap or aluminum foil. Then, place them in an airtight container. This method helps to keep moisture in and prevents them from drying out. Enjoy your calzones within three days for the best taste. For a longer shelf life, freezing is a great option. Allow the calzones to cool completely before freezing. Wrap each calzone tightly in plastic wrap and then in aluminum foil. This helps to prevent freezer burn. You can freeze them for up to three months. When you’re ready to eat, just thaw in the fridge overnight. Reheating calzones can be tricky. The oven is the best tool for this task. Preheat your oven to 375°F (190°C). Place the calzone on a baking sheet. Heat for about 10-15 minutes or until warm. This method keeps the crust crispy and the filling hot. If you need to use a microwave, place the calzone on a microwave-safe plate. Heat it for about 1-2 minutes. To keep the crust from getting soggy, place a cup of water in the microwave with it. This helps to create steam, which keeps the calzone from drying out. Enjoy your cheesy pepperoni goodness! To make your calzone crispy, follow these tips: - Use a pizza stone for even heat. - Preheat your oven thoroughly to 450°F (230°C). - Brush the calzone with olive oil before baking. - Bake until golden brown, about 12-15 minutes. Yes, you can prepare calzones ahead of time. Here’s how: - Make the dough and let it rise. - Shape the calzones, but do not bake them. - Cover them tightly with plastic wrap and refrigerate. - Bake them within 24 hours for the best taste. You can use various meats in your calzone, such as: - Cooked sausage for a spicy kick. - Ham for a sweet, savory flavor. - Grilled chicken for a lighter option. - Bacon for extra richness and crunch. Look for these signs to know if your calzone is done: - The crust should be golden brown. - The filling should be bubbling slightly. - When tapped, it sounds hollow. You can find great calzones at these types of places: - Local pizzerias known for their specialty dishes. - Italian restaurants that focus on traditional recipes. - Food trucks that serve gourmet pizza-style foods. For a recipe you can make at home, check out the Full Recipe for the Ultimate Cheesy Pepperoni Calzone! Making a calzone is simple and fun. We covered ingredients, from measurements to tasty options. I shared step-by-step instructions to prepare, assemble, and bake your calzone. Tips helped perfect your crust and avoid common mistakes. We explored filling variations and sauces to try. Finally, I explained storage and reheating methods for leftovers. With this guide, you can make a delicious calzone at home. Enjoy your cooking and share your tasty results!

Craving a cheesy, satisfying meal? You’re in the right place! In this blog post, I’ll guide you through making the ultimate cheesy pepperoni calzone. With simple steps, you’ll create a …

Read more

Categories Appetizers

Chia Banana Bread Energy Bites Tasty and Simple Snack

May 27, 2025 by Chef Theo
Chia Banana Bread Energy Bites are simple to make. Here’s what you need: - 2 ripe bananas, mashed - 1 cup rolled oats - 1/4 cup chia seeds - 1/4 cup almond butter or peanut butter - 1/4 cup honey or maple syrup - 1 teaspoon vanilla extract - 1/2 teaspoon baking powder - 1/2 teaspoon cinnamon - A pinch of salt - Optional add-ins: 1/2 cup chopped walnuts or pecans, 1/2 cup dark chocolate chips Each ingredient plays a key role in flavor and texture. The bananas add natural sweetness. Chia seeds give a nice crunch and boost nutrition. Oats create a hearty base that holds everything together. Almond butter or peanut butter adds creaminess and richness. Honey or maple syrup sweetens the bites. Vanilla extract brings warmth. Baking powder helps them rise a bit while baking. Cinnamon and salt enhance the overall taste. If you want more crunch or sweetness, add walnuts or dark chocolate chips. You can find the full recipe for these tasty bites in the earlier section. Enjoy making them! Preheat your oven to 350°F (175°C). Line a baking sheet with parchment paper. This step helps prevent sticking and makes cleanup easy. In a large bowl, mix the mashed bananas, almond butter, honey, and vanilla extract. Stir until the mixture is smooth and creamy. This blend adds natural sweetness and moisture. In another bowl, combine the rolled oats, chia seeds, baking powder, cinnamon, and salt. This mix gives your energy bites a nice texture and flavor. Make sure to stir well so everything is evenly distributed. Gradually add the dry ingredients to the wet mixture. Stir gently until just combined. Avoid over-mixing, as this can change the texture of your bites. If you want, fold in chopped walnuts or dark chocolate chips for extra flavor. Shape the mixture into small balls, about 1 inch in diameter. Place them on the prepared baking sheet. Bake in the preheated oven for 12-15 minutes. Look for a golden brown color on the edges. Let them cool for a few minutes before moving them to a wire rack. Enjoy your tasty energy bites as a quick snack! For the full recipe, check out the details above. To get the right texture for your energy bites, follow a few simple steps. You want a soft yet firm mix. Use ripe bananas; they mash easily and add moisture. If the mix feels too dry, add a splash of almond milk. If it's too wet, sprinkle in more oats. Rolling the bites helps them hold shape. Aim for bites about one inch in size. This size cooks evenly and is easy to grab. Sweetness can change based on your taste. Honey adds a nice touch, while maple syrup gives a unique flavor. Start with a quarter cup, then taste the mix. If you want more sweetness, add a little more. You can also add chocolate chips for extra sweetness. This way, you tailor the energy bites to your liking. Serving these energy bites can be fun! Place them in a rustic bowl lined with parchment paper. You can sprinkle chia seeds on top for a nice look. They work well for parties, snacks, or even breakfast. Pair them with fruit slices or yogurt for a complete meal. You can also wrap them for easy on-the-go snacks. For the full recipe, check the recipe section above. {{image_2}} You can easily change the flavor of your Chia Banana Bread Energy Bites. Try adding spices like nutmeg or ginger for a warm twist. You can also mix in flavor extracts, like almond or coconut, to enhance the taste. If you want a chocolatey kick, add cocoa powder or even espresso powder for depth. The options are endless! If you need to make these energy bites gluten-free, use certified gluten-free oats. For a nut-free version, swap almond butter for sunflower seed butter. This keeps your bites tasty and safe for those with allergies. You can also adjust the sweetener to fit your dietary needs. Maple syrup works great for vegans. You can customize your energy bites with what you have at home. Instead of bananas, use applesauce for moisture. If you don’t have chia seeds, flaxseeds can work too. For the sweetener, you might use agave syrup or a sugar substitute. These small changes let you make the recipe work for you. For the full recipe, check out the [Full Recipe]. To keep your Chia Banana Bread Energy Bites fresh, store them in an airtight container. This helps prevent moisture and keeps them tasty. Place the bites in a single layer if you can. If stacking, add parchment paper between layers to avoid sticking. You can freeze these energy bites for longer-lasting freshness. After they cool completely, place them in a single layer on a baking sheet. Freeze them for about 1 hour. Once frozen, transfer the bites to a freezer-safe bag or container. Remember to label it with the date. They will stay fresh for about three months. In the refrigerator, your energy bites last up to one week. If you freeze them, they'll keep for about three months. Always check for any signs of spoilage before enjoying them after storage. This way, you can savor all the deliciousness without worry. To make Chia Banana Bread Energy Bites, follow these key steps: 1. Mix Wet Ingredients: In a bowl, mash ripe bananas. Stir in almond butter, honey or maple syrup, and vanilla extract until smooth. 2. Combine Dry Ingredients: In another bowl, mix rolled oats, chia seeds, baking powder, cinnamon, and salt. 3. Blend Mixtures: Gradually add the dry mix to the wet mix. Stir until just combined. 4. Form Bites: Shape the mixture into small balls, about 1 inch wide, and place them on a baking sheet. 5. Bake: Bake at 350°F (175°C) for 12-15 minutes. Look for golden edges. 6. Cool: Let them cool for a few minutes before enjoying your tasty snacks. For the full recipe, check the section above. Chia seeds pack a punch of nutrients. They are high in fiber, protein, and omega-3 fatty acids. This helps keep you full and may aid digestion. Bananas add natural sweetness and provide potassium. This mineral is vital for heart health and muscle function. Together, they create a nutritious energy bite that fuels your day. Yes, you can swap almond butter with other nut or seed butters. Peanut butter works well and has a stronger taste. Sunflower seed butter is a great nut-free option. Each butter gives a slightly different flavor and texture. Just keep in mind that this change may alter the final taste of your energy bites. Choose the one you enjoy most! These Chia Banana Bread Energy Bites are easy to make and very tasty. You need simple ingredients and a few steps. Preheat your oven, mix wet and dry ingredients, and shape the bites. Baking them takes just 12 to 15 minutes. Remember to store any extras in an airtight container. You can even freeze some for later. Try different flavors and ingredients to make this recipe your own. Enjoy these healthy snacks that fit your taste!

Looking for a quick and tasty snack? Try these Chia Banana Bread Energy Bites! They’re packed with flavor and full of healthy ingredients like bananas and chia seeds. You can …

Read more

Categories Desserts

Reese’s Peanut Butter Banana Bread Easy and Delicious

May 27, 2025 by Chef Theo
When I make Reese’s Peanut Butter Banana Bread, I love how easy it is to gather the ingredients. Here’s what you need: - 3 large ripe bananas, mashed - 1/2 cup peanut butter (creamy or chunky) - 1/2 cup granulated sugar - 1/4 cup brown sugar, packed - 2 large eggs - 1 teaspoon vanilla extract - 1 teaspoon baking soda - 1/4 teaspoon salt - 1 1/2 cups all-purpose flour - 1/2 cup chopped Reese’s peanut butter cups - 1/2 cup chocolate chips (optional) These ingredients blend perfectly together. The ripe bananas add natural sweetness. Peanut butter gives it a rich, nutty taste. Reese’s cups add a fun crunch and extra chocolate. If you want, you can even throw in chocolate chips for a double dose of sweetness. This recipe is simple but packed with flavor. You can find the full recipe in the earlier section. It’s a great treat to share or keep for yourself! 1. Preheat the oven and prepare the loaf pan Start by preheating your oven to 350°F (175°C). Grease a 9x5-inch loaf pan with butter or cooking spray. This will help your banana bread slide out easily once it’s baked. 2. Mix wet ingredients In a large bowl, combine 3 large ripe bananas (mashed), 1/2 cup peanut butter, 1/2 cup granulated sugar, and 1/4 cup brown sugar. Mix these until they are smooth and well blended. Next, add 2 large eggs and 1 teaspoon of vanilla extract. Whisk everything together until it looks nice and creamy. 3. Combine dry ingredients In another bowl, mix together 1 teaspoon of baking soda, 1/4 teaspoon of salt, and 1 1/2 cups of all-purpose flour. Slowly combine this dry mixture into your wet ingredients. Stir gently until everything is combined. Be careful not to overmix; a few lumps are okay! 1. Fold in Reese’s and chocolate chips Now for the fun part! Gently fold in 1/2 cup of chopped Reese’s peanut butter cups and 1/2 cup of chocolate chips if you want some extra sweetness. Make sure they are evenly mixed throughout the batter. 2. Pour batter into the pan Carefully pour your batter into the greased loaf pan. Use a spatula to smooth the top so it bakes evenly. 3. Baking time and checking for doneness Place the pan in the preheated oven. Bake for about 50-60 minutes. To check if it’s done, insert a toothpick into the center. If it comes out clean, your banana bread is ready! Let it cool in the pan for about 10 minutes before transferring it to a wire rack to cool completely. Enjoy making this delightful Reese’s Peanut Butter Banana Bread with the full recipe! Ripe bananas are key to great banana bread. They add natural sweetness and moisture. Look for bananas with lots of brown spots. The more ripe, the better. Mixing is important too. You want to combine your ingredients just enough. Overmixing makes the bread tough. Stir until you don’t see dry flour. A few lumps are okay. For a lovely presentation, slice the bread and serve it warm. Drizzle some melted peanut butter on top. Add a few banana slices and half a Reese’s cup for flair. Pair your banana bread with a nice cup of coffee. It also goes well with a scoop of vanilla ice cream. Enjoying it this way makes for a delightful treat! {{image_2}} You can switch out some ingredients for fun. If you want to try nut alternatives, use almond butter or cashew butter instead of peanut butter. These options give a new taste while keeping it creamy. For sugar, honey or maple syrup works well. They add sweetness and a hint of flavor too. Want to boost the taste? Try adding spices like cinnamon or nutmeg. Just a little will change the whole vibe of your bread. If you love chocolate, increase the amount of chocolate chips or Reese’s peanut butter cups. More of these treats will make each bite even more exciting. For the full recipe, refer to the earlier section. Enjoy your baking! To keep your Reese’s peanut butter banana bread fresh, store it at room temperature. Wrap it in plastic wrap or place it in an airtight container. This helps keep the bread moist and tasty. If you want to store it longer, you can refrigerate it. However, this may dry it out a bit. For the best flavor, freeze the bread if you cannot eat it right away. To do this, slice the bread first. Wrap each slice in plastic wrap. Then, place the wrapped slices in a freezer bag. Make sure to squeeze out as much air as you can. It can last up to three months in the freezer. Reheating banana bread is easy and fun. Here are a few methods you can try: - Microwave: Place a slice on a microwave-safe plate. Heat it for about 10-15 seconds. Check if it is warm enough. If not, heat it in 5-second bursts. - Oven: Preheat your oven to 350°F (175°C). Wrap the bread in foil to keep it moist. Heat for about 10-15 minutes. - Toaster Oven: Set your toaster oven to a low setting. Heat the slice for about 5-7 minutes, checking often to avoid burning. These methods will help you enjoy your banana bread just like when it was fresh! Can I use frozen bananas? Yes, you can use frozen bananas! Just thaw them first. Drain any excess liquid. Your banana bread will still taste great. How can I tell when banana bread is done? To check if banana bread is done, use a toothpick. Insert it into the center. If it comes out clean, your bread is ready. Can I make mini loaves instead? Absolutely! Just divide the batter into mini loaf pans. Bake for about 25-30 minutes. Check for doneness like you would with a regular loaf. What if my banana bread is too dry? If your banana bread turns out dry, try adding more bananas next time. You can also add a bit of yogurt or applesauce for moisture. How to make it gluten-free? To make gluten-free banana bread, swap the all-purpose flour for a gluten-free blend. Make sure it has xanthan gum for the best texture. You learned how to make delicious banana bread with peanut butter, chocolate, and Reese’s. We covered ingredients, steps, tips, and storage. Always use ripe bananas for the best flavor. Don’t forget to experiment with flavors and ingredients. You can even freeze your banana bread for later enjoyment. Share this recipe with friends and family; they will love it! Happy baking, and enjoy your tasty treat!

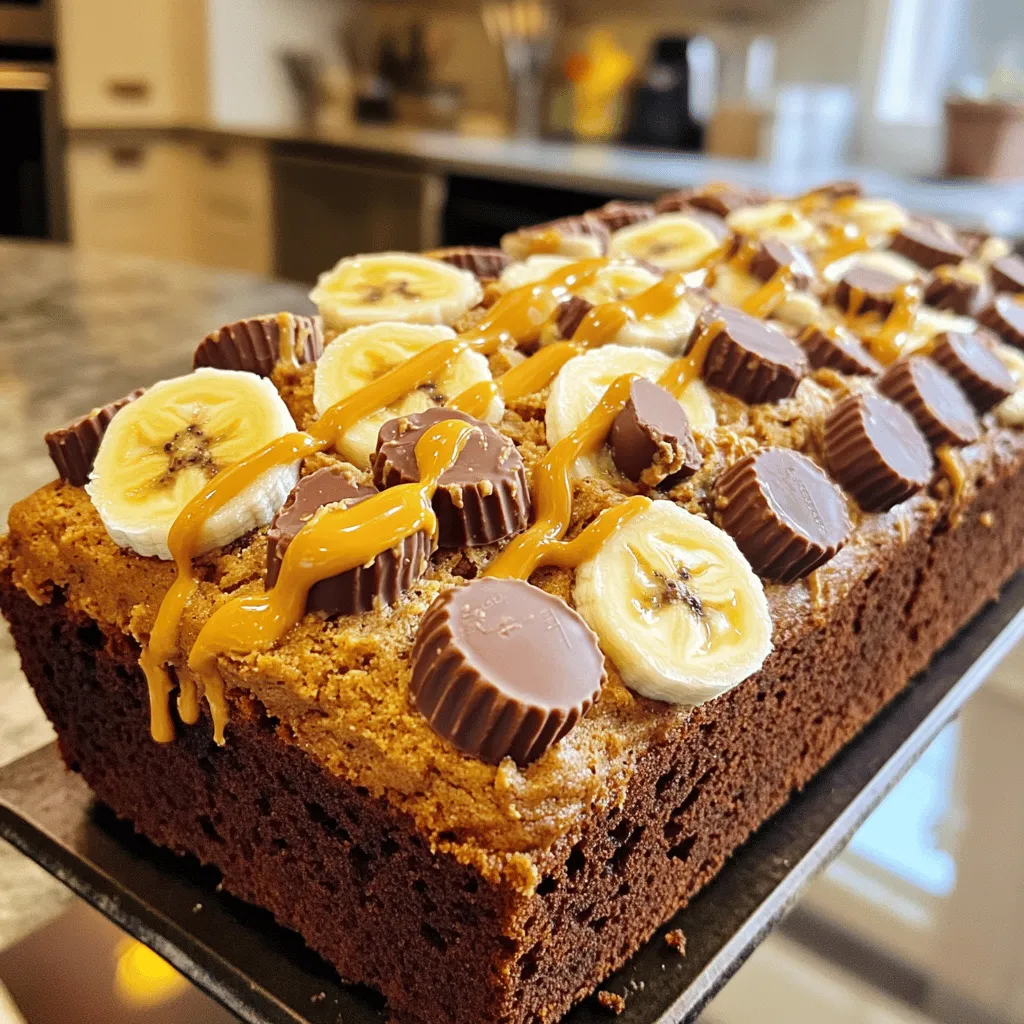
Are you ready for a sweet twist on a classic? My Reese’s Peanut Butter Banana Bread is both easy and delicious. This recipe combines the rich flavors of peanut butter …

Read more

Categories Desserts

Oreo Brownie Cookies Irresistible and Easy Recipe

May 23, 2025 by Chef Theo
To make Oreo brownie cookies, you need these tasty items: - 1 cup unsalted butter, melted - 1 1/4 cups granulated sugar - 1 cup brown sugar, packed - 2 large eggs - 2 teaspoons vanilla extract - 1 cup all-purpose flour - 3/4 cup unsweetened cocoa powder - 1 teaspoon baking powder - 1/2 teaspoon salt - 1 cup semi-sweet chocolate chips - 12 Oreo cookies, crushed (plus extra for topping) These ingredients blend together to create rich, gooey cookies. The butter adds moistness, while the sugars give sweetness. The cocoa powder provides that deep chocolate flavor we love. If you don’t have something on hand, don’t worry! Here are some swaps you can try: - Butter: Use coconut oil for a dairy-free option. - Granulated sugar: You can use coconut sugar instead for a healthier choice. - Eggs: Replace each egg with 1/4 cup unsweetened applesauce. - All-purpose flour: Use almond flour for a gluten-free version. - Chocolate chips: You can swap in white chocolate or dark chocolate. These substitutions keep the cookies delicious while catering to different diets. Fresh ingredients make the best cookies. Here are some tips to keep them fresh: - Butter: Store it in the fridge until you’re ready to use it. - Sugar: Keep it in an airtight container to prevent clumping. - Eggs: Use eggs that are within their expiration date for the best results. - Flour: Store flour in a cool, dark place to avoid bugs and spoilage. - Cocoa powder: Keep it sealed tightly to maintain its rich flavor. Using fresh ingredients will ensure your Oreo brownie cookies taste amazing. For the full recipe, check out the complete guide. Start by preheating your oven to 350°F (175°C). This step is key for even baking. While the oven warms up, grab a baking sheet. Line it with parchment paper. This will help the cookies release easily after baking. Make sure to space the cookies well on the sheet. This allows them to spread without sticking to each other. In a large bowl, combine the melted butter, granulated sugar, and brown sugar. Mix them until smooth and creamy. Next, add the eggs, one at a time. Then, stir in the vanilla extract. These wet ingredients create a rich base for your cookies. In a separate bowl, whisk the flour, cocoa powder, baking powder, and salt together. This step ensures no lumps in your cookie dough. Gradually mix the dry ingredients into the wet mixture. Stir until you just combine them. If you mix too much, the cookies may turn out tough. Now, fold in the semi-sweet chocolate chips and crushed Oreo cookies. Make sure they are evenly spread throughout the dough. Using a spoon or cookie scoop, drop generous tablespoons of dough onto your prepared baking sheet. Space them about 2 inches apart. To add a special touch, press extra Oreo pieces on top of each cookie. Bake the cookies in your preheated oven for 10-12 minutes. You want the edges set but the centers soft. Once they are done, take them out and cool them on the baking sheet for about 5 minutes. This helps them firm up a bit. After that, transfer the cookies to a wire rack to cool completely. These steps will guide you to delicious Oreo brownie cookies. For the full recipe, check the earlier section. To get the best cookie texture, focus on your mixing. Start by mixing the melted butter with sugars until smooth. This step adds air, helping your cookies rise. When you add the eggs, beat them in well, one by one. When combining dry and wet ingredients, mix gently. Overmixing can lead to tough cookies. Aim for a dough that is slightly thick but still soft. This balance gives you chewy edges and soft centers. If you have leftover cookies, store them in an airtight container. This keeps them fresh for days. If you want to keep them even longer, freeze them. Place the cookies in a freezer bag and remove as much air as possible. You can freeze them for up to three months. When you're ready to eat, let them thaw at room temperature. You can also warm them in the oven for a few minutes to restore their softness. One mistake is not measuring your ingredients accurately. Use a kitchen scale if you can. Another mistake is using cold eggs or butter. Room-temperature ingredients blend better. Also, avoid skipping the chilling time if your dough feels too warm. Chilling helps the cookies hold their shape. Finally, don’t forget to check your oven temperature. An oven that’s too hot can burn the edges. Always use an oven thermometer for accuracy. For the complete recipe, check the [Full Recipe]. {{image_2}} You can make these cookies even more fun by adding different types of chocolate. Try using white chocolate chips for a sweet, creamy twist. Milk chocolate adds a nice touch of sweetness too. Mix and match to find your favorite flavor combo. Each type of chocolate brings its own unique taste and texture to the cookies. If you need gluten-free cookies, switch to a gluten-free flour blend. This works great and keeps the cookies soft. For a vegan option, use plant-based butter and flax eggs. Just mix one tablespoon of flaxseed meal with three tablespoons of water. Let it sit until it thickens. This will help bind your cookie dough and keep it moist. Get creative with mix-ins! Chopped nuts like walnuts or pecans add a crunchy texture. Dried fruits, like cranberries or cherries, give a chewy bite and a hint of tartness. You can even toss in some mini marshmallows for a fun surprise. Mix in your favorites to make these Oreo brownie cookies truly your own. For the full recipe, check out the detailed steps above. Enjoy the fun of customizing your cookies! To keep your Oreo brownie cookies fresh, store them in an airtight container. This helps lock in moisture and keeps them soft. Place a piece of bread in the container with the cookies. The bread adds extra moisture and keeps the cookies from drying out. Keep the container at room temperature, away from heat and direct sunlight for the best results. If you want to save some cookies for later, freezing is a great option. First, let the cookies cool completely. Then, place them in a single layer on a baking sheet. Freeze them for about an hour. Once frozen, transfer the cookies to a freezer-safe bag. Squeeze out all the air before sealing. You can freeze them for up to three months. When ready to eat, just thaw them at room temperature. Oreo brownie cookies stay fresh for about one week at room temperature. If stored properly in an airtight container, they can last even longer. If you freeze them, they will be good for up to three months. Enjoy your cookies anytime by checking the date you made them. For the best taste, eat them within a week if kept at room temperature. Oreo brownie cookies are a tasty blend of brownies and cookies. They have a rich, chewy texture and a deep chocolate flavor. You mix in crushed Oreo cookies for added crunch and sweetness. The result is a cookie that is both soft and slightly crispy. Each bite has a delightful Oreo surprise. They are perfect for chocolate lovers! Yes, you can make Oreo brownie cookies ahead of time. Prepare the dough and scoop it onto a baking sheet. Freeze the cookie dough for up to a month. When you want fresh cookies, just bake them straight from the freezer. This method saves time and gives you warm cookies on demand. You can find pre-made Oreo brownie cookies at many grocery stores. Look in the cookie aisle or the bakery section. Some cafes and bakeries may also sell them. If you want a special treat, consider local bakeries; they might create their own unique versions. However, nothing beats the fun of making them at home using the Full Recipe! In this post, we explored the key ingredients for Oreo brownie cookies, how to create them, and useful tips. You learned about ingredient substitutes and how to keep everything fresh. I shared step-by-step instructions for mixing and baking, ensuring your cookies turn out great. Remember, tweaks like different chocolate types can make a big difference. Store your cookies properly to keep them fresh. Whether you're making them for a snack or a party, these cookies bring joy. Enjoy your baking journey!

Craving a treat that combines rich brownies and Oreos? You’re in the right place! These Oreo Brownie Cookies are not just delicious, but also easy to make. Whether you’re baking …

Read more

Categories Desserts

Garlic Butter Honey BBQ Chicken Tacos Flavor Booster

May 23, 2025 by Chef Theo
- 1 lb boneless, skinless chicken thighs - 4 tablespoons unsalted butter - 4 cloves garlic, minced - 1/4 cup honey - 1/4 cup BBQ sauce (your favorite brand) - 1 teaspoon smoked paprika - 1 teaspoon chili powder - 1 teaspoon salt - 1/2 teaspoon black pepper - 8 small corn or flour tortillas - 1 cup shredded cabbage (red or green) - 1/2 cup diced tomatoes - 1/2 cup chopped cilantro - Lime wedges, for serving You can swap chicken thighs for chicken breasts if you prefer. This change works well, and the dish remains tasty. For the BBQ sauce, choose a brand that you love. A sweeter sauce can give the tacos a nice flavor. For fresh tortillas, look for ones that feel soft and are not dry. You can find good ones at local markets. If you need gluten-free options, use corn tortillas. They taste great and hold the filling well. For a low-carb version, you can skip the tortillas. Serve the chicken over a salad instead. This keeps it light and fresh. First, we start with the garlic butter. In a big skillet, melt 4 tablespoons of unsalted butter over medium heat. Add 4 cloves of minced garlic to the pan. Sauté the garlic for 1-2 minutes until it smells great. Be careful not to let it brown. Next, mix 1/4 cup of honey and 1/4 cup of BBQ sauce in the skillet. Stir well and bring this mix to a gentle simmer. This step is key. It creates a sweet and sticky sauce that makes the tacos special. Now, we need to prepare the chicken. Take 1 lb of boneless, skinless chicken thighs and season them. Sprinkle on 1 teaspoon of smoked paprika, 1 teaspoon of chili powder, 1 teaspoon of salt, and 1/2 teaspoon of black pepper. Make sure each piece is coated well. Add the seasoned chicken to the skillet. Cook it for about 7-8 minutes on each side. The chicken is done when it is no longer pink inside and reaches 165°F. Once cooked, take the chicken out and let it rest for a few minutes before slicing it into bite-sized pieces. For the tortillas, warm 8 small corn or flour tortillas in a separate skillet or microwave. This keeps them soft and easy to fold. When you’re ready to put the tacos together, take a tortilla and add a few pieces of the garlic butter honey BBQ chicken. Then, top it with 1 cup of shredded cabbage, 1/2 cup of diced tomatoes, and 1/2 cup of chopped cilantro. This mix adds freshness and crunch. Don’t forget to serve the tacos with lime wedges on the side for a tasty drizzle. Enjoy your flavorful creation! - Best skillet for even cooking: I recommend using a heavy cast-iron skillet. It heats evenly and retains heat well. This helps cook the chicken uniformly. A non-stick skillet is also a good choice if you prefer an easier cleanup. - Ensuring chicken is cooked perfectly: Cook the chicken till it reaches 165°F. Use a meat thermometer to check the inside temperature. This ensures it’s safe to eat. Letting the chicken rest after cooking helps keep it juicy and tender. - Adding spices for personal taste: Feel free to adjust the spices. If you like heat, add cayenne or red pepper flakes. For a smokier taste, increase the smoked paprika. Don’t be afraid to experiment! - Suggestions for drizzling additional sauces: Try adding a drizzle of ranch or a spicy aioli for extra flavor. A squeeze of lime juice also brightens up the dish. You can even mix in some hot sauce for a kick. - Serving ideas for tacos: Serve the tacos in a stack on a colorful platter. Arrange lime wedges around the tacos for a fun touch. This makes the dish look inviting. - Creative garnishing options to impress guests: Add slices of avocado or radishes for color and texture. A sprinkle of sesame seeds can add a nice crunch. Fresh herbs like cilantro or parsley give it a vibrant finish. {{image_2}} You can easily change the flavors of your Garlic Butter Honey BBQ Chicken Tacos. For a spicy kick, add jalapeños. Dice them small and mix them in with the chicken. This adds heat and a nice crunch. If you prefer a sweeter touch, try adding mango salsa. The fruit pairs well with the honey and BBQ sauce. It brings a fresh taste that brightens each bite. For those seeking vegan options, jackfruit is a great choice. It shreds like chicken and soaks up flavors well. You can also use tofu, which adds protein and absorbs the tasty sauce. For a low-sodium option, reduce the salt in the recipe. You can also choose low-sodium BBQ sauce. This keeps all the taste while being healthier. Pair your tacos with rice or beans for a fulfilling meal. The rice adds a nice base, while beans bring protein. For drinks, consider serving iced tea or a light beer. These beverages complement the flavors of the tacos perfectly. Enjoying them with friends makes the meal even better. For the complete recipe, check out the Full Recipe. To keep your Garlic Butter Honey BBQ Chicken Tacos fresh, use airtight containers. Glass or plastic containers work great. You can store leftovers in the fridge for up to three days. Make sure to cool everything down before sealing the container. This helps prevent sogginess. When reheating, the best method is in a skillet over medium heat. This keeps the chicken juicy and the tortillas soft. Avoid the microwave if you can; it can make the tortillas soggy. If you must use a microwave, heat the chicken separately from the tortillas. You can freeze tacos in two ways: assembled or unassembled. If you freeze them assembled, wrap them tightly in foil. This helps keep the flavors fresh. For unassembled tacos, freeze the chicken and tortillas separately. Thaw them in the fridge overnight before reheating. To reheat, use a skillet or oven for best results. How do I make Garlic Butter Honey BBQ Chicken Tacos from scratch? You can find the full recipe [here](link to Full Recipe). Can I use chicken breast instead of thighs? Yes, you can use chicken breast. However, thighs stay juicier. Breasts may dry out more easily. Adjust cooking time to ensure they reach 165°F. What is the best BBQ sauce for this recipe? Choose a sauce that you enjoy. A sweet and smoky sauce works best. You can even mix two sauces for a unique flavor. How do I ensure my chicken is juicy? Cook the chicken on medium heat. This helps keep it tender. Also, let it rest after cooking. Resting allows the juices to redistribute. Can I make these tacos ahead of time? Yes, you can prep the chicken and sauce in advance. Store them in the fridge. Assemble the tacos just before serving for the best taste. What sides go well with Garlic Butter Honey BBQ Chicken Tacos? Serve with rice, beans, or a fresh salad. These sides balance the flavors. You could also offer chips and salsa for crunch. Can I serve these tacos in a salad form? Absolutely! Start with a bed of greens. Add the chicken and toppings on top. Drizzle with lime juice for a fresh twist. In this blog post, we explored a tasty recipe for Garlic Butter Honey BBQ Chicken Tacos. We covered essential ingredients, cooking steps, and ways to customize your tacos. Remember, you can swap ingredients or adjust the spice level to suit your taste. With simple tips and clever variations, these tacos can fit anyone's diet. Enjoy making these easy and delicious tacos with your family!

Craving a burst of flavor? Look no further! My Garlic Butter Honey BBQ Chicken Tacos blend sweet, smoky, and savory elements, creating a dish that’s hard to resist. With tender …

Read more

Categories Dinner

Chocolate Drip Cake Indulgent Dessert Recipe Guide

May 23, 2025 by Chef Theo
To make a Chocolate Drip Cake, you need some key ingredients. Each one plays a big role in the flavor and texture. - 2 cups all-purpose flour - ¾ cup unsweetened cocoa powder - 1 cup semi-sweet chocolate chips All-purpose flour helps the cake rise and gives it a nice texture. Unsweetened cocoa powder adds a rich chocolate flavor. The semi-sweet chocolate chips bring sweetness and melt beautifully in the ganache. You can add some fun touches to your cake with optional ingredients. These extras can enhance both flavor and appearance. - Chocolate shavings or sprinkles - Flavoring variations (vanilla extract, almond extract) Chocolate shavings or sprinkles give your cake a festive look. You can also add vanilla or almond extract for extra flavor. These small changes make a big difference in taste. Having the right tools makes baking easier and more fun! Here’s what you’ll need: - Measuring cups and spoons - Mixing bowls - 9-inch round cake pans Measuring cups and spoons help you get the right amounts. Mixing bowls make it easy to combine your ingredients. A 9-inch round cake pan is perfect for baking the layers of your cake. For the full recipe, check out the details above. Happy baking! Preheat the oven and prepare the pans: Start by preheating your oven to 350°F (175°C). This step is crucial to get that perfect rise. Grease and flour two 9-inch round cake pans. This helps the cake come out easily. Mixing dry and wet ingredients: In a large bowl, sift together the flour, sugar, cocoa powder, baking powder, baking soda, and salt. This ensures there are no lumps. In another bowl, mix the eggs, milk, vegetable oil, and vanilla extract. Beat them for about 2 minutes. Then, carefully stir in the boiling water. Your batter will be thin, but that’s okay! Preparing the chocolate ganache: In a saucepan, heat the heavy cream until it just starts to boil. Remove it from heat and add the chocolate chips. Let it sit for 5 minutes. Then, stir until smooth and glossy. This ganache will make your cake shine! Layering the cake: Once the cakes are fully cooled, place one layer on a serving plate. Spread a nice layer of ganache on top. Place the second layer on top of this. Pop it in the fridge for about 30 minutes. This helps the layers hold firm. Dripping the ganache: Now, it’s time for the fun part! Pour the remaining ganache over the top of the cake. Watch it drip down the sides. Use a spatula to spread it evenly if you want. Decorating with sprinkles: After the ganache sets, decorate the top with chocolate shavings or sprinkles. This adds a nice touch and makes your cake look extra special. Enjoy your creation! To get the perfect drip, you need the right ganache consistency. Aim for a smooth and glossy texture. The ganache should flow but not be too runny. If it's too thick, warm it gently. If too thin, let it sit for a few minutes to thicken. Timing is key for the drip effect. Pour the ganache on the cake when it's slightly cooled but still pourable. This helps it drip down the sides nicely without running off entirely. How do you test if your cake is done? Use a toothpick. Insert it into the center of the cake. If it comes out clean, the cake is ready. If it has batter on it, bake a little longer. Cooling your cakes correctly matters, too. After baking, let them cool in the pan for about 10 minutes. Then, flip them onto a wire rack to cool completely. This prevents sogginess and helps keep the cake fluffy. Decorating your cake can be fun! Try adding chocolate shavings or colorful sprinkles. They add texture and make your cake look festive. For serving, slice the cake with a sharp knife. Wipe the knife between cuts for clean slices. You can serve it with a scoop of ice cream or a dollop of whipped cream for an extra treat. For the complete recipe, check out the Full Recipe. {{image_2}} You can make your chocolate drip cake truly your own. Adding fruit like raspberries or strawberries gives a fresh taste. Nuts, such as walnuts or pecans, add crunch and flavor. You can also experiment with different types of chocolate. Use dark chocolate for a richer taste. Milk chocolate makes the cake sweeter. White chocolate adds a creamy touch and a unique look. Designing your cake can be fun. For special events, try themed decorations. You could use edible flowers for a spring look or holiday shapes for Christmas. Layering techniques can also change how your cake looks. Try stacking different flavors or colors. This will make each slice exciting. If you need gluten-free options, use almond flour or gluten-free flour blends. Many people enjoy these alternatives without losing flavor. For vegan substitutions, swap eggs with flaxseed meal or applesauce. Use plant-based milk and dairy-free chocolate chips. This ensures everyone can enjoy your tasty creation. Feel free to check out the Full Recipe for more ideas on how to make your chocolate drip cake special! To keep your chocolate drip cake fresh, let it cool completely first. Wrap it in plastic wrap or foil. This helps keep the cake moist. Use an airtight container for best results. It prevents air from drying out your cake. You can also use a cake dome if you have one. This offers a great way to store while keeping it visible. You can freeze your chocolate drip cake for later. First, slice the cake into pieces. Wrap each slice in plastic wrap tightly. Then place all slices in a freezer bag. Make sure to remove as much air as you can. To thaw, take out a slice and leave it in the fridge overnight. It will be ready to enjoy the next day! A chocolate drip cake stays fresh for about 3 to 5 days when stored properly. If you freeze it, it can last for up to 3 months. Just make sure to use it within that time for the best taste. After thawing, enjoy it within 2 to 3 days for the best flavor. You can try dark chocolate chips for a richer taste. Milk chocolate chips offer a sweeter flavor. White chocolate chips work too, but the ganache will be less chocolatey. If you're looking for a healthier option, use cocoa powder mixed with a bit of coconut oil. You can swap out the heavy cream with coconut cream for a dairy-free version. For a vegan option, use dairy-free chocolate and coconut cream. Yes, you can prepare the cake ahead of time. Bake it a day before and let it cool. Wrap the cakes in plastic wrap and keep them in the fridge. This helps the flavors develop. Frosting works best later, once the cake is cooled. If you frost too soon, it might melt. Wait until the ganache is ready and the cake is chilled. If your ganache is too thick, add a splash of warm cream. Stir until it reaches the right consistency. You can also heat it gently over low heat, stirring often. To ensure a smooth drizzle, let the ganache cool slightly before pouring. A warm ganache drips better than a cold one. Enjoy your perfect Chocolate Drip Cake with these tips! For a detailed recipe, check the Full Recipe. You now have all the steps and tips to make a great chocolate drip cake. Start with the key ingredients like flour and cocoa powder. Follow the baking steps carefully for the best results. Remember the tips for perfect ganache and presentation. Don’t hesitate to experiment with flavors or decorations. This cake is fun to make and share. Enjoy the process, and your sweet creations will impress everyone. Happy baking!

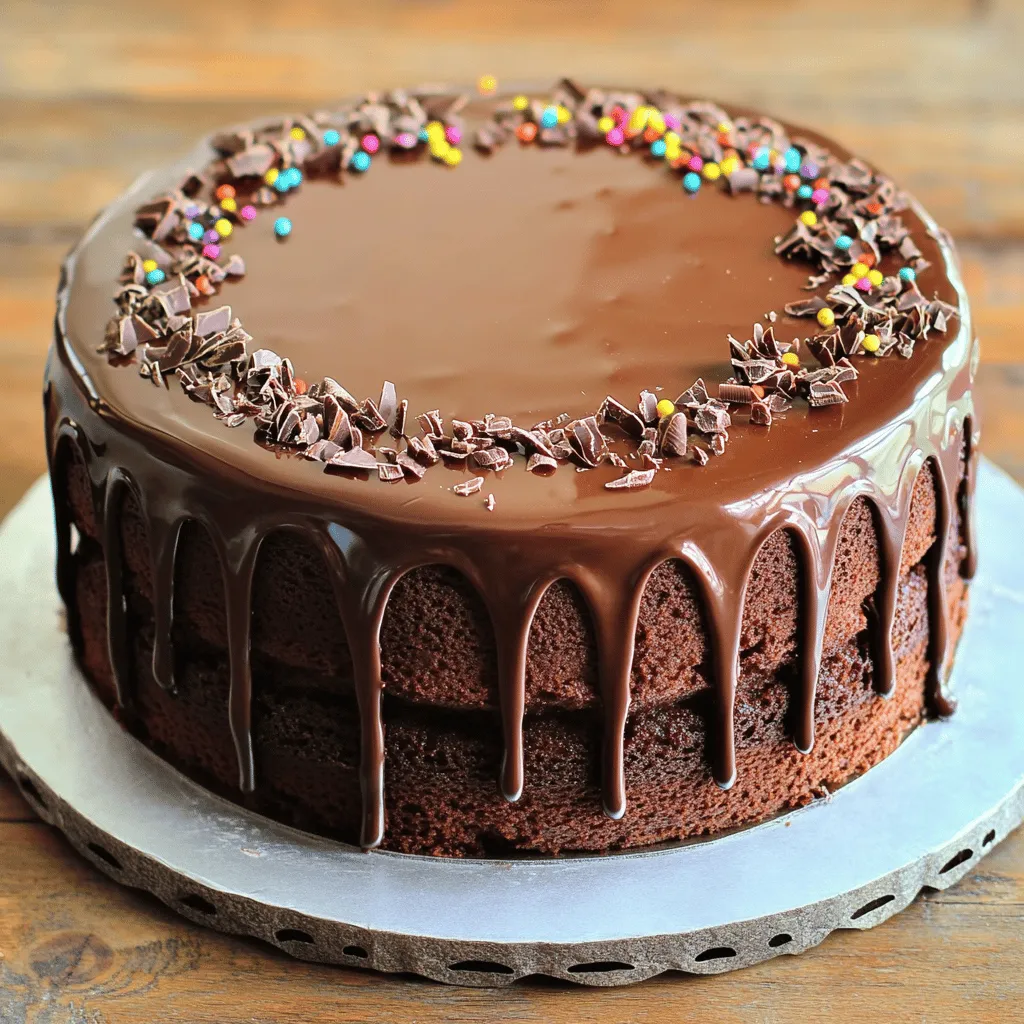
Welcome to the ultimate treat for chocolate lovers: the Chocolate Drip Cake! This guide will help you create a rich, moist cake topped with a glossy, tempting ganache. I’ll walk …

Read more

Categories Desserts

Mozzarella Pepperoni Croissant Rolls Easy Snack Idea

May 23, 2025 by Chef Theo
- 1 package (8 ounces) refrigerated crescent roll dough - 1 cup shredded mozzarella cheese - 1 cup pepperoni slices - 1 teaspoon Italian seasoning - 1 egg, beaten (for egg wash) - Marinara sauce, for dipping - Baking sheet - Parchment paper - Mixing bowl - Rolling pin (optional) To make mozzarella pepperoni croissant rolls, you need simple ingredients. You can find them at any store. The crescent roll dough is the base of this dish. It adds a nice flaky texture. The mozzarella gives a gooey, cheesy flavor that everyone loves. Pepperoni adds a savory touch and makes this snack even better. I suggest using fresh mozzarella for a rich taste. If you like, add a bit more cheese for extra gooeyness. Italian seasoning brings all the flavors together. It adds a nice herbal note that works well with the cheese and meat. For tools, you’ll want a baking sheet and parchment paper for easy cleanup. A mixing bowl helps if you want to mix the cheese and seasoning. A rolling pin can help if you want to flatten the dough more, but it’s not necessary. Once you have your ingredients and tools, you're ready to make these tasty rolls. Check out the Full Recipe for more details. - Preheat your oven to 375°F (190°C). - Prepare your baking sheet with parchment paper. Start by getting your oven hot. This helps the croissants bake nicely and become golden. The parchment paper makes clean-up easy and stops sticking. - Unroll and separate the crescent roll dough. - Add mozzarella, pepperoni, and Italian seasoning. Next, take the crescent roll dough. Unroll it and break it into triangles. At the wide end, place a tablespoon of shredded mozzarella. Add 2-3 pepperoni slices and a sprinkle of Italian seasoning. This adds flavor and fun. - Roll the croissants and arrange them on the baking sheet. - Apply egg wash and bake for 12-15 minutes. Now, roll each triangle from the wide end to the point. Press the edges to seal them tight. Place the rolled croissants on the baking sheet with space between them. Brush the tops with a beaten egg for a shiny finish. Bake in the oven for about 12-15 minutes until they turn golden and the cheese melts. Enjoy them warm with marinara sauce on the side for dipping. For the complete recipe, check out the Full Recipe section. To make great Mozzarella Pepperoni Croissant Rolls, you want to fill them just right. Make sure the filling is even so every bite is tasty. Place mozzarella and pepperoni near the wide end of the dough. Seal the edges tightly as you roll. This keeps all the gooey cheese inside. If you leave gaps, the filling might leak out during baking. Using parchment paper makes baking easy and clean. It stops the rolls from sticking. This way, you can lift them off the sheet without a mess. Don’t forget to rotate the baking sheet halfway through baking. This helps the rolls brown evenly and stay crispy. You want every roll golden and delicious. Want to switch things up? Try different cheeses or spices. Cheddar and provolone can add a nice twist. You can also sprinkle red pepper flakes for a kick. Mixing in herbs like basil or oregano adds fresh flavor. Don’t be afraid to get creative! {{image_2}} You can change the fillings to keep things fresh. Try ham or turkey instead of pepperoni. Both add a nice flavor. If you want to sneak in some veggies, add spinach or bell peppers. They add color and taste to each bite. The dough can change the whole roll. Use puff pastry if you want a flakier texture. This makes the rolls extra light and crispy. If you need gluten-free options, look for gluten-free crescent roll dough. It works well and keeps the flavor. The right dip can take your rolls to the next level. Marinara sauce is a classic choice, but don't stop there. Try ranch or garlic butter for different flavors. These dips make the rolls even more fun to eat. To keep your Mozzarella Pepperoni Croissant Rolls fresh, store them in an airtight container. Place the container in your refrigerator. This method helps maintain their flavor and texture for about three days. If you have a lot of leftovers, you can separate layers with parchment paper. This prevents sticking. For the best taste, reheat your croissant rolls in the oven. Preheat your oven to 350°F (175°C). Bake for about 8-10 minutes. This method keeps the rolls crispy outside and warm inside. If you need a quick option, you can use the microwave. Heat them for about 30 seconds. Keep in mind, the microwave may make them a bit soft. You can freeze both uncooked and baked croissant rolls. For uncooked rolls, wrap them tightly in plastic wrap. Then place them in a freezer bag. They can stay frozen for up to two months. When you are ready to bake, just thaw them in the fridge overnight. For baked rolls, let them cool completely first. Then, follow the same wrapping method. Reheat from frozen when you want to enjoy them again. To make the dough from scratch, you need flour, yeast, milk, butter, and salt. Start by mixing warm milk with yeast until it bubbles. Combine this with flour, salt, and melted butter. Knead the dough until it’s smooth. Let it rise for about an hour in a warm place. After it rises, roll it out and fold it several times to create layers. This will give you a flaky texture. Cut it into triangles and fill with cheese and pepperoni as per the full recipe. Yes, you can prep these rolls ahead of time. First, roll them as usual, then place them on a baking sheet. Cover with plastic wrap and keep in the fridge for up to 24 hours. When you’re ready to bake, just take them out, let them sit for 10-15 minutes, then bake as instructed. This saves time and makes serving easy. The classic choice is marinara sauce, as it adds a nice tang. You can also try ranch dressing for a creamy dip. Garlic butter is another winner, adding a rich flavor. Feel free to experiment with pesto or hot sauce for a kick. Each sauce offers a different taste, so find your favorite! Cooked rolls can last in the fridge for about three days. Store them in an airtight container to keep them fresh. Uncooked rolls are best if used within 24 hours. If you need to keep them longer, consider freezing them. They can stay frozen for up to three months. Just make sure to wrap them well to avoid freezer burn. In this post, we explored making delicious Mozzarella Pepperoni Croissant Rolls. We covered the required ingredients, tools, and step-by-step instructions for preparation and baking. You learned tips for perfecting your rolls and discovered fun variations to try. Lastly, we discussed storage and reheating options. Enjoy creating and sharing these tasty treats. They’re easy, fun, and perfect for any occasion.

Looking for a quick and tasty snack? Try these Mozzarella Pepperoni Croissant Rolls. With just a few simple ingredients, you can whip up a treat everyone will love. Imagine warm, …

Read more

Categories Appetizers

Tomato Avocado Corn Salad Fresh and Flavorful Delight

May 23, 2025 by Chef Theo
- 2 cups cherry tomatoes, halved - 1 ripe avocado, diced - 1 cup sweet corn kernels (fresh, canned, or frozen) - 1/2 red onion, finely chopped - 1/4 cup fresh cilantro, chopped - 2 tablespoons lime juice - 1 tablespoon olive oil - 1 teaspoon chili powder (optional for some heat) - Salt and pepper to taste In this salad, cherry tomatoes bring bright flavor. You can find sweet corn in many forms. Fresh corn adds crunch, while canned or frozen works well too. The avocado gives creaminess and richness. Red onion adds a sharp bite, which balances the dish. Fresh cilantro brightens the flavors and makes the salad pop. When it comes to lime juice, it adds a zesty twist. Olive oil ties everything together, making it smooth. If you want some heat, add chili powder. Adjust salt and pepper to your taste. You can find the full recipe to make this vibrant dish. Enjoy each bite of this fresh and flavorful delight! Start with the cherry tomatoes. Halve the cherry tomatoes and place them in a large bowl. Next, grab a ripe avocado. Dice the avocado into small pieces. Make sure to be gentle to keep the pieces intact. Now, take a red onion and finely chop the red onion. This adds a nice flavor and crunch to the salad. If you chose fresh corn, you need to husk and briefly cook fresh sweet corn. Bring a pot of water to a boil. Add the corn and cook for about 3-5 minutes until tender. Once cooked, cool the corn before adding it to the salad. If you prefer, use canned or frozen corn. Just rinse and drain them well. In a large mixing bowl, combine all prepared ingredients. This includes the halved cherry tomatoes, diced avocado, sweet corn, and chopped red onion. Now, let’s make the dressing. In a small bowl, whisk together the dressing ingredients. Mix lime juice, olive oil, chili powder, salt, and pepper. Pour the dressing over the salad mixture. Gently toss everything to combine, being careful not to mash the avocado. Finally, add the chopped cilantro and give it one last gentle toss. Taste the salad and adjust the seasoning if needed. Enjoy your fresh and vibrant Tomato Avocado Corn Salad! For the complete recipe, check the Full Recipe section. How to select ripe avocados To find a ripe avocado, look for one that feels slightly soft when you gently squeeze it. The skin should be dark green or black. Avoid avocados with large dark spots, as they may be overripe. If you buy firm avocados, let them sit on your counter for a few days to ripen. Properly rinsing canned or frozen corn If you use canned corn, open the can and pour the corn into a colander. Rinse it under cold water for a few seconds. This helps remove excess salt and keeps your salad fresh. For frozen corn, thaw it first. You can rinse it under cold water or microwave it briefly until warm. Ideal serving dishes and garnishes Serve your salad in a large, clear bowl. This lets the colors shine. You can also use individual bowls for a nice touch. Garnish each dish with a sprig of cilantro or a lime wedge to add flair. This makes the salad look even more inviting. Pairing ideas for the salad This salad pairs great with grilled chicken or shrimp. You can also serve it alongside tacos or fish. The fresh flavors complement many dishes. It’s a perfect side for summer barbecues or picnics. Modifying seasoning levels Taste your salad before serving. If you want more flavor, add extra lime juice or salt. For heat, sprinkle in more chili powder. Adjusting these elements makes the salad fit your taste. Adding other vegetables or elements Feel free to mix in other fresh veggies. Diced bell peppers or cucumbers add crunch. You could also toss in black beans for added protein. Get creative with your ingredients to make this salad your own! {{image_2}} You can boost the salad by adding protein. Grilled chicken or shrimp works well. Just chop them into bite-sized pieces and mix them in. For a vegetarian option, try adding chickpeas or black beans. These add both protein and a nice texture. You can change up the dressing to suit your taste. Try a balsamic vinaigrette for a tangy twist. Or, make it creamy by stirring in yogurt or sour cream. This adds a rich flavor and smooth texture to the salad. Feel free to swap in other seasonal vegetables. Bell peppers or cucumber add a nice crunch. You can also replace corn with quinoa or farro for a different grain option. This gives the salad a new spin while keeping it fresh and tasty. To keep your Tomato Avocado Corn Salad fresh, store it in the fridge. Use an airtight container to prevent air from changing the taste. If you have leftover dressing, keep it separate until you serve the salad again. This way, your salad stays crisp and tasty. In the fridge, your salad can last about 1-2 days. After that, it might not taste as good. Look for signs of spoilage, like brown avocado or a sour smell. If the salad looks slimy or has an off smell, throw it away to stay safe. Can you freeze the salad? It is not the best idea. Freezing can change the texture of the tomatoes and avocado. If you must freeze it, try freezing only the corn. To thaw, place it in the fridge overnight before using. This keeps it safe and helps it taste better. Yes, you can use frozen corn. Frozen corn is often sweeter than fresh corn. It is picked at peak ripeness and frozen quickly. This process locks in the flavor and nutrients. Plus, frozen corn is easy to store and quick to prepare. Just rinse it under cold water before adding it to your salad. This helps thaw it and keeps the corn crisp. If you need a substitute for avocado, consider using hummus. Hummus adds a creamy texture. You can also use mashed banana or silken tofu for a plant-based option. Each of these options brings a different taste, but they all work well. Experiment to find what you like best. To ensure this salad is vegan-friendly, check all your ingredients. Lime juice and olive oil are plant-based. Use vegan-friendly canned corn and check the chili powder. Most brands are vegan, but it’s good to confirm. This way, you can enjoy the salad without worry. This blog post covered how to make a fresh summer salad using healthy ingredients. You learned about cherry tomatoes, avocados, and sweet corn, along with tasty add-ons like red onion and cilantro. I shared tips for preparation, cooking, and mixing your salad for the best flavor. You can tweak the recipe to fit your taste and even add protein if you want. Remember to store leftovers properly to keep your salad fresh. Enjoy your fresh salad creation—it’s perfect for any meal or gathering. Happy cooking!

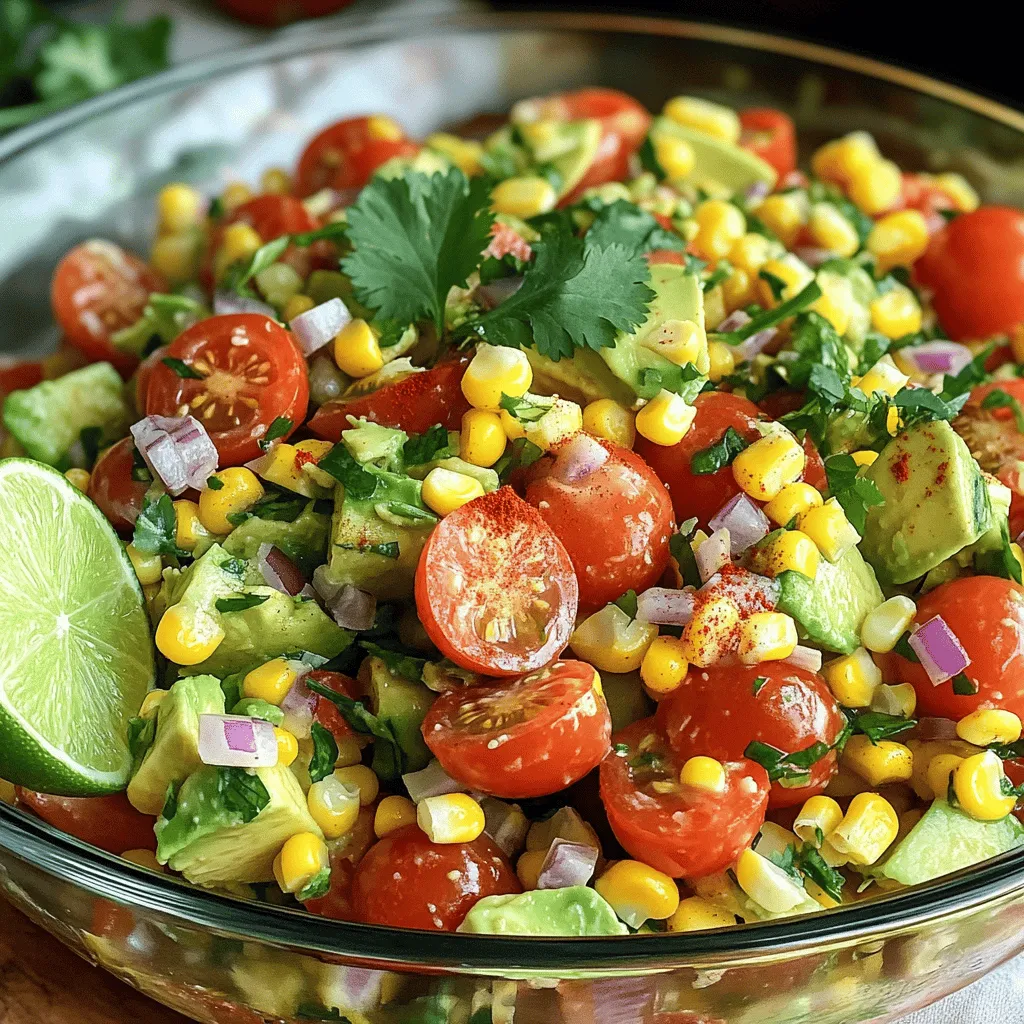
Are you searching for a fresh and tasty dish that’s quick to make? Look no further than this Tomato Avocado Corn Salad! Bursting with the vibrant flavors of ripe cherry …

Read more

Categories Salads
Older posts
Newer posts
← Previous Page1 … Page63 Page64 Page65 … Page94 Next →

TOASTED RECIPES

Where ideas are warm, crisp, and ready to serve! 🍞

PAGES

Home About Contact Privacy Policy Terms & Conditions Cookie Policy GDPR Policy Copyright Policy Disclaimer

CATEGORIES

Appetizers Desserts Salads Breakfast Dinner

Contact

  • Pinterest
  • Mail
Copyright © 2025 Toasted Recipes. All rights reserved.