Skip to content
toastedrecipes.com
  • Home
  • Appetizers
  • Desserts
  • Salads
  • Breakfast
  • Dinner
  • Privacy Policy
  • Contact
  • About

Chef Theo

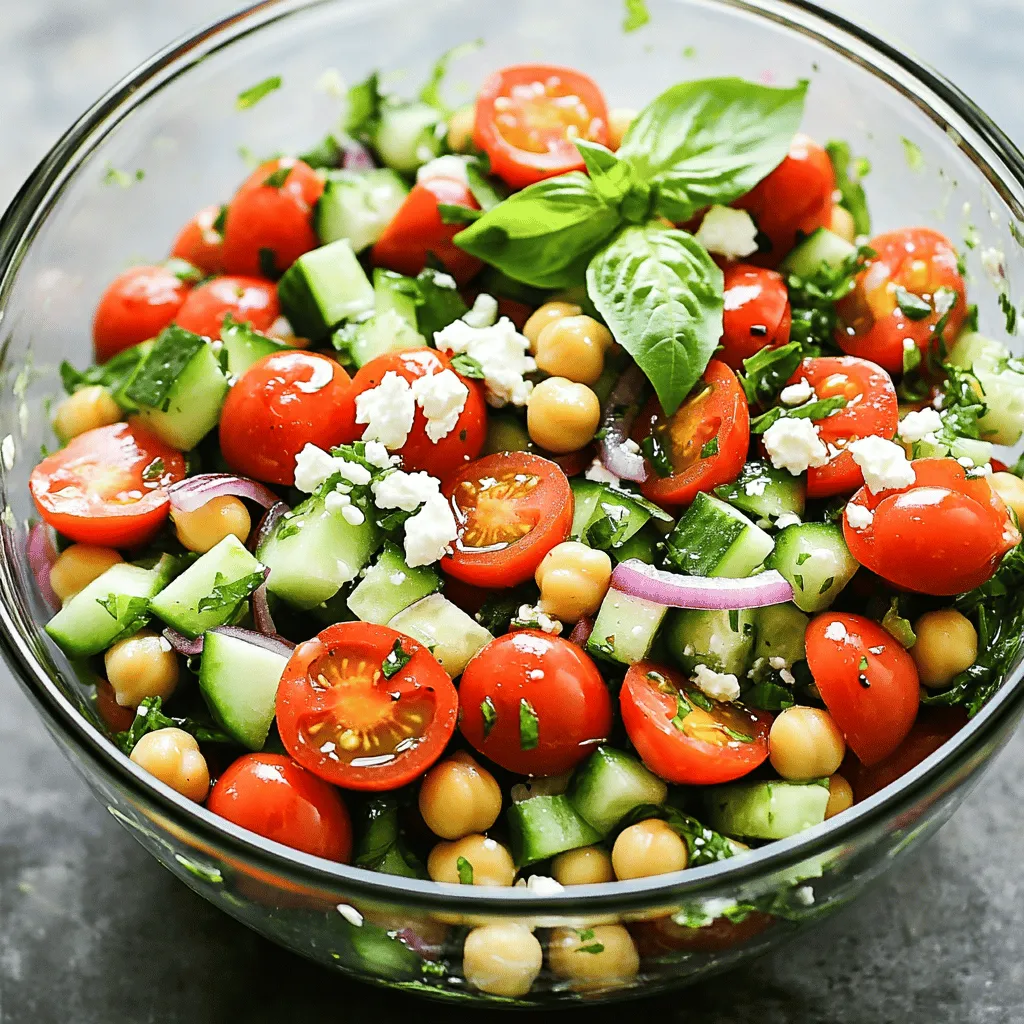
Mediterranean Chickpea Salad Healthy and Flavorful Dish

May 29, 2025 by Chef Theo
To make a vibrant Mediterranean chickpea salad, gather these fresh ingredients: - 1 can (15 oz) chickpeas, drained and rinsed - 1 cup cherry tomatoes, halved - 1 cucumber, diced - 1/2 red onion, finely chopped - 1/2 cup kalamata olives, pitted and sliced - 1/4 cup fresh parsley, chopped - 1/4 cup feta cheese, crumbled (optional) - 3 tablespoons extra virgin olive oil - 2 tablespoons lemon juice - 1 teaspoon dried oregano - Salt and pepper to taste This salad shines with every ingredient. The chickpeas add protein and fiber. Cherry tomatoes bring sweetness and color. The cucumber adds crunch. Red onion gives a sharp bite, while olives add a salty depth. Fresh parsley brightens the dish. The feta cheese is optional but makes it richer. You can tweak this recipe to suit your taste. Try adding bell peppers or avocado for a twist. For a vegan version, skip the feta. Use more herbs or spices to change the flavor profile. For the complete recipe, check out the Full Recipe. Enjoy creating this healthy and flavorful dish! To make your Mediterranean Chickpea Salad, follow these simple steps. 1. First, get a large mixing bowl. Add the drained chickpeas, halved cherry tomatoes, diced cucumber, finely chopped red onion, sliced kalamata olives, and chopped parsley. Mix them well. This step combines all the fresh tastes. 2. If you like feta cheese, sprinkle it over the salad. This gives a nice creamy touch. 3. Next, take a small bowl for the dressing. In it, whisk together the extra virgin olive oil, lemon juice, dried oregano, salt, and pepper. Whisking helps blend the flavors well. 4. Pour the dressing over the salad mixture. Gently toss everything to coat. Be careful not to mash the ingredients. 5. Let the salad sit for at least 15 minutes. This time helps the flavors blend and taste better. 6. You can serve the salad chilled or at room temperature. Enjoy it with your meal or as a snack! These steps help you create a healthy and flavorful dish. I encourage you to check out the Full Recipe for more details on this delightful salad. To make your Mediterranean chickpea salad pop, try adding a few extra touches. Here are some ideas: - Dressings: You can use tahini sauce or a yogurt dressing. They add creaminess and flavor. - Spices: Try adding cumin or smoked paprika. These spices bring warmth and depth to the dish. - Serving Suggestions: Serve the salad with pita bread or on a bed of greens. It makes a great meal or side dish. Balancing flavors is key. You want a mix of salty, sweet, and tangy. Taste as you go. If it’s too salty, add more lemon juice. If it’s too tangy, a bit of honey can help. While making this salad, avoid a few common pitfalls: - Overcooking Ingredients: Make sure your chickpeas are just drained, not cooked. You want them firm and fresh. - Skipping the Resting Time: Letting the salad sit for at least 15 minutes helps flavors blend. Don’t skip this step! - Not Tasting: Always taste before serving. You may need more salt or lemon juice. If your salad seems dry, add a splash more olive oil. If it’s too tangy, a pinch of sugar can balance it out. Enjoy your Mediterranean chickpea salad with confidence! You can find the Full Recipe above for step-by-step guidance. {{image_2}} You can switch up the vegetables in your Mediterranean chickpea salad. Try using bell peppers or shredded carrots instead of cucumbers. If you want some extra protein, add grilled chicken or tuna. For a vegan option, skip the feta cheese. If you need a gluten-free salad, you’re already good to go since all main ingredients are gluten-free. When it comes to dressings, you can mix things up. Try balsamic vinegar for a sweeter taste. Or use apple cider vinegar for a tangy twist. A bit of tahini can add creaminess too. Think about making themed versions of this salad. You can add roasted red peppers and artichokes for a fun Mediterranean twist. Consider using fresh herbs like mint or dill for a unique flavor. Seasonal variations are also a great idea. In summer, use fresh corn and ripe peaches. In fall, add roasted sweet potatoes and pomegranate seeds for a colorful touch. Adjusting the ingredients keeps your Mediterranean chickpea salad fresh and exciting every time! To keep your Mediterranean Chickpea Salad fresh, store it in an airtight container. This helps prevent it from drying out or absorbing odors. If you have leftovers, make sure to chill them in the fridge right away. The salad stays good for about 3 to 5 days. For meal prep, consider making a larger batch. You can divide it into single servings for easy lunches. Just remember to add any toppings, like feta cheese, right before you eat. This keeps everything fresh. This salad is best served cold or at room temperature. After storing, give it a good stir before serving. If it seems dry, add a splash of olive oil or lemon juice. This will help revive the flavors. For a fresh taste, try to eat it within a few days. The longer it sits, the softer the veggies become. If you want a crunchy bite, eat it sooner rather than later. Enjoy this salad as a side dish or a main meal! For the full recipe, check out Mediterranean Chickpea Delight. Mediterranean Chickpea Salad is packed with nutrients. One serving has about 200 calories. It provides protein from chickpeas and healthy fats from olive oil. The salad also contains fiber, vitamins, and minerals. Each ingredient adds its own benefits. For example, tomatoes boost your vitamin C, while cucumbers keep you hydrated. Yes, you can prepare this salad in advance. It actually tastes better after sitting for a while. You can make it a day ahead. Just keep it in the fridge. This helps the flavors blend well. Before serving, give it a quick toss to mix everything. You can store leftover salad in the fridge for about 3 days. Use an airtight container to keep it fresh. If you added feta cheese, it may change texture after a day. If you want to keep it longer, leave out the cheese and add it right before serving. For the full recipe, check out the Mediterranean Chickpea Delight. In this post, I shared how to make a delicious Mediterranean Chickpea Salad. We looked at the essential ingredients, step-by-step prep, and tips for flavor and storage. I emphasized avoiding common mistakes and offered ideas for variations and substitutions. With these details, you can enjoy a fresh, tasty salad that suits your needs. Use this guide to explore flavors and make it your own. Enjoy your meal and share it with others!

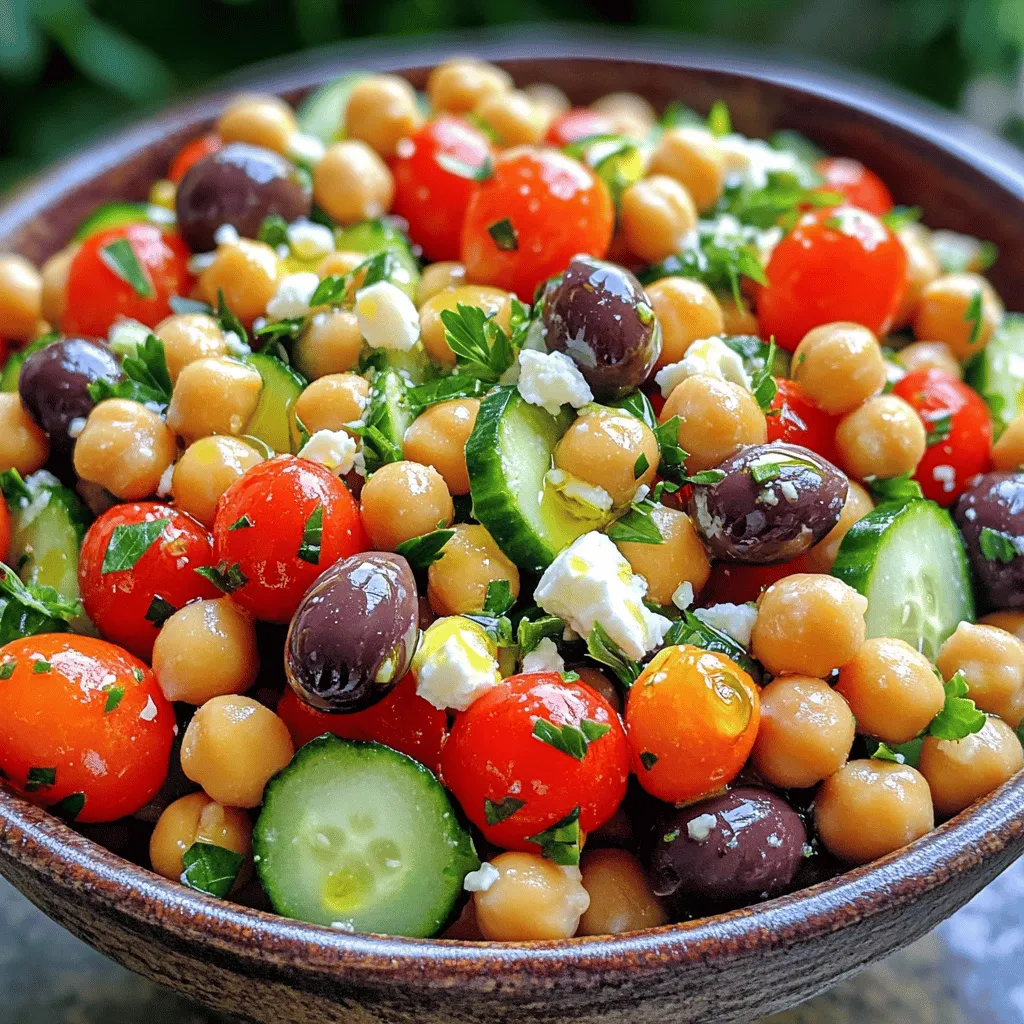
Looking for a fresh and tasty dish? This Mediterranean Chickpea Salad is just what you need! Packed with nutritious ingredients, it’s perfect for any meal. You’ll love the crunch of …

Read more

Categories Salads

Shrimp Boil Foil Packs Flavorful and Easy Recipe

May 29, 2025 by Chef Theo
- 1 pound large shrimp, peeled and deveined - 2 ears of corn, husked and cut into quarters - 1 pound baby potatoes, halved - 1 tablespoon Old Bay seasoning - 2 tablespoons olive oil - 1 teaspoon smoked paprika - Salt and pepper to taste - 1 lemon, sliced - Fresh parsley, chopped (for garnish) The ingredients in this shrimp boil foil pack create a blend of flavors that delight. The large shrimp bring a sweet and tender bite. Corn offers a burst of sweetness, while baby potatoes add heartiness. Each ingredient plays a part in creating a balanced dish. For seasonings, Old Bay seasoning is a classic choice. It gives a savory kick that pairs well with seafood. Olive oil adds richness and helps coat the ingredients. Smoked paprika introduces a subtle smokiness that enhances the overall taste. Salt and pepper round out the flavors, ensuring each bite is delicious. For garnishing, lemon slices not only add flavor but also brighten the dish. Fresh parsley adds a pop of color and freshness. Together, these ingredients make your shrimp boil foil packs a tasty and visually appealing meal. For the full recipe, check here. - Preheat your oven to 400°F (200°C). - In a large mixing bowl, combine shrimp, corn, and potatoes. This first step is simple but crucial. Preheating your oven ensures even cooking. While the oven heats, gather your fresh ingredients. Mixing shrimp, corn, and potatoes creates a colorful base for your dish. - Toss with minced garlic, seasonings, and olive oil. - Ensure everything is evenly coated for flavor. Next, add minced garlic to the bowl. Garlic brings a rich taste that pairs well with shrimp. Then, sprinkle in Old Bay seasoning and smoked paprika. These spices add depth and warmth. Drizzle the olive oil over the mixture to help everything blend together. Toss it well! You want every piece coated with flavor. - Lay out aluminum foil for packets and divide mixture. - Bake in the oven for 20–25 minutes and serve. Now, lay out large sheets of aluminum foil on your counter. Divide the shrimp and vegetable mixture onto the foil. Top each portion with lemon slices. The lemon will add a zesty touch. Fold the foil tightly to seal in the steam. Place the packets on a baking sheet. Bake in the oven for 20-25 minutes. When done, carefully open the packets. Watch out for steam! Garnish with fresh parsley to make it pop. Enjoy this shrimp boil foil pack with family or friends! - Use fresh, high-quality ingredients for best flavor. - Monitor cooking time to prevent overcooking shrimp. When you cook shrimp, freshness matters. Try to buy shrimp from a trusted source. Look for shrimp that smells like the ocean, not fishy. The same goes for your veggies. Choose firm baby potatoes and sweet corn. This will make your dish pop with flavor. Timing is key. Shrimp cook quickly, usually about 3-5 minutes. If you leave them in too long, they can turn rubbery. Keep a close eye on your foil packs. Check them at the 20-minute mark. If the shrimp are pink and firm, you are ready to eat! - Serve packets directly on the table for a communal experience. - Consider adding lemon wedges for extra flavor. Serving your shrimp boil foil packs right on the table is fun. It creates a cozy vibe. Everyone can help themselves, making it a shared experience. Just open the foil and let the delicious steam escape! Adding lemon wedges is a great idea. The citrus juice brightens the flavors. You can squeeze some on the shrimp and veggies right before you dig in. It really enhances the taste and adds a fresh kick. - Experiment with different seasonings or add some heat with cayenne pepper. Feel free to get creative with flavors. Old Bay seasoning is classic, but you can try others too. Cajun spices or garlic herb mixes work well. If you like it spicy, add cayenne pepper for a kick. Just a pinch can change the whole dish! You can also add fresh herbs like dill or cilantro for a new twist. Mixing and matching flavors can lead to your perfect shrimp boil foil pack. Don't be afraid to experiment! {{image_2}} You can switch shrimp with scallops or chicken. Scallops give a sweet taste. Chicken adds a hearty feel. Both options work well with the same spices. Just be sure to adjust cooking times. Scallops cook fast, while chicken needs more time. Adding more veggies makes the dish colorful. Try bell peppers for sweetness and crunch. Onions add a nice bite. Zucchini brings a soft texture. Mix and match your favorites. More veggies mean more flavor and nutrition. Experiment with different spice blends. Cajun seasoning adds heat and zest. Garlic herb mix brings a fresh taste. You can even create your own blend. Just combine spices you like for a fun twist. A new flavor can change the whole meal! Store leftovers in an airtight container in the refrigerator for up to 2 days. This keeps the shrimp moist and the flavors fresh. I like to use glass containers for easy viewing of what’s inside. Freeze cooked packs for up to 3 months. Before serving, reheat thoroughly to make sure everything is hot. I suggest dividing portions for easy meal prep. Just remember to label your containers with dates. Reheat in the oven for best results. This method keeps the shrimp and veggies from getting soggy. If you are in a hurry, you can use the microwave. Just add a splash of water to keep moisture in. Yes, you can assemble them in advance and refrigerate until ready to cook. This makes meal prep easy and helps you save time on busy nights. Just remember to seal the foil packs tightly to keep everything fresh. You can include crab or lobster for a more luxurious dish. Both options add a rich flavor and elevate the meal. If you love seafood, feel free to mix and match your favorites! Shrimp is done when it turns pink and opaque; it should be firm to the touch. Keep an eye on the color change. Overcooked shrimp can become rubbery, so check them at the 20-minute mark. Yes, Shrimp Boil Foil Packs can be grilled; just adjust cooking time as needed. Cooking on a grill adds a nice smoky flavor. Aim for about 10-15 minutes on medium heat. Always check for doneness! For the full recipe, you can refer back to the main section. Enjoy your cooking! This blog post shared a simple way to make Shrimp Boil Foil Packs. We covered main ingredients like shrimp, corn, and potatoes, along with key seasonings. I offered tips for cooking, serving, and storage, plus fun variations. Don't hesitate to try this dish at your next gathering. It’s easy and delicious. You can mix and match ingredients for your perfect meal. Enjoy your cooking adventure!

If you’re craving a fun and flavorful meal, Shrimp Boil Foil Packs are the perfect choice! Easy to make and packed with tasty shrimp, sweet corn, and tender potatoes, this …

Read more

Categories Dinner

Cheesy Pepperoni Pizza Roll-Ups Tasty and Fun Snack

May 28, 2025 by Chef Theo
- 1 large pizza dough (store-bought or homemade) - 1 cup shredded mozzarella cheese - 1 cup sliced pepperoni - 1/2 cup pizza sauce (for dipping) - 1 tablespoon olive oil - 1 teaspoon garlic powder - 1 teaspoon dried oregano - 1/2 teaspoon red pepper flakes (optional) - Fresh basil leaves for garnish (optional) You can replace mozzarella with other cheeses like cheddar or provolone for a twist. If you need gluten-free options, use a gluten-free pizza dough. You can also swap pepperoni for other meats like sausage or turkey. For a veggie option, try mushrooms, bell peppers, or olives. To make the flavor pop, add herbs like thyme or rosemary. You can also change the garlic powder with fresh minced garlic for a stronger taste. If you enjoy heat, add more red pepper flakes for a spicy kick. These small changes can make a big difference in taste! 1. Preheat your oven to 400°F (200°C). This helps cook the roll-ups evenly. 2. Prepare a baking sheet by lining it with parchment paper. This prevents sticking. 3. On a floured surface, roll out the pizza dough. Aim for a rectangle about 1/4 inch thick. This gives a nice base for your filling. - First, brush the rolled dough with olive oil. This adds flavor and helps crisp the outside. - Evenly sprinkle the shredded mozzarella cheese over the dough. Then, layer the pepperoni slices on top. - Mix garlic powder, oregano, and red pepper flakes in a small bowl. Sprinkle this mix over the cheese and pepperoni. This boosts the taste of your roll-ups. - Start at one end and roll the dough tightly into a log. Be careful not to let the filling spill out. The tighter the roll, the better the slices will hold. - Use a sharp knife to cut the log into 1-inch thick pieces. This makes the roll-ups bite-sized and easy to eat. - Place the pieces on your prepared baking sheet. Keep some space between them for even cooking. - Bake the roll-ups in the preheated oven for 15-20 minutes. Watch for a golden brown color and bubbling cheese. - When they look golden and smell great, they are done. Let them cool for a few minutes before serving. Serve warm with pizza sauce for dipping. This recipe is quick and fun, perfect for snacks or parties. Enjoy making these cheesy pepperoni pizza roll-ups! For the complete recipe, check out the Full Recipe section. To get the perfect golden brown crust, follow these steps: - Preheat your oven to 400°F (200°C). This temp helps crisp the outside while melting the cheese inside. - Brush the dough lightly with olive oil before baking. This adds flavor and helps achieve that nice color. - Place your roll-ups cut-side up on the baking sheet. This allows for even browning. To ensure gooey cheese with every bite, use the right cheese. I recommend fresh mozzarella or a blend of cheeses. Shredded cheese melts well, but using slices can give you a stringy effect that is fun. When serving Cheesy Pepperoni Pizza Roll-Ups, keep it simple. Arrange them on a large platter. This makes it easy for guests to grab one. Serve with warm pizza sauce in the center for dipping. For drinks, pair these roll-ups with soda or sparkling water. If you want something more special, try a light beer or red wine. For sides, a fresh salad or some crunchy veggies complement the richness of the roll-ups well. To impress your guests, arrange the pizza roll-ups on a colorful serving platter. You can also add fresh basil leaves for a pop of green. This adds a nice touch and makes the dish look gourmet. For added visual appeal, sprinkle some red pepper flakes around the platter. This hints at the flavors inside. You can even drizzle a little olive oil on the side for those who want extra flavor. For the full recipe, check out the complete instructions above. {{image_2}} You can mix it up with different ingredients. Try using different meats like ham or sausage. You can also add vegetables like bell peppers or mushrooms. For a vegetarian option, leave out the meat and add spinach or zucchini. Use a blend of cheeses for a fun twist. Mix mozzarella with cheddar or pepper jack for extra flavor. Pizza roll-ups taste great with more than just pizza sauce. You can use ranch, marinara, or even honey mustard. For a homemade garlic dip, mix sour cream with minced garlic and herbs. This adds a nice touch. You can also try a spicy mayo for a kick! You can bake or air fry your pizza roll-ups. Baking gives a nice golden crust, but air frying can make them crispier. If you choose to fry them, heat oil in a pan. Fry until they are golden brown on all sides. This gives you a crunchy outside and melty cheese inside. For the full recipe, check out the details above! To keep your pizza roll-ups fresh, place them in an airtight container. You can store them in the fridge for up to three days. If you want to keep them longer, freezing is a great option. Just remember, the sooner you store them, the better they taste later! You can freeze pizza roll-ups before or after baking. To freeze them before baking, roll them up and wrap each one in plastic wrap. Then, place them in a freezer bag. If you freeze them after baking, let them cool first. Then, place them in a container with a lid. When ready to eat, reheat them in the oven for the best results. 1. Preheat your oven to 375°F (190°C). 2. Place the frozen roll-ups on a baking sheet. 3. Bake for about 15-20 minutes or until heated through. Pizza roll-ups make meal prep easy and fun. You can make a big batch and store them for the week. Just adjust the portions to fit your meals. For lunch, pack a few roll-ups with some veggies. They reheat quickly in the microwave or oven. Enjoy tasty snacks anytime! How can I make these pizza roll-ups in advance? You can prepare the roll-ups ahead of time. After rolling up the dough, slice them and place them on a baking sheet. Cover the tray with plastic wrap and keep it in the fridge for up to 24 hours. When you are ready to bake, just pop them in the oven. Can I use other types of cheese? Absolutely! You can mix it up with cheeses like cheddar or provolone. Each cheese adds a unique flavor. You can also try a blend for a more complex taste. What can I do if my dough is too sticky? If your dough is sticky, sprinkle some flour on your work surface and on the dough. Use your hands to knead in a bit more flour until it is easier to work with. This helps it roll out smoothly. How do I know when the roll-ups are fully cooked? Look for a golden brown color on the roll-ups. You will also see the cheese bubbling. If they look good, they are done. What oven temperature is best for perfect pizza roll-ups? Preheat your oven to 400°F (200°C). This temperature helps the dough cook evenly and become crispy. Are there any gluten-free options for this recipe? Yes, you can use gluten-free pizza dough. Many stores sell it ready-made. You can also make your own from gluten-free flour. How to make Cheesy Pepperoni Pizza Roll-Ups dairy-free? To make them dairy-free, swap mozzarella for a dairy-free cheese. Look for brands that melt well. You can also skip the cheese for a lighter roll-up. In this post, we explored tasty Cheesy Pepperoni Pizza Roll-Ups. You learned about the key ingredients, helpful tips, and fun variations. We also covered storage methods to keep them fresh. Remember, these roll-ups can suit any taste with simple swaps. Enjoy them at parties or as a quick meal. You can always get creative with flavors and dips. Try these tips to make every bite delicious. Happy cooking!

Looking for a fun snack that’s easy to make and packed with flavor? Cheesy Pepperoni Pizza Roll-Ups are the perfect dish for pizza lovers, young and old! With gooey cheese …

Read more

Categories Appetizers

Crispy Parmesan Chicken with Garlic Sauce Recipe

May 28, 2025 by Chef Theo
To make crispy Parmesan chicken with garlic sauce, gather these key items: - 2 boneless, skinless chicken breasts - 1 cup breadcrumbs (preferably panko for extra crispiness) - 1/2 cup grated Parmesan cheese - 1 teaspoon garlic powder - 1 teaspoon Italian seasoning - 1/2 teaspoon salt - 1/2 teaspoon black pepper - 1/2 cup all-purpose flour - 2 large eggs - 2 tablespoons olive oil - 3 cloves garlic, minced - 1/2 cup heavy cream - Fresh parsley, chopped (for garnish) Garnishes can elevate your dish. Here are some ideas: - Lemon wedges for a fresh kick - Extra grated Parmesan for added flavor - More fresh herbs, like basil or thyme Having the right tools makes cooking easier. You will need: - A large oven-safe skillet for frying - Shallow bowls for coating the chicken - A baking sheet for oven cooking - A small saucepan for the garlic sauce - A meat thermometer to ensure perfect cooking This list prepares you for a fun and tasty cooking experience. Dive into the full recipe for more details! First, set your oven to 400°F (200°C). This temperature helps the chicken get crispy. Next, take a baking sheet. You can line it with parchment paper or spray it with cooking spray. This step keeps the chicken from sticking. In a shallow bowl, mix the following: - 1 cup breadcrumbs (panko is best for crunch) - 1/2 cup grated Parmesan cheese - 1 teaspoon garlic powder - 1 teaspoon Italian seasoning - 1/2 teaspoon salt - 1/2 teaspoon black pepper Stir these ingredients until they blend well. This coating gives the chicken a great flavor and crunch. Set up a dredging station. In one bowl, place 1/2 cup all-purpose flour. In another bowl, beat 2 large eggs. Take each chicken breast. Coat it first in flour, shaking off any extra. Next, dip it into the eggs, allowing excess to drip off. Finally, coat it with the breadcrumb mix. Press gently so it sticks well. In a large oven-safe skillet, heat 2 tablespoons of olive oil over medium heat. Once hot, add the breaded chicken. Fry each side for about 3-4 minutes until golden brown. After frying, transfer the skillet to the preheated oven. Bake the chicken for 15-20 minutes. Use a meat thermometer to check for doneness. The chicken should reach an internal temperature of 165°F (75°C). This baking step ensures your chicken is fully cooked and crispy. While the chicken bakes, make the garlic sauce. In a small saucepan, add 3 cloves of minced garlic. Sauté over medium heat for about 1-2 minutes. Be careful not to burn the garlic; this can ruin the flavor. Add 1/2 cup of heavy cream to the saucepan. Let it simmer for about 3-4 minutes. This thickens the sauce. Season with salt and pepper to taste. Once the chicken is done, take it out of the oven. Drizzle the garlic sauce over the crispy chicken. For a fresh touch, sprinkle chopped parsley on top. Serve this dish with your favorite sides. Enjoy your meal! You can find the full recipe for Crispy Parmesan Chicken with Garlic Sauce in the recipe section. To get that perfect crispiness, use panko breadcrumbs. They are lighter and crunchier than regular breadcrumbs. Make sure to coat the chicken well. Press the breadcrumb mixture onto the chicken to help it stick. Fry the chicken in hot oil before baking. This locks in moisture and adds extra crunch. Bake the chicken on a wire rack for even air circulation. For a rich garlic sauce, sauté the garlic gently. Cook it just until fragrant, around 1-2 minutes. If you burn it, the sauce will taste bitter. Adding heavy cream makes the sauce creamy and smooth. Simmer the sauce to thicken it slightly. Season with salt and pepper to enhance the flavors. Fresh parsley adds color and brightness when serving. If you need a gluten-free option, use gluten-free breadcrumbs. Almond flour is a great substitute for all-purpose flour. For a dairy-free option, swap heavy cream with coconut cream. You can use nutritional yeast instead of Parmesan for a vegan version. Adjust seasonings to fit your taste and dietary needs. Always taste as you go! For the full recipe, check out the detailed steps above. {{image_2}} You can change the taste by adding herbs and spices. Fresh basil or thyme adds a nice touch. A sprinkle of red pepper flakes gives heat. You can mix Italian herbs into the breadcrumbs for a twist. Experiment with different flavors to find what you like best. While garlic sauce is great, you can try other sauces too. A lemon butter sauce adds brightness. A creamy mushroom sauce works well for a rich taste. For a tangy kick, try a honey mustard sauce. Each sauce can change the dish and make it special. If you want a meat-free option, use eggplant or zucchini. Cut them into thick slices and follow the same steps. You can also use tofu, which soaks up flavors well. Just make sure to press it first to remove extra moisture. These alternatives give you a crispy, tasty meal without chicken. For the full recipe, check out the Crispy Parmesan Chicken with Garlic Sauce section above. Store any leftover Crispy Parmesan Chicken in an airtight container. Place it in the fridge. It will stay fresh for about 3 days. Make sure it cools down before sealing. To reheat, use the oven for the best results. Preheat your oven to 350°F (175°C). Place the chicken on a baking sheet. Heat for about 10-15 minutes. This keeps the chicken crispy. You can also use a microwave, but it may not stay crispy. If you want to freeze, wrap the chicken tightly in plastic wrap and then in foil. It can last up to 3 months in the freezer. When ready to eat, thaw it in the fridge overnight before reheating. Enjoy your meal again with great taste! For the full recipe, check out the Cooking Guide. To make this dish gluten-free, swap regular breadcrumbs for gluten-free breadcrumbs. You can find these in most grocery stores. Check labels to ensure they are truly gluten-free. Also, use gluten-free flour for dredging the chicken. This way, you keep the crispiness while staying gluten-free. Yes, you can use chicken thighs. They have more fat, which makes them juicy and flavorful. Adjust the cooking time since thighs may take a bit longer to cook through. Aim for an internal temperature of 165°F (75°C) for safety. Crispy Parmesan Chicken pairs well with many sides. Consider serving it with: - Roasted vegetables - Creamy mashed potatoes - A fresh green salad - Garlic bread These sides will enhance your meal and add variety to your dinner. Leftover chicken lasts for about 3-4 days in the fridge. Store it in an airtight container to keep it fresh. If you want to save it longer, consider freezing it for up to three months. Yes, you can prepare the garlic sauce ahead of time. Make it and store it in the fridge for up to 3 days. When ready to use, just reheat it gently on the stove. This saves time when you're ready to serve your Crispy Parmesan Chicken. For the full recipe, check out the detailed steps provided. You've learned how to make Crispy Parmesan Chicken step by step. We covered the main ingredients, cooking tools, and tips for making it extra crispy. You can also explore fun variations and storage tips for leftovers. Remember, cooking is fun! Play with flavors and share your creations. Enjoy your delicious meal!

If you crave crispy, juicy chicken, you’re in the right place! This Crispy Parmesan Chicken with Garlic Sauce recipe is a must-try. I’ll guide you through each step, from gathering …

Read more

Categories Dinner

Chocolate Sugar Cookies Delightful Baking Recipe

May 28, 2025 by Chef Theo
To make these delightful chocolate sugar cookies, gather the following: - 2 cups all-purpose flour - 1 cup unsweetened cocoa powder - 1 teaspoon baking soda - 1/2 teaspoon salt - 1/2 cup unsalted butter, softened - 1 cup granulated sugar - 1/2 cup brown sugar, packed - 1 large egg - 2 teaspoons vanilla extract - 1/2 cup chocolate chips (optional) - Sea salt for sprinkling When measuring flour, spoon it into a cup and level it off. Avoid scooping directly with the cup. For cocoa powder, use a dry measuring cup and level it too. Pack the brown sugar firmly into the cup for accurate measurement. A kitchen scale can help if you want precision. One cup of flour weighs about 120 grams, while cocoa powder is about 100 grams per cup. If you run out of an ingredient, don't worry! You can swap unsalted butter with coconut oil or margarine. Use almond or oat milk instead of cow’s milk, if needed. For a vegan option, replace the egg with 1/4 cup of unsweetened applesauce or a flax egg (1 tablespoon ground flaxseed mixed with 2.5 tablespoons water). You can also use gluten-free flour blends for a gluten-free version. The full recipe will guide you through these options! Start by preheating your oven to 350°F (175°C). This ensures a great bake. While the oven heats, line two baking sheets with parchment paper. This step prevents sticking and makes cleanup easy. Next, grab a medium bowl. In this bowl, whisk together 2 cups of all-purpose flour, 1 cup of unsweetened cocoa powder, 1 teaspoon of baking soda, and 1/2 teaspoon of salt. Mixing these dry ingredients first helps to blend the flavors evenly. In a large bowl, add 1/2 cup of softened unsalted butter, 1 cup of granulated sugar, and 1/2 cup of packed brown sugar. Use a mixer to cream these together until they are light and fluffy. This step is key for a soft cookie texture. Now, add 1 large egg and 2 teaspoons of vanilla extract to the butter mixture. Mix until everything is well blended. Gradually, add the dry mixture to the wet ingredients. Stir gently until just combined, to avoid tough cookies. Scoop tablespoon-sized amounts of dough. Roll each scoop into a ball and place them on the prepared baking sheets. Space them about 2 inches apart. Press each ball lightly with your hand or the bottom of a glass to flatten them slightly. For a tasty finish, sprinkle a little sea salt on top. Bake the cookies in your preheated oven for 10 to 12 minutes. The edges should feel firm, but the centers will still be soft. Once done, let the cookies cool on the baking sheet for 5 minutes. Then, transfer them to a wire rack to cool completely. Enjoy the delightful aroma while they cool! You can follow the [Full Recipe] for more details. To get the best texture, use the right butter. Make sure it is softened, not melted. This helps create a light and airy dough. When mixing, stop once the dough comes together. Over-mixing can lead to tough cookies. One common mistake is not measuring the flour correctly. Always spoon flour into your measuring cup and level it off. This ensures you don’t add too much. Also, avoid skipping the chilling time if you want thicker cookies. Chilling helps the dough firm up, giving you a great shape. For a richer chocolate taste, use high-quality cocoa powder. Look for brands that are Dutch-processed for deeper flavor. Adding a bit of espresso powder also boosts the chocolate flavor. Just a teaspoon can make a big difference. You can find the full recipe here: [Full Recipe]. By following these tips, your chocolate sugar cookies will be a hit every time! {{image_2}} Adding nuts can give your cookies a tasty crunch. Chopped walnuts or pecans work well. You can also try adding dried fruit like cherries or cranberries for a sweet twist. If you love peanut butter, mix in some peanut butter chips. They add a rich layer of flavor. Just remember to keep the total mix-ins to about 1 cup. This way, the dough stays balanced. While these cookies are great on their own, frosting can make them even better. Try a simple chocolate glaze. Just melt some chocolate with a bit of cream. Pour it over the cooled cookies for a smooth finish. You can also use cream cheese frosting for a tangy taste. Just mix cream cheese, butter, and powdered sugar until smooth. Spread it on your cookies for a rich treat. You can change the flavors to match the seasons. In fall, add pumpkin spice to your dough for a warm taste. For winter, try peppermint extract mixed in for a minty twist. In spring, consider adding lemon zest for a fresh flavor. Summer calls for a touch of coconut for a tropical feel. These small changes can make your cookies exciting all year round. Each season brings new flavors to explore and enjoy. Store your chocolate sugar cookies in an airtight container. This keeps them soft and fresh. Use parchment paper between layers to avoid sticking. Keep the container in a cool, dry place. This way, your cookies stay tasty for longer. You can freeze these cookies to enjoy later. First, let them cool completely. Then, wrap each cookie in plastic wrap. Place the wrapped cookies in a freezer bag. Squeeze out as much air as you can before sealing. They can last up to three months in the freezer. Chocolate sugar cookies stay fresh for about one week at room temperature. If you want them to last longer, freeze them. For the best flavor, eat them within the first few days. If they start to lose their softness, you can warm them in the microwave for a few seconds. For the full recipe, check the link. Yes, you can! Use gluten-free all-purpose flour instead of regular flour. This swap works well. Just ensure the flour has a binding agent, like xanthan gum. Your cookies will still taste great and have a nice texture. To keep your cookies soft and chewy, do not overbake them. Bake just until the edges firm up but the centers stay soft. Also, use brown sugar. It adds moisture and helps create that chewy texture. You can decorate chocolate sugar cookies in many fun ways. Use melted chocolate to drizzle on top. White chocolate can create a nice contrast. You can also use colorful sprinkles or edible glitter to add some flair. If you want a classic touch, a light dusting of powdered sugar works well too. Keep an eye on your cookies as they bake. When the edges look firm and the center is still a bit soft, they are done. Remember, cookies will harden as they cool. You can find the full recipe for chocolate sugar cookies [here](#). This recipe includes all the steps and tips to make your cookies perfect. In this post, we explored the essentials for baking chocolate sugar cookies. We covered ingredients, measurement tips, and substitutions. I shared step-by-step instructions for mixing, shaping, and baking cookies. You learned how to enhance flavors and avoid common mistakes. Lastly, we discussed storage tips to keep cookies fresh. Now, with these tools and tips, you can bake delicious cookies your friends and family will love. Enjoy your cookie-making journey!

If you love cookies, you’re in for a treat! In this post, I’ll show you how to make Chocolate Sugar Cookies that are rich, soft, and oh-so-delicious. Get ready to …

Read more

Categories Desserts

Raspberry Cookies Delightful and Easy Recipe Guide

May 28, 2025 by Chef Theo
To make delicious raspberry cookies, you need a few key ingredients. Here’s the list: - 1 cup unsalted butter, softened - 1 cup granulated sugar - 1 large egg - 1 teaspoon vanilla extract - 2 cups all-purpose flour - 1/2 teaspoon baking soda - 1/4 teaspoon salt - 1 cup fresh raspberries, gently mashed - 1/2 cup white chocolate chips - 1/4 cup powdered sugar (for dusting) These ingredients work together to create a soft and flavorful cookie. The raspberries add a fruity taste, while white chocolate chips bring sweetness. You can boost the flavor of your raspberry cookies with some optional add-ins. Here are a few ideas: - Chopped nuts, like walnuts or almonds - Zest from a lemon or orange - A dash of cinnamon for warmth - Swap white chocolate for dark chocolate chips Adding these ingredients can give your cookies a unique twist. Feel free to experiment with your favorites! If you are missing an ingredient, don't worry! Here are some easy swaps: - Use coconut oil instead of butter. - Replace granulated sugar with brown sugar for a richer taste. - For a vegan option, use a flax egg in place of the egg. - Substitute almond flour for all-purpose flour for a gluten-free option. These substitutions can help you adapt the recipe to what you have on hand. Enjoy the process of making your own raspberry cookies! For the full recipe, you can check the details above. Start by gathering all your tools and ingredients. A clean space helps you focus. You need a mixing bowl, a whisk, and a baking sheet lined with parchment paper. Preheat your oven to 350°F (175°C). This ensures even baking. 1. In a large mixing bowl, cream together the softened butter and granulated sugar. Mix until it looks light and fluffy. 2. Add the egg and vanilla extract. Beat until everything blends well. 3. In a separate bowl, whisk together the all-purpose flour, baking soda, and salt. 4. Slowly add the dry mix to the butter mix. Stir until just combined. Don't over-mix. 5. Gently fold in the mashed raspberries and white chocolate chips. Be careful not to crush the raspberries too much. 6. Use a tablespoon to drop dough onto the baking sheet. Leave about 2 inches between each dollop. 7. Bake for 12-15 minutes. Look for lightly golden edges and set centers. 8. Take them out and let them cool on the sheet for 5 minutes. Then, move cookies to a wire rack to cool completely. 9. Once cooled, sprinkle powdered sugar on top for a nice touch. You can find the full recipe [here](#). To get the right texture, pay attention to your mixing. Mix just enough to combine the ingredients. Over-mixing can lead to tough cookies. Also, make sure your butter is soft but not melted. This helps create a light cookie. Lastly, let your cookies cool on a wire rack. This helps them firm up and prevents sogginess. Many people make simple errors when baking raspberry cookies. One common mistake is overmixing the dough after adding the raspberries. This can break them down too much. Try to gently fold them in just until combined. Another mistake is not measuring flour correctly. Always spoon flour into your measuring cup and level it off. Using too much flour makes cookies dry and hard. To make raspberry cookies burst with flavor, use fresh raspberries. They bring a bright taste. Also, consider adding a bit of lemon zest. The lemon enhances the berry flavor. Using high-quality vanilla extract is key, too. It elevates the overall taste. You can also swap half of the white chocolate chips for dark chocolate. This adds depth to the sweetness. Baking time is crucial for perfect cookies. Set your timer for 12 minutes, but check for doneness. The edges should be golden, and the centers should look slightly soft. After baking, let the cookies rest on the sheet for five minutes. This helps them firm up before moving them. Always use a wire rack to cool completely. This prevents sogginess and keeps the texture just right. For an extra touch, dust the cookies with powdered sugar right before serving. For the full recipe, refer to the Raspberry Bliss Cookies section. Enjoy your baking! {{image_2}} You can add fun flavors to your raspberry cookies. Try mixing in lemon zest for a fresh burst. This bright flavor pairs well with raspberries. You might also add crushed nuts for a crunchy texture. Walnuts or almonds work best. Another unique twist is using coconut flakes. They add a chewy bite and tropical taste. Raspberries shine on their own, but you can pair them with other flavors. Dark chocolate is a fantastic match. It adds richness that balances the tartness of the raspberries. You can also try almond extract instead of vanilla. This gives the cookies a warm, nutty flavor. Consider using spices like cinnamon or cardamom for warmth. These spices create a cozy feel, perfect for cool days. If you want to make these cookies healthier, swap out some ingredients. Use whole wheat flour instead of all-purpose flour. This adds fiber and nutrients. You can also reduce the sugar by half. The natural sweetness of raspberries can help. For a dairy-free option, try coconut oil instead of butter. These small changes make your cookies a bit lighter without losing taste. For the full recipe, check out the [Full Recipe]. To keep your raspberry cookies fresh, store them in an airtight container. This will help keep moisture out and maintain their soft texture. Line the container with parchment paper to absorb any excess moisture. If you have many cookies, separate layers with parchment paper as well. This will prevent them from sticking together. Raspberry cookies can last about 5 to 7 days when stored properly at room temperature. If you put them in the fridge, they may last up to 10 days, but they might lose some of their softness. Always check for any signs of spoilage before enjoying them. To freeze your raspberry cookies, let them cool completely first. Then, place them in a single layer on a baking sheet and freeze them for about 2 hours. Once frozen, transfer them to a freezer-safe bag or container. They can last up to 3 months in the freezer. When you are ready to eat, simply thaw them at room temperature or warm them in the oven for a few minutes. This keeps their taste and texture just right. For the full recipe, check out the Raspberry Bliss Cookies section. To make Raspberry Cookies from scratch, follow this simple recipe. Start by preheating your oven to 350°F (175°C). Line a baking sheet with parchment paper to prevent sticking. Next, cream together 1 cup of softened unsalted butter and 1 cup of granulated sugar in a large bowl. Mix until fluffy. Then, beat in 1 large egg and 1 teaspoon of vanilla extract. In a separate bowl, combine 2 cups of all-purpose flour, 1/2 teaspoon of baking soda, and 1/4 teaspoon of salt. Gradually add this mix to your butter mixture. Fold in 1 cup of gently mashed fresh raspberries and 1/2 cup of white chocolate chips. Drop tablespoon-sized portions onto the baking sheet. Bake for 12-15 minutes until golden. Let them cool and dust with powdered sugar. Yes, you can use frozen raspberries. They work well in this recipe. Just remember to thaw them first. Pat them dry to remove excess moisture. This helps keep your cookie dough from becoming too wet. Using frozen raspberries may change the cookie’s texture slightly, but they will still taste great! You can find ready-made Raspberry Cookies at many grocery stores. Check the bakery section for fresh options. Some big brands also offer packaged Raspberry Cookies in the snack aisle. You might also find them at local bakeries or online retailers. If you want a homemade taste, look for shops that focus on fresh baked goods. You now have all the tools to make delicious raspberry cookies. We covered essential ingredients, step-by-step instructions, tips for the best cookie texture, and creative variations to try. Remember, baking is about fun and creativity. Don’t be afraid to experiment with flavors or healthier options. Store your cookies properly to keep them fresh longer. With these insights, you can bake with confidence and enjoy every bite of your raspberry cookies.

Are you ready to bake something amazing? This Raspberry Cookies Delightful and Easy Recipe Guide will help you create sweet, tangy treats in no time. I’ll share essential ingredients, step-by-step …

Read more

Categories Desserts

Honey Chipotle Chicken Bowls Flavorful and Simple Meal

May 28, 2025 by Chef Theo
- Chicken thighs - Honey - Chipotle in adobo sauce - Olive oil - Spices: garlic powder, onion powder, cumin, smoked paprika - Quinoa or rice - Black beans - Corn - Red bell pepper - Avocado - Fresh cilantro - Lime wedges Gather these ingredients to make your Honey Chipotle Chicken Bowls. The chicken thighs provide a juicy base. Honey adds a touch of sweetness. Chipotle in adobo sauce brings the heat and depth. For added flavor, use olive oil and essential spices like garlic powder and cumin. They help create a rich marinade. Quinoa or rice acts as a filling base. Black beans and corn add texture. Diced red bell pepper provides color and crunch. To finish, top your bowl with slices of creamy avocado, fresh cilantro, and lime wedges. These garnishes bring brightness and freshness. They make the dish visually appealing and more delicious. This balanced mix of ingredients ensures you enjoy every bite. Follow the [Full Recipe] for all the details on preparation and cooking. - Mix the marinade ingredients: In a bowl, combine honey, chipotle in adobo sauce, olive oil, garlic powder, onion powder, cumin, smoked paprika, salt, and pepper. This mix gives the chicken its sweet and spicy kick. - Marinate the chicken: Place the chicken thighs in a ziplock bag or shallow dish. Pour the marinade over the chicken. Seal or cover and let it marinate in the fridge for at least 30 minutes. For the best flavor, aim for 2 hours. - Preheat the grill or skillet: Heat your grill or skillet on medium-high heat. This step is key for getting that nice char on the chicken. - Grill or sear the chicken: Remove the chicken from the marinade and place it on the grill or skillet. Cook for about 5-6 minutes on each side. The chicken is done when it reaches an internal temperature of 165°F (75°C). - Prepare the quinoa or rice mixture: In a large bowl, mix together the cooked quinoa or rice, black beans, corn, and diced red bell pepper. This base is colorful and full of flavor. - Slice the chicken and arrange: After resting, slice the grilled chicken thighs. Place them on top of the quinoa mixture. Add avocado slices and sprinkle fresh cilantro on top. You can find the full recipe for more details. Marinating the chicken is key to great flavor. I suggest marinating for at least 30 minutes. If you want more taste, aim for 2 hours. This helps the chicken soak up all those yummy flavors from the marinade. The longer you let it sit, the better it gets! You can cook the chicken in two ways: grilling or skillet cooking. Grilling gives a smoky taste and nice grill marks. It also keeps the chicken juicy. Skillet cooking is quick and easy. It allows the chicken to brown well. Either way, you should cook the chicken until it reaches 165°F (75°C). This ensures it’s safe to eat. These bowls are tasty on their own, but you can add more! Serve with fresh veggies like a salad or roasted broccoli. Tacos or tortilla chips are great sides too. You can also top your bowl with a dollop of sour cream or a sprinkle of cheese. For more ideas, check the Full Recipe. {{image_2}} You can switch up the protein in your Honey Chipotle Chicken Bowls. Shrimp works great if you like seafood. Just marinate it like the chicken. Cook shrimp for about 2-3 minutes on each side. Tofu is another good choice. Press it first to remove extra water. Then cut it into cubes and marinate. Cook it in a skillet until golden. Boost nutrition by adding veggies. Spinach, kale, or zucchini add color and health. You can also use alternative legumes. Chickpeas or lentils give a nice twist. They add protein and fiber to your bowl. You can mix and match to find your favorite combo. Adjust the chipotle to fit your taste. If you like it spicy, add more chipotle. For a milder bowl, use less. Start with one tablespoon and taste as you go. You can always add more if needed. Remember, it's all about what you enjoy! To keep your Honey Chipotle Chicken Bowls fresh, store leftovers in an airtight container. Place them in the fridge within two hours of cooking. Eat within three days for the best taste. Make sure to separate the chicken from the quinoa mixture. This helps keep everything fresh. When you reheat the chicken, use low heat on the stove or in the oven. This helps keep the chicken juicy. Avoid using a microwave if you can. Microwaves can make the chicken dry. Add a splash of water or broth while reheating to add moisture. Check the chicken's temperature; it should reach 165°F (75°C) again. To freeze your Honey Chipotle Chicken Bowls, let them cool first. Use freezer-safe bags or containers. Remove as much air as possible to prevent freezer burn. You can freeze the chicken and quinoa mixture together. For best taste, use them within three months. To thaw, place in the fridge overnight and reheat as mentioned above. Yes, you can make Honey Chipotle Chicken Bowls ahead of time. The chicken can marinate overnight. Just mix the marinade and coat the chicken. Store it in the fridge until you’re ready to cook. The quinoa mixture also holds well. You can prepare it a day in advance. Just store it in an airtight container. This way, your meal stays fresh and tasty when you heat it up. If you want to substitute for quinoa, try rice. Brown rice or white rice works well. You could also use couscous or farro. Both options add nice texture. Another good choice is cauliflower rice. It’s low in carbs and very healthy. Choose what fits your taste best. Yes, this recipe is great for meal prep. Each bowl can stay fresh for a few days in the fridge. Just keep the chicken and veggies separate until serving. This helps keep everything fresh and tasty. You can pack the bowls in containers for easy lunches or dinners. It’s a smart way to eat well during a busy week. For the full recipe, please refer to the complete guide. You learned how to make delicious Honey Chipotle Chicken Bowls. We covered main ingredients like chicken thighs, honey, and chipotle. I shared step-by-step instructions on marinating and cooking the chicken. You now know how to serve and store the dish, plus tips for extra flavors. Get creative by trying different proteins or adjusting spice levels. Meal prep these bowls to enjoy anytime. This recipe is easy, fun, and full of flavor. Enjoy making it your way!

Looking for a tasty meal that’s quick and easy? Honey Chipotle Chicken Bowls are just what you need! With juicy chicken thighs coated in sweet and spicy goodness, this dish …

Read more

Categories Dinner

Cheesy Garlic Chicken Wraps Quick and Tasty Meal

May 28, 2025 by Chef Theo
To make Cheesy Garlic Chicken Wraps, gather these simple ingredients: - 2 cups cooked chicken, shredded - 1 cup cream cheese, softened - 1 cup shredded mozzarella cheese - 2 cloves garlic, minced - ½ teaspoon garlic powder - 1 teaspoon Italian seasoning - Salt and pepper, to taste - 4 large flour tortillas - 1 cup spinach leaves - 1 cup cherry tomatoes, halved - Olive oil, for drizzling These items make a tasty meal in just 30 minutes. You can swap some ingredients for different flavors. Try these options: - Use rotisserie chicken for quick prep. - Cream cheese can be replaced with Greek yogurt for a lighter option. - If you don’t have mozzarella, use cheddar or pepper jack cheese. - Fresh herbs can replace Italian seasoning for a fresh taste. - Any tortilla type works, such as whole wheat or corn. Choosing quality brands can enhance your meal. Here are my favorites: - For chicken, I like Perdue or Tyson. - Philadelphia cream cheese is the gold standard for smooth texture. - Use Sargento or Kraft for tasty shredded cheese. - For tortillas, Mission or La Banderita are reliable choices. - Fresh spinach is great from local farms or pre-packaged options. With these ingredients and tips, you are all set to create Cheesy Garlic Chicken Wraps. For the complete process, check the Full Recipe. To start, gather your ingredients. You need cooked chicken, cream cheese, mozzarella, and garlic. Don't forget the tortillas and fresh veggies! 1. In a mixing bowl, combine 2 cups of shredded chicken, 1 cup of softened cream cheese, and 1 cup of shredded mozzarella cheese. 2. Add 2 cloves of minced garlic, ½ teaspoon of garlic powder, and 1 teaspoon of Italian seasoning. 3. Sprinkle in some salt and pepper to taste. Mix well until everything combines nicely. Now, it's time to build your wraps! 1. Lay a tortilla flat on your clean surface. 2. Spread a quarter of the chicken mixture across the center. 3. Top it with 1 cup of fresh spinach leaves and a handful of cherry tomatoes, halved. 4. Fold in the sides of the tortilla. Then, roll it tightly from the bottom up. Repeat this for the other tortillas. Next, heat a non-stick skillet over medium heat. Drizzle a bit of olive oil in the pan. 1. Place the wraps seam-side down in the skillet. 2. Cook for about 3-4 minutes on each side. You want them golden brown and the cheese melted. Once cooked, remove the wraps from the skillet. Let them cool for a moment before cutting them in half. Serve warm for the best taste. These wraps are great on their own or with a side salad. For the full recipe, check out the earlier sections. Enjoy your tasty meal! To make the best cheesy garlic chicken wraps, I have a few handy tips. First, make sure your chicken is well shredded. This helps it mix into the cheese better. Mix your cheeses and garlic thoroughly. This ensures that each bite is creamy and tasty. When you spread the chicken mix on the tortilla, leave space at the edges. This makes it easier to roll. Be careful when cooking the wraps. Check for a golden brown color. This tells you the cheese is melted and the wrap is ready. These wraps taste great warm but can also be enjoyed cold. I love to slice them in half for a fun presentation. You can serve them with a side salad for a fresh touch. Add some salsa or ranch dip on the side for extra flavor. If you want a crunchy texture, try adding chips or veggie sticks. They make a perfect snack or light meal. Pairing drinks with your wraps can enhance the meal. A cold lemonade or iced tea works well. If you prefer something warmer, try a nice soup. Tomato soup pairs nicely with these wraps. You can also serve them with a light wine if you like. A crisp white wine complements the cheese flavors wonderfully. {{image_2}} You can change the flavor of your Cheesy Garlic Chicken Wraps easily. Swap the cream cheese for ranch dressing for a tangy twist. Try using cheddar cheese instead of mozzarella for a sharper taste. You can even add herbs like cilantro or parsley for fresh flavors. Make it your own by mixing in other cooked meats or beans. If you prefer a meatless meal, you can make a tasty vegetarian version. Use grilled vegetables like zucchini, bell peppers, and mushrooms instead of chicken. You can also add beans for protein and fiber. Cream cheese can be replaced with a dairy-free option, like cashew cheese, for a vegan choice. The wraps still stay creamy and delicious. For those who love heat, add some spice to your wraps. Mix in chopped jalapeños or crushed red pepper flakes with the chicken. You can also drizzle some hot sauce inside the wrap before rolling it up. If you want more flavor, try a spicy cheese blend. These spicy additions make the wraps exciting and full of flavor. To keep your cheesy garlic chicken wraps fresh, store them in an airtight container. Place a paper towel inside to absorb moisture. This helps keep the wraps crisp. They last about three days in the fridge. If you notice any sogginess, reheat them before eating. You can freeze these wraps for later. Wrap each one tightly in plastic wrap. Then, place them in a freezer bag or container. They can stay in the freezer for up to three months. When you're ready to eat, thaw them in the fridge overnight. Reheat your wraps in the oven for the best results. Preheat the oven to 350°F (175°C). Place the wraps on a baking sheet and heat for about 10-15 minutes. This makes them warm and crispy. You can also use a microwave, but the texture won't be as good. Heat them on a plate for about 1-2 minutes. Enjoy your wraps from the Full Recipe! Cheesy Garlic Chicken Wraps stay fresh for about three days in the fridge. Store them in an airtight container. If you want to keep them longer, consider freezing them. When frozen, they can last up to three months. Just make sure to wrap them tightly in plastic wrap or foil. Yes, you can prepare these wraps ahead of time! You can make the chicken filling and store it in the fridge for up to two days. When you're ready to eat, just spread the filling on the tortillas and roll them up. This way, you save time on busy days. These wraps pair well with a variety of sides. Here are some great options: - A simple green salad - Crispy potato wedges - Fresh fruit salad - Steamed or roasted vegetables - Garlic bread for extra flavor These sides enhance the meal and add more color to your plate. Enjoy your meal with your favorite sides! For the full recipe, check out the [Full Recipe]. This blog post outlined everything you need for Cheesy Garlic Chicken Wraps. We covered ingredients, easy step-by-step instructions, and helpful tips. I shared storage info and answered common questions. You can adjust the flavors and even try vegetarian or spicy options. True success in cooking means being creative while following a plan. Enjoy these wraps any day of the week! Remember, the right combinations will make your meal a hit.

Looking for a quick and tasty meal? Cheesy Garlic Chicken Wraps are here to save the day! Packed with flavor and super easy to make, these wraps will impress your …

Read more

Categories Dinner

High Protein Chickpea, Basil & Tomato Salad Delight

May 28, 2025 by Chef Theo
To make the High Protein Chickpea, Basil & Tomato Salad, you need: - 1 can (15 oz) chickpeas, rinsed and drained - 1 cup cherry tomatoes, halved - 1/2 cup cucumber, diced - 1/4 red onion, thinly sliced - 1/2 cup fresh basil leaves, chopped - 1/4 cup feta cheese, crumbled - 2 tablespoons olive oil - 1 tablespoon balsamic vinegar - 1 teaspoon garlic powder - Salt and pepper to taste - Chickpeas: High in protein and fiber. They help you feel full. - Cherry Tomatoes: Packed with vitamins A and C. They add sweetness and color. - Cucumber: Low in calories and hydrating. It adds crunch to the salad. - Red Onion: Rich in antioxidants. It gives a nice bite to the mix. - Basil: Contains vitamins and has anti-inflammatory properties. It adds freshness. - Feta Cheese: Provides calcium and protein. It gives a creamy texture. - Olive Oil: Heart-healthy fat that enhances flavor. It helps absorb nutrients. - Balsamic Vinegar: Low in calories and adds a tangy note. It brightens the dish. - Garlic Powder: Adds flavor and has health benefits. It makes the salad savory. - Salt and Pepper: Essential for seasoning. They enhance all the flavors. You can swap ingredients for personal taste. Here are some ideas: - Use black beans instead of chickpeas for a different protein source. - Try grape tomatoes if cherry tomatoes aren't available. - Replace cucumber with bell pepper for added crunch. - Use green onions instead of red onion for a milder taste. - Swap feta with goat cheese for a tangy twist. - Use avocado instead of feta for a creamy, dairy-free option. - Substitute lemon juice for balsamic vinegar for a zesty flavor. For the full recipe, check out the detailed instructions mentioned earlier. To start, grab a large bowl. First, rinse and drain the chickpeas. This step removes extra salt and makes them fresher. Next, halve the cherry tomatoes and dice the cucumber. Thinly slice the red onion. Chop the fresh basil leaves. Finally, crumble the feta cheese. In a small bowl, combine the olive oil and balsamic vinegar. Add the garlic powder, salt, and pepper. Use a whisk to blend everything until smooth. This dressing will add great flavor to your salad. To boost the flavors, let the salad sit for about 10 minutes. This time helps the dressing soak into the ingredients. You can also add a squeeze of lemon juice for brightness. If you like heat, try adding red pepper flakes for a kick. For the full recipe, check out the details above. Enjoy making this high protein chickpea, basil, and tomato salad! When making your high protein chickpea, basil & tomato salad, fresh ingredients matter. Look for bright cherry tomatoes with no blemishes. They should feel firm when you squeeze them gently. Choose cucumbers that are crisp and shiny. Fresh basil should smell sweet and look vibrant. Avoid wilted or brown leaves. For chickpeas, canned ones work great. Just rinse and drain them well to remove excess salt. Serve your salad in a large glass bowl. This way, it looks colorful and inviting. Add a sprinkle of feta on top for a nice finish. You can also garnish with extra basil leaves for a fresh touch. This salad pairs well with grilled chicken or fish, making it a perfect meal. Enjoy it as a light lunch or side dish at dinner. To boost the protein in your meal, try adding grilled chicken or shrimp. They both complement the salad well. Tofu or tempeh are great vegan options too. Mix in some nuts or seeds for a crunchy texture. You can even serve this salad with a side of hummus and pita for more flavor and protein. The choices are endless! For the full recipe, check out the link provided. {{image_2}} You can easily make this salad vegan. Just skip the feta cheese. Instead, add some avocado for creaminess. You can also sprinkle on some nutritional yeast. This adds a cheesy flavor without any dairy. Want to give your salad a Mediterranean twist? Toss in some Kalamata olives. They add a salty kick that complements the chickpeas. You can also add artichoke hearts or roasted red peppers. These add more color and flavor to your dish. Use fresh ingredients based on the season. In summer, swap cherry tomatoes for heirloom varieties. In fall, add roasted butternut squash for a warm touch. This keeps your salad fresh and exciting. Check out the Full Recipe for more ideas on how to customize! To keep your salad fresh, store it in an airtight container. This helps to keep it crispy and flavorful. Make sure to separate the dressing if you plan to store it for more than a day. Add the dressing right before you eat. This way, the salad stays crunchy and bright. When stored properly, the High Protein Chickpea, Basil & Tomato Salad lasts about three to four days in the fridge. After this time, the flavors may fade, and the veggies can get soggy. Always check for any off smells or strange textures before eating. Freezing this salad isn’t the best option. The tomatoes and cucumbers lose their crispness when frozen. However, if you must freeze it, do so without the dressing. Freeze the chickpeas and veggies separately. When you’re ready to eat, thaw them in the fridge overnight. Add fresh basil and dressing just before serving for the best taste. This salad is high in protein mainly due to chickpeas. One can of chickpeas has about 14 grams of protein. Chickpeas are also rich in fiber, which helps with digestion. The feta cheese adds even more protein, bringing the total higher. This balance makes it a great meal for anyone looking to boost their protein intake. Yes, you can make this salad ahead of time. I suggest preparing it a few hours before serving. This allows the flavors to blend nicely. Just keep it in the fridge until you’re ready to serve. If you wait too long, the veggies may lose their crispness. I recommend adding the dressing right before serving to keep everything fresh. You can use many dressings with this salad. A lemon vinaigrette adds a bright flavor. A yogurt-based dressing can give it a creamy touch. You might also try a simple mix of olive oil and lemon juice. Each option brings a new taste to the dish, so feel free to experiment. Check out the Full Recipe for more ideas! To sum up, we explored essential ingredients that boost nutrition and flavor. I shared tips on how to prepare, mix, and enhance your salad dressing. You learned about fresh ingredients, serving ideas, and protein pairings. We also discussed fun variations, smart storage tips, and answered common questions. These insights will help you create delicious salads every time. Trust your skills and enjoy making fresh meals that are good for you.

Looking for a tasty way to boost your protein intake? Try my High Protein Chickpea, Basil & Tomato Salad Delight! This colorful dish is packed with flavor and good-for-you ingredients. …

Read more

Categories Salads

Crispy Beef and Cheese Chimichangas Delightful Recipe

May 28, 2025 by Chef Theo
To make Crispy Beef and Cheese Chimichangas, gather these ingredients: - 1 pound ground beef - 1 small onion, finely chopped - 2 cloves garlic, minced - 1 tablespoon chili powder - 1 teaspoon cumin - 1 teaspoon paprika - Salt and pepper to taste - 1 cup shredded cheddar cheese - 1 cup shredded Monterey Jack cheese - 6 large flour tortillas - 1 cup oil (for frying) - Sour cream and salsa (for serving) - Fresh cilantro, chopped (for garnish) You can easily swap some ingredients for different flavors: - Use turkey or chicken instead of ground beef. - Try green onions if you don’t have a small onion. - Swap garlic cloves with garlic powder (1/4 teaspoon per clove). - Use taco seasoning instead of chili powder, cumin, and paprika. - For cheese, mix in pepper jack for a spicy twist. - Corn tortillas work well too but may be less flexible. To make your cooking smooth, you’ll need: - A large skillet for browning the meat - A spatula for mixing and flipping - A large pot for frying - A slotted spoon for removing chimichangas from oil - Paper towels to drain excess oil - A cutting board and knife for chopping These tools make the process easier and help you create delicious chimichangas. For the full recipe, refer to the earlier sections. To make the filling, start by heating a splash of oil in a large skillet over medium heat. Add the finely chopped onion. Sauté it until it softens, about 3-4 minutes. Next, toss in the minced garlic. Stir it for about a minute until it becomes fragrant. Then, add 1 pound of ground beef, chili powder, cumin, paprika, salt, and pepper. Cook this mixture until the beef turns brown and is no longer pink, about 6-7 minutes. Use a spoon to break up any clumps. Once cooked, remove the skillet from heat. Stir in 1 cup of shredded cheddar cheese and 1 cup of Monterey Jack cheese until they melt into the beef. Let this filling cool slightly before you assemble your chimichangas. Now that your filling is ready, it's time to assemble the chimichangas. First, warm the flour tortillas in a dry skillet or microwave. This makes them softer and easier to roll. Take a tortilla and place about 1/3 cup of the beef and cheese mixture in the center. Fold the sides of the tortilla over the filling. Then, roll it up tightly from the bottom to the top to form a chimichanga. Make sure it’s secure, so the filling doesn’t spill out while frying. Repeat this process for all six tortillas. For frying, heat 1 cup of oil in a large pot over medium-high heat until it shimmers. Carefully add each chimichanga, seam-side down, to the hot oil. Fry them for about 3-4 minutes on each side until they turn golden brown and crispy. Be sure not to overcrowd the pot; fry in batches if needed. Once they are crispy, remove them using a slotted spoon. Place the chimichangas on paper towels to drain excess oil. Serve them hot with sour cream, salsa, and a sprinkle of fresh cilantro on top. Enjoy your crispy beef and cheese chimichangas! For the full recipe, check the earlier section. To get that crunchy outside, make sure your oil is hot. Heat oil until it shimmers. Test it by dropping a small piece of tortilla in. If it sizzles, you’re ready! Fry the chimichangas seam-side down first. This keeps them closed. Fry for about 3-4 minutes on each side until golden. Drain on paper towels to remove excess oil. You can prepare the filling a day in advance. Store it in the fridge in an airtight container. When ready, warm the filling before wrapping it in tortillas. For freezing, wrap each chimichanga in plastic wrap. Place them in a freezer bag. They can stay fresh for up to three months. To cook from frozen, fry directly without thawing. Serve your chimichangas with sour cream and salsa for dipping. Fresh cilantro adds color and flavor. You can also pair them with a side of Mexican rice or beans. A light salad with lime dressing refreshes the meal. For a fun twist, add jalapeños for some heat! For the full recipe, check out the complete instructions above. {{image_2}} You can easily make vegetarian chimichangas. Replace the beef with black beans or lentils. Both are full of protein and flavor. Add in some diced bell peppers and corn for extra crunch. You can also mix in some sautéed mushrooms for a hearty bite. Use the same spices to keep the flavor strong. This way, you still get that delicious taste without the meat. Cheese is key to a great chimichanga. While I love cheddar and Monterey Jack, there are many other options. Try using pepper jack for a spicy kick. Feta adds a tangy twist that surprises your taste buds. You can also use a blend of mozzarella and gouda for a creamy texture. Experiment with different cheeses to find your favorite mix. If you like heat, add jalapeños to your filling. Fresh or pickled jalapeños both work well. You can also mix in some diced green chiles for an extra punch. For a smoky flavor, add chipotle powder or smoked paprika. These spices elevate the dish and make it exciting. Adjust the heat to your taste, so everyone can enjoy. To keep your crispy beef and cheese chimichangas fresh, store them properly. First, let them cool down. This step helps prevent sogginess. Place the chimichangas in an airtight container. You can also wrap them in plastic wrap. Keep them in the fridge for up to three days. If you want to store them longer, consider freezing. Just make sure they cool first before freezing. For the best taste, reheat chimichangas in the oven. Preheat your oven to 350°F (175°C). Place the chimichangas on a baking sheet. Heat for about 10-15 minutes. This method keeps them crispy. You can also reheat them in a skillet. Just use low heat and cover the pan. Flip them once for even heating. This will keep the outside nice and crunchy. Cooked chimichangas last for about three days in the fridge. If you freeze them, they can last up to three months. Uncooked chimichangas stay fresh for about two days in the fridge. If you freeze uncooked ones, they can last up to six months. Make sure to label your containers. This way, you’ll know when to use them. For the full recipe, check the main article. Chimichangas are deep-fried burritos. They are crispy on the outside and soft inside. The filling usually includes meat, cheese, and spices. You can find them in many Mexican restaurants. They often come with toppings like salsa or guacamole. They are tasty and filling, making them a favorite for many. Yes, you can bake chimichangas! Baking is a healthier option. To do this, preheat your oven to 425°F (220°C). Place the chimichangas seam-side down on a baking sheet. Brush them lightly with oil for crispiness. Bake for about 20-25 minutes, flipping halfway. They will turn golden and crispy without frying. You can tell chimichangas are done when they are golden brown. If frying, cook each side for 3-4 minutes. For baked chimichangas, check after 20 minutes. The filling should be hot and the tortillas crunchy. You can also use a food thermometer. The inside should reach 165°F (74°C) for safety. For more details, check the [Full Recipe]. Crispy beef and cheese chimichangas are fun and tasty to make. We covered all you need in this post, from the right ingredients to how to fry them perfectly. With easy tips for variations and storing leftovers, you can enjoy them anytime. Remember, the secret to success lies in the details, like achieving that perfect crispiness. So grab your tools and start cooking! Enjoy serving these delicious treats at your next meal.

Are you ready to enjoy a crispy, cheesy treat? My Crispy Beef and Cheese Chimichangas recipe delivers big flavor in every bite. With step-by-step instructions, you’ll learn how to make …

Read more

Categories Dinner
Older posts
Newer posts
← Previous Page1 … Page61 Page62 Page63 … Page96 Next →

TOASTED RECIPES

Where ideas are warm, crisp, and ready to serve! 🍞

PAGES

Home About Contact Privacy Policy Terms & Conditions Cookie Policy GDPR Policy Copyright Policy Disclaimer

CATEGORIES

Appetizers Desserts Salads Breakfast Dinner

Contact

  • Pinterest
  • Mail
Copyright © 2025 Toasted Recipes. All rights reserved.