Skip to content
toastedrecipes.com
  • Home
  • Appetizers
  • Desserts
  • Salads
  • Breakfast
  • Dinner
  • Privacy Policy
  • Contact
  • About

Chef Theo

Philly Cheesesteak Sloppy Joes Flavorful and Easy Meal

June 6, 2025 by Chef Theo
For the best Philly Cheesesteak Sloppy Joes, gather these ingredients: - 1 lb ground beef - 1 cup onions, finely chopped - 1 cup green bell pepper, finely chopped - 1 cup mushrooms, finely chopped - 2 cloves garlic, minced - 1 tablespoon soy sauce - 1 tablespoon Worcestershire sauce - 1 teaspoon black pepper - 1 teaspoon salt - 1 teaspoon Italian seasoning - 1 cup provolone cheese, shredded - 4 hamburger buns - 2 tablespoons olive oil To create a flavorful meal, use fresh, high-quality ingredients. Fresh veggies add sweetness and crunch. The ground beef gives a rich taste. Provolone cheese melts beautifully, making each bite creamy. The soy sauce and Worcestershire sauce add depth and umami, enhancing the dish. Italian seasoning brings warmth and a hint of herbs. You can swap some ingredients if needed. For a leaner option, use ground turkey or chicken. Instead of provolone, try mozzarella or cheddar cheese. If you want more veggies, add diced zucchini or spinach. For a kick, toss in jalapeños or hot sauce. You can use gluten-free buns for those with dietary needs. These changes let you customize your Sloppy Joes to your taste. Before you start cooking, gather your ingredients. You need: - 1 lb ground beef - 1 cup onions, finely chopped - 1 cup green bell pepper, finely chopped - 1 cup mushrooms, finely chopped - 2 cloves garlic, minced - 1 tablespoon soy sauce - 1 tablespoon Worcestershire sauce - 1 teaspoon black pepper - 1 teaspoon salt - 1 teaspoon Italian seasoning - 1 cup provolone cheese, shredded - 4 hamburger buns - 2 tablespoons olive oil Chop the veggies and mince the garlic. This saves time while cooking. Make sure your ground beef is ready too. Heat the olive oil in a large skillet over medium heat. Add the chopped onions, green bell pepper, and mushrooms. Sauté them for about 5-7 minutes. You want the veggies to be tender and the onions to turn translucent. Next, stir in the minced garlic. Cook this for an additional 1-2 minutes until it smells good. Now, add the ground beef. Break it apart with a spatula as it cooks. Keep cooking until the beef is browned, about 8-10 minutes. Once the beef is cooked, drain any extra fat. Then add the soy sauce, Worcestershire sauce, black pepper, salt, and Italian seasoning. Mix everything well. Lower the heat and sprinkle the shredded provolone cheese over the beef mixture. Cover the skillet with a lid. Let it sit for 3-5 minutes until the cheese melts. While the beef and cheese are melting, toast the hamburger buns. You can do this in a separate skillet or under the broiler until they turn golden brown. Now, it’s time to serve! Place the cheesy beef mixture on the toasted buns. You can add extra toppings like pickles or hot sauce if you want. Enjoy your Philly Cheesesteak Sloppy Joes! For the complete recipe, refer to the Full Recipe section. To get the best flavor in your Philly cheesesteak sloppy joes, start with fresh ingredients. Use high-quality ground beef for a rich taste. Sauté the onions, green bell peppers, and mushrooms until soft. This adds depth. The soy sauce and Worcestershire sauce bring umami. Don't skip the provolone cheese. It melts well and adds creaminess. One common mistake is overcooking the meat. Cook just until browned. If you drain the fat, do it carefully. Too much fat can dry out the mix. Also, don’t rush the cheese melting. Cover the skillet to help it melt evenly. This step makes your dish gooey and delicious. Lastly, be careful with salt; taste before adding more. For this recipe, you need a large skillet for cooking. A spatula helps in breaking the meat apart. You may want a lid for the skillet to melt the cheese. A cutting board and knife are essential for prepping veggies. Finally, tongs can help with toasting the buns. These tools make cooking easy and fun. For the full recipe, check out the details above. {{image_2}} You can make a tasty vegetarian version of Philly cheesesteak sloppy joes. Just swap the ground beef for lentils or chopped mushrooms. These options give a great texture. Use the same spices to keep the flavor. Add some extra veggies like zucchini or eggplant for more taste. You still get that cheesy goodness with provolone or a dairy-free cheese. If you like heat, try adding jalapeños to your sloppy joes. Chop them finely and cook them with the onions and peppers. This will add a nice kick. You can also mix in some hot sauce for extra spice. Don’t forget to adjust the cheese. Spicy pepper jack cheese works great here! Making this dish gluten-free is easy. Use gluten-free hamburger buns instead of regular ones. Check your sauces too; some soy sauces have gluten. You can find gluten-free soy sauce easily. Also, make sure your cheese is gluten-free. This way, everyone can enjoy Philly cheesesteak sloppy joes without worry. For more ideas, check out the full recipe. After you enjoy your Philly cheesesteak sloppy joes, let any leftovers cool. Place them in an airtight container. Make sure to store them in the fridge. They will stay fresh for about three days. When you’re ready to eat, just reheat them. You can also freeze these sloppy joes. To do this, let them cool completely. Use a freezer-safe bag or container. Make sure to remove as much air as possible. They can last up to three months in the freezer. When you want to use them, just thaw them in the fridge overnight. To reheat leftovers, you have a few options. You can use the microwave for quick heating. Place the beef mixture in a bowl and cover it. Heat it in 30-second bursts until warm. You can also reheat on the stove. Just warm it over low heat, stirring often. If you want to keep that cheesy goodness, add a little more cheese while reheating. For a crispy bun, toast it lightly after reheating the beef. Enjoy your meal again! Philly Cheesesteak Sloppy Joes mix two famous dishes. The classic Philly cheesesteak comes from Philadelphia. It features thinly sliced beef, cheese, and a hoagie roll. Sloppy Joes are a beloved American dish with ground meat in a sweet sauce. Combining these two creates a fun twist. It offers great flavors and is easy to make. You get the rich taste of a cheesesteak in a casual format. This dish shows how food can evolve and adapt over time. Yes, you can prepare Philly Cheesesteak Sloppy Joes ahead of time. Cook the beef mixture and store it in the fridge. Just keep the buns separate until you are ready to serve. When you're ready, heat the beef mixture on the stove. Toast the buns right before serving. This makes it easy for busy nights or gatherings. You can enjoy a hearty meal with less stress. Philly Cheesesteak Sloppy Joes pair well with many sides. Here are some great options: - French fries - Sweet potato fries - Coleslaw - Potato chips - Salad These sides add crunch and balance to the meal. You can also serve pickles or hot sauce for extra flavor. This balance enhances your dining experience, making it more enjoyable. This blog post covered the full recipe for Philly Cheesesteak Sloppy Joes. We explored the best ingredients for flavor and alternative options. I shared step-by-step cooking instructions and tips for the best results. We also looked at fun variations and how to store leftovers safely. Remember, don’t rush the cooking process to keep flavors rich. With these easy steps, you’ll make a tasty dish that everyone loves. Enjoy cooking and have fun with your meals!

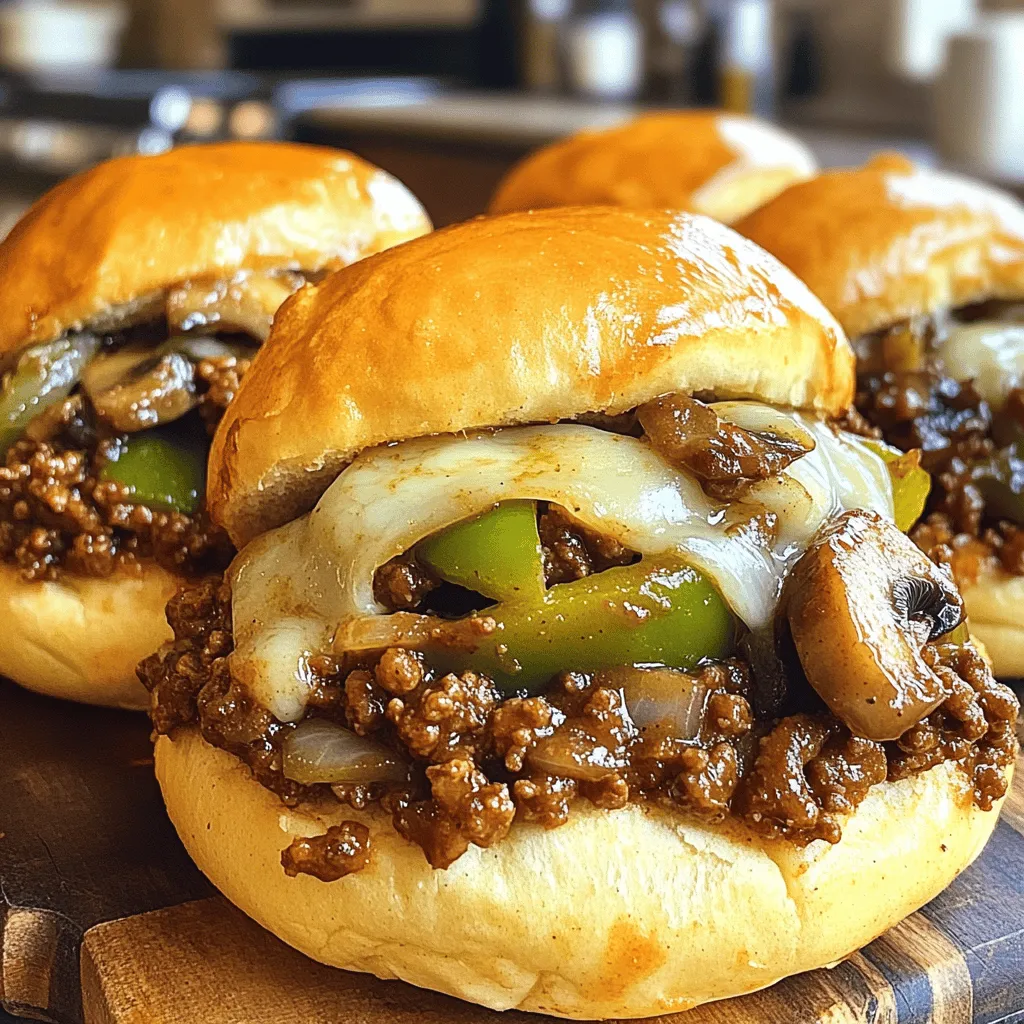
If you crave a tasty twist on a classic, Philly Cheesesteak Sloppy Joes are for you! This meal blends the rich, savory flavors of Philly cheesesteaks with the ease of …

Read more

Categories Dinner

Chai Cinnamon Rolls Irresistible Warm Breakfast Treat

June 6, 2025 by Chef Theo
- 2 ¼ cups all-purpose flour - 1 packet (2 ¼ tsp) active dry yeast - ½ cup warm milk (110°F or 43°C) - 1/4 cup granulated sugar - 1 large egg - 1/4 cup unsalted butter, melted - 1 tsp ground cinnamon - 1/4 tsp ground ginger - 1/4 tsp ground cardamom - 1/4 tsp ground cloves - 1/4 tsp salt - 1/2 cup brown sugar, packed - 1 tbsp ground cinnamon (for filling) - 1/4 cup unsalted butter, softened (for filling) - 1 cup powdered sugar (for icing) - 2-3 tablespoons milk (for icing) - 1/4 tsp vanilla extract (for icing) The right ingredients make all the difference in these chai cinnamon rolls. Start with flour and yeast for the base. The warm milk helps the yeast bloom. Sugar adds a hint of sweetness, while the egg gives richness. Melted butter enhances flavor and texture. Next, you have the spices. Ground cinnamon is key for that chai taste. Ginger, cardamom, and cloves add warmth and depth. Salt balances the sweetness and highlights the spices. For the filling, you need brown sugar, which adds moisture and a caramel-like flavor. Mix that with more cinnamon and softened butter for a rich filling. Lastly, prepare the icing with powdered sugar, milk, and vanilla extract. This adds a sweet glaze on top of your warm rolls. For more details on how to put all these ingredients together, check the Full Recipe. 1. First, take a small bowl. Combine warm milk, sugar, and active dry yeast. Let it sit for 5-7 minutes until it froths. 2. In a large bowl, mix together 2 cups of flour, salt, ground cinnamon, ginger, cardamom, and cloves. This blend gives your rolls a lovely chai flavor. 3. Pour the frothy yeast mixture, melted butter, and one large egg into the dry mix. Stir until everything combines. You’ll start to see your dough taking shape. 1. Gradually add the remaining flour. Knead the dough for about 5-7 minutes. You want it to be smooth and elastic. 2. Place the dough in a greased bowl. Cover it with a cloth and let it rise in a warm spot for about 1 hour. It should double in size. This step is key for soft rolls! 1. On a floured surface, roll the dough out into a rectangle, about 12x18 inches. You want it nice and even. 2. Spread softened butter over the dough. Mix brown sugar with 1 tablespoon of cinnamon and sprinkle it evenly on top. 3. Starting from the longer edge, roll the dough tightly into a log. Pinch the seams to seal. Slice it into 12 equal pieces and place them in a greased baking dish. Cover and let them rise again for 30 minutes. 1. Preheat your oven to 350°F (175°C). Bake the rolls for 25-30 minutes until they turn golden brown. 2. While they bake, prepare the icing. Mix powdered sugar, milk, and vanilla extract until smooth. 1. Once your rolls cool slightly, drizzle the icing over them. 2. For a beautiful finish, serve the chai cinnamon rolls on a large platter. Drizzle them generously with icing and sprinkle a light dusting of ground cinnamon on top. For the full recipe, check the ingredients and methodology provided above. To make your chai cinnamon rolls stand out, you can play with spices. A classic chai blend includes cinnamon, ginger, cardamom, and cloves. You can add more of your favorites to get a bolder flavor. Try adding a pinch of black pepper for warmth or nutmeg for a sweet touch. Adjusting the sweetness is also key. If you prefer it sweeter, mix in more brown sugar in the filling. Or, you can add more icing to the top. Taste as you go until you find your ideal balance. One common mistake is not allowing enough rise time. The dough needs to double in size for light and fluffy rolls. Make sure it is in a warm spot, covered with a cloth. If you're in a hurry, don’t rush this step. Another mistake is baking them too long or not long enough. Keep an eye on the rolls. They should be golden brown on top. If they look too dark, check them a minute earlier. Having the right tools will help you a lot. A quality mixing bowl and a rolling pin are essential. A good measuring cup and spoons will ensure that your ingredients are precise. This accuracy helps your dough rise properly and taste just right. Don't forget to use a thermometer for the milk. It should be warm but not hot. This temperature activates the yeast. Without it, your rolls may not rise. {{image_2}} You can add nuts or fruits to your chai cinnamon rolls for more flavor. I suggest using walnuts or pecans. They give a nice crunch and pair well with the spices. If you love dried fruits, try raisins or chopped dates. These will add sweetness and chewiness, making each bite even more delicious. If you want to switch up the icing, consider cream cheese frosting. It adds a tangy taste that complements the rolls perfectly. You can mix in some chai spices for a fun twist. If you need a dairy-free option, use coconut cream or almond milk for a vegan icing. This way, everyone can enjoy your treat! Don’t be afraid to play with spices! You can try adding nutmeg or allspice for a different flavor. They can bring new depth to your rolls. For a chai-inspired glaze, mix powdered sugar with brewed chai tea. It gives a unique kick and keeps your rolls moist. To keep your chai cinnamon rolls fresh, store them in an airtight container. This helps prevent them from drying out. A glass or plastic container works best. You can also wrap them tightly in plastic wrap for added protection. Make sure they cool completely before sealing. You can freeze both unbaked and baked rolls. For unbaked rolls, prepare them up to the second rise. Then, place them in a greased dish and cover tightly. Freeze for up to 2 months. To bake, thaw them in the fridge overnight, then let them rise for 30 minutes before baking. For baked rolls, let them cool completely first. Then wrap them in foil or plastic wrap. Freeze for up to 3 months. To reheat, thaw in the fridge overnight. Warm them in the oven at 350°F for about 10-15 minutes. Chai cinnamon rolls last about 2-3 days at room temperature when stored properly. They can last up to a week in the fridge. Look for signs of spoilage like a dry texture or mold. If they smell off, it's best to toss them. Enjoy your delicious treats while they are fresh! For a full recipe, check out the detailed instructions provided earlier. Making Chai Cinnamon Rolls takes about 2 hours in total. You spend 20 minutes prepping the dough. The rest of the time is for the dough to rise and bake. Allow about 1 hour for the first rise. Then, let the rolls rise again for 30 minutes before baking. Baking takes about 25-30 minutes. Yes, you can use pre-made dough for Chai Cinnamon Rolls. This option saves time. However, homemade dough gives a fresh taste and better texture. Pre-made dough often lacks the rich flavors of chai spices. If you prefer convenience, store-bought dough can work well. Just roll it out and add your filling. If your rolls don’t rise, check a few things. First, make sure your yeast is fresh. Old yeast won’t work well. Second, your dough needs warmth. Keep it in a warm, draft-free spot. If it’s too cold, the yeast will slow down. Lastly, allow enough time for rising. If still flat, try letting them rise longer. You can easily make vegan Chai Cinnamon Rolls. Substitute the egg with flaxseed meal or applesauce. Use almond or oat milk instead of dairy milk. For butter, try coconut oil or vegan butter. These swaps keep the rolls soft and tasty. The chai spices will shine through, giving great flavor. You can find pre-made Chai Cinnamon Rolls in many stores. Check local bakeries or specialty shops. Look for brands that focus on natural ingredients. Some grocery stores may also carry frozen options. If you're in a hurry, these can be a quick treat. Just heat them according to package instructions. You’ve learned how to make delicious chai cinnamon rolls from scratch. We covered essential ingredients, step-by-step instructions, and tips for success. Remember, patience is key during the rising process. Feel free to experiment with fillings and toppings to make them unique. Store leftovers properly to keep them fresh. Making these rolls can be a fun way to enjoy chai flavors any time. Now, gather your ingredients and start baking! Enjoy the warm, sweet treats you create.

Craving a warm, comforting breakfast? You’re in for a treat with Chai Cinnamon Rolls! These gooey rolls combine the rich flavors of chai spices with a soft, fluffy dough, making …

Read more

Categories Desserts

Korean Ground Beef Bowl Flavorful and Simple Meal

June 6, 2025 by Chef Theo
- Ground beef or ground turkey - Aromatics: garlic and ginger - Sauces and pastes: soy sauce, brown sugar, sesame oil, gochujang For this dish, you want flavorful meat. I often use ground beef, but ground turkey works well too. Both choices give you a tasty base. The key aromatics, garlic and ginger, add a fragrant punch to your meal. Next, we have the sauces. Soy sauce brings saltiness, while brown sugar adds a hint of sweetness. Sesame oil offers a nutty depth, and gochujang gives a spicy kick. Together, they create a rich sauce that coats the meat perfectly. - Green onions - Shredded carrots - Cucumber and radishes for garnish Fresh ingredients add color and crunch. I like to use green onions for their mild flavor. Shredded carrots not only look great but also add some sweetness. For garnish, cucumber and radishes give a refreshing bite that balances the rich beef. - White rice - Brown rice Rice is the perfect base for your Korean Ground Beef Bowl. White rice is soft and fluffy, while brown rice offers a chewier texture and more nutrients. Choose the one you prefer or have on hand. Either option works well with the savory beef and fresh toppings. You can find the full recipe to make this delicious meal easily. - First, heat a large skillet over medium heat. - Add 1 lb of ground beef. Cook until it starts to brown. - Break it apart with a spatula for about 5-7 minutes. - Then, add 3 cloves of minced garlic and 1 tablespoon of grated ginger. - Cook for 2 more minutes until fragrant. - Now, stir in 3 tablespoons of soy sauce. - Add 2 tablespoons of brown sugar, 1 tablespoon of sesame oil, and 1 tablespoon of gochujang. - Mix well until the beef is fully coated. - Simmer for another 3-4 minutes to enhance the flavors. - Remove from heat and add half of the chopped green onions. - Stir in 2 teaspoons of sesame seeds. - Serve by scooping cooked rice into bowls. - Top with the Korean ground beef mixture. - Add shredded carrots and cucumber slices on the side. - Garnish with the rest of the green onions and sliced radishes. This Korean Ground Beef Bowl is a tasty and colorful meal. Don't forget to check out the Full Recipe for any additional tips! Choosing the right ground meat is key. I love using ground beef for its rich flavor, but ground turkey works too. It’s leaner and still tasty. Look for meat with some fat for better taste. For cooking, start by preheating your skillet. Use medium heat to brown the beef. Break it apart with a spatula. This helps it cook evenly. The meat should be brown and crumbly in about 5 to 7 minutes. To boost flavor, add extra spices. Try garlic powder or onion powder for more depth. You can also mix in some sesame seeds for crunch. Gochujang is a star ingredient. If you like heat, add more. Start with a little, then taste. Adjust until you find the right spice level for you. Make your bowl look great! Start with a scoop of rice. Then, add the beef on top. Arrange the veggies on the side. This adds color and texture. Garnishing is fun! Use the reserved green onions and sliced radishes. They add freshness and make your bowl pop. A beautiful meal is always more enjoyable to eat. For the full recipe, check out the Korean Ground Beef Bowl. {{image_2}} You can make this meal gluten-free easily. Just swap regular soy sauce for tamari. Tamari is a gluten-free soy sauce alternative that keeps the flavor intact. This small change allows everyone to enjoy the dish. If you want a vegetarian option, try using tofu or tempeh. Both can absorb flavors well. Crumble firm tofu or cube tempeh and cook it just like the ground beef. You will get a tasty meal that fits different diets. Feel free to play with the vegetables in this dish. You can add bell peppers, snap peas, or broccoli. These veggies add color and crunch. They also boost the meal's nutrients. Using different sauces can change the flavor too. Instead of gochujang, try sriracha for more heat. You can also use hoisin sauce for a sweet twist. Mixing sauces gives you a new taste each time you cook. Pair your Korean Ground Beef Bowl with Korean side dishes for a complete meal. Kimchi or pickled vegetables add a nice tangy kick. You can also serve it with a simple salad for freshness. For meal prep or leftovers, pack the beef mixture and rice separately. This keeps everything fresh. You can easily reheat the beef and rice together when you're ready to eat. This method saves time and tastes great! For the complete recipe, check out the [Full Recipe]. To store leftovers, first let the dish cool down. Place the Korean ground beef in an airtight container. You can also store the rice separately. This helps keep the texture fresh. Make sure to use the leftovers within 3 to 4 days. When you are ready to eat, give it a good sniff. If it smells off, it's best to toss it. Freezing is a great option for meal prep. You can freeze the ground beef mixture in portions. Use freezer-safe containers or bags. Label them with the date. You can keep them for up to 3 months. Just remember to cool it completely before freezing. This will help avoid ice crystals that can ruin the texture. When reheating, aim for even heat. The microwave works, but it can make the beef tough. Instead, try using a skillet. Heat the beef over low heat, stirring often. If it seems dry, add a splash of water or soy sauce. This keeps the flavors strong and the texture nice. You can use the microwave for the rice, but cover it to keep it from drying out. To add spice, use more gochujang. You can also mix in a splash of chili oil. For heat, add sliced fresh chilies into the beef mixture. Another option is to sprinkle crushed red pepper flakes on top before serving. Adjusting spice levels is easy. Taste as you go. This helps you find the right heat for your dish. Yes, you can use ground turkey or chicken instead of beef. For a plant-based option, try crumbled tofu or tempeh. Both are great substitutes that soak up flavors well. If you prefer, use pork for a richer taste. Each protein gives a unique twist to the dish. Serve your bowl with simple sides. Steamed broccoli or bok choy adds color and nutrients. Pickled vegetables give a nice crunch. For drinks, try iced green tea or a light beer. These drinks balance the meal's flavors. You can also add a side of kimchi for a traditional touch. To wrap up, making a Korean Ground Beef Bowl is simple and rewarding. You start with ground beef or turkey and tasty aromatics. Adding sweet and savory sauces brings rich flavor. Fresh veggies like green onions and carrots add zing. You also have options for rice, making it flexible for everyone. Remember, feel free to swap ingredients or adjust spice levels to suit your taste. Enjoy this dish, and share your creations with friends and family. It’s a fun meal that makes any day better.

Looking for a quick and tasty meal? You’ll love my Korean Ground Beef Bowl! This dish is packed with bold flavors and comes together in no time. With just a …

Read more

Categories Dinner

Ground Beef Stroganoff Simple and Tasty Recipe

June 6, 2025 by Chef Theo
- 1 lb (450g) ground beef - 1 medium onion, finely chopped - 2 cloves garlic, minced - 8 oz (225g) mushrooms, sliced - 1 cup beef broth - 1 cup sour cream - 2 tablespoons all-purpose flour - 2 tablespoons olive oil These main ingredients create a rich and hearty dish. Ground beef provides a savory base. Onions and garlic add depth and flavor. Mushrooms bring earthiness and texture. Beef broth ties everything together, while sour cream gives a creamy finish. - 1 tablespoon Worcestershire sauce - 1 teaspoon Dijon mustard - Salt and black pepper to taste These seasonings are key to enhancing the taste. Worcestershire sauce offers umami, while Dijon mustard adds a subtle kick. Salt and black pepper balance the flavors perfectly. - 8 oz (225g) egg noodles - Fresh parsley, chopped (for garnish) Serve your stroganoff over egg noodles for a classic touch. They soak up the sauce well. A sprinkle of fresh parsley adds a burst of color and flavor. For the full recipe, check out the detailed steps to create this tasty meal. Start by boiling water in a large pot. Add a pinch of salt for flavor. Once the water boils, drop in the egg noodles. Cook them according to the package instructions until they are al dente. This usually takes about 7 to 9 minutes. After cooking, drain the noodles in a colander. Set them aside for later use. In a large skillet, pour in 2 tablespoons of olive oil over medium heat. Wait for it to heat up. Next, add the finely chopped onion. Sauté the onion for about 3 to 4 minutes, until it turns translucent. This adds a nice flavor to the dish. After that, stir in 2 minced garlic cloves. Cook them for another minute until you smell their aroma. Now, it’s time to brown the ground beef. Add 1 pound of ground beef to the skillet. Sprinkle in some salt and black pepper to taste. Break the beef apart with a spatula as it cooks. This will take about 5 to 7 minutes. Cook until the beef is fully browned. If there is too much fat, drain it off. Once the beef is browned, it's time to add mushrooms. Stir in 8 ounces of sliced mushrooms. Cook them for about 5 minutes until they are tender and any moisture is gone. Now, let’s make the sauce. Sprinkle 2 tablespoons of all-purpose flour over the beef and mushrooms. Stir to mix well. Slowly pour in 1 cup of beef broth while stirring. This will help prevent lumps. Add 1 tablespoon of Worcestershire sauce and 1 teaspoon of Dijon mustard. Bring everything to a gentle simmer. Finally, reduce the heat to low. Fold in 1 cup of sour cream until the sauce is smooth. Taste and adjust seasoning if needed. Now, you can add the cooked egg noodles to the skillet. Toss well to coat them in the creamy beef mixture. Cook for an additional 2 to 3 minutes until everything is heated through. For a full recipe, check out the details above. To make a smooth sauce, avoid lumps. After adding flour, stir well. Then, pour in the beef broth slowly while you mix. This keeps the sauce creamy. If the sauce tastes bland, add more salt and pepper. A dash of Worcestershire sauce can also enhance flavor. Browning the beef is crucial. Use medium-high heat to get a nice color. Break the meat into small pieces for even cooking. Stir often to prevent burning. Once the beef is done, make sure the noodles are well coated. Toss them with the sauce until every noodle is covered. This makes each bite delicious. Garnishing adds a nice touch. Use fresh chopped parsley to brighten your dish. Sprinkle it on top right before serving. You can also add a dollop of sour cream for extra creaminess. Serve the stroganoff in deep bowls; it looks great and keeps the sauce contained. For a fun twist, try a sprinkle of paprika for color. For the full recipe, check out the complete guide! {{image_2}} You can easily switch up the protein in this dish. Ground turkey or chicken work well. They have a lighter taste but still pack a punch. If you want a vegetarian option, try using lentils or mushrooms. These add great flavor and texture. You can make the sauce even better! Adding extra spices like paprika or garlic powder gives a nice kick. You can also swap out the sour cream for cream or yogurt. This will change the flavor and texture a bit but will still taste great. Think outside the box with your noodles! Use gluten-free pasta for a lighter option. You can also try serving the stroganoff over rice or mashed potatoes. Both make a tasty base and soak up the sauce beautifully. For the full recipe, check out the detailed instructions above. To keep your Ground Beef Stroganoff fresh, cool it down quickly. You can do this by spreading it in a shallow dish. This helps it cool faster. Once it's cool, transfer it to storage containers. Use airtight containers to prevent air from spoiling your food. Make sure to label them with the date. To freeze leftover stroganoff, let it cool completely first. Then, portion it into freezer-safe bags or containers. Remove as much air as you can before sealing. This helps prevent freezer burn. When you want to eat it, thaw it in the fridge overnight. Reheat it gently on the stove or in the microwave, stirring often. In the fridge, Ground Beef Stroganoff lasts about 3 to 4 days. If you freeze it, it can last up to 3 months. After that, the texture may change, but it will still be safe to eat. Always check for any off smells or changes in texture before consuming. You can use plain yogurt as a sour cream substitute. Greek yogurt works well. It adds creaminess and tangy flavor. Another option is cream cheese, which gives a nice thickness. Mix it with a bit of milk to reach the right consistency. You can also try buttermilk for a lighter touch. Each option will change the taste slightly, so choose based on your preference. Yes, you can make Ground Beef Stroganoff ahead of time. Just prepare the dish, and let it cool. Store it in the fridge for up to three days. When you’re ready to eat, heat it on the stove over low heat. Stir often to keep it creamy. You can also microwave it, but be careful not to overcook it. Ground Beef Stroganoff is great for meal prep. It stores well and can be portioned for easy meals. Make a big batch and divide it into containers. Pair it with noodles or rice. This dish reheats nicely, making it perfect for busy days. Just remember to store it properly to keep it fresh. To spice up Ground Beef Stroganoff, add red pepper flakes or hot sauce. Start with a small amount, then taste and adjust. You can also mix in some diced jalapeños for heat. Another option is to use spicy mustard instead of Dijon. These tweaks will add a kick without losing the dish's creamy nature. Ground Beef Stroganoff is a simple, hearty dish using easy ingredients. We covered main components, like ground beef, mushrooms, and sour cream. I shared clear steps for cooking egg noodles and preparing the sauce. Plus, you learned tips to enhance flavor and presentation. Variations allow for personal twists. Store leftovers right for future meals. Remember, this dish suits all, whether you are new to cooking or an expert. Enjoy creating your Stroganoff masterpiece!

If you’re craving a warm, hearty meal, Ground Beef Stroganoff is a classic choice. This simple and tasty recipe combines savory beef, fragrant onion, and creamy sour cream for a …

Read more

Categories Dinner

Taco Bell Beefy Melt Burrito Simple Recipe Guide

June 6, 2025 by Chef Theo
- 1 lb ground beef - 1 packet taco seasoning - 4 large flour tortillas - 2 cups shredded cheddar cheese - 1 cup refried beans - 1 cup sour cream To make a tasty Beefy Melt Burrito, you need a few key ingredients. Ground beef is your main protein. It brings richness and flavor. Taco seasoning adds the classic Mexican flair. Flour tortillas are perfect for wrapping all those delicious layers. Shredded cheddar cheese gives a melty, creamy texture. Refried beans add a hearty feel, while sour cream lends a cool contrast. - 1/2 cup diced tomatoes - 1/4 cup chopped green onions - 1/4 cup sliced black olives - Salsa for topping You can take this burrito to the next level with optional ingredients. Diced tomatoes add freshness. Chopped green onions give a nice crunch. If you like, sliced black olives can add a briny flavor. Salsa is a great topping for that extra zing. - Serving size and portion calculations: This recipe serves 4. Each burrito makes a filling meal. - Nutritional information overview: Each burrito includes protein, carbs, and fats. Check the full recipe for exact numbers. This simple guide should help you gather all you need to make a Beefy Melt Burrito. Enjoy creating this delightful dish at home! 1. Start by browning 1 pound of ground beef in a skillet over medium heat. Use a spatula to break the meat apart. Cook it until it turns brown and no longer pink. 2. After cooking, drain any extra fat from the beef. Then, add 1 packet of taco seasoning and 1 cup of water. Stir everything well. Let it simmer for about 5 minutes. This makes the mixture thick and tasty. - To warm the tortillas, place them on a dry skillet over medium heat. Heat each side for about 30 seconds. This makes them soft and easy to roll. - For better rolling, try not to overfill the tortilla. Leave space at the edges. This way, your burrito will stay together when you roll it. 1. Take a warm tortilla and spread a spoonful of refried beans down the center. 2. Next, add a good portion of the beef mixture on top of the beans. 3. Sprinkle shredded cheddar cheese over the beef. Then, add a dollop of sour cream, diced tomatoes, and chopped green onions. If you like, toss in some black olives too. 4. To fold it, bring in the sides of the tortilla first. Then, roll it up from the bottom to keep the filling secure. - To crisp the burrito, place it seam-side down in the skillet. Cook each side for about 2 minutes until golden brown. - If you prefer, you can also bake the burritos in the oven. Just place them on a baking sheet and bake at 350°F for about 10 minutes. This simple guide will help you make a delicious Taco Bell Beefy Melt Burrito at home. For the full recipe, check the section above. Enjoy your cooking adventure! - Spice level adjustments: You can change the heat by adding more or less taco seasoning. For a kick, try adding some cayenne pepper or chili powder. Start small, and taste as you go. - Alternative seasonings: If you want to mix things up, use smoked paprika or cumin. These spices add depth and richness to your burrito. - Overfilling the burrito: It’s easy to get carried away. Too much filling makes rolling tough. Stick to a good balance of beef, beans, and cheese for a perfect wrap. - Cooking time tips: Don’t rush the beef mixture. Let it simmer well. This helps the flavors blend and thickens the sauce. A few extra minutes make a big difference. - Serving suggestions: Cut the burrito in half to show off the layers. Serve with a side of salsa and tortilla chips for crunch. A colorful plate adds to the appeal. - Garnishes and sides to complement: Fresh cilantro or a sprinkle of lime juice brightens the dish. Add sliced jalapeños for extra heat. Consider a side of guacamole or a simple salad for freshness. {{image_2}} You can make a tasty vegetarian version of the Beefy Melt Burrito. Simply swap the ground beef for either refried beans or a meat alternative. Black beans or lentils work great here. They add texture and protein. Make sure to season them well with taco seasoning for that classic flavor. If you love heat, try adding jalapeños or spicy salsa. Chopped fresh jalapeños can give your burrito a nice kick. You can also mix in some spicy salsa with your beef mixture. This twist will make sure each bite is bursting with flavor. Looking for a low-carb option? Use lettuce wraps instead of tortillas. Just layer your fillings on large lettuce leaves. You can also reduce the calories by using low-fat cheese and sour cream. This way, you can still enjoy the rich taste without the extra fat. To keep your Beefy Melt Burrito fresh, follow these steps: - Refrigeration techniques: Place leftovers in an airtight container. This keeps moisture in and prevents drying. Store in the fridge for up to 3 days. - Freezing options: Wrap each burrito in foil or plastic wrap. Place in a freezer bag to prevent freezer burn. You can freeze them for up to 2 months. You can reheat your burritos using different methods: - Microwave: Place the burrito on a microwave-safe plate. Heat for 1-2 minutes until hot. - Skillet: Heat a skillet over medium heat. Cook the burrito for about 3-4 minutes on each side until warm and crispy. - Oven: Preheat the oven to 350°F. Wrap the burrito in foil and bake for about 15-20 minutes. Knowing how long your burritos last is key: - Duration for refrigerated storage: They last for about 3 days in the fridge. - Duration for frozen storage: They can stay good in the freezer for about 2 months. Enjoy your tasty burrito while it’s fresh! For the full recipe, check out the Beefy Cheesy Dream Burrito . A Taco Bell Beefy Melt Burrito has about 440 calories. It packs in 20 grams of protein, which is great for energy. The burrito also contains 22 grams of fat and 46 grams of carbs. If you compare it to a homemade version, you can adjust the calories to fit your diet by controlling the ingredients. Yes, you can make this burrito ahead of time. Prepare the filling and wrap them in tortillas. Store them in an airtight container in the fridge. They stay fresh for about three days. For longer storage, freeze the wrapped burritos. They keep well for up to three months. You can add many tasty toppings to your burrito. Some great options include: - Diced tomatoes - Chopped green onions - Sliced black olives - Salsa - Avocado or guacamole These toppings add flavor and texture, making each bite fun. The homemade version of the Beefy Melt Burrito is fresher and customizable. You control the ingredients and their quality. It allows you to adjust flavors and spice levels. The texture is also different. Homemade burritos tend to be softer, while Taco Bell’s are a bit firmer. Try both to see which one you like best. In this blog post, we explored the Taco Bell Beefy Melt Burrito. We covered its main and optional ingredients, plus cooking steps. I shared tips for flavor, common mistakes, and presentation ideas. You can also try variations to fit your taste. Homemade burritos can be delicious, customizable, and fun to make. Enjoy creating your own version, and keep experimenting with flavors!

Are you craving the delicious Taco Bell Beefy Melt Burrito? You can make it at home! This simple recipe guide walks you through everything you need, from ingredients to cooking …

Read more

Categories Dinner

Overnight Crème Brûlée French Toast Delightful Recipe

June 4, 2025 by Chef Theo
- Brioche Bread - Eggs - Whole Milk - Heavy Cream - Granulated Sugar - Vanilla Extract - Ground Cinnamon - Salt - Brown Sugar (for topping) - Fresh Berries (for garnish) - Whipped Cream (optional) You can swap brioche with other breads like challah or sourdough. These options work well too. For a dairy-free version, use almond or oat milk instead of whole milk. You can also use coconut cream in place of heavy cream. If you want to cut sugar, try natural sweeteners, like honey or maple syrup. Just adjust the amounts to taste. Start by whisking the egg mixture. In a bowl, combine 4 large eggs, 2 cups of whole milk, 1 cup of heavy cream, ¾ cup of granulated sugar, 1 tablespoon of vanilla extract, ½ teaspoon of ground cinnamon, and a pinch of salt. Mix until it looks smooth and creamy. This step is key for a rich flavor. Next, arrange the brioche slices in a greased 9x13 inch baking dish. You want them to overlap slightly for even soaking. Pour the egg mixture evenly over the slices. Make sure every piece is well-coated. Gently press down so the bread absorbs the mixture. Cover the dish tightly with plastic wrap. This keeps the moisture in while it chills. Place it in the fridge overnight or for at least 4 hours. This soaking time allows the bread to soak up all the delicious flavors. In the morning, preheat your oven to 350°F (175°C). This ensures the dish bakes evenly. After preheating, remove the plastic wrap. Sprinkle ¼ cup of brown sugar evenly over the top of the soaked bread. This topping creates a nice caramelized layer. Bake in the preheated oven for 30-35 minutes. Keep an eye on it until the custard sets and the top is golden brown. It’s okay to have a little jiggle in the center, as it will firm up while cooling. When it’s done, let the dish cool slightly. For a true crème brûlée effect, use a kitchen torch to caramelize the sugar on top. This gives it that crunchy layer we all love. For garnishes, fresh berries add a nice touch. You can also serve it with whipped cream if you like. When plating, cut into squares and arrange on plates. Best of all, enjoy it warm for the best flavor. For the full recipe, check out the detailed instructions above! To make the best custard, soaking the bread is key. Use thick slices of brioche. When you place the slices in the dish, overlap them slightly. This helps the custard soak in evenly. Pour your egg mixture over the bread slowly. Press down gently so every slice absorbs the liquid. Mixing well is just as important. Whisk the eggs and cream until combined. You want a smooth texture with no lumps. If the sugar does not mix in well, it can lead to grainy custard. Timing is everything. Bake your French toast for 30 to 35 minutes. Set a timer to help you keep track. Check for doneness by gently shaking the dish. If the center jiggles, it needs more time. The top should be golden and firm. A good baking dish makes a difference. I recommend a 9x13 inch glass or ceramic dish. These materials help cook the custard evenly. For serving, a spatula works well to lift pieces. If you want a fancy touch, use a torch to caramelize the sugar on top. This gives it that classic crème brûlée finish. For the full recipe, check the section above. Happy cooking! {{image_2}} You can easily change the flavor of your Overnight Crème Brûlée French Toast. Adding fruit can make it taste fresh and fun. Think about using apples or bananas. Both fruits will add sweetness and a nice texture. You can slice them thin and layer them on top of the brioche before pouring the egg mixture. Another great option is to add nuts. Pecans or walnuts can bring a crunchy bite. Chop them up and sprinkle them over the bread before soaking it. This will give your dish a nutty flavor that is simply delightful. If you want a vegan version, you can swap out a few ingredients. Use plant-based milk like almond or oat milk. Instead of eggs, try using flaxseed or chia seeds mixed with water. This will help create that creamy texture without using animal products. For those needing gluten-free options, use gluten-free bread. There are many tasty types available now. Make sure all your other ingredients are gluten-free too. This way, everyone can enjoy this yummy dish! You can create themed versions of this dish for holidays. For example, pumpkin spice adds a warm flavor for fall. Just mix in some pumpkin puree and pumpkin spice into your egg mixture. You’ll love the cozy taste. Seasonal toppings can also keep things exciting. In the summer, add fresh strawberries or blueberries on top. In winter, consider using spiced pears or warm apples. Each season brings new flavors to try! For the full recipe, check out the [Full Recipe]. To keep your Overnight Crème Brûlée French Toast fresh, store it in the fridge. Place the leftovers in an airtight container. This method helps maintain the moisture and flavor. You can refrigerate the dish for up to three days. When reheating, preheat your oven to 350°F (175°C). Place the French toast in an oven-safe dish. Cover it with foil to avoid drying out. Heat for about 15 minutes or until warm. You can also use the microwave, but it may not keep the texture as nice. If you want to freeze the dish, let it cool first. Slice the French toast into individual pieces. Wrap each slice tightly in plastic wrap and then place them in a freezer bag. This keeps them fresh for up to two months. When you’re ready to enjoy it, thaw the slices in the fridge overnight. After thawing, reheat them as mentioned above. This way, you can savor the creamy goodness anytime! In the fridge, the Overnight Crème Brûlée French Toast lasts about three days. If it stays longer, check for signs of spoilage. Look for changes in smell or appearance. If it smells off or has a slimy texture, it’s best to discard it. Always trust your senses! Yes, you can. If you are short on time, make the egg mixture in the morning. Whisk together the eggs, milk, cream, sugar, and spices. Then, soak the brioche slices for at least 30 minutes. This gives the bread some time to soak up the flavor. Make sure to preheat the oven while the bread soaks. Bake it just like the recipe says. You can pair this dish with many tasty sides. Fresh fruit, like berries or bananas, adds color and flavor. You can also serve it with a light syrup or maple syrup. If you want something warm, try hot chocolate or coffee. These drinks balance the sweet flavors of the French toast. Yes, you can use different breads. Challah or sourdough works well, too. These breads have a nice texture. They soak up the mixture well and are still soft. Just make sure the bread is thick enough to hold the custard without falling apart. This way, your French toast will be delicious! For the full recipe, check out the details above. This article covered delicious recipes for Overnight Crème Brûlée French Toast. We talked about key ingredients, helpful tips, and variations to try. You learned about preparing ahead, cooking methods, and storing leftovers. Customizing the dish to suit your taste is easy. With these ideas, your breakfast can be quick, fun, and tasty. Enjoy your cooking adventure with this tasty dish!

Get ready to elevate your breakfast game with my Overnight Crème Brûlée French Toast! This delicious dish combines soft brioche bread soaked in a rich custard, topped with caramelized sugar …

Read more

Categories Breakfast

Easy Peanut Butter & Jelly French Toast Delight

June 4, 2025 by Chef Theo
To make this tasty dish, gather these simple ingredients: - 4 slices of bread (your choice: white, whole grain, or brioche) - 1/2 cup creamy or crunchy peanut butter - 1/4 cup your favorite fruit jam or jelly (grape, strawberry, or raspberry) - 2 large eggs - 1/4 cup milk (dairy or non-dairy) - 1/2 teaspoon cinnamon - 1 teaspoon vanilla extract - Butter or oil for frying - Powdered sugar for dusting (optional) - Fresh fruit for garnish (optional) You can easily adjust this recipe to fit your needs. Here are some swaps: - Bread: Use gluten-free bread for a gluten-free option. - Peanut Butter: Swap peanut butter for almond or sunflower seed butter. - Jelly: Choose sugar-free jelly or fruit spread for a healthier option. - Milk: Use oat milk or almond milk for a dairy-free version. - Eggs: For a vegan twist, use flax eggs or a commercial egg replacer. The type of bread can change your French toast. Here are some great options: - White Bread: Soft and easy to work with. - Whole Grain Bread: Adds a nutty flavor and more fiber. - Brioche: Rich and buttery, perfect for a special treat. - Challah: Slightly sweet and fluffy, great for a cozy breakfast. Use the Full Recipe to create this delightful dish. Enjoy making your Easy Peanut Butter & Jelly French Toast! First, grab your favorite bread. You can use white, whole grain, or brioche. Take one slice and spread about a tablespoon of peanut butter on it. Then, grab your fruit jam or jelly. Spread about a tablespoon of jelly on top of the peanut butter. Now, add another slice of bread on top to make a sandwich. Repeat this with the other slices to make a second sandwich. Next, take a shallow bowl. Crack two large eggs into the bowl. Add a quarter cup of milk. You can use dairy or non-dairy milk, whichever you like. Now, sprinkle in half a teaspoon of cinnamon and one teaspoon of vanilla extract. Use a whisk or fork to mix everything together until it looks smooth and well combined. Now, heat a non-stick skillet or griddle over medium heat. Add a pat of butter or a splash of oil to the pan. While the pan heats up, dip each sandwich into the egg mixture. Make sure both sides get coated, but don’t let them soak too long. Place the soaked sandwiches in the skillet. Cook for about 3-4 minutes on each side. You're aiming for a golden brown and crispy finish. If they start to burn, lower the heat. Once done, take them out and cut each sandwich into halves or quarters. You can dust them with powdered sugar if you want. Serve while hot, and maybe add some extra jelly or peanut butter on the side for fun. Enjoy this easy peanut butter & jelly French toast delight! For the full recipe, check above. To make the best peanut butter and jelly French toast, follow these tips: - Use thick bread: Choose bread that is thick, like brioche or Texas toast. This helps soak up the egg mixture without falling apart. - Let the mixture soak: Dip the sandwich in the egg mix and let it soak for a few seconds. This allows the bread to absorb more flavor. - Use medium heat: Cooking on medium heat gives the toast a nice golden color without burning it. Keep an eye on it while cooking. - Add a pinch of salt: Mixing a small pinch of salt into the egg mix can enhance the flavor of the French toast. Avoid these common mistakes to ensure your French toast is a hit: - Soaking too long: Don’t let the bread sit too long in the egg mix. It can become too soggy and break apart. - Not using enough heat: If your skillet is not hot enough, the toast may end up pale and soft rather than golden and crisp. - Skipping the butter: Using butter or oil in the skillet is key for a crispy exterior. Don’t skip this step! - Overcrowding the pan: Cook in batches if needed. Too many sandwiches at once will lower the pan's heat and lead to uneven cooking. Toppings can elevate your peanut butter and jelly French toast. Here are some ideas: - Drizzle of honey or maple syrup: A sweet drizzle adds extra flavor and makes it feel fancy. - Fresh fruit: Slices of banana or strawberries on top can enhance both flavor and nutrition. - Chopped nuts: Sprinkle chopped nuts like almonds or walnuts for added crunch. - Whipped cream: A dollop of whipped cream can make your dish feel indulgent and special. For the complete recipe, check out the Full Recipe. {{image_2}} You can switch up the nut butter in this recipe. While creamy or crunchy peanut butter is classic, try almond or cashew butter. Each nut butter brings a new taste. Almond butter adds a slight sweetness, while cashew butter is smooth and creamy. You can even use sunflower seed butter for a nut-free option. This keeps the dish fun and fresh! The jelly you choose can change the flavor profile. Grape jelly is a favorite, but strawberry or raspberry jam works well too. For a twist, consider using honey or chocolate spread instead. Each spread adds its own flair. Experimenting with different jams can lead to tasty surprises. You might find a new favorite! Adding fruits or nuts gives your French toast extra texture. You can slice bananas or strawberries and add them inside the sandwich. This adds sweetness and a burst of flavor. Chopped nuts like walnuts or pecans can bring a crunchy bite. You can even sprinkle some on top after cooking. Get creative with what you have at home! For the full recipe, check out the Easy Peanut Butter & Jelly French Toast. Enjoy the fun of making it your own! You can store leftover Easy Peanut Butter & Jelly French Toast in an airtight container. Place it in the fridge for up to three days. Make sure to separate layers with parchment paper to keep them from sticking. If you have extra toppings, store them separately to maintain freshness. To reheat, use a toaster oven or skillet. A toaster oven warms the bread evenly and keeps it crispy. If using a skillet, heat it on low. Place the French toast in the skillet for about 2-3 minutes on each side, or until warm. Avoid the microwave, as it can make the toast soggy. You can freeze this French toast for later. After cooking, let it cool completely. Wrap each piece in plastic wrap, then place them in a freezer bag. They can last up to three months in the freezer. When ready to eat, thaw in the fridge overnight, then follow the reheating tips mentioned above. Enjoy your meal anytime! Yes, you can! Just use gluten-free bread. Many brands offer great options. Look for bread made from rice or almond flour. This way, you keep the taste and texture nice. You can use a banana or flaxseed meal. For a banana, mash it in a bowl. Mix it with 1/4 cup of milk and a pinch of cinnamon. For flaxseed, mix 1 tablespoon of flaxseed with 2.5 tablespoons of water. Let it sit for a few minutes. Both options work well for binding the toast. Fresh fruit makes a great side. Try strawberries, bananas, or blueberries. You can also serve it with yogurt or a drizzle of honey. A glass of milk or a smoothie can round out the meal. This blog post covered how to make easy peanut butter and jelly French toast. We discussed the ingredients, including possible substitutions, and the best bread types. I shared step-by-step instructions to help you along the way. Remember, practice makes perfect. Avoid common mistakes and try different flavors to keep things fun. You can store leftovers or freeze them for later. Enjoy this tasty treat with your favorite sides. Now go ahead and make your own delicious version!

Are you ready to take your breakfast to a new level? With my Easy Peanut Butter & Jelly French Toast Delight, you can turn a classic sandwich into a warm, …

Read more

Categories Breakfast

Copycat Chipotle Ranch Grilled Chicken Burrito Recipe

June 4, 2025 by Chef Theo
- 2 chicken breasts, boneless and skinless - 1 tablespoon olive oil - 1 teaspoon garlic powder - 1 teaspoon onion powder - 1 teaspoon smoked paprika - 1 teaspoon ground cumin - Salt and pepper to taste - 4 large whole wheat tortillas - 1 cup cooked rice (brown or white) - 1 cup black beans, drained and rinsed - 1 cup corn, canned or frozen - 1 cup shredded cheddar cheese - 1 cup romaine lettuce, chopped - 1 ripe avocado, sliced - 1 cup Chipotle Ranch Dressing (store-bought or homemade) The main ingredients make this burrito tasty and filling. The chicken breasts are the star, providing protein and flavor. The spices add depth, while the tortillas hold everything together. Rice and beans give the burrito a hearty feel. The cheese, lettuce, and avocado add freshness and creaminess. You can use store-bought Chipotle Ranch dressing for convenience. It saves time and still tastes great. However, making it at home is simple and fun! You can adjust flavors to your liking. To make homemade Chipotle Ranch dressing, you'll need: - 1 cup mayonnaise - 1/2 cup buttermilk - 2 tablespoons ranch seasoning mix - 2 tablespoons chipotle peppers in adobo sauce - Juice of 1 lime Mix these ingredients well, and you'll have a delicious dressing. This homemade version packs a punch of flavor, making your burrito even better. For the full recipe, check out the link above! Start by gathering your marinade ingredients. You need: - 1 tablespoon olive oil - 1 teaspoon garlic powder - 1 teaspoon onion powder - 1 teaspoon smoked paprika - 1 teaspoon ground cumin - Salt and pepper to taste In a bowl, mix the olive oil, garlic powder, onion powder, smoked paprika, ground cumin, salt, and pepper. This mix gives your chicken a bold flavor. Place the chicken breasts in the bowl and coat them well with the marinade. Cover the bowl and let it sit for at least 30 minutes. This step is key. It helps the chicken soak up all those yummy flavors. Preheat your grill or grill pan to medium-high heat. This is the perfect temperature for grilling. Once hot, place the marinated chicken on the grill. Grill each side for about 6 to 7 minutes. You want the internal temperature to reach 165°F (75°C). A meat thermometer is a great tool for this. After grilling, let the chicken rest for 5 minutes before slicing. This helps keep the juices inside. To build your burrito, start with warm tortillas. You can warm them in a dry skillet or microwave for a few seconds. Then, layer your ingredients: - 1/4 cup cooked rice - 1/4 cup black beans - 1/4 cup corn - Sliced grilled chicken - 1/4 cup shredded cheddar cheese - A handful of romaine lettuce - A few slices of avocado - Drizzle 2 tablespoons of Chipotle Ranch Dressing Make sure to layer these well for the best taste. To wrap your burrito, fold in the sides of the tortilla. Then, roll from the bottom up. This keeps everything secure inside. Repeat this for each tortilla, and you’re ready to enjoy! - Avoid Dry Chicken: To keep your chicken juicy, always marinate it for at least 30 minutes. Use a mix of olive oil, spices, and seasoning. This adds flavor and moisture. Grill the chicken until it reaches 165°F. A meat thermometer helps ensure perfect cooking. - Perfectly Grilled Burritos: Warm the tortillas in a skillet or microwave. This makes them easy to roll. Fill each tortilla with just the right amount of ingredients. Overfilling may cause spills. After wrapping, grill the burritos briefly. This gives a golden crust and crisp texture. - Garnishing with Fresh Ingredients: Serve your burritos on a bright plate. Drizzle extra Chipotle Ranch Dressing on top. Add fresh cilantro or lime wedges. This adds color and freshness. You can also sprinkle some chopped tomatoes for a vibrant look. - Serving Suggestions with Sides: Pair your burrito with sides like tortilla chips or a colorful salad. A side of black bean salsa works well too. This adds variety to your meal. You can also serve with a refreshing drink like lemonade or iced tea. {{image_2}} Using Shrimp or Tofu You can switch chicken for shrimp or tofu. Shrimp adds a sweet touch that pairs well with the ranch dressing. To prepare shrimp, season and grill them just like the chicken. For tofu, press it first to remove excess water. Then, marinate and grill until golden. Both options create a tasty twist on the burrito. Vegetarian Options If you want a meatless meal, use beans or lentils. Black beans work well, providing protein and fiber. You can also add grilled veggies like bell peppers and zucchini for extra flavor. These options keep the dish hearty and satisfying. Rice Variations: Quinoa, Cauliflower Rice If you prefer quinoa, it’s a great substitute for rice. It adds a nutty flavor and is packed with protein. To use cauliflower rice, just pulse cauliflower florets in a food processor. Sauté it briefly for a light, low-carb option. Both alternatives keep the burrito fresh and exciting. Dairy-Free Cheese Options For a dairy-free meal, there are many cheese substitutes. Look for nut-based or soy-based cheeses. They melt well and give a creamy texture. You can also skip cheese altogether and use extra avocado for creaminess. This keeps the burrito rich while meeting dietary needs. For the full recipe, visit the detailed instructions above. Refrigeration Tips After you enjoy your burrito, store any leftovers in the fridge. Wrap each burrito in plastic wrap or aluminum foil. Place them in an airtight container. This helps keep them fresh for up to three days. Freezing Burritos If you want to save your burritos for longer, freezing works well. Wrap each burrito tightly in plastic wrap. Then place them in a freezer bag. Label the bag with the date. They can stay frozen for up to three months. Remember to remove as much air as possible from the bag. Best Methods for Maintaining Flavor To reheat your burrito, the oven is best. Preheat your oven to 350°F (175°C). Remove the burrito from any wrap and place it on a baking sheet. Heat for about 15-20 minutes until warm. This keeps the burrito crispy and tasty. Avoiding Sogginess If you use a microwave, place the burrito on a microwave-safe plate. Heat it for 1-2 minutes. Check if it is warm enough. To prevent sogginess, avoid covering the burrito while it heats. Enjoy your tasty meal again! A Copycat Chipotle Ranch Grilled Chicken Burrito is a delicious, homemade version of the popular dish from Chipotle. It features grilled chicken, rice, beans, corn, cheese, lettuce, and avocado, all wrapped in a warm tortilla. The key flavor comes from the Chipotle Ranch Dressing, which adds a creamy, zesty taste. Here’s a quick look at the main ingredients: - 2 chicken breasts, boneless and skinless - 1 tablespoon olive oil - 1 teaspoon garlic powder - 1 teaspoon onion powder - 1 teaspoon smoked paprika - 1 teaspoon ground cumin - Salt and pepper to taste - 4 large whole wheat tortillas - 1 cup cooked rice (brown or white) - 1 cup black beans, drained and rinsed - 1 cup corn, canned or frozen - 1 cup shredded cheddar cheese - 1 cup romaine lettuce, chopped - 1 ripe avocado, sliced - 1 cup Chipotle Ranch Dressing (store-bought or homemade) This combination gives you a burrito that is both satisfying and full of flavor. Yes, you can easily make Chipotle Ranch Dressing at home. To do this, mix ranch dressing with some chipotle peppers in adobo sauce. Here’s a simple recipe: 1. Combine 1 cup of ranch dressing with 1-2 chipotle peppers. 2. Add 1 tablespoon of adobo sauce. 3. Blend until smooth. Taste and adjust for heat or creaminess. This dressing adds a nice kick to your burrito and is simple to make! To add more heat to your burrito, you can use several methods: - Add jalapeños: Slice fresh jalapeños and place them inside the burrito. - Use spicy salsa: Top your burrito with your favorite spicy salsa. - Increase chipotle: Add more chipotle peppers to your dressing for extra heat. These options let you customize your burrito to fit your heat preference. In this post, we covered how to make a flavorful Chipotle Ranch Grilled Chicken Burrito. We explored key ingredients, like seasoning the chicken and making the dressing. I shared step-by-step instructions for marinating, grilling, and assembling. You gained cooking tips and ideas for variations to suit your taste. Enjoying this dish at home is easy and fun! With these tips, you can create a tasty burrito your family will love. Use your creativity to make it unique every time!

Do you crave that flavorful Chipotle experience but want to make it at home? In this blog, I’m excited to share my Copycat Chipotle Ranch Grilled Chicken Burrito recipe that …

Read more

Categories Dinner

Easy Cream Puff Cake Simple and Delicious Recipe

June 4, 2025 by Chef Theo
- 1 cup water - 1/2 cup unsalted butter - 1 cup all-purpose flour - 1/4 teaspoon salt - 1 teaspoon vanilla extract - 4 large eggs - 1 cup heavy cream - 1/2 cup powdered sugar - 1 teaspoon vanilla extract (for the cream) - Fresh berries (for garnish, optional) - Chocolate shavings (for garnish, optional) To make this Easy Cream Puff Cake, you need simple ingredients. Each one plays a key role in the texture and taste. 1. Water and butter create the dough's base. They add moisture and richness. 2. All-purpose flour gives structure to the puffs. It helps them rise in the oven. 3. Salt enhances flavor. A little goes a long way in balancing sweetness. 4. Vanilla extract adds a sweet aroma. It makes your puffs smell divine. 5. Eggs provide richness and help the dough rise. They are key to light, airy puffs. 6. Heavy cream is for whipping. It makes a fluffy filling that's hard to resist. 7. Powdered sugar sweetens the cream. It helps achieve the perfect consistency. 8. More vanilla extract is for the cream. This keeps the flavor consistent. 9. Fresh berries and chocolate shavings are optional garnishes. They add color and style. These ingredients come together to create a delightful dessert. For the complete guide on preparing this dish, check the Full Recipe. Enjoy crafting your cream puff cake! 1. Preheat your oven to 400°F (200°C). This helps the puffs rise well. 2. Line a baking sheet with parchment paper. It prevents sticking and makes cleanup easy. 3. In a medium saucepan, combine 1 cup of water and 1/2 cup of unsalted butter. Bring this mixture to a boil over medium-high heat. 4. Once it boils, remove from heat. Quickly stir in 1 cup of all-purpose flour and 1/4 teaspoon of salt. Mix until the dough forms a ball. 1. Let the dough cool for a few minutes. This step is important to avoid cooking the eggs. 2. Next, stir in 1 teaspoon of vanilla extract. This adds a nice flavor. 3. Now, add 4 large eggs one at a time. Mix well after each egg. The dough should be smooth and glossy. 4. Using a pastry bag or a spoon, drop tablespoon-sized mounds of dough onto the baking sheet, leaving space between them. 1. Bake in the preheated oven for 25-30 minutes. They should look golden brown and puffed. 2. Remove from the oven and let them cool completely on a wire rack. This helps keep them airy. 1. While the puffs cool, prepare the filling. In a mixing bowl, whip 1 cup of heavy cream with 1/2 cup of powdered sugar and another teaspoon of vanilla extract. 2. Whip until you see soft peaks form. This means the cream is ready. 3. Once the puffs cool, gently slice off the tops. Fill each puff with the whipped cream mixture. Replace the tops and your delicious dessert is ready! For the complete recipe, check out the [Full Recipe]. To get the best cream puffs, avoid a few common mistakes. First, do not skip preheating your oven. If your oven is not hot enough, the puffs will not rise. Second, make sure to mix your dough well; lumps can ruin the texture. Lastly, avoid opening the oven door while baking. This can let heat escape and affect the rise. To ensure proper rising, keep the oven closed for the first 20 minutes. This helps create steam, which is key for that fluffy texture. If you see them rising, don't panic! They will puff up beautifully. Flavor is where you can get creative. You can use different flavor extracts to change things up. Try almond or hazelnut for a nutty twist. You can also mix in some cocoa powder for a chocolate flavor. For fillings, think outside the box. You can add fruit purees or even flavored creams. Lemon curd or coffee cream can add a nice zing. Don't be afraid to experiment! Presentation matters. Stack the cream puffs high on a platter for a show-stopping look. Dust with powdered sugar for an elegant touch. You can also add fresh berries or chocolate shavings on top. Pair your cream puffs with coffee, tea, or even a sweet dessert wine. These drinks can enhance the flavors and make your dessert even more special. For the full recipe, check out the heavenly cream puff cake! {{image_2}} You can easily change the flavors of your cream puff cake. For a fruity twist, try using strawberries or raspberries. Simply chop fresh berries and fold them into the whipped cream. This adds a bright color and taste. You can also make a chocolate cream filling. Melt some chocolate and mix it with the whipped cream. This gives your cake a rich, sweet flavor. If you need a gluten-free version, you can swap all-purpose flour with a gluten-free blend. Look for one that works well in baking. This change keeps the texture light and fluffy. You might also need to adjust the baking time slightly. Keep an eye on them as they bake. They might need a few extra minutes. Making mini cream puffs is fun and perfect for parties. Just scoop smaller amounts of dough onto the baking sheet. You can also use a smaller pastry bag. Smaller puffs bake faster, so check them after 20 minutes. For serving, arrange them on a platter with fresh fruit or chocolate drizzle. This creates an eye-catching treat that everyone will love. For more details on how to create this delightful dessert, check the Full Recipe. To keep your cream puffs fresh, store them in the fridge. Use an airtight container for best results. This helps to seal in moisture and keep them from drying out. Place a layer of paper towel at the bottom of the container. This absorbs any excess moisture and keeps the puffs crisp. Avoid stacking the puffs directly on top of each other. This can cause them to become soggy. Instead, place them in a single layer if possible. If you have too many puffs, consider freezing some for later. Freezing cream puffs is simple. First, let them cool completely after baking. Then, place them on a baking sheet. Make sure they are not touching each other. Freeze them for about one hour until solid. After that, transfer the puffs to a freezer-safe bag. Remove as much air as you can before sealing. When you want to eat them, take out the puffs and let them thaw. For the best texture, thaw them in the fridge overnight. This helps to maintain their shape and freshness. Cream puffs can last in the fridge for about 2 to 3 days. After that, they may lose their texture. Check for signs of spoilage, like a sour smell or changes in color. If you notice any of these signs, it’s best to discard them. Enjoy your Easy Cream Puff Cake with confidence, knowing how to store it properly! For the full recipe, check out the previous section. To make Easy Cream Puff Cake, you start with simple steps. First, gather your ingredients. You will need water, butter, flour, salt, eggs, and heavy cream. Here’s a quick overview: 1. Preheat your oven to 400°F (200°C). 2. Boil water and butter in a saucepan. 3. Mix in flour and salt quickly until it forms a ball. 4. Let the dough cool for a few minutes. 5. Stir in vanilla and add eggs one at a time. 6. Drop spoonfuls of dough onto a baking sheet. 7. Bake for 25-30 minutes until golden brown. 8. Cool the puffs, whip the cream, and fill each puff. That’s it! You can find the Full Recipe for all the details. Yes, you can swap heavy cream for other ingredients. If you want a dairy-free option, use coconut cream or almond milk. Both work well for whipping. For a lower-fat choice, consider using half-and-half or Greek yogurt. Just remember, the texture may change slightly. If your cream puffs did not rise, check a few things. First, make sure you boiled the water and butter well. This step is key. If the dough is too wet or too dry, it won’t puff. Here are some tips for success: - Use fresh eggs, as they help with rising. - Avoid opening the oven door while baking. - Let the puffs cool completely before filling them. By following these tips, you should have tasty, puffy cream puffs! You now have everything you need to make the perfect cream puffs. We covered the key ingredients, step-by-step instructions, and tips for perfect texture. You also learned about variations, storage, and common questions. Remember to enjoy the process and get creative with flavors and presentations. Homemade cream puffs can impress your family and friends. With practice, they will become a favorite treat. So, gather your ingredients and start baking! Your kitchen awaits delightful aromas and tasty results.

Are you ready to impress your friends and family with a treat that’s simple yet stunning? My Easy Cream Puff Cake is a dessert that delivers rich flavors and a …

Read more

Categories Desserts

Classic Mexican Street Corn Off the Cob Delightful Dish

June 4, 2025 by Chef Theo
For a tasty classic Mexican street corn off the cob, you will need: - 4 ears of fresh corn, husked - 1/2 cup mayonnaise - 1/2 cup sour cream - 1 cup crumbled queso fresco (or feta cheese) - 2 tablespoons lime juice (about 1 lime) - 1 teaspoon chili powder - 1/2 teaspoon garlic powder - 1/4 teaspoon cayenne pepper (optional, for added heat) - 2 green onions, finely chopped - Fresh cilantro, chopped (for garnish) - Lime wedges (for serving) You can swap ingredients based on your taste. For a lighter option, use Greek yogurt instead of sour cream. If you want a dairy-free version, try avocado or a vegan mayo. You can also use cotija cheese if you can't find queso fresco. For spice, add more chili powder or a dash of hot sauce. This dish is flexible and can fit many diets! When picking corn, look for bright green husks. The silk should be golden and slightly sticky. Fresh corn should feel plump and firm. Avoid any ears that look dry or have brown spots. If you can, buy corn the same day you plan to cook it. Fresh corn gives the best flavor, making your dish truly delightful! To make this dish, first, cook the corn. You can use boiling or grilling. If boiling, fill a large pot with salted water. Bring it to a boil. Add the husked corn and cook for 3-5 minutes. The corn should be tender. For grilling, heat your grill to medium. Place the corn on the grill and turn it every few minutes. Grill for about 10-12 minutes until it is charred and cooked through. Next, prepare the creamy sauce. In a medium bowl, mix together 1/2 cup of mayonnaise and 1/2 cup of sour cream. Add 2 tablespoons of lime juice, 1 teaspoon of chili powder, and 1/2 teaspoon of garlic powder. If you like heat, add 1/4 teaspoon of cayenne pepper. Stir until the mixture is smooth and creamy. Once the corn cools, cut the kernels off the cob. Stand each ear upright on a cutting board. Use a sharp knife to slice down the cob. Be careful to cut the kernels off cleanly. After that, combine the corn kernels with the sauce in a large bowl. Mix well to coat all the corn. Next, fold in 1 cup of crumbled queso fresco and 2 chopped green onions. Stir gently so the cheese and onions spread throughout the corn. Finally, transfer the mixture to a serving dish. Garnish with more queso fresco and fresh cilantro. Serve with lime wedges for extra flavor. Both boiling and grilling methods work well for this dish. Boiling gives you tender corn quickly. However, grilling adds a nice smoky flavor. It also gives the corn beautiful char marks. Choose the method that fits your taste and time. You can even use both! Cutting corn off the cob can be tricky. Use a sharp knife for the best results. Hold the cob upright on a cutting board. Cut downwards, letting the kernels fall into a bowl. If you want less mess, place a clean kitchen towel under the cob. It catches the kernels as you cut. This way, you keep your workspace clean! To make the best creamy sauce, start with quality ingredients. Mix the mayonnaise and sour cream well. Adding lime juice brightens the flavor. Use fresh lime juice for the best taste. For a richer sauce, consider using Greek yogurt instead of sour cream. This adds a nice tang. Make sure to mix until the sauce is smooth. A creamy sauce makes every bite delicious. One common mistake is overcooking the corn. If you cook it too long, corn can become tough. Keep an eye on the cooking time. Aim for a tender but crisp texture. Another mistake is not cutting the corn off the cob properly. Use a sharp knife and cut downwards. Be careful to avoid injury. Lastly, don’t skip the lime juice. It adds vital flavor that balances the dish. To boost flavors, use a mix of spices. Chili powder adds warmth and depth. Garlic powder gives a nice savory touch. If you like heat, cayenne pepper is a great choice. Fresh herbs like cilantro brighten the dish. You can also try adding a pinch of smoked paprika for a smoky flavor. These small additions make a big difference in taste. {{image_2}} Want to add some heat? Try making spicy Mexican street corn off the cob. You can achieve this by simply adding more cayenne pepper. Start with 1/2 teaspoon. Mix it into the creamy sauce. If you want it even hotter, increase the amount to 1 teaspoon. Another great option is to add chopped jalapeños. They bring fresh heat and a nice crunch. You can easily make this dish vegetarian or vegan. For a vegan version, swap the mayonnaise and sour cream for vegan alternatives. Look for cashew-based or coconut-based products. These options provide creaminess without dairy. You can also use nutritional yeast to add that cheesy flavor. This way, everyone can enjoy the delight of street corn! Cheese adds great flavor to this dish. While queso fresco is traditional, feel free to explore. Try feta, cotija, or even a sharp cheddar. Each cheese brings its unique taste. You can also add fresh herbs. Cilantro is a classic choice, but chives or parsley work well too. Mixing in these flavors can turn your street corn into a gourmet dish. For the full recipe, check out the details above. To keep your Mexican street corn fresh, store leftovers in an airtight container. Place the corn in the fridge right after serving. It will stay good for about 3 days. If you notice any changes in smell or texture, it’s best to toss it. If you want to save the dish for later, freezing is a great option. First, let the corn cool completely. Then, scoop it into freezer-safe bags or containers. Remove as much air as possible before sealing. It can last up to 3 months in the freezer. When you are ready to eat it, just thaw it in the fridge overnight. To reheat, you can use the stove or microwave. If using the stove, heat it in a pan over low heat. Stir until warmed through. If using a microwave, place it in a bowl and cover it with a damp paper towel. Heat in short bursts, stirring in between until hot. Avoid overheating, as it can dry out. For more delicious ideas, check out the Full Recipe I shared earlier! The best way to cook corn for this recipe is to boil or grill it. Boiling gives the corn a tender bite. To boil, bring salted water to a boil. Add the corn and cook for 3-5 minutes. If you love a smoky flavor, grilling is great! Grill the corn on medium heat for 10-12 minutes. Turn the ears often to get those nice char marks. Yes, you can use frozen corn instead of fresh corn. Frozen corn is a quick option and is often sweet. Just thaw it before mixing it into the dish. You may want to sauté it in a skillet for a few minutes to warm it up. This helps bring out its flavor, making the dish just as tasty as using fresh corn. You can easily make this dish ahead of time. Cook the corn and prepare the creamy sauce as directed. Mix everything together, but wait to add the cheese and green onions. Store the mixture in the fridge. When ready to serve, fold in the cheese and onions. This keeps them fresh and crunchy. Enjoy your classic Mexican street corn off the cob delightfully! Check the Full Recipe for detailed steps. We covered a lot today, from choosing fresh corn to cooking methods. You learned how to make a creamy sauce and avoid common mistakes. I provided you with fun variations to try, like spicy street corn. I also shared tips for storing leftovers and reheating them. Remember, simple steps can lead to tasty meals. Embrace your creativity in cooking, and enjoy the delicious results!

Have you ever craved the vibrant taste of classic Mexican street corn but wanted it easier to enjoy? This blog post, Classic Mexican Street Corn Off the Cob Delightful Dish, …

Read more

Categories Appetizers
Older posts
Newer posts
← Previous Page1 … Page57 Page58 Page59 … Page100 Next →

TOASTED RECIPES

Where ideas are warm, crisp, and ready to serve! 🍞

PAGES

Home About Contact Privacy Policy Terms & Conditions Cookie Policy GDPR Policy Copyright Policy Disclaimer

CATEGORIES

Appetizers Desserts Salads Breakfast Dinner

Contact

  • Pinterest
  • Mail
Copyright © 2025 Toasted Recipes. All rights reserved.