Skip to content
toastedrecipes.com
  • Home
  • Appetizers
  • Desserts
  • Salads
  • Breakfast
  • Dinner
  • Privacy Policy
  • Contact
  • About

Chef Theo

Air Fryer Buffalo Cauliflower Crispy and Flavorful Treat

June 13, 2025 by Chef Theo
- 1 head of cauliflower, cut into bite-sized florets - 1 cup all-purpose flour - 1 teaspoon garlic powder - 1 teaspoon onion powder - 1 teaspoon smoked paprika - 1 teaspoon salt - ½ teaspoon black pepper - 1 cup water (or plant-based milk for a creamier texture) - ½ cup hot sauce (like Frank’s RedHot) - 2 tablespoons unsalted butter or olive oil, melted - Fresh parsley or cilantro, for garnish To make Air Fryer Buffalo Cauliflower, you need fresh and simple ingredients. Start with one head of cauliflower. Cut it into bite-sized florets. This helps in cooking them evenly. Next, gather your dry ingredients. You will need one cup of all-purpose flour. Add in one teaspoon each of garlic powder, onion powder, smoked paprika, salt, and half a teaspoon of black pepper. These spices create a flavorful batter. For a creamier texture, use one cup of water or plant-based milk. This choice can change the taste slightly, so you can choose what suits you. You will also need half a cup of hot sauce. Frank’s RedHot is a popular choice. It gives that classic buffalo flavor. Finally, two tablespoons of melted unsalted butter or olive oil will mix with the hot sauce. This adds richness to the dish. Don't forget fresh parsley or cilantro for garnish. It adds a nice touch to the presentation. With all these ingredients ready, you can start making this crispy treat. For the full recipe, check out the detailed steps. - Preheat the air fryer to 400°F (200°C). - In a bowl, whisk together the flour, garlic powder, onion powder, smoked paprika, salt, and black pepper. - Gradually add water or plant-based milk. Stir until the batter is smooth and thick enough to coat the cauliflower florets. - Dip each cauliflower floret into the batter, making sure it is fully coated. Shake off any excess batter. - Place the battered florets in a single layer in the air fryer basket. You may need to work in batches if necessary. - Air fry for 12-15 minutes. Shake the basket halfway through to ensure even cooking. Look for a golden brown color and crispy texture. - In a small bowl, mix the hot sauce with melted butter or olive oil to create the buffalo sauce. - Once the cauliflower is done, carefully remove it from the air fryer. Toss it in the buffalo sauce until well coated. - Return the coated cauliflower to the air fryer. Cook for an additional 2-3 minutes to achieve extra crunch. For the full recipe, check out the details above. Enjoy your crispy and flavorful treat! To get that perfect crispy texture, coat each cauliflower floret evenly. Use a good amount of batter, but shake off extra. This helps avoid soggy bits. Make sure your air fryer is hot enough before cooking. The heat makes a big difference in crispiness. Air fryers can vary a lot. Some might cook faster than others. Start with the suggested 12-15 minutes. Check your cauliflower halfway through. Look for a golden color. If it needs more time, add a few minutes. Always trust your eyes! When serving, present the buffalo cauliflower on a nice platter. Add celery sticks for crunch. Pair it with ranch or blue cheese dressing for dipping. This adds more flavor and fun to your meal. For the full recipe, check back to see how simple it is! {{image_2}} If you're looking for gluten-free options, use almond flour or chickpea flour instead of all-purpose flour. These swaps keep the dish tasty and friendly for those with gluten sensitivities. For a vegan twist, replace the butter with olive oil and use plant-based milk in the batter. This change keeps the flavors rich while catering to your vegan friends. To amp up the taste, consider adding herbs like thyme or oregano to the batter. You can also sprinkle in some cayenne for an extra kick. Want to play with heat? Try different hot sauces like Sriracha or a smoky chipotle sauce. Each sauce brings its unique flavor, making the dish your own. Get creative with how you serve this dish! You can turn the buffalo cauliflower into a wrap by adding it to a tortilla with greens and a drizzle of ranch. Tacos are another fun option. Just place the cauliflower in taco shells, add toppings like avocado and cilantro, and you have a delicious meal. You can also toss it on a salad for a crunchy, spicy twist. For the full recipe, check out the directions and tips above! To keep your fried cauliflower fresh, store it in an airtight container. If you have extra, you can refrigerate it for up to three days. For longer storage, freeze it in a freezer-safe bag. When stored this way, it lasts for about three months. To reheat, the best method is to use your air fryer again. Set it to 350°F (175°C) and heat for about 5-7 minutes. This keeps the cauliflower crispy. Avoid using the microwave, as it can make the cauliflower soggy. If you must use the microwave, heat it in short bursts and check often. Enjoy your tasty treat! Yes, you can use frozen cauliflower. Here’s how: - Thaw the florets: Let them sit out or use the microwave. - Pat dry: Remove excess moisture with a paper towel. This helps the batter stick. - Coat as usual: Follow the same steps as fresh cauliflower. Using frozen cauliflower may change the texture slightly, but it still tastes great. To add more heat, consider these tips: - Extra hot sauce: Mix more hot sauce into your batter or buffalo sauce. - Chili powder: Add a teaspoon of chili powder to the dry mix. - Cayenne pepper: Sprinkle some cayenne pepper into the batter or sauce for a kick. These options can really amp up the flavor of your dish. Air Fryer Buffalo Cauliflower is a tasty and healthy option. Here's a basic breakdown: - Calories: Around 150 per serving. - Protein: About 5 grams. - Fiber: Roughly 3 grams. - Vitamins: Rich in vitamins C and K. This dish provides a healthy dose of nutrients while satisfying your cravings. Check the Full Recipe for detailed ingredients and cooking methods. In this article, we explored making Air Fryer Buffalo Cauliflower. We covered the essential ingredients, easy step-by-step instructions, and helpful tips for crispiness. You also learned about variations and storage methods. This dish is healthy, tasty, and easy to prepare. Whether you prefer spicy or mild, you can customize it your way. Enjoy your cooking, and don’t hesitate to share your own twists!

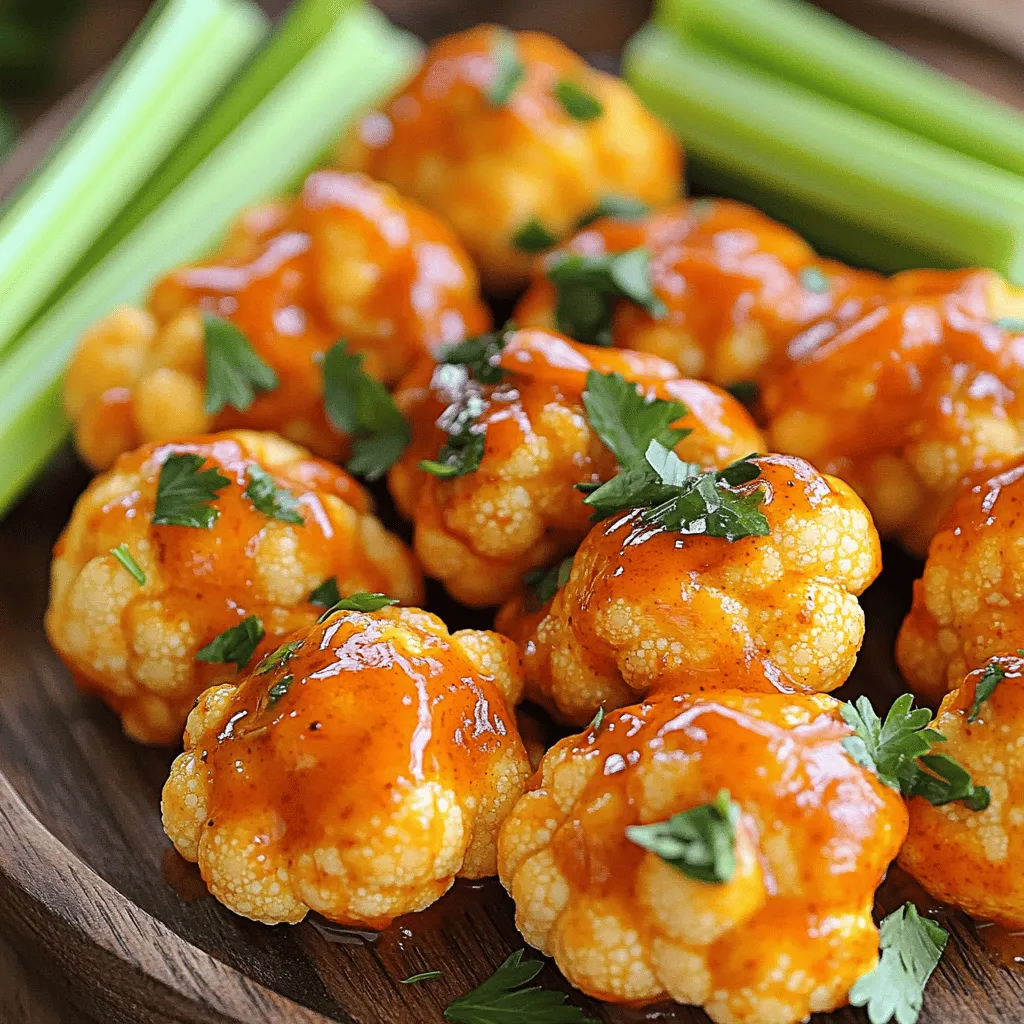
Craving a delicious snack that’s both crispy and packed with flavor? Look no further! My Air Fryer Buffalo Cauliflower recipe transforms ordinary cauliflower into a spicy, savory treat that will …

Read more

Categories Appetizers

Fruit Salsa with Cinnamon Sugar Tortilla Chips Delight

June 13, 2025 by Chef Theo
For the fruity salsa, I like to use a mix of fresh fruits. You can choose any of your favorites! Here’s what I suggest: - 2 cups mixed fresh fruits (like strawberries, kiwi, pineapple, and blueberries), diced - 1 tablespoon fresh mint, chopped These fruits add color and taste. The mint gives a fresh touch that brightens the dish! To make the cinnamon sugar tortilla chips, you will need: - 4 flour tortillas - 2 tablespoons melted butter The tortillas become crispy and sweet. The butter helps the cinnamon sugar stick well. For the salsa, these ingredients boost the flavors: - 1 tablespoon honey (or agave syrup) - 1 tablespoon lime juice - 1/4 teaspoon ground cinnamon - 1 tablespoon sugar Honey adds sweetness, while lime juice offers a zesty kick. The ground cinnamon and sugar blend adds a sweet, warm touch to your chips. For the full recipe, check out the instructions above! To start, gather your fresh fruits. I love using strawberries, kiwi, pineapple, and blueberries. You need about 2 cups of diced mixed fruits. Next, chop 1 tablespoon of fresh mint. This adds a nice touch. In a medium bowl, combine the diced fruits, mint, 1 tablespoon of honey or agave syrup, and 1 tablespoon of lime juice. Toss gently to mix everything well. Let it sit for a few minutes. This helps the flavors blend together beautifully. While the salsa sits, preheat your oven to 350°F (175°C). In a small bowl, mix 1 tablespoon of sugar with 1/4 teaspoon of ground cinnamon. This is your cinnamon sugar. Take 4 flour tortillas and brush one side with 2 tablespoons of melted butter. Sprinkle the cinnamon sugar mixture on the buttered side. Cut each tortilla into triangles. Place them on a baking sheet, cinnamon sugar side up. Bake for about 10 to 12 minutes. They should turn golden brown and crispy. Now that everything is ready, it’s time to serve. Carefully remove the tortilla chips from the oven and let them cool for a moment. Grab a lovely bowl and scoop the fruity salsa into it. Arrange the crispy cinnamon sugar tortilla chips around the salsa. This dish looks great and tastes even better! Enjoy this delightful treat with friends and family. For the full recipe, refer to the earlier section. Choosing the right fruits makes your salsa shine. Look for ripe, fresh fruits. They should feel firm but not hard. The colors should be bright and vibrant. For this salsa, I love using strawberries, kiwi, pineapple, and blueberries. - Strawberries: Pick ones that are deep red and smell sweet. - Kiwi: Look for fruits that are slightly soft when you press them. - Pineapple: Choose a pineapple with a sweet scent. The skin should be golden. - Blueberries: Select plump blueberries with a deep blue color. Mixing different fruits gives your dish a nice contrast in flavors and textures. The right mix of cinnamon and sugar makes your tortilla chips special. Here’s how to get it just right. Use a 1:4 ratio of cinnamon to sugar. For every tablespoon of sugar, add about 1/4 teaspoon of cinnamon. This mix gives a sweet and warm flavor without being too overpowering. - Adjust the cinnamon if you want a bolder taste. - Sprinkle it evenly on the buttered tortillas. This ensures every bite is tasty. Serving your fruit salsa can be fun and creative. Here are some ideas: - Place the salsa in a bright bowl to make it pop. - Use small cups for individual servings. This makes it easy for guests to grab. - Pair with whipped cream or yogurt for a creamy twist. - Add a few mint leaves on top for a fresh look. For a full recipe, check out the Fruity Fiesta Salsa. It’s a delightful treat that everyone will love! {{image_2}} You can switch up the fruits in the salsa. Try using peaches, mangoes, or raspberries. Each fruit brings its own taste. For a twist, add some citrus like oranges or grapefruit. Mix and match to find your favorite combo! While cinnamon sugar is tasty, you can try other spices. A pinch of chili powder adds heat. For a savory taste, sprinkle garlic powder or even taco seasoning. Get creative and find what you like best. The spice can change the whole flavor! To make this dish vegan, swap honey for agave syrup. Use corn tortillas instead of flour for a gluten-free choice. This way, everyone can enjoy the yummy flavors. Don’t forget, the full recipe is easy to follow and adaptable for all diets! To store leftover fruit salsa, place it in an airtight container. Keep it in the fridge for up to three days. If you see any browning, that's normal for some fruits. Just stir it gently before serving it again. Avoid freezing fruit salsa, as it can change the texture. Store your tortilla chips in a cool, dry place. Use an airtight container to keep them crisp. They can last for about a week if stored properly. If you want to keep them longer, consider placing them in the fridge. They lose their crunch when exposed to air. I recommend glass containers or BPA-free plastic ones. They seal tightly and prevent air from getting in. Mason jars also work well for small amounts. Make sure the containers are clean and dry before adding your salsa or chips. This simple step helps keep everything fresh and tasty. For the Full Recipe, check out the main article. Yes, you can make the fruit salsa ahead of time. Just prepare it a few hours before serving. This helps the flavors mix well. Store the salsa in an airtight container in the fridge. It will stay fresh for up to two days. Just remember, some fruits may get mushy after a while. I suggest adding softer fruits, like strawberries, just before serving. If you need a substitute for honey, try agave syrup or maple syrup. Both of these options work well. You can also use a sugar alternative if you want to reduce sugar. Just keep in mind the sweetness level may change. Make sure to taste and adjust as needed. If you want a sugar-free option, use mashed banana. It adds a nice flavor and sweetness. To make your tortilla chips extra crispy, follow these tips. First, brush the tortillas with melted butter evenly. This helps them crisp up in the oven. Next, cut the tortillas into smaller triangles. Smaller pieces tend to bake more evenly. Bake them at 350°F (175°C) until they turn golden brown. Keep an eye on them, as they can burn quickly. Finally, let them cool on a wire rack. This keeps air circulation and helps them stay crispy. For the full recipe, check the details above. This blog post covered how to make a delicious fruit salsa and cinnamon sugar tortilla chips. We discussed key ingredients, easy steps, and tips for the best results. You learned how to pick fresh fruits and balance flavors. Remember, there are many variations you can try, making it fun and unique. Don’t forget how to store leftovers safely! With these basics, you can impress anyone with your snacks. Enjoy creating this tasty dish, and make it your own!

Dive into a world of flavor with my Fruit Salsa with Cinnamon Sugar Tortilla Chips Delight! This easy and fun recipe will make your taste buds sing. I’ll guide you …

Read more

Categories Appetizers

Fiery Chicken Ramen with Creamy Garlic Sauce Delight

June 11, 2025 by Chef Theo
- 2 boneless chicken thighs - 2 packs of instant ramen noodles - 4 cups chicken broth - 2 tablespoons soy sauce - 1 tablespoon sesame oil - 1 tablespoon chili paste - 1 cup baby spinach - 2 green onions, chopped - 1 soft-boiled egg for garnish Gathering these ingredients is the first step to making your fiery chicken ramen. The chicken thighs provide rich flavor and tenderness. Instant ramen noodles cook quickly, making this dish fast and easy. Chicken broth gives the soup a warm base, while soy sauce, sesame oil, and chili paste add depth and heat. Including fresh baby spinach and green onions brings color and nutrition to your meal. The soft-boiled egg on top not only looks nice but also adds creaminess. You can find the complete recipe for this dish in the Full Recipe section, which will guide you through each step. Enjoy making this vibrant and spicy ramen! To start, slice the boneless chicken thighs into bite-sized pieces. In a bowl, mix soy sauce, sesame oil, chili paste, and grated ginger. Add the chicken to this mixture and stir well. Let the chicken sit for at least 15 minutes. This step helps the chicken soak up all the yummy flavors. Next, heat a large pot over medium-high heat. Add a splash of sesame oil. Once hot, throw in the marinated chicken. Cook for about 5 to 7 minutes. You want the chicken to turn golden brown and be fully cooked. Once done, take it out of the pot and set it aside. In the same pot, add minced garlic. Sauté it for 1 to 2 minutes. Keep an eye on it so it doesn’t burn. You want it to smell really good and become fragrant. Now, pour in the chicken broth. Bring it to a full boil. This will create a rich and tasty base for your ramen. When the broth starts boiling, add the ramen noodles. Follow the package instructions for cooking time, usually about 3 to 4 minutes. Stir gently to prevent sticking. Next, take the cornstarch mixed with water and pour it into the broth. Stir this mixture continuously for 2 minutes. This will help thicken the broth just right. It’s time for the final steps! Add the cooked chicken back into the pot. Toss in the baby spinach and stir until it wilts, which takes about a minute. Taste and adjust with salt and pepper if needed. Now, divide the ramen into bowls. Top each with a soft-boiled egg, chopped green onions, and a sprinkle of sesame seeds for that extra touch. Enjoy your Fiery Chicken Ramen with Creamy Garlic Sauce! For the full recipe, check the earlier section. Adjusting Spice Levels To make this dish just right for you, play with the chili paste. If you like more heat, add more. If you prefer less spice, cut back on the chili paste. You can also use milder sauces or fresh herbs. This helps you find your perfect balance of heat. Importance of Marinating Marinating the chicken is key. It adds deep flavor and keeps the meat juicy. Mix soy sauce, sesame oil, chili paste, and ginger. Let the chicken soak in these tasty flavors for at least 15 minutes. This small step makes a big difference in taste. Ensuring the Chicken is Tender Cook the marinated chicken over medium-high heat. This method ensures it browns nicely without drying out. Stir it often for even cooking. The chicken should be golden brown and fully cooked in about 5-7 minutes. How to Make Perfectly Soft-Boiled Eggs For the soft-boiled egg, boil water and gently add the eggs. Cook them for exactly 6-7 minutes. After cooking, place them in ice water to stop the cooking. This technique gives you a creamy yolk that pairs well with ramen. Tips for Garnishing Garnishing adds beauty to your dish. Use chopped green onions and sesame seeds for a pop of color. A soft-boiled egg on top looks stunning too. Don't forget to add some baby spinach for freshness. Serving Suggestions Serve your ramen hot in deep bowls. This keeps it warm longer. Offer extra chili paste on the side for spice lovers. You can also serve it with crunchy vegetables for a nice crunch. For the full recipe, visit the [Full Recipe]. {{image_2}} Alternative Proteins You can swap chicken for shrimp, tofu, or beef. Shrimp cooks fast and adds a sweet flavor. Tofu is great for a plant-based meal. Beef gives a rich taste, but it takes longer to cook. Vegetables to Add Feel free to mix in vegetables. Try mushrooms for a meaty bite. Carrots add sweetness and crunch. Broccoli boosts nutrition and color. Snow peas offer a fresh crunch. Making it Gluten-Free Use gluten-free ramen noodles. Check the soy sauce for gluten-free options. This way, everyone can enjoy the dish. Vegan Options For a vegan broth, use vegetable stock. Replace chicken with tofu or tempeh. Add a splash of soy sauce for flavor. This keeps the dish tasty and friendly for all diets. Mild Versions To make it mild, reduce or skip the chili paste. Use sweet soy sauce instead for flavor. The dish still tastes great without the heat. Adding Extra Heat Want more spice? Add more chili paste or fresh chilies. You can also sprinkle in red pepper flakes. Adjust to your heat level, and enjoy the fiery kick! For the complete cooking experience, check the Full Recipe for step-by-step guidance. Best Practices for Refrigeration After enjoying your Fiery Chicken Ramen, let it cool down first. Then, place it in an airtight container. This keeps the flavors fresh and prevents drying out. Store it in the fridge for up to three days. Freezing Tips If you want to save some for later, freezing works well too. Divide the ramen into portions before freezing. Use freezer-safe bags or containers. This keeps the ramen good for up to three months. Just remember to label them with dates. How to Reheat Ramen without Losing Flavor To reheat ramen, use a pot on the stove. Add a splash of water or broth to keep it moist. Heat over medium-low until it warms up, stirring gently. This method helps maintain the taste and texture. Avoiding Soggy Noodles To avoid soggy noodles, do not overheat. Heat just until everything is warm. If noodles start to break apart, they’ve been heated too long. Keep an eye on them while reheating. It takes about 30 minutes to make Fiery Chicken Ramen from start to finish. - Prep Time: 15 minutes - Cooking Time: 15 minutes This quick cooking time makes it ideal for busy weeknights. You can have a tasty meal ready in no time. Yes, you can make this dish in advance. - Storage Tips for Meal Prep: - Store the ramen and broth separately. - Keep cooked chicken in an airtight container for up to 3 days. - Reheat the broth and noodles together for best flavor. This way, you can enjoy a delicious meal throughout the week. You can easily swap out the chicken for other proteins. - Alternative Proteins and Vegan Options: - Tofu works great for a vegan option. - Shrimp or pork can also be used. - For a vegetarian twist, add mushrooms or tempeh. These options keep the dish tasty and fun while catering to different diets. The spice level can vary based on your preference. - Adjusting the Spice Level: - Use less chili paste for a milder dish. - Add extra chili paste if you enjoy more heat. - You can also use fresh chili peppers for a fresh kick. This flexibility makes it easy for everyone to enjoy the dish. Fiery Chicken Ramen is a tasty dish that brings heat and flavor to your table. You learned about the main ingredients, flavor enhancers, and fresh elements that make this recipe shine. I shared tips for cooking tender chicken and perfectly soft-boiled eggs. You can customize the broth and spice level to fit your taste. Don't forget how to store and reheat your leftovers. Now, you can make this ramen your own. Enjoy experimenting with flavors and enjoy a warm bowl today!

Spice things up with my Fiery Chicken Ramen with Creamy Garlic Sauce! This easy recipe combines tender chicken, rich broth, and tasty toppings for a dish that warms you up. …

Read more

Categories Dinner

Baked Feta Pasta Easy and Flavorful Recipe Guide

June 11, 2025 by Chef Theo
To make baked feta pasta, gather these simple ingredients: - 200g pasta of choice - 200g block of feta cheese - 300g cherry tomatoes - 4 cloves garlic - 3 tablespoons olive oil - 1 teaspoon dried oregano - Salt and pepper - Fresh basil leaves - Zest of 1 lemon (optional) These ingredients create a flavorful dish that is easy to prepare. You can use any pasta you like, but penne or fusilli works best. The feta cheese adds creaminess, while the cherry tomatoes burst with flavor. Garlic, olive oil, and oregano enhance the taste of the dish. Fresh basil gives it a nice touch, and lemon zest brightens the flavors. With these ingredients, you are on your way to making a delicious meal. Don't forget, you can find the full recipe in the article! Set your oven to 200°C (400°F). This temperature helps the feta melt and the tomatoes blister. Preheating ensures even cooking. In a baking dish, mix the halved cherry tomatoes, minced garlic, and olive oil. Add one teaspoon of dried oregano, along with salt and pepper. Stir well until everything is nicely coated. Put the baking dish in the oven for 25 to 30 minutes. Watch for the tomatoes to blister and the feta to turn golden and soft. This means the dish is ready. While the feta and tomatoes bake, boil water in a pot. Add your pasta and cook according to the package instructions. You want it al dente, which means it should still have a slight bite. Drain the pasta when done and set it aside. After baking, remove the dish from the oven. Use a fork to mash the feta into the tomatoes. This creates a creamy sauce. Next, add the cooked pasta to the baking dish. Toss everything together until the pasta is well coated. For extra flavor, add lemon zest if you like. Serve hot and garnish with fresh basil leaves. For the complete guide, check out the Full Recipe. To get that creamy sauce, start by mashing the baked feta. Use a fork to break it up. This method works well because the feta mixes easily with the tomatoes. When you mash, do it gently at first. Then, mix it with the juicy tomatoes. This helps create a smooth, creamy texture that coats the pasta perfectly. If you want more creaminess, add a splash of pasta water. It helps thin the sauce while adding flavor. For this dish, I recommend using penne or fusilli. Both types hold sauce well. Penne has ridges that catch the creamy sauce nicely. Fusilli twists capture the flavor in every bite. If you want to try different pasta, choose farfalle or rigatoni. They also work great and add a fun shape to your meal. Just remember to cook the pasta until it’s al dente for the best texture. To enhance the flavor, sprinkle in some dried herbs. Oregano adds a nice touch, but you can also try thyme or basil. Fresh herbs are great too! When the dish is ready, toss in some fresh basil leaves. They brighten up the flavors. For a spicy kick, add red pepper flakes. Just a pinch can make a big difference. You can also squeeze a bit of lemon juice for extra zest. This brightens the dish and brings all the flavors together. {{image_2}} You can easily switch feta cheese for goat cheese or ricotta. Goat cheese gives a tangy twist. It melts beautifully, creating a creamy texture. Ricotta offers a rich, mild flavor. Both choices elevate the dish. Experimenting with these cheeses makes the recipe fun and versatile. Adding more vegetables can boost flavor and nutrition. Consider bell peppers, spinach, or zucchini. Roasted bell peppers add sweetness. Spinach wilts nicely, adding color and health benefits. Zucchini brings a nice crunch. Feel free to mix and match your favorites. This dish is a great way to use up leftover veggies. For those wanting protein, chicken or shrimp work well. Grilled or sautéed chicken adds heartiness. Shrimp cooks quickly and pairs great with the feta. Add them during the last few minutes of baking for best results. This makes the dish more filling and can impress your guests. Try these variations to suit your taste! For a complete guide on making this dish, check out the Full Recipe. To keep your baked feta pasta fresh, store leftovers in an airtight container. This helps prevent moisture loss and keeps flavors strong. Let the dish cool first before sealing it. Store it in the fridge for up to three days. Always label your container with the date. This helps you remember when you made it. Reheat your pasta in a skillet over low heat. Add a splash of water or olive oil to keep it moist. Stir gently to combine the sauce and pasta. You can also use a microwave. Heat in short bursts, stirring in between. This way, you avoid hot spots and keep the texture nice. If you want to freeze baked feta pasta, cool it completely first. Then, portion it into freezer-safe bags or containers. Make sure to remove as much air as possible. This helps prevent freezer burn. To thaw, move it to the fridge overnight. Reheat it gently, just like before. Avoid refreezing once it has thawed. Enjoy the creamy goodness any time! For the full recipe, check out the Baked Feta Pasta Delight. Baked Feta Pasta is a simple dish that mixes baked feta cheese with pasta. You start with a block of feta and cherry tomatoes, then bake them until soft. This dish went viral on social media for its creamy texture and rich flavor. It is easy to make and perfect for any weeknight meal. Yes, you can prepare Baked Feta Pasta ahead of time. Cook the pasta and bake the feta and tomatoes in advance. Store them in separate containers in the fridge. When you are ready to eat, just heat the tomatoes and feta, mix in the pasta, and enjoy. This helps with meal prep and saves time on busy nights. To add some heat, you can use red pepper flakes. Just sprinkle them on the tomatoes before baking. You could also add sliced jalapeños or a dash of hot sauce into the mix. These options will give your dish a nice kick without overpowering the flavors. Yes, Baked Feta Pasta is vegetarian-friendly. It contains no meat, making it a great choice for vegetarians. The dish is rich in flavor from the feta and tomatoes, so it satisfies without meat. You can enjoy it as a main course or as a side dish. This blog post covered how to make baked feta pasta. You learned about the fresh ingredients, cooking steps, and tips for the perfect dish. Remember, you can customize it with different cheeses or veggies. Proper storage and reheating also help keep your meal tasty. Experiment with flavors to find what you enjoy. Baked feta pasta is simple and packed with flavor. Now, it's time for you to try this delicious recipe and share it with others!

Are you ready to impress with a dish that’s both simple and bursting with flavor? Baked Feta Pasta is the recipe you need. With just a few key ingredients, you …

Read more

Categories Dinner

High-Protein Overnight Oats for a Healthy Start

June 11, 2025 by Chef Theo
To make high-protein overnight oats, gather these key ingredients: - 1 cup rolled oats - 1 cup unsweetened almond milk (or any milk of choice) - 1 scoop vanilla protein powder - 2 tablespoons chia seeds - 1 tablespoon almond butter - A pinch of salt These ingredients work together to create a creamy, protein-rich meal. The oats give you fiber and energy. Almond milk keeps it light and dairy-free. Protein powder boosts the protein content. Chia seeds add healthy fats and help thicken the mix. Almond butter gives it a nice nutty flavor and creaminess. A pinch of salt enhances all the tastes. You can add some optional ingredients to make your oats even better: - 2 tablespoons mini chocolate chips (dark or dairy-free) - 1 tablespoon maple syrup (optional) - Fresh berries or sliced bananas for topping Mini chocolate chips add a sweet touch. Maple syrup gives a hint of sweetness if you want more. Fresh fruits like berries or bananas make a great topping. They add color and more nutrients. Let’s look at the nutrition of these ingredients: - Rolled oats: High in fiber, help keep you full. - Almond milk: Low in calories, offers a nutty flavor. - Protein powder: Boosts protein, important for muscle health. - Chia seeds: Packed with omega-3, good for heart health. - Almond butter: Contains healthy fats, supports brain health. - Mini chocolate chips: Provide quick energy and a sweet taste. - Maple syrup: Natural sweetener, adds some vitamins. - Fresh fruits: Full of vitamins, minerals, and antioxidants. This mix not only tastes great but packs a healthy punch. You can find the full recipe above to get started! To make high-protein overnight oats, start with a medium bowl. First, combine these ingredients: - 1 cup rolled oats - 1 cup unsweetened almond milk (or your choice of milk) - 1 scoop vanilla protein powder - 2 tablespoons chia seeds - 1 tablespoon almond butter - A pinch of salt If you like it sweeter, add 1 tablespoon of maple syrup. Mix all the ingredients well. Make sure the almond butter blends smoothly. Then, gently fold in 2 tablespoons of mini chocolate chips. This adds a fun touch! Divide the mixture into two jars. Seal them and place them in the fridge overnight. When you layer your oats, add some berries or banana slices on top. This not only looks nice but adds flavor. Make sure to use airtight containers to keep them fresh. Store them in the fridge for up to five days. If you make multiple servings, consider adding toppings just before eating. This keeps them fresh and tasty! In the morning, stir your oats well. You can add a splash of almond milk for a creamier texture. Top with fresh berries or sliced bananas. You can also sprinkle nuts or seeds for extra crunch. If you want a little more sweetness, drizzle some honey or maple syrup on top. Each spoonful is packed with flavor and protein. For the complete recipe, check the Full Recipe section. To get creamy oats, focus on the right liquid ratio. I use one cup of almond milk for every cup of oats. This balance helps the oats soak up the milk well. Chia seeds also add creaminess as they swell. If you like it extra smooth, add a splash of milk before serving. A good stir makes a big difference. Customizing your oats makes breakfast fun. Try different nut butters, like peanut or cashew. Add sweeteners like honey or agave for more flavor. Fresh or dried fruits can change the taste too. Think about spices like cinnamon or vanilla for an extra kick. You can also switch the protein powder flavor, like chocolate or berry. Avoid using too little liquid; this makes the oats dry. Don't skip the soaking time; overnight is best for flavor and texture. Adding toppings too early can make them soggy. Always store your oats in airtight containers to keep them fresh. Lastly, remember to taste your mix before you refrigerate. Adjust sweetness as needed for your perfect blend. For the full recipe, check out Nutty Chocolate Chip High-Protein Overnight Oats . {{image_2}} You can switch up the protein in your oats easily. Instead of vanilla protein powder, try pea protein or hemp protein. Both are great for plant-based diets. Greek yogurt is another solid choice. It adds creaminess and boosts protein. If you want a nutty flavor, use powdered peanut butter. It gives protein and great taste without extra fat. Mixing flavors can make breakfast exciting. Try adding cocoa powder for a chocolate kick. You can also swap in different nut butters. Sunflower seed butter works well for those with nut allergies. For a fruity twist, add cinnamon and diced apples. These flavors blend well with oats and give a warm vibe. Fruits make your oats fresh and fun. In summer, use strawberries or peaches. They add sweetness and color. Fall is perfect for apples and pumpkin. These fruits bring warmth and spice. Winter months call for citrus fruits like oranges or pomegranates. They add a bright burst of flavor. Feel free to mix and match fruits based on what's in season. You’ll keep your oats interesting all year round. You can find the full recipe for Nutty Chocolate Chip High-Protein Overnight Oats in the earlier sections. To keep your high-protein overnight oats fresh, store them in airtight containers. Glass jars work great. Always seal the lids tightly. These jars help prevent spills and keep out air. This way, your oats stay delicious for longer. High-protein overnight oats last about 3 to 5 days in the fridge. After that, the oats may become too soft or sour. If you notice an off smell or color, it's best to toss them. Always check your oats before eating. You can enjoy your overnight oats cold or warm. If you prefer them warm, heat them in the microwave. Just add a splash of almond milk for moisture. Heat for about 30 seconds. Stir and check the temperature. If it’s still cool, heat for another 10 seconds. Enjoy the creamy texture that comes from the oats soaking overnight. If you prefer them cold, just grab a jar and dig in! Yes, you can skip the protein powder! Use Greek yogurt or cottage cheese instead. Both options add protein and creaminess. You can also add nuts or seeds for more protein. This way, you still enjoy a healthy meal. Experiment with different ingredients to find what you like best. Eating a high-protein breakfast helps keep you full longer. It can reduce hunger and cravings later in the day. High-protein meals also support muscle growth and repair. They can boost energy levels too. Starting your day with protein helps you focus better and improves mood. You can store overnight oats in the fridge for up to five days. Make sure they are in sealed containers. This keeps them fresh and tasty. If you notice any changes in smell or texture, it’s best to toss them. Enjoy your oats throughout the week for quick and healthy meals! High-protein overnight oats are simple to make and great for your health. We covered essential and optional ingredients, a clear step-by-step recipe, and tips for creamy oats. You learned how to store them safely and even tried fun flavor variations. High-protein breakfasts boost energy and keep you full. Enjoy customizing your oats to fit your taste. Remember, by avoiding common mistakes, you can create a delicious meal each time. Make overnight oats a regular part of your routine for easy, nutritious breakfasts.

Start your day strong with high-protein overnight oats! This quick and easy breakfast is perfect for busy mornings. Packed with essential nutrients, these oats can fuel your day. In this …

Read more

Categories Breakfast

Savory Chicken Parmesan Pillows Simple and Tasty Delight

June 11, 2025 by Chef Theo
- 2 chicken breasts, cooked and shredded - 1 cup ricotta cheese - 1 cup shredded mozzarella cheese - 1/2 cup grated Parmesan cheese - 1 teaspoon Italian seasoning - 1/2 teaspoon garlic powder - 1/4 teaspoon red pepper flakes (optional) - 1 package (2 sheets) of puff pastry, thawed - 1 egg, beaten (for egg wash) - 1 cup marinara sauce (for dipping) - Fresh basil leaves for garnish To make Chicken Parmesan Pillows, gather all the ingredients listed above. Using cooked chicken helps save time. You can use rotisserie chicken for an easy option. The mixture of ricotta, mozzarella, and Parmesan creates a creamy filling. Italian seasoning and garlic powder add great flavor. If you like a little heat, add red pepper flakes. Next, the puff pastry is key for that flaky texture. You can find it in the freezer section. Let it thaw before using. The egg wash gives the pillows a nice golden color. Lastly, have marinara sauce ready for dipping. Fresh basil leaves make a lovely garnish. This combination of ingredients creates a tasty and comforting meal. For the full recipe, check the detailed instructions and enjoy cooking! 1. Preheat your oven to 400°F (200°C). Line a baking sheet with parchment paper. This helps the pillows not stick. 2. In a mixing bowl, combine the shredded chicken, ricotta cheese, mozzarella cheese, Parmesan cheese, Italian seasoning, garlic powder, and red pepper flakes if you want some heat. Mix until blended well. 3. On a lightly floured surface, roll out the puff pastry sheets. Cut each sheet into 4 equal squares. You should have 8 squares in total. 1. Take a generous spoonful of the chicken and cheese mixture. Place it in the center of each puff pastry square. Make sure not to overfill! 2. Fold each square diagonally to form a triangle. Press down the edges to seal them tight. Use a fork to crimp the edges for a nice look. 1. Brush the tops of the pillows with the beaten egg. This gives them a lovely golden finish. 2. Bake in the preheated oven for 20-25 minutes. They should puff up and turn golden brown. Keep an eye on them! To make your Chicken Parmesan Pillows perfect, focus on the puff pastry. It should be light and flaky. Roll it out gently and keep it cold before baking. This helps it puff up nicely. If it's warm, it might not rise as well. Next, don’t skip the seasoning. The filling needs flavor. Use the Italian seasoning, garlic powder, and red pepper flakes wisely. This mix brings out the taste of the chicken and cheeses. It makes each bite flavorful and satisfying. For dips, marinara sauce is a must. It adds a rich taste that pairs well with the pillows. You can warm it up on the stove for serving. If you want to get creative, try adding a sprinkle of fresh herbs to the sauce. Garnishing can elevate your dish. Fresh basil leaves add color and a fresh taste. You can also use a sprinkle of Parmesan for extra flavor. A light drizzle of olive oil over the pillows makes them shine and look appetizing. For the full recipe, check the detailed instructions above. {{image_2}} You can easily switch up the cheeses in these pillows. If you want a creamier texture, try mascarpone instead of ricotta. For a sharper taste, swap out mozzarella for provolone. You can even mix different cheeses for a unique flavor. When it comes to protein, chicken is not your only option. Ground turkey works well if you prefer poultry. For a plant-based choice, try using shredded tofu or tempeh. These swaps keep the dish tasty while catering to different diets. Adding vegetables is a great way to boost nutrition. Spinach, chopped bell peppers, or mushrooms blend well with the chicken and cheese. Just sauté the veggies slightly before adding them to the mixture. This adds flavor and makes the pillows even healthier. If you like heat, consider adjusting the spice level. You can add more red pepper flakes or even a dash of hot sauce into the filling. This will give your pillows a bit of a kick. Experiment to find the heat level that suits your taste. Looking for more ideas? Check out the Full Recipe for even more ways to make these Chicken Parmesan Pillows your own! To keep your Chicken Parmesan Pillows fresh, place leftovers in the fridge. Use an airtight container to prevent moisture loss. Make sure they are cool before sealing. This helps keep the texture nice and tasty. Store them for up to three days. If you want to keep them longer, consider freezing. To reheat, avoid the microwave if you can. Instead, use the oven to keep the pillows crispy. Preheat the oven to 350°F (175°C). Place the pillows on a baking sheet and cover them with foil. Heat for about 15-20 minutes. You can also freeze these pillows before baking. Just wrap them well before storing. When ready, bake directly from the freezer, adding a few extra minutes to the baking time. For more detailed steps, check out the Full Recipe. Can I use frozen chicken for this recipe? Yes, you can use frozen chicken. Be sure to cook it first. Once cooked, shred it and mix it with the other ingredients. This will give you the same tasty flavor. What can I substitute for ricotta cheese? If you need a substitute for ricotta cheese, use cottage cheese. You can also try cream cheese or mascarpone. These options will still keep the pillows creamy and delicious. How do I know when the pillows are done baking? The pillows are done when they turn golden brown and puffed up. You can check them at 20 minutes. If they need more time, let them bake a little longer. Can I make the filling ahead of time? Yes, you can make the filling ahead of time. Store it in the fridge for up to 24 hours. Just mix it with the puff pastry when you are ready to bake. What sides pair well with Chicken Parmesan Pillows? Some great sides are a fresh salad or steamed veggies. Garlic bread also complements the pillows nicely. These sides will add flavor and texture to your meal. Are these pillows suitable for meal prep? Yes, these pillows are perfect for meal prep. You can make a batch and store them in the fridge. They also freeze well, making them easy to reheat later. Check the full recipe for more details on storage! You now know how to make Chicken Parmesan Pillows. We covered key ingredients, step-by-step prep, and baking tips. You also learned about variations, storage, and answers to common questions. These pillows bring fun and easy flavor to your table. They suit any meal or gathering. Try different ingredients to make this dish your own. Enjoy every bite!

Looking for an easy and delicious treat? These Chicken Parmesan Pillows combine savory chicken, creamy cheeses, and crispy puff pastry. Perfect as a snack, appetizer, or main dish, they are …

Read more

Categories Appetizers

Bang Bang Chicken Bowl Flavorful and Nutritious Meal

June 11, 2025 by Chef Theo
Creating a Bang Bang Chicken Bowl is simple and fun. Here’s what you need: - 2 chicken breasts, diced - 1 cup cooked jasmine rice - 1 cup broccoli florets - 1 red bell pepper, sliced - 1 carrot, julienned - 1 avocado, sliced - 3 green onions, chopped - 1/4 cup mayonnaise - 1-2 tablespoons sriracha (adjust for spice level) - 1 tablespoon honey - 1 teaspoon garlic powder - 1 teaspoon onion powder - Salt and pepper to taste - Sesame seeds for garnish Each ingredient brings its own flavor and nutrients. The chicken fills you up while the vegetables add color and crunch. The sauce ties it all together with a spicy, creamy kick. This dish is not just tasty; it’s good for you too! You can find the full recipe to guide you through the steps. Enjoy every bite! Start by cooking jasmine rice according to the package instructions. This rice is fluffy and fragrant, making it a perfect base for the bowl. Once the rice is done, set it aside and keep it warm. This will help it stay nice and soft for assembly. In a small bowl, combine the following ingredients for the bang bang sauce: - 1/4 cup mayonnaise - 1-2 tablespoons sriracha (adjust for your spice level) - 1 tablespoon honey - 1 teaspoon garlic powder - 1 teaspoon onion powder - Salt and pepper to taste Mix the ingredients well until smooth. This sauce adds a creamy, spicy kick to your dish. Heat a tablespoon of oil in a large skillet over medium heat. Season the diced chicken breasts with salt and pepper. Add the chicken to the skillet and cook it for about 5-7 minutes. The chicken should turn golden brown and be cooked through. This step is key for juicy, flavorful chicken. While the chicken cooks, bring a pot of water to a boil. Add the broccoli florets, sliced red bell pepper, and julienned carrots. Blanch the vegetables for 2-3 minutes until they are vibrant and slightly tender. After blanching, drain the vegetables and transfer them to an ice bath. This stops the cooking process and keeps their bright colors. In serving bowls, start with a layer of warm jasmine rice. Top it with the cooked chicken, blanched vegetables, and sliced avocado. Drizzle the prepared bang bang sauce generously over everything. This creates a beautiful and tasty meal. Finish by sprinkling chopped green onions and sesame seeds over the bowls. This adds a nice crunch and extra flavor to the dish. Enjoy your colorful and nutritious Bang Bang Chicken Bowl! For the full recipe, check the link. To achieve juicy and tender chicken, always start with fresh meat. Cut the chicken into uniform pieces. This helps it cook evenly. Season your chicken with salt and pepper before cooking. Use a meat thermometer to check for doneness. The internal temperature should reach 165°F (75°C). This ensures your chicken is safe to eat and stays moist. You can easily adjust the spice levels in the bang bang sauce. If you like it hot, add more sriracha. If you prefer it milder, reduce the sriracha. You can also substitute mayonnaise with Greek yogurt for a lighter option. This change adds creaminess and a tangy flavor. Feel free to mix in other spices like paprika or cayenne for extra kick. Arranging your ingredients can be fun and creative. Use colorful vegetables like red bell pepper and green broccoli for a vibrant look. Place the ingredients in layers for a nice visual effect. Don’t forget to add lime slices on the side. This adds a fresh twist and brightens the dish. A well-presented bowl makes every meal feel special. {{image_2}} If you want a change from chicken, you can use shrimp or tofu. Shrimp cooks quickly and adds a sweet flavor. Just sauté it until pink. Tofu is a great plant-based choice. Press it to remove excess water, then cube and fry until golden. Both options make the bowl tasty and fun. You can switch up the rice for different flavors and health benefits. Brown rice adds a nutty taste and more fiber. Cauliflower rice is a low-carb option that packs in nutrients. Just sauté the cauliflower until tender. Both options work well with the sauce and toppings. Adding extra toppings makes your Bang Bang Chicken Bowl even better. You can sprinkle nuts or seeds for crunch. Chopped peanuts or sunflower seeds add a nice touch. You can also toss in more veggies like snap peas or radishes for color and nutrients. Mix and match to suit your taste! To keep your Bang Bang Chicken Bowl fresh, store everything in airtight containers. Place the chicken, rice, and veggies in one container, and store the sauce separately. This keeps the sauce from making the rice soggy. Refrigerate the leftovers within two hours of cooking to ensure safety. When you’re ready to enjoy your leftovers, reheat them in a skillet over low heat. This method keeps the chicken juicy and the veggies crisp. Stir gently until everything is warmed through. If using a microwave, cover with a damp paper towel to retain moisture. Heat in short bursts to avoid overcooking. If you want to save some for later, freeze the chicken and veggies separately from the rice and sauce. Use freezer-safe bags or containers. This way, you can enjoy a fresh meal later. When ready to eat, thaw in the fridge overnight and reheat as mentioned above. A Bang Bang Chicken Bowl is a tasty dish loaded with flavors. It features tender chicken, fresh veggies, and a spicy sauce. The dish has a mix of sweet, spicy, and creamy tastes. You will love the crunch from the veggies and the richness of the sauce. Yes, you can easily make it vegetarian. Swap out chicken for tofu or chickpeas. Use the same bang bang sauce for flavor. You can also add more veggies like zucchini or mushrooms for extra taste. A Bang Bang Chicken Bowl has about 500 calories per serving. This can vary based on ingredients and portion sizes. It has protein from the chicken, healthy fats from the avocado, and fiber from the veggies. This dish is a balanced meal. Serve the bowl warm for the best taste. Start with a base of jasmine rice. Layer the chicken and veggies on top. Drizzle with the bang bang sauce for a nice finish. You can garnish with sesame seeds and green onions for added flavor. To adjust the spice level, change the amount of sriracha in the sauce. Start with one tablespoon for mild heat. Add more if you like it spicier. You can also mix in some honey to balance the heat with sweetness. This blog post covered how to create a delicious Bang Bang Chicken Bowl. We explored the key ingredients and provided step-by-step instructions. You learned how to cook perfect chicken, make a flavorful sauce, and assemble your bowl like a pro. You can customize your dish easily and store leftovers without hassle. Enjoy experimenting with different proteins and rice options. This bowl is not just a meal; it’s a chance to enjoy vibrant flavors and colors. Get ready to impress your friends and family with your tasty creation!

Looking for a meal that’s both tasty and healthy? The Bang Bang Chicken Bowl is your answer! This dish packs flavor and nutrition into one vibrant bowl, making it perfect …

Read more

Categories Dinner

Protein Oreo Fluff Dessert Dreamy and Simple Treat

June 11, 2025 by Chef Theo
- 1 cup vanilla protein powder - 1 cup Greek yogurt - 1 cup whipped topping (light or regular) - 1 cup crushed Oreo cookies (plus extra for garnish) - 2 tablespoons cocoa powder - 2 tablespoons honey or maple syrup (optional for sweetness) - 1 teaspoon vanilla extract - A pinch of salt To make the Protein Oreo Fluff Dessert, you need simple ingredients. The vanilla protein powder gives it a tasty boost. Greek yogurt adds creaminess and protein. Whipped topping adds lightness, while crushed Oreo cookies bring delightful crunch. Cocoa powder adds rich chocolate flavor. You can sweeten it with honey or maple syrup if you like. A dash of vanilla extract brightens the taste, and a pinch of salt balances the sweetness. - Calories per serving: About 200 calories - Protein content: 20 grams - Sugar content: 10 grams - Fat content: 6 grams This dessert is not just tasty; it packs a protein punch too! Each serving has around 20 grams of protein. It also contains about 200 calories, making it a great treat without too many calories. The sugars come mainly from the yogurt and cookies, keeping it sweet but not too sweet. The fat content is moderate, making it a balanced delight. Mixing ingredients Start by grabbing a large mixing bowl. Add 1 cup of vanilla protein powder, 1 cup of Greek yogurt, 1 cup of whipped topping, and 2 tablespoons of cocoa powder. If you like it sweeter, add 2 tablespoons of honey or maple syrup. Don't forget 1 teaspoon of vanilla extract and a pinch of salt. Blending until smooth Use a hand mixer or a whisk to blend the mix. You want it smooth and creamy. Make sure there are no lumps. This step takes just a minute or two. Folding in crushed Oreos Now, gently fold in 1 cup of crushed Oreo cookies. Be careful not to overmix. You want some crunchy bits for texture. This makes the dessert extra special. How to transfer to serving dish Once everything is mixed, transfer the fluff into a serving dish or individual cups. Smooth the top with a spatula for a nice finish. This makes it look good and ready to eat. Refrigeration time Cover the dish with plastic wrap or a lid. Place it in the fridge for at least 1 hour. This helps the flavors blend together. Plus, it gives the fluff time to set. When it's ready, you can garnish with extra crushed Oreos for a tasty touch. For the complete recipe, check out the Full Recipe section! Adjusting sweetness Taste is key! After mixing, try a small spoonful. If it’s not sweet enough, add a bit of honey or maple syrup. A little can go a long way. Make sure to blend well after each addition. This helps you find the perfect balance without overpowering the Oreo flavor. Achieving the right consistency You want the fluff to be creamy but still thick. If it seems too thick, add a touch of Greek yogurt. If it feels too runny, mix in a bit more protein powder. Gently fold ingredients together, so you don't lose that light texture. Creative serving ideas This dessert looks great in cups or bowls. You can layer it with extra crushed Oreos for a fun twist. Try adding colorful sprinkles or fruit on top for a pop of color. Serve it at parties for a crowd-pleaser, or enjoy it as a cozy snack at home. Pairing with other desserts Protein Oreo Fluff can be a fantastic side to fruit salad or brownies. The creamy fluffiness complements the chewy texture of brownies well. You can also serve it with cookies or even a scoop of ice cream for a special treat. The options are endless! {{image_2}} You can make this dessert even better for you. Try using low-sugar Oreos. They cut down on calories and sugar, but keep the flavor. You can also switch to dairy-free yogurt and whipped topping. Almond or coconut yogurt works well. This way, everyone can enjoy it, no matter their diet. To change the taste, add different flavor extracts. Almond or mint extracts can give your fluff a twist. You can also mix in fruits or nuts. Chopped strawberries or slivers of almonds add a nice touch. These variations keep the dish exciting and fun. For the Full Recipe, check the instructions earlier. You’ll see how simple it is to make this dessert, plus all the ways to customize it! To keep your Protein Oreo Fluff fresh, use an airtight container. This way, it won’t absorb other smells from the fridge. You can use glass or plastic containers. Just make sure they seal tightly. In the fridge, the dessert lasts about 3 to 5 days. If you want to keep it longer, you can freeze it. When frozen, it stays good for about a month. Just remember to let it thaw in the fridge before serving. This will help keep the texture nice and creamy. Can I use different protein powders? Yes, you can swap protein powders. Use chocolate or plant-based protein if you like. Each type adds its own flavor, so choose one you enjoy. Is this recipe suitable for meal prep? Absolutely! This dessert keeps well in the fridge. You can make it ahead and enjoy it later. Just store it in an airtight container to keep it fresh. How can I make it vegan-friendly? To make it vegan, use plant-based protein powder. Replace Greek yogurt with a dairy-free yogurt. Choose a vegan whipped topping and sweeten with maple syrup. What to do if it turns out too sweet? If your fluff is too sweet, add more Greek yogurt. It will help balance the sweetness. You could also mix in some cocoa powder for a richer taste. Fixing texture issues If your dessert feels too runny, try adding more protein powder. Let it chill longer in the fridge to firm up. If it’s too thick, mix in a splash of milk or yogurt to smooth it out. For the full recipe, check out the detailed instructions above! This blog post shared a tasty dessert recipe using simple ingredients. We covered everything from mixing to storage. You learned about tips for perfecting the taste and ways to add variety. Remember, you can adapt this recipe to fit your health goals or flavor choices. Enjoy creating a delicious treat that fits your needs. This dessert will wow everyone around you!

Looking for a fun and healthy dessert? Try my Protein Oreo Fluff! This dreamy treat is packed with protein and is super simple to make. With just a few ingredients—like …

Read more

Categories Desserts

Quick Air Fryer Chicken and Vegetables in 15 Minutes

June 11, 2025 by Chef Theo
- 2 boneless, skinless chicken breasts, cut into bite-sized pieces - 1 cup bell peppers, sliced (mixed colors for vibrancy) - 1 cup zucchini, sliced - 1 cup cherry tomatoes, halved - 2 tablespoons olive oil - 1 teaspoon garlic powder - 1 teaspoon paprika - ½ teaspoon Italian seasoning - Salt and pepper to taste Gather these ingredients, and you are ready to create a quick and tasty meal. The chicken and vegetables blend well together, offering great flavor and nutrition. The vibrant colors from the bell peppers and tomatoes make the dish visually appealing. You can find the full recipe above to get started. Enjoy your cooking adventure! Start by cutting the chicken breasts into bite-sized pieces. This helps them cook faster. Place the chicken pieces in a mixing bowl. Add garlic powder, paprika, Italian seasoning, salt, and pepper. Pour in 1 tablespoon of olive oil. Toss everything together until the chicken is well coated. This step adds flavor and keeps the chicken juicy. Next, take a separate bowl for the vegetables. Add the sliced bell peppers, zucchini, and halved cherry tomatoes. Drizzle the remaining tablespoon of olive oil over the veggies. Sprinkle with salt and pepper to taste. Toss them well to ensure each piece has some seasoning. This mix of colors and flavors makes the dish pop. Preheat your air fryer to 380°F (193°C) for about 5 minutes. Once ready, place the seasoned chicken pieces in the basket in a single layer. Cook them for 8 minutes. After 8 minutes, shake the basket to flip the chicken. Then, add the mixed vegetables on top of the chicken. Cook for another 7 minutes. Shake the basket halfway through for even cooking. Check if the chicken reaches an internal temperature of 165°F (74°C). Make sure the vegetables are tender too. If needed, give it a few extra minutes. Once done, remove everything from the air fryer and let it cool for a minute. You can serve it warm on a platter or in individual bowls. Enjoy your quick and delicious meal! For detailed cooking instructions, you can refer to the Full Recipe. For tender chicken, cook it for 8 minutes at 380°F. After that, add your vegetables. Cook them for an extra 7 minutes. This method helps both cook evenly. Always check that chicken reaches 165°F. If not, add a few more minutes. To get that nice crunch, do not crowd the air fryer basket. Leave space for hot air to circulate. Lightly coat your chicken and veggies in olive oil. This helps them crisp up nicely. Shake the basket halfway through cooking to ensure even browning. One common mistake is not preheating the air fryer. Always preheat for about 5 minutes. Another mistake is over-seasoning. Use just enough salt and spices for flavor. Lastly, avoid opening the basket too often. This can lower the temperature and extend cooking time. For a complete guide, check out the Full Recipe. {{image_2}} You can switch out chicken for other proteins. Try turkey, tofu, or shrimp. Each option cooks well in the air fryer. Adjust the cooking time as needed. For instance, shrimp cooks faster, so check it at five minutes. Tofu gives a nice texture and absorbs flavors well. Feel free to mix up the veggies. Broccoli, carrots, or asparagus work great. Cut them into bite-sized pieces for even cooking. You can also try sweet potatoes for a heartier meal. Each veggie brings its own taste and texture. Just remember to keep the cooking time in mind. To boost flavor, add different spices or sauces. Try adding cumin or chili powder for a kick. You could also toss in some soy sauce or teriyaki sauce for a savory twist. Fresh herbs like basil or parsley can add a fresh taste. Get creative and find your favorite mix! For the full recipe, check out the details above! After you cook your air fryer chicken and vegetables, let them cool. Store leftovers in an airtight container. They stay fresh in the fridge for up to three days. When you’re ready to eat, just check for any signs of spoilage, like an off smell or change in color. If you want to save some for later, freezing is an option. Place the cooled chicken and vegetables in a freezer-safe bag or container. Remove as much air as possible to prevent freezer burn. They can last up to three months in the freezer. When you are ready to enjoy them, thaw in the fridge overnight. To reheat, use your air fryer for best results. Set it to 350°F (175°C) and heat for about 5 to 7 minutes. This keeps the chicken crispy and the veggies tender. You can also use a microwave, but the air fryer is the best for texture. Enjoy your meal again with ease! For the full recipe, check out the detailed instructions above. Yes, you can use frozen chicken or vegetables. However, cooking times will change. Frozen chicken may need about 10 extra minutes to cook through. For frozen vegetables, add them for the last half of the cooking time. This way, they will have time to cook without becoming mushy. If you don’t have an air fryer, you can bake the chicken and vegetables in the oven. Preheat your oven to 400°F (200°C). Spread the chicken and veggies on a baking sheet. Bake for about 20-25 minutes, turning halfway through. You won’t get the same crispness, but the flavors will still shine through. You can easily change the seasoning to fit your taste. Try adding chili powder for heat. You can also use lemon zest for a fresh taste. For a smoky flavor, add some cumin or smoked paprika. Experiment with any herbs you enjoy, like rosemary or thyme. Just remember to keep it balanced for the best results. For more details, check the Full Recipe. In this post, we explored air frying chicken and veggies. We covered ingredients, cooking steps, and storage tips. I shared the best ways to achieve crispiness and avoid mistakes. You can also try different proteins and vegetables for fun flavors. Air frying makes meals quick and delicious. With these easy tips, you can cook healthy meals every time. Remember to experiment and enjoy your cooking!

Are you ready to whip up a tasty meal in just 15 minutes? In this article, I’ll show you how to make quick air fryer chicken and vegetables that are …

Read more

Categories Dinner

Air Fryer Honey Mustard Salmon Rich and Flavorful Dish

June 11, 2025 by Chef Theo
To make this dish, gather these key ingredients: - 4 salmon fillets (about 1.5 lbs) - 3 tablespoons honey - 2 tablespoons Dijon mustard - 1 tablespoon olive oil - 2 cloves garlic, minced - 1 teaspoon lemon juice - Salt and black pepper to taste These items blend perfectly for a sweet and tangy flavor. You can elevate your dish with these optional extras: - Fresh parsley, chopped (for garnish) - Lemon wedges (for serving) - Steamed broccoli or asparagus - Quinoa or rice These sides add color and nutrition to your meal. To make this recipe easy, you need: - Air fryer - Mixing bowl - Whisk - Shallow dish or resealable plastic bag - Cooking spray - Basting brush These tools help ensure your salmon turns out great every time. For the complete recipe, check out the Full Recipe. To start, grab a small bowl. In this bowl, you will mix the sauce. First, add 3 tablespoons of honey. Next, pour in 2 tablespoons of Dijon mustard. Then, add 1 tablespoon of olive oil. Now, take 2 cloves of minced garlic and toss them in. Squeeze in 1 teaspoon of lemon juice. Lastly, sprinkle in some salt and black pepper to taste. Whisk everything together until smooth. This sauce will give your salmon a rich, sweet, and tangy flavor. Now it’s time to marinate the salmon. Take 4 salmon fillets and place them in a shallow dish or a resealable bag. Pour the honey mustard mixture over the fillets. Make sure each piece is well coated. The marinade will soak in the flavors. Let the salmon sit for at least 20 minutes. This step is key for a tasty dish. While the salmon marinates, preheat your air fryer to 390°F (200°C). Lightly spray the air fryer basket with cooking spray. This helps to prevent sticking. Once the salmon is ready, take it out of the marinade. Place the fillets skin-side down in the basket. Don’t forget to save some marinade for later. Cook the salmon for 10 minutes. After 5 minutes, use a brush to baste the salmon with the saved marinade. This adds even more flavor. When the cooking time is up, check if the salmon is flaky and cooked through. If it needs more time, add a minute. Once done, let it rest for a few minutes. Garnish with chopped fresh parsley before serving. Enjoy your delicious meal! Check the full recipe for more details. To get perfectly flaky salmon, choose fresh fillets. Look for bright color and no strong smell. Marinate the salmon well. The honey mustard mix adds flavor and moisture. Cooking at the right temperature is key. Set your air fryer to 390°F (200°C). Cook it just until it flakes easily with a fork. Salmon fillets can vary in size. Thicker fillets need more time to cook. For thicker cuts, add 1-2 extra minutes. If the fillets are thinner, reduce the time by a minute. Always check for doneness. The salmon should be opaque and flaky when done. Preheat your air fryer for even cooking. Lightly spray the basket to avoid sticking. Place the salmon skin-side down for best results. Avoid overcrowding the basket. Give each fillet space to cook evenly. Baste halfway through for extra flavor. This keeps the salmon moist and tasty. For a detailed cooking guide, check the Full Recipe. {{image_2}} Adding different herbs and spices can change the flavor of your Air Fryer Honey Mustard Salmon. You can use fresh dill, thyme, or rosemary. Each herb offers a unique taste that pairs well with salmon. Just chop the herbs finely and mix them into the marinade. This small change can brighten your dish and make it more exciting. You may also want to substitute ingredients for a fun twist. Instead of honey, try maple syrup for a deeper flavor. Different mustards, like whole grain or honey mustard, can give your dish a new kick. You can also swap olive oil for sesame oil. These swaps keep things fresh and fun. Air Fryer Honey Mustard Salmon with vegetables is another great option. Add asparagus, bell peppers, or broccoli to the air fryer. Toss the veggies in a bit of olive oil and seasoning. Cook them alongside the salmon for a complete meal. The veggies soak up the flavors and add crunch to your plate. This method not only makes cooking easier but also boosts your meal's nutrition. For the full recipe, check out the detailed instructions provided. To store leftover honey mustard salmon, let it cool first. Place the salmon in an airtight container. This keeps it fresh and tasty. You can store it in the fridge for up to three days. If you want to keep it longer, freezing is a great option. When reheating salmon, you want to keep it moist. The best way is to use the air fryer. Set it to 350°F (175°C) and heat for about 5 minutes. You can also use the microwave. Just cover it with a damp paper towel. Heat in short bursts to avoid drying it out. If you want to freeze your salmon, wrap each piece tightly in plastic wrap. Then, place them in a freezer bag. This helps prevent freezer burn. Honey mustard salmon can stay in the freezer for up to three months. When ready to eat, thaw it overnight in the fridge before reheating. This keeps the texture and flavor intact. You can enjoy your delicious dish anytime, even from the freezer. For the full recipe, check the earlier section. The best salmon for air frying is wild-caught salmon. It has great flavor and texture. Types like sockeye or coho work well. Farmed salmon can also be used, but it may be richer. Choose fillets with smooth skin and bright color for the best results. Yes, you can use other methods. Baking in the oven is a great choice. Grill the salmon on a barbecue for a smoky flavor. A skillet on the stove works well too; just use medium heat. Each method gives a different taste and texture. Cooking salmon in an air fryer takes about 10 minutes. Preheat it to 390°F (200°C) first. The cooking time may change slightly based on the fillet's thickness. Always check for doneness after 10 minutes. If needed, add one more minute. Absolutely! This recipe is perfect for meal prep. You can make it ahead and store leftovers. Place cooked salmon in an airtight container in the fridge. It stays fresh for up to three days. Just reheat gently before serving. To check if salmon is fully cooked, use a fork. Flake the fish gently to see if it’s flaky and opaque. The internal temperature should reach 145°F (63°C). If you’re unsure, cook it for another minute to be safe. Enjoy your Air Fryer Honey Mustard Salmon! For the full recipe, click here. In this post, we covered how to make air fryer honey mustard salmon. We discussed main ingredients, optional sides, and tools. I shared step-by-step cooking instructions, tips for perfect salmon, and variations for flavor. I also included storage info and answered common questions. With these insights, you can cook salmon that’s tasty and flaky, every time. Enjoy experimenting with your meals!

Looking to make a quick but delicious dinner? Let me introduce you to Air Fryer Honey Mustard Salmon. This dish is rich in flavor and very easy to prepare. In …

Read more

Categories Dinner
Older posts
Newer posts
← Previous Page1 … Page54 Page55 Page56 … Page104 Next →

TOASTED RECIPES

Where ideas are warm, crisp, and ready to serve! 🍞

PAGES

Home About Contact Privacy Policy Terms & Conditions Cookie Policy GDPR Policy Copyright Policy Disclaimer

CATEGORIES

Appetizers Desserts Salads Breakfast Dinner

Contact

  • Pinterest
  • Mail
Copyright © 2025 Toasted Recipes. All rights reserved.