Lemon Zucchini Bread Deliciously Refreshing Recipe
![To make a great lemon zucchini bread, gather your ingredients first. Having everything ready makes cooking easy and fun. Here’s what you need: - 1 cup finely grated zucchini - 1 teaspoon salt - 1 cup granulated sugar - 1/2 cup vegetable oil - 2 large eggs - 1 teaspoon vanilla extract - 1 tablespoon lemon zest - 1/4 cup fresh lemon juice - 2 cups all-purpose flour - 1 teaspoon baking powder - 1/2 teaspoon baking soda - 1/2 teaspoon ground cinnamon - 1/4 teaspoon nutmeg - 1/2 cup chopped walnuts or pecans (optional) - Powdered sugar for dusting (optional) You can find the full recipe at [Full Recipe]. Each ingredient plays a role in flavor and texture. For example, the zucchini keeps the bread moist. The lemon adds a bright and fresh taste. If you like nuts, they give a nice crunch. Adjust any ingredient to fit your taste. Enjoy the process! - Preheat your oven to 350°F (175°C). Grease a 9x5-inch loaf pan or line it with parchment paper. - Grate one medium zucchini finely. Mix it with salt and let it sit for about 10 minutes. This helps to draw out moisture. After that, wring out any excess water using a clean kitchen towel. - In a large bowl, mix together the sugar, vegetable oil, eggs, and vanilla extract. Whisk until blended. Then stir in the lemon zest and fresh lemon juice. - In another bowl, whisk together the flour, baking powder, baking soda, cinnamon, and nutmeg. - Gradually add the dry mixture to the wet mixture. Mix just until combined. Avoid overmixing to keep it light. - Fold in the grated zucchini and any chopped nuts if you like. Make sure they are evenly mixed into the batter. - Pour the batter into the prepared loaf pan. Smooth the top with a spatula to make it even. - Bake in the preheated oven for 55-65 minutes. Check for doneness by inserting a toothpick into the center. It should come out clean. - Once baked, remove the bread from the oven. Let it cool in the pan for about 10 minutes. Then, transfer it to a wire rack to cool completely. - If you want, dust the cooled loaf with powdered sugar before slicing and serving. For the full recipe, please check the [Full Recipe]. Wringing out the zucchini is key. It removes excess moisture, which keeps your bread from being soggy. After grating the zucchini, sprinkle it with salt and let it sit for ten minutes. Then, use a clean towel to squeeze out the water. Measuring flour correctly is vital for good texture. Always use a spoon to scoop flour into your measuring cup. Then, level it off with a knife. This method avoids packing the flour, which may lead to dense bread. Adjusting sweetness and acidity can enhance flavor. If you like it sweeter, add more sugar. For a zesty kick, increase the lemon juice or zest slightly. Taste the batter before baking, but be cautious with raw eggs. To avoid a dense bread, mix the batter gently. Overmixing can make the bread tough. Stir until just combined. Preventing overbaking is simple. Check your bread a few minutes before the timer goes off. Insert a toothpick into the center. If it comes out clean, your bread is done. If not, give it a few more minutes. Adjusting for dietary preferences is easy. You can use gluten-free flour or substitute eggs with flaxseed meal mixed with water. These swaps help make the bread suitable for various diets. Garnish your lemon zucchini bread for a fresh look. Thin lemon slices and mint sprigs add color and appeal. When serving, slice the bread carefully. Use a serrated knife for clean cuts. Arrange the slices on a platter for a beautiful display. For the best presentation, dust the cooled loaf with powdered sugar. This small touch gives the bread a nice finish and makes it more inviting. For the complete recipe, check the [Full Recipe]. {{image_2}} You can make lemon zucchini bread even more exciting by adding fruits or nuts. Berries like blueberries or raspberries add a sweet burst. You can fold in 1 cup of fresh berries into the batter for a fun twist. Other fruits, like chopped apples or peaches, work well too. They add moisture and flavor. If you want some crunch, try adding nuts or seeds. You can swap walnuts for pecans or even use sunflower seeds. Just 1/2 cup of your favorite nuts will give the bread a nice texture. If you are gluten-free, you can still enjoy this bread. Use a gluten-free flour mix instead of regular flour. This will help keep the same texture. Make sure your mix has a binding agent like xanthan gum. For dairy-free options, replace eggs with flax eggs. To make a flax egg, mix 1 tablespoon of ground flaxseed with 2.5 tablespoons of water. Let it sit for a few minutes to thicken. This will help bind your ingredients just like eggs do. Want to change the flavor a bit? You can add other citrus fruits. Try using orange or even lime zest for a different taste. Just replace lemon zest with the zest of your chosen fruit. You can also add herbs and spices to boost flavor. Fresh mint or basil can give a fresh taste. A pinch of ginger or cardamom can add warmth. These small changes can make your lemon zucchini bread unique and delicious. If you want to try this refreshing recipe, check out the Full Recipe for all the steps! To keep your lemon zucchini bread fresh, store it at room temperature. Wrap the bread in plastic wrap or foil. This helps keep moisture in and prevents it from drying out. If you plan to eat it within a few days, this method works great. For longer storage, refrigerate it. Place the wrapped bread in an airtight container. This keeps it fresh for up to a week. Freezing is an excellent way to save extra lemon zucchini bread. Follow these steps: 1. Cool the Bread: Allow the bread to cool completely after baking. 2. Wrap It: Use plastic wrap to tightly wrap the loaf. Then, wrap it in aluminum foil. 3. Label It: Write the date on the foil. This helps you remember how long it’s been frozen. 4. Freeze: Place the wrapped bread in the freezer. It can last for about three months. When you’re ready to enjoy it again, here’s how to thaw: - Remove the bread from the freezer. - Unwrap it and let it thaw at room temperature for a few hours. - For a warm slice, you can also heat it in the oven at 350°F for about 10 minutes. Lemon zucchini bread has a great shelf life. At room temperature, it lasts about 3 to 4 days. If refrigerated, it can last up to a week. Always check for signs of spoilage before eating. Look for: - Unpleasant smells - Mold on the surface - A dry or hard texture If you notice any of these signs, it’s best to throw it away. Enjoy your lemon zucchini bread fresh and tasty! For complete details on making this delightful dish, check the Full Recipe. Why is my bread dense? Your bread may be dense if you overmix the batter. Mixing too much adds air and can make it heavy. Make sure to mix just until everything is blended. Also, check your flour measurement. Too much flour can lead to a dense loaf. Can I use yellow zucchini instead? Yes, you can use yellow zucchini. It has a similar taste and texture. Yellow zucchini adds a nice color to your bread, making it fun and bright. How do I know when it's done baking? You can check if the bread is done by inserting a toothpick in the center. If it comes out clean, your bread is ready. You can also gently press the top; if it springs back, it’s perfect. What is the calorie count per slice? Each slice of lemon zucchini bread has about 150 calories. This can vary based on your ingredient choices. Using less sugar or swapping oil for applesauce can lower the calories. Are there any health benefits to zucchini? Yes, zucchini is low in calories and high in water. It is a good source of vitamins A and C. Its fiber content helps with digestion. Plus, it adds moisture and nutrients to your bread without extra fat. What can I use instead of eggs? You can use flaxseed meal mixed with water as an egg substitute. Mix 1 tablespoon of flaxseed meal with 2.5 tablespoons of water. Let it sit for a few minutes until it thickens. This works well in baking. How to replace sugar with alternatives? You can use honey or maple syrup in place of sugar. For every cup of sugar, use 3/4 cup of honey or syrup. Reduce the liquid in your recipe slightly to balance the moisture. You can also try stevia or coconut sugar for lower-calorie options. This post provided a clear recipe for lemon zucchini bread, covering ingredients, steps, and storage tips. You learned how to prepare, bake, and troubleshoot this tasty treat. By trying variations and using helpful tips, you can make it your own. Remember, the right preparation makes all the difference in your baking. Enjoy your homemade lemon zucchini bread, and share it with friends!](https://toastedrecipes.com/wp-content/uploads/2025/06/d133ea0f-6895-407b-820c-f9588ac2c372.webp)
Looking for a delicious way to enjoy summer’s bounty? My Lemon Zucchini Bread is just the treat you need! This moist, refreshing bread pairs the zesty taste of lemon with …
Looking for a delicious way to enjoy summer’s bounty? My Lemon Zucchini Bread is just the treat you need! This moist, refreshing bread pairs the zesty taste of lemon with …
![- 1 cup finely grated zucchini (about 1 medium zucchini) - 1 cup grated carrots (about 2 medium carrots) - 1 cup peeled and grated apple (about 1 large apple, preferably a tart variety) - 1/2 cup granulated sugar - 1/2 cup brown sugar, packed - 1/2 cup vegetable oil - 3 large eggs - 1 teaspoon vanilla extract - 1 1/2 cups all-purpose flour - 1 teaspoon baking soda - 1 teaspoon baking powder - 1 teaspoon ground cinnamon - 1/2 teaspoon ground nutmeg - 1/4 teaspoon salt - 1/2 cup chopped walnuts or pecans (optional) - 1/2 cup raisins or dried cranberries (optional) This list includes all the ingredients you need for a moist and flavorful bread. The zucchini brings in moisture, while the apple adds a touch of sweetness. The carrots provide a lovely texture and color too. You might wonder why I suggest optional ingredients like walnuts or raisins. Adding these can enhance flavor and give a nice crunch. Walnuts have healthy fats, while raisins provide natural sweetness. Here are some key nutritional highlights: - Zucchini is low in calories and high in water content. - Carrots are rich in beta-carotene, which is great for your eyes. - Apples add fiber, which is good for digestion. Using fresh, high-quality ingredients will make a big difference. They enhance the taste and health benefits of your bread. For precise measurements and a complete cooking method, check out the Full Recipe. First, preheat your oven to 350°F (175°C). This step ensures that your bread bakes evenly. Next, grease a 9x5 inch loaf pan. I like to use a bit of vegetable oil or butter for this. For the vegetables and fruit, grate one medium zucchini, two medium carrots, and one large apple. Use the large holes of a box grater for the best texture. If you find the zucchini too wet, use a clean kitchen towel to squeeze out the extra moisture. This keeps the bread from being soggy. Now, let’s move to the wet ingredients. In a medium bowl, mix together the following: - 1/2 cup granulated sugar - 1/2 cup brown sugar - 1/2 cup vegetable oil - 3 large eggs - 1 teaspoon vanilla extract Whisk these ingredients together until the mixture is smooth and well combined. I suggest using a whisk to make sure everything mixes evenly. Next, pour the wet mixture into the bowl with the grated veggies and fruit. Stir gently until the two mixtures are just combined. Be careful here! Do not overmix. Overmixing can make your bread tough, and we want it soft and moist. Once your batter is ready, it’s time to bake. Pour the batter into your prepared loaf pan and smooth the top. Bake it in your preheated oven for 55 to 65 minutes. You'll know it's done when a toothpick inserted in the center comes out clean. Let the bread cool in the pan for 10 minutes before transferring it to a wire rack. This cooling time helps the texture develop further. For the full recipe, check back to the ingredients section! To prevent sogginess, always squeeze excess moisture from the zucchini. Use a clean kitchen towel for this step. If your bread is too wet, it may not rise well. Adjusting ingredients can help. You can change the amount of grated apple or zucchini. Reducing these can lower moisture levels. Adding a bit more flour also helps balance the mix. To boost flavor, consider adding spices. Ground ginger or allspice pairs well with cinnamon. A dash of vanilla extract adds depth. Fresh ingredients are key. Use crisp, tart apples. Freshly grated carrots and zucchini give the best taste. These ingredients provide natural sweetness and flavor. For a fun presentation, slice the bread thickly. Serve it warm or at room temperature. You can dust the top with powdered sugar for a sweet touch. Spreading cream cheese frosting on slices creates a delightful treat. Pair the bread with yogurt or a fresh fruit salad for a complete meal. Enjoy it as breakfast or a snack! For the complete recipe, check out the Full Recipe. {{image_2}} You can make this carrot apple zucchini bread even healthier. For a low-sugar option, use less granulated sugar. You can also swap out the brown sugar for a natural sweetener like honey or maple syrup. If you need a gluten-free choice, replace the all-purpose flour with almond flour or a gluten-free blend. For those on a vegan diet, you can still enjoy this bread. Replace the eggs with flaxseed meal. Mix one tablespoon of flaxseed meal with three tablespoons of water. Let it sit for five minutes to thicken. You can also use applesauce instead of oil to keep it moist. Want to enhance the taste? You can add other fruits like mashed bananas or crushed pineapple. They bring natural sweetness and moisture. You might also try nuts such as pecans or hazelnuts for crunch. For a spice boost, consider adding ground ginger or allspice. A pinch of cloves can give a warm flavor, too. The more you experiment, the more unique your bread will become! Change the recipe with the seasons. In summer, try adding fresh berries. Blueberries or strawberries can brighten the flavor. In fall, use pumpkin puree instead of some of the zucchini. It gives a nice twist. In winter, include spices like nutmeg or cardamom for warmth. You can also add shredded coconut for a tropical touch. Seasonal veggies like sweet potatoes can work well, too. Just remember to adjust the moisture as needed. For the complete recipe details, check the Full Recipe. To keep your Carrot Apple Zucchini Bread fresh, wrap it in plastic wrap or foil. Store it at room temperature for about three days. This way, it stays moist and tasty. If you want it to last longer, place it in the fridge. Just remember to wrap it well to prevent drying out. You can also slice the bread and store it in an airtight container. This makes it easy to grab a piece when you want a quick snack. For long-term storage, freezing is your best bet. Slice the bread first, then wrap each piece tightly in plastic wrap. Place the wrapped slices in a freezer bag or container. This method keeps them fresh for up to three months. When you want to enjoy a slice, take it out and let it thaw at room temperature. To warm it up, pop it in the toaster or microwave for a few seconds. This helps bring back the fresh taste. At room temperature, your Carrot Apple Zucchini Bread lasts about three days. In the fridge, it can last up to a week. If you freeze it, remember to eat it within three months for the best flavor. Always check for any signs of spoilage before enjoying your delicious bread. What if my bread is too moist? If your bread is moist, it might have too much liquid. Make sure to squeeze out excess moisture from the zucchini. You can also bake it longer to let more moisture escape. Check for doneness by inserting a toothpick in the center. If it comes out clean, your bread is ready. Can I make this bread ahead of time? Yes, you can make this bread ahead of time. It stores well for a few days in a sealed container. To keep it fresh, place it in the fridge. You can also freeze it for up to three months. Just wrap it well in plastic wrap and foil. What can I use instead of eggs? If you want to skip eggs, use unsweetened applesauce or mashed bananas. About 1/4 cup replaces one egg. This keeps the bread moist and adds a hint of flavor. Can I substitute the oil? You can use applesauce or melted coconut oil instead of vegetable oil. Both options keep your bread moist. Applesauce adds sweetness, while coconut oil gives a light coconut taste. What to serve with Carrot Apple Zucchini Bread? Serve this bread with cream cheese or butter for a tasty treat. You can also pair it with fresh fruit or yogurt for a light meal. Is this recipe suitable for breakfast or dessert? This recipe works great for both breakfast and dessert. Enjoy it warm with coffee in the morning or as a sweet snack later in the day. It's a versatile choice for any time! For the full recipe, check out the [Full Recipe]. This blog post covered all you need to make delicious Carrot Apple Zucchini Bread. We explored ingredients, preparation steps, and baking tips to ensure great results. I shared ways to enhance texture and flavor, plus fun serving ideas. With variations and storage tips, you can enjoy this bread on any occasion. Whether you want a quick snack or a tasty meal, this recipe fits the bill. Simplify your baking and impress friends and family with your yummy creation! Enjoy your baking journey!](https://toastedrecipes.com/wp-content/uploads/2025/06/867dbad6-3123-4cfb-8e55-304bb877bbc5.webp)
Are you ready to bake a treat that combines three power-packed ingredients into one delicious bread? In this easy recipe for Carrot Apple Zucchini Bread, you’ll learn how to create …
![To make Copycat Honey Pepper Chicken Mac and Cheese, you need the right mix of ingredients. Here’s what you will need: - 2 cups elbow macaroni - 2 cups cooked chicken breast, diced - 1 cup sharp cheddar cheese, shredded - 1 cup mozzarella cheese, shredded - 2 tablespoons unsalted butter - 1/4 cup all-purpose flour - 2 cups milk - 1/4 cup honey - 1 tablespoon black pepper - 1 teaspoon garlic powder - 1 teaspoon onion powder - Salt to taste - 1/2 cup breadcrumbs (optional, for topping) - Fresh parsley, chopped (for garnish) Gather these items before you start cooking. Having everything ready makes the cooking process smooth. Each ingredient plays a key role in the flavor and texture of the dish. The elbow macaroni serves as the base, while the cheeses create a creamy sauce. Honey adds sweetness, and black pepper gives a nice kick. This balance makes it a crowd-pleaser. For the full recipe, check the instructions to ensure perfect results. - Boil elbow macaroni until al dente. - Drain and set aside. To cook the macaroni, fill a large pot with water and add a pinch of salt. Bring it to a rolling boil. Add the elbow macaroni and cook according to the package instructions. Stir occasionally to prevent sticking. You want it firm but not hard. This is called al dente. Once cooked, drain the macaroni in a colander. Set it aside for later. - Create roux with butter and flour. - Gradually add milk and thicken sauce. Now, let’s make the cheese sauce. In the same pot, melt butter over medium heat. Once the butter is melted, whisk in the flour. Stir for about one minute to create a roux. This helps thicken our sauce. Next, slowly pour in the milk while whisking. This keeps the sauce smooth and lump-free. Cook for 4-5 minutes until the sauce thickens and becomes creamy. - Incorporate cheddar and mozzarella. - Mix in chicken, honey, and spices. - Combine with macaroni. Once the sauce is thick, reduce the heat to low. Add the sharp cheddar and mozzarella cheese. Stir until both cheeses melt and blend into the sauce. Next, add the diced chicken, honey, black pepper, garlic powder, onion powder, and salt. Mix well to combine all these delicious flavors. Now, fold in the cooked macaroni, making sure every piece is coated in that cheesy goodness. - Preheat oven to 350°F (175°C). - Transfer to baking dish and add breadcrumbs. - Bake until golden and bubbly. If you want a crispy top, let’s bake it! Preheat your oven to 350°F (175°C). Transfer the mac and cheese into a baking dish. If you like, sprinkle breadcrumbs on top for a crunch. Bake it for about 15 minutes. You want it to be golden and bubbly. The aroma will fill your kitchen with warmth. Enjoy! For the complete steps on how to make this dish, check out the Full Recipe. To make the best cheese sauce, whisk constantly. This keeps the sauce smooth and lump-free. I recommend using freshly shredded cheese. Pre-shredded cheese has additives that make it less creamy. Fresh cheese melts better and adds a richer flavor. You can make this dish your own! Add vegetables like spinach or broccoli for extra nutrition. You can also adjust the spice levels. If you like it spicy, add more black pepper or even some cayenne. For a milder taste, reduce the pepper. Serve this dish hot for the best taste. A sprinkle of fresh parsley adds a nice touch. Pair it with a side salad or some garlic bread for a complete meal. These sides balance the rich flavors of the mac and cheese. Explore the [Full Recipe] for more ideas! {{image_2}} You can switch up the protein in this dish easily. - Use shredded rotisserie chicken for quick prep. - Replace the chicken with crispy bacon or sausage for a savory twist. These options add great flavors and textures. Each choice gives a new life to the classic dish. Cheese is key in mac and cheese. You can always mix it up! - Try pepper jack cheese for a spicy kick. - Gouda adds a nice smokey flavor that many love. - Experiment with a blend of cheeses for depth. Mixing cheeses can make your dish unique and fun. The taste will be rich and creamy. If you need a gluten-free option, it’s simple! - Substitute elbow macaroni with gluten-free pasta. - Use gluten-free flour for your roux. This way, everyone can enjoy this tasty meal. You won’t lose any flavor or creaminess. Try these variations to make the dish your own! For the full recipe, check the earlier section. To keep your Copycat Honey Pepper Chicken Mac and Cheese fresh, store leftovers in an airtight container. This way, it stays safe and tasty. It will last up to 3-4 days in the fridge. Make sure to let it cool before sealing it up. If you want to save some for later, you can freeze it. I recommend freezing in individual portions. This makes it easy to grab a serving when you want one. Use the frozen mac and cheese within 2-3 months for the best quality. Make sure to label the containers with the date so you know when to use them. When you’re ready to enjoy your leftovers, you can reheat them easily. Use the microwave or stovetop for best results. If the dish seems dry, add a splash of milk to restore its creaminess. This little trick helps it taste just as good as when you first made it! Yes, you can make this dish ahead. Prepare it up to the baking step. Just refrigerate it. When you are ready, bake it as normal. This makes it easy for busy days! Yes, you can use non-dairy milk. Almond, soy, or oat milk works well. However, keep in mind it may change the sauce's creaminess. You might want to add a bit more cheese to balance it out. You can spice it up! Try adding smoked paprika for a smoky taste. Or use cayenne pepper for some heat. Adjust these based on your taste. It’s all about finding what you love in this dish. This article covered a tasty recipe for Copycat Honey Pepper Chicken Mac and Cheese. You learned about the key ingredients, like macaroni and chicken, and how to make a creamy cheese sauce. I shared tips for perfecting your dish and options for storage and reheating. Remember, you can customize it to your taste with different proteins and cheeses. Enjoy this comforting meal with your family and friends. It's easy to make, delicious, and sure to impress! Dive in and start cooking today!](https://toastedrecipes.com/wp-content/uploads/2025/06/7e2c09e3-6189-4342-b02b-c3376c8650de.webp)
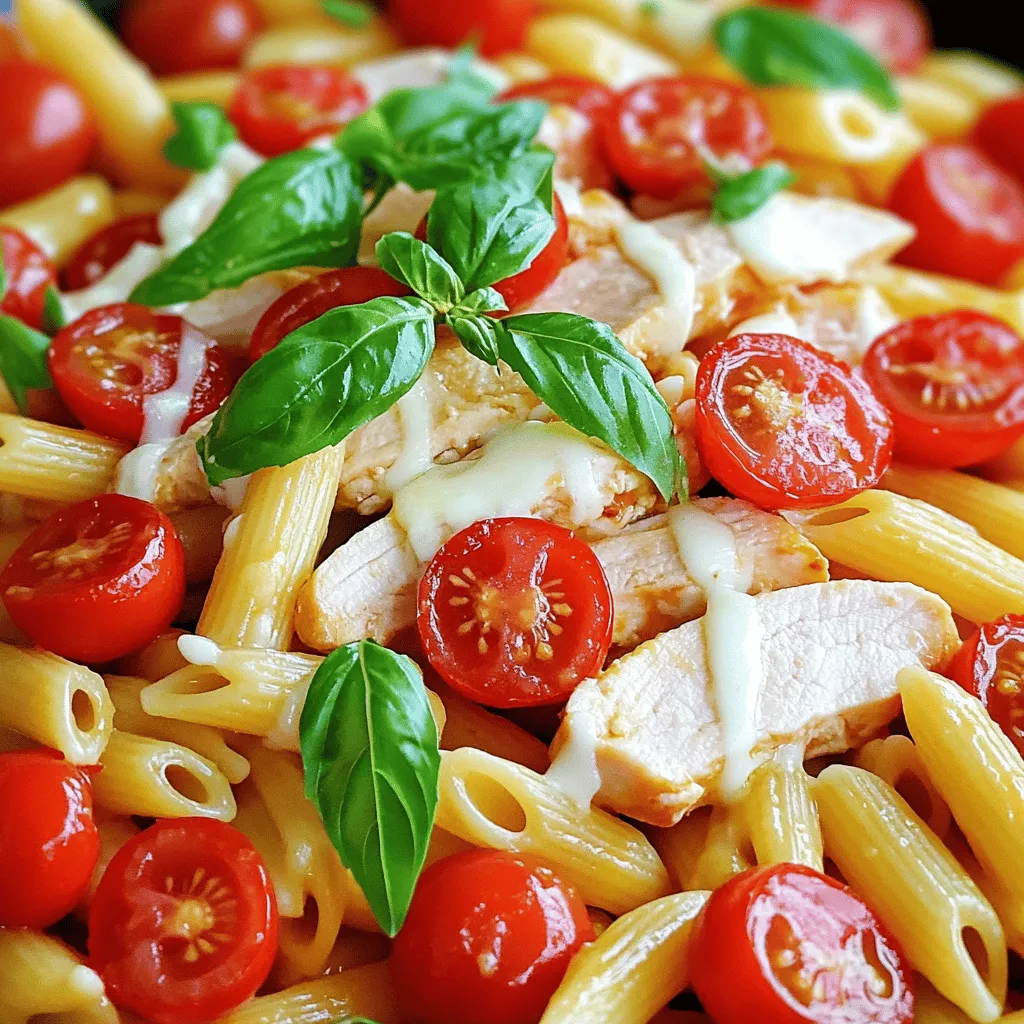
Are you craving a cheesy, savory dish that packs a punch? Look no further! My Copycat Honey Pepper Chicken Mac and Cheese Delight offers a perfect blend of flavors and …

If you love a savory treat that’s both tasty and easy to make, you’ll enjoy this Zucchini Cheese Bread recipe. Using fresh zucchini and rich cheese, this bread brings comfort …
. To cook ramen noodles just right, start by boiling water in a medium pot. Add your noodles and cook them for about 3-4 minutes. Check them often until they are tender but not mushy. Drain the noodles and set them aside. This step is key for great texture. To make your ramen even better, think about adding more flavors. You can toss in extra veggies like mushrooms or bok choy. You might like adding a boiled egg on top for protein. If you want more heat, add more chili garlic sauce. These little changes can make your dish shine! Using the right tools can save time in the kitchen. A large skillet or wok works best for stir-frying your ingredients. A whisk helps mix your sauce smoothly. Don’t forget to use a sharp knife for chopping veggies. These tools make cooking ramen quick and easy. For the complete experience, check out the Full Recipe. {{image_2}} You can easily make Easy Saucy Ramen Noodles vegetarian. Start by swapping the chicken or shrimp for more veggies. Great choices include mushrooms, zucchini, or bok choy. Use firm tofu instead of meat for protein. Just cut the tofu into cubes and pan-fry until golden. This adds texture and flavor. You still get a tasty meal without meat. Want to add some protein? You can use chicken, shrimp, or tofu. For chicken, cut it into bite-size pieces. Sauté it in the skillet until it's cooked through, about 5-7 minutes. For shrimp, cook until it turns pink, which takes about 3-4 minutes. If you prefer tofu, follow the tips above. Each protein option adds flavor and fills you up. If you love heat, you can spice up your ramen. Add more chili garlic sauce to the mix. You can also toss in sliced jalapeños or sriracha for extra kick. Another idea is to sprinkle in red pepper flakes while cooking. This adds a punch to the dish. Adjust the spice level to fit your taste. Enjoy the bold flavors! After enjoying your Easy Saucy Ramen Noodles, store any leftovers in an airtight container. Keep them in the fridge for up to three days. If you want to keep them longer, avoid mixing the noodles with the sauce. Store the sauce separately. This helps retain the noodles' texture. When you're ready to eat the leftovers, reheat them on the stove. Use low heat and add a splash of water or broth. This helps the noodles stay moist. Stir often to prevent sticking. You can also use the microwave. Heat in short bursts, stirring in between, until warm. If you want to save your ramen for longer, freezing is a great option. Portion the noodles and sauce into freezer-safe bags. Remove as much air as possible before sealing. They can last up to two months in the freezer. When ready to eat, thaw in the fridge overnight and reheat as described earlier. Enjoy your Easy Saucy Ramen Noodles any time! It takes about 20 minutes to make Easy Saucy Ramen Noodles. You’ll spend 10 minutes prepping, and another 10 minutes cooking. This quick time makes it a great meal for busy days. Yes, you can use fresh ramen noodles! Just cook them according to the package instructions. Fresh noodles often have a better texture, making your dish even tastier. You can add many things to boost nutrition. Here are some ideas: - Leafy greens like spinach or kale - Cooked chicken, tofu, or shrimp for protein - A boiled egg for extra protein and creaminess - More veggies like broccoli or zucchini for fiber These additions make your meal healthy and delicious! For the full recipe, check out the Easy Saucy Ramen Noodles section above. In this post, we explored easy saucy ramen noodles. We covered essential and optional ingredients for best flavor. I shared simple steps to prepare the noodles, sauce, and combine them. Tips helped you cook the noodles right and add extra taste. We also looked at delicious variations, storage tips, and answered common questions. Now you have the tools to create your perfect bowl of ramen. Enjoy making and sharing your own ramen adventures!](https://toastedrecipes.com/wp-content/uploads/2025/06/b14350b1-d536-44b8-baab-332c4dc40644.webp)
Are you ready to whip up a quick and tasty meal? Easy Saucy Ramen Noodles are your answer! In just a few simple steps, you can create a flavorful dish …

Are you ready to spice up your dinner with a simple, tasty dish? Black Pepper Chicken combines bold flavors and juicy chicken in a quick recipe that anyone can master! …
Craving a vibrant and delicious meal? Bruschetta Chicken Pasta is your answer! This dish combines juicy chicken, fresh tomatoes, and pasta in a way that’s both simple and satisfying. In …

Looking for a simple and tasty meal that fits your keto lifestyle? These Easy Keto Egg Cups are your go-to solution! Packed with flavor and easy to customize, you can …

If you’re craving a delicious dinner, look no further! In this article, I’ll share my go-to recipe for best fish tacos that are both quick to make and packed with …
![To make Lemon Butter Baked Tilapia, you need the following ingredients: - 4 tilapia fillets - 1/4 cup unsalted butter, melted - 2 tablespoons lemon juice - 1 tablespoon lemon zest - 3 cloves garlic, minced - 1 teaspoon dried thyme - 1 teaspoon dried parsley - Salt and pepper to taste - Lemon slices, for garnish - Fresh parsley, chopped, for garnish If you want to try different fish, you can use cod, haddock, or even salmon. Each fish has its own flavor, but they work well with lemon and butter. For this recipe, you will need a few common kitchen tools: - A baking dish: I recommend using a glass or ceramic dish for even cooking. - Mixing bowl: This is where you will combine your lemon butter sauce. - Measuring cups and spoons: Accurate measurements make a big difference. - Knife and cutting board: You’ll need these for chopping garlic and parsley. - Parchment paper: It helps with easy cleanup and prevents sticking. With these ingredients and tools, you're all set to create a tasty dish that is simple yet impressive. For more detailed steps on how to prepare this dish, check out the Full Recipe. First, preheat your oven to 400°F (200°C). This step is key for even cooking. Next, prepare your baking dish by lining it with parchment paper. This makes cleanup easy later. Now, let’s mix the lemon butter sauce. In a bowl, combine: - 1/4 cup unsalted butter, melted - 2 tablespoons lemon juice - 1 tablespoon lemon zest - 3 cloves garlic, minced - 1 teaspoon dried thyme - 1 teaspoon dried parsley - Salt and pepper to taste Stir well until all ingredients blend nicely. This sauce adds great flavor! Place your tilapia fillets in the prepared baking dish. Arrange them in a single layer. This helps them cook evenly. Now, pour the lemon butter mixture over the fish. Make sure each fillet gets well coated. Bake the tilapia in your preheated oven for 15-20 minutes. To check if it’s done, use a fork. The fish should flake easily and look opaque. Once cooked, remove it from the oven. Let it rest for a minute. For a lovely finish, garnish with fresh lemon slices and chopped parsley. This adds color and brightness to your dish. For more details, check the Full Recipe. To get the best flavor, use fresh ingredients. Fresh lemon juice and zest make a big difference. When you mix the butter, lemon juice, and spices, blend them well. This helps each fillet soak up the flavor. Avoid cooking the fish too long. Overcooked tilapia can become dry. Check for doneness by using a fork. The fish should flake easily. If you see it turn opaque, it’s ready to eat. Be careful with salt. Start with a small amount, then taste. You can always add more later. Too much salt can ruin the dish. Pair your tilapia with bright sides. Steamed broccoli or asparagus adds color. A fresh salad with mixed greens works well too. You can even serve it with rice or quinoa for a hearty meal. For a beautiful plate, use a white dish. Place the tilapia in the center and drizzle the lemon butter sauce on top. Add lemon slices and chopped parsley for a fresh look. This makes your meal appealing and vibrant. Explore the [Full Recipe] for more tips on making Lemon Butter Baked Tilapia! {{image_2}} You can make this dish lighter while keeping it tasty. Instead of using regular butter, try a low-fat option. You can use margarine or a plant-based butter. Both options work well and cut down on fat. Adding different herbs and spices also helps. Try dill or basil for a fresh twist. Both herbs add great flavor without extra calories. You can even toss in some spinach for added nutrients. It cooks down well and blends nicely with the fish. Want to kick up the heat? Add some chili flakes to your lemon butter mix. This will give your tilapia a nice spicy kick. Just a pinch goes a long way! If you want to change the citrus flavor, try lime or orange juice instead of lemon. Lime gives a zesty twist, while orange adds sweetness. Both options keep the dish bright and fresh. Remember to adjust the zest based on your choice for best flavor. Feel free to explore these variations to make your Lemon Butter Baked Tilapia even more exciting. For the full recipe, check out the details above! To keep your leftover tilapia fresh, place it in an airtight container. Make sure to cover it well with a lid or plastic wrap. This helps prevent any unwanted odors from seeping in. You can store the tilapia in the fridge for up to three days. After that, the fish may lose its taste and texture. When you are ready to enjoy your leftover tilapia, reheat it gently. The best way is to use an oven or a skillet. If using the oven, preheat it to 350°F (175°C). Place the fish on a baking sheet and cover it loosely with foil. Bake for about 10 minutes. This keeps the fish moist. If you prefer the skillet, heat a bit of oil on medium heat. Place the fillets in the skillet and cook for about 3-4 minutes on each side. For serving, add a touch of fresh lemon juice and some chopped parsley on top. This will brighten the flavor and make it look fresh again. Enjoy your meal! For the full recipe, check the earlier section. You can use other mild fish if you don’t have tilapia. Here are some great options: - Cod - Haddock - Sole - Flounder These fish will soak up the lemon butter flavor well. They also cook similarly, so you can follow the same baking time. Yes, you can prep this dish ahead of time. Here are some tips: - Marinate the tilapia in the lemon butter mix for up to an hour. - Place the marinated fish in the fridge if you make it early. - Bake the tilapia right before serving for the best taste. This way, you keep it fresh and tasty! For a balanced meal, try these side dishes: - Steamed broccoli - Roasted asparagus - Quinoa or rice - A fresh salad These sides add color and nutrition to your plate. Enjoy your meal with the full recipe for Lemon Butter Baked Tilapia! This blog post covered how to make Lemon Butter Baked Tilapia. We listed the key ingredients, tools, and step-by-step instructions. You learned cooking tips and ways to enhance flavors with variations. We also discussed how to store leftovers and answered common questions. In conclusion, this dish is easy and fun to prepare. With simple ingredients and tools, you can make a tasty meal. Enjoy experimenting with flavors and serving ideas. Happy cooking!](https://toastedrecipes.com/wp-content/uploads/2025/06/1b17701d-a588-443b-a192-76ca96e3532f.webp)
Are you searching for a quick and delicious dinner idea? Look no further! Lemon Butter Baked Tilapia is both simple to make and packed with flavor. This dish uses just …