Easy Pickled Peppers Quick and Flavorful Recipe
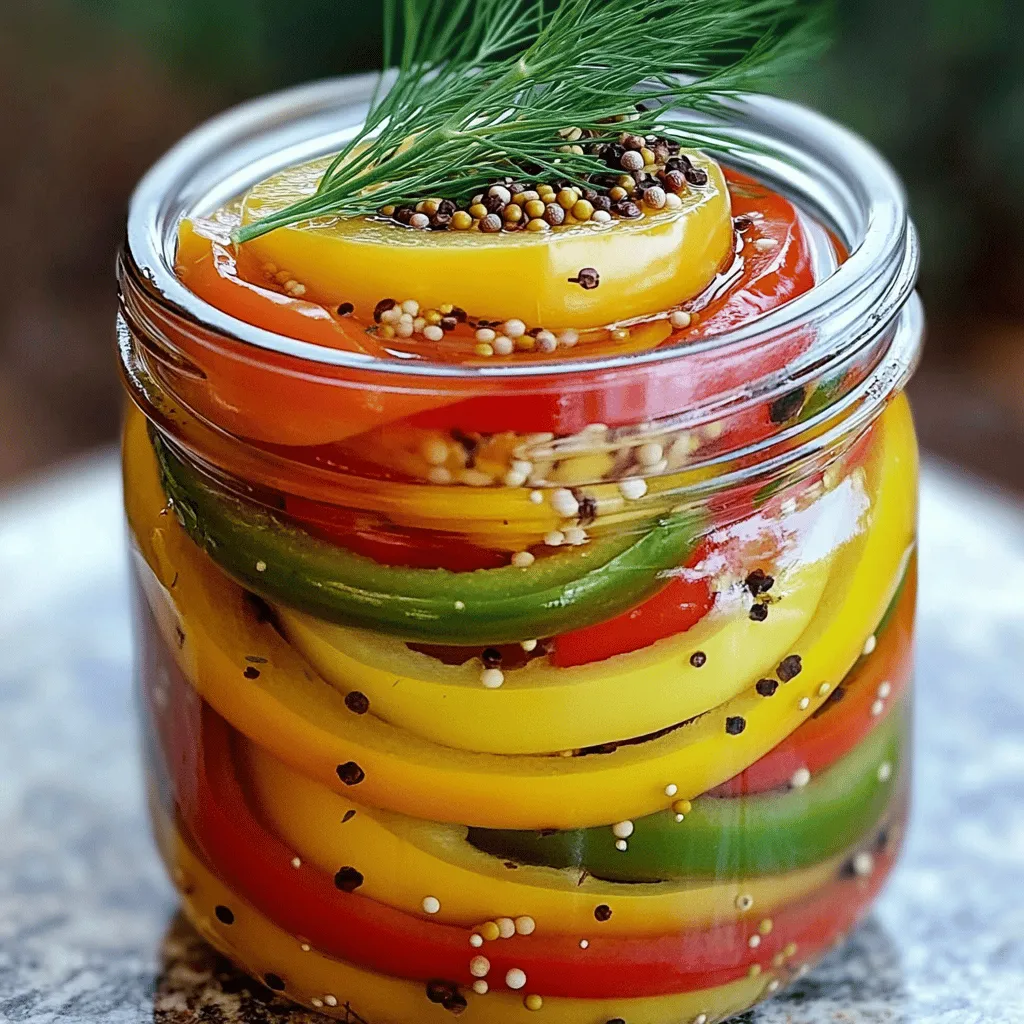
Are you ready to add a zing to your meals? My “Easy Pickled Peppers” recipe is your ticket to quick and flavorful goodness! With just a handful of fresh peppers …
Are you ready to add a zing to your meals? My “Easy Pickled Peppers” recipe is your ticket to quick and flavorful goodness! With just a handful of fresh peppers …
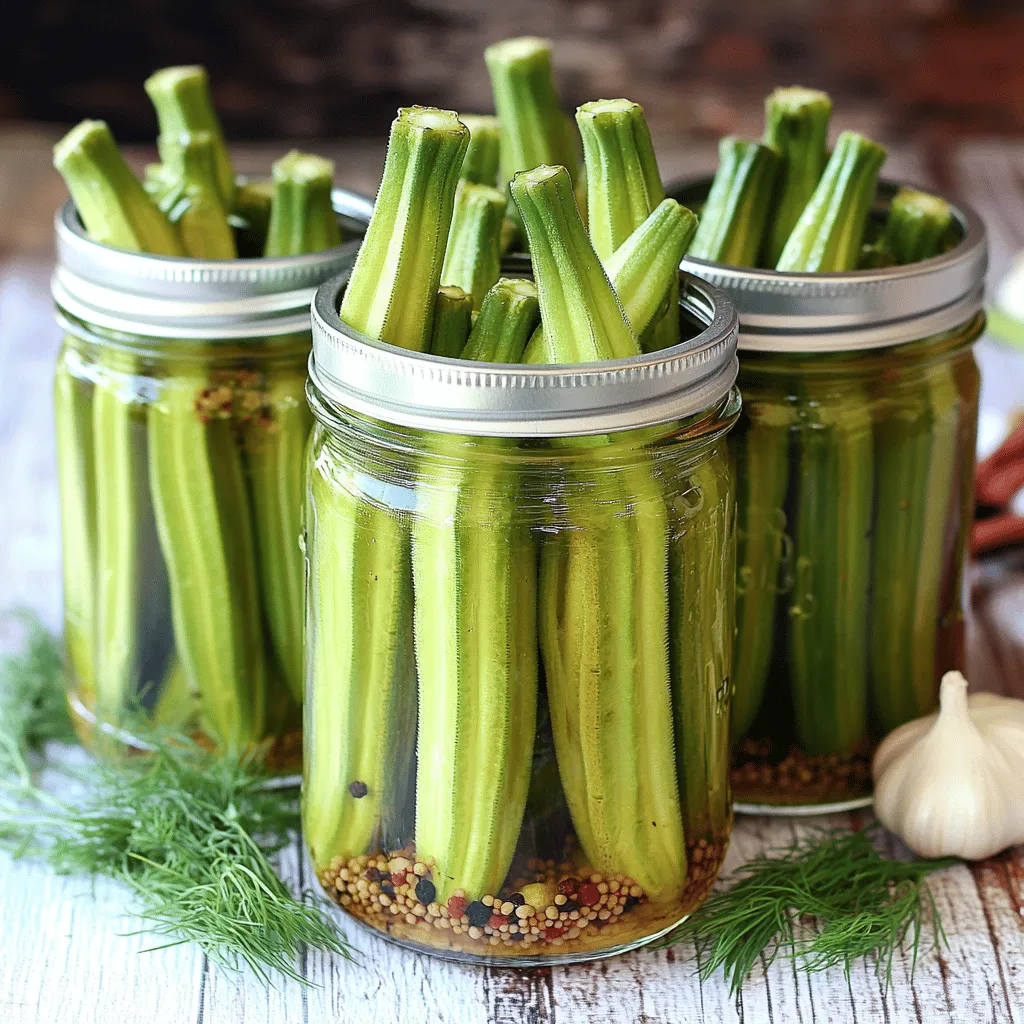
Crisp pickled okra is a tasty treat you can make at home. With a tangy kick and crunchy texture, this dish adds flavor to any meal. I’ll show you how …

Craving a warm and cheesy treat? Chili cheese fries may just be the ultimate comfort food! This dish combines crispy fries, hearty chili, and gooey cheese for a delicious bite …
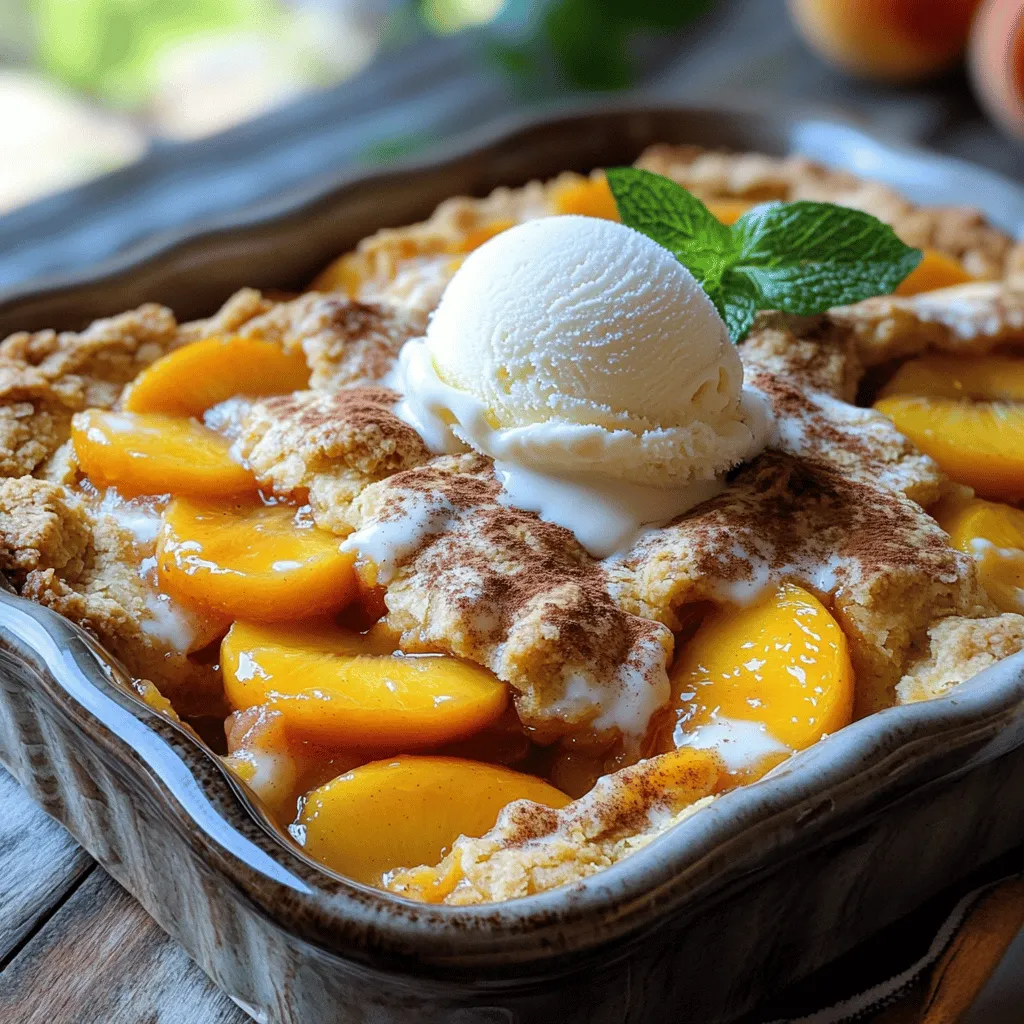
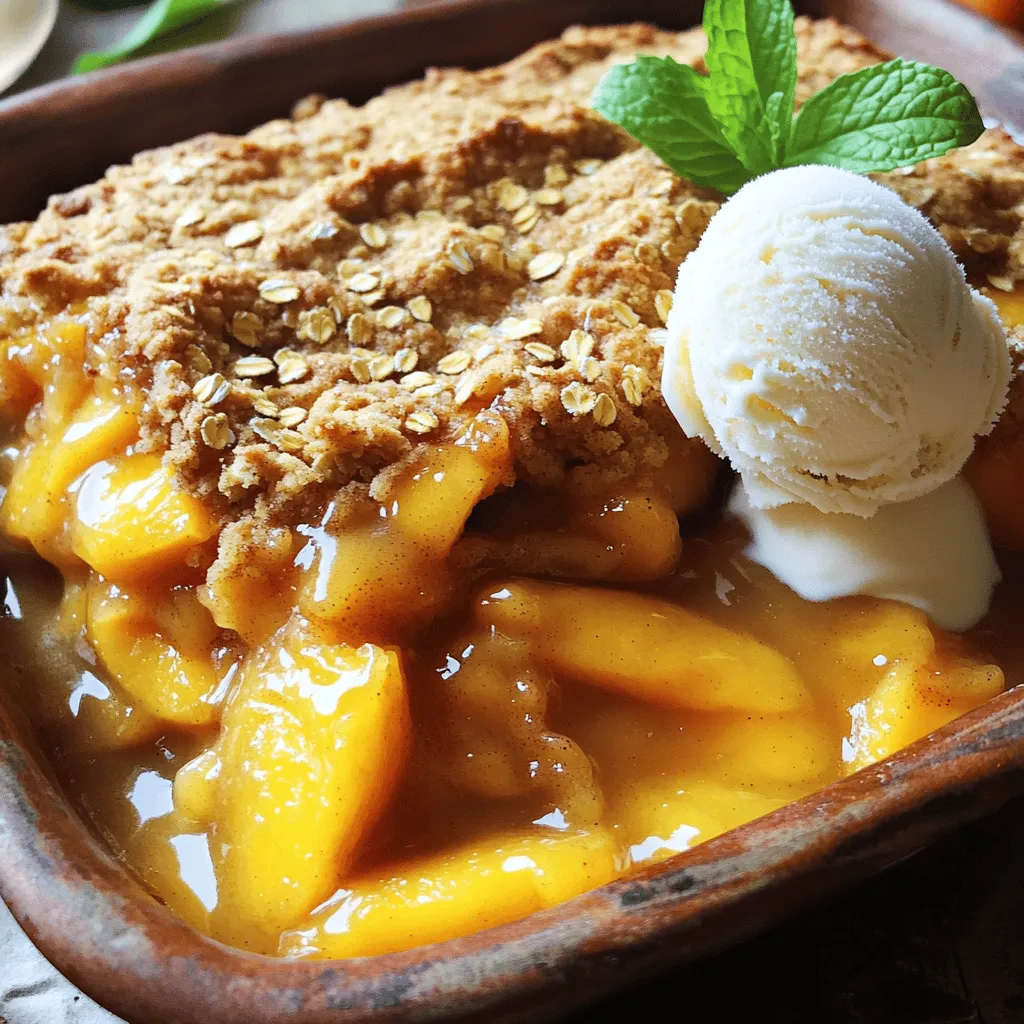
Are you ready to impress your family with a simple, delicious dessert? This Fresh Peach Cobbler recipe is both delightful and easy to make. With juicy peaches and a buttery …
Are you ready to dive into the world of sweet delights? Paula Deen’s Peach Cobbler is an easy and yummy dessert that brings joy to every table. With fresh peaches …
Craving a simple and tasty dessert? Let me introduce you to Frozen Peach Cobbler. It’s perfect for any occasion, and you can whip it up easily. With juicy peaches and …
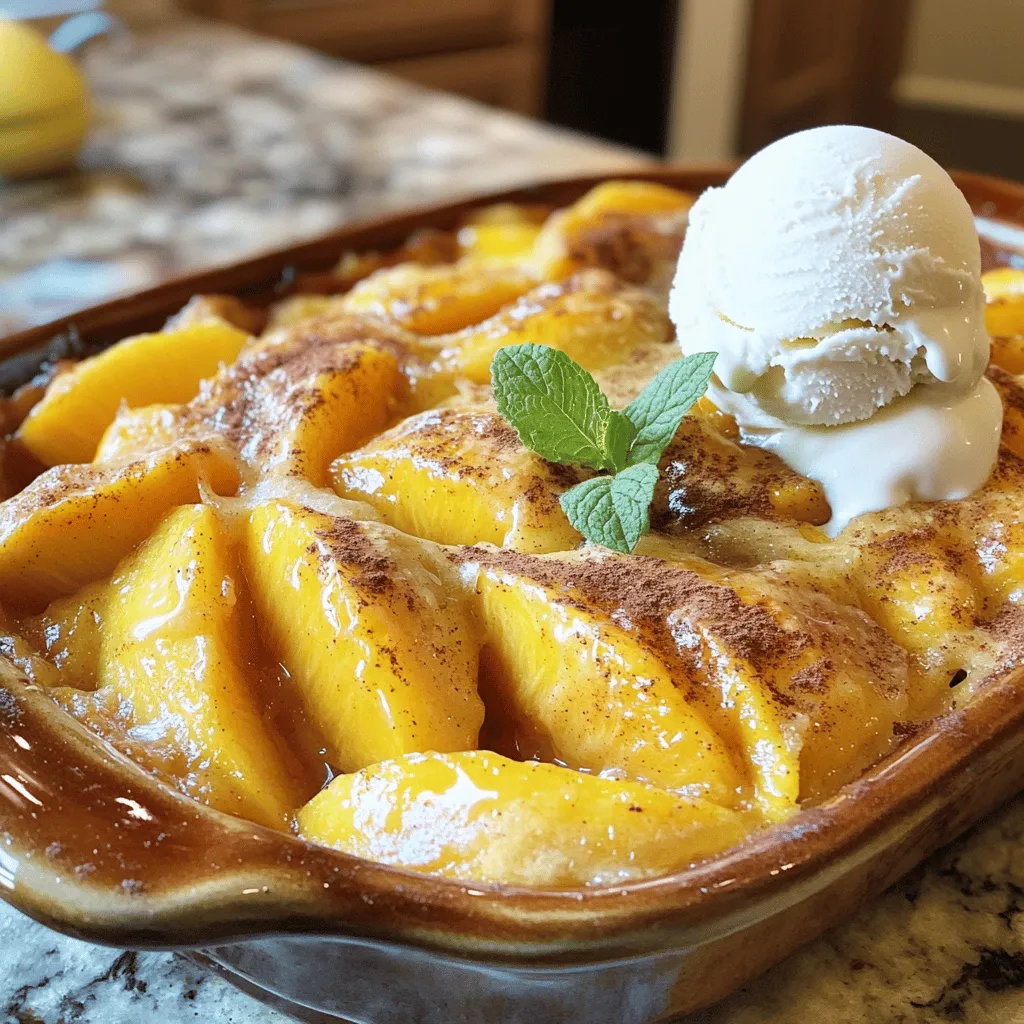
![To make the Easy Peach Custard Dessert, you need a few key items. Here are the must-have ingredients: - 4 ripe peaches, pitted and sliced - 1 cup heavy cream - 1/2 cup granulated sugar - 3 large eggs - 1 teaspoon vanilla extract - 1/4 teaspoon almond extract - 1 tablespoon cornstarch - Pinch of salt These ingredients work together to create a creamy, sweet, and fruity delight that is hard to resist. You can add a few optional ingredients to enhance the flavor: - 1/2 teaspoon cinnamon (optional) Cinnamon gives a warm note that pairs well with peaches. Feel free to add it or skip it based on your taste. Use these simple conversions to make your preparation easier: - 1 cup = 8 ounces - 1 tablespoon = 3 teaspoons - 1/4 teaspoon = 1 dash Knowing these can help you adjust the recipe as needed. For the full recipe, check out the detailed instructions above. Enjoy your peach custard creation! First, gather your ingredients. You need ripe peaches, heavy cream, sugar, eggs, and a few flavorings. Start by preheating your oven to 350°F (175°C). This step is key to getting a nice custard texture. Next, in a medium bowl, whisk the eggs, sugar, cornstarch, vanilla extract, almond extract, and salt together. Make sure the mixture is smooth. Then, slowly add the heavy cream. Whisk until it blends well. Now, take a baking dish and grease it lightly. You can use butter or a non-stick spray for this. Slice your peaches and arrange them evenly at the bottom of the dish. This creates a sweet base for your custard. Pour the custard mixture over the peaches. Make sure they are fully covered. If you like, sprinkle some cinnamon on top for extra flavor. Place your baking dish in the preheated oven. Bake for 30-35 minutes. Keep an eye on it. You want the custard to be set and lightly golden on top. To check if it's done, gently shake the dish. If the center jiggles slightly, it’s ready. If it wobbles too much, give it a few more minutes. Once baked, take it out and let it cool for about 10 minutes. When serving your peach custard, cut it into squares. You can use a sharp knife for clean edges. For an extra touch, add a dollop of whipped cream or a scoop of vanilla ice cream on top. This makes it look even more tempting. Serve it warm or at room temperature. You can also garnish with a sprig of mint for color. Enjoy this delightful dessert straight from the oven or chilled. For the full recipe, check out the earlier section. One common error is overcooking the custard. This can make it grainy. Keep an eye on your timer. If the custard jiggles slightly in the center, it is done. Another mistake is not whisking enough. You want a smooth mixture. If you see lumps, it can ruin the texture. Always mix until everything is well blended. Use ripe peaches for the best taste. They should feel soft and smell sweet. If your peaches are firm, let them ripen for a few days. You can enhance the flavor by adding a touch of cinnamon. This spice pairs well with the sweetness of peaches. Also, consider using almond extract. It adds a nice nutty flavor that complements the fruit. Start with room temperature eggs. Cold eggs can make it hard to blend. Whisk the eggs and sugar until they are light and fluffy. This helps to incorporate air, making the custard creamy. When adding heavy cream, do it slowly. Mix gently to keep the air in the custard. Following the [Full Recipe] carefully also helps ensure success. {{image_2}} You can swap peaches for other fruits easily. Try ripe pears, sweet cherries, or juicy berries. Each fruit brings its own flavor. For example, berries add a tart taste. This makes the dessert unique every time. Just follow the same steps in the recipe. The results will still be delicious. If you want a dairy-free dessert, use coconut milk instead of heavy cream. This change still gives you a creamy texture. Use almond milk or oat milk as another option. Replace the eggs with a flaxseed mixture. Mix 1 tablespoon of ground flaxseed with 2.5 tablespoons of water. Let it sit for five minutes. This will help create a nice custard without dairy. You can enhance the flavor with different spices. Try nutmeg or cardamom for a warm taste. A splash of rum or bourbon can add depth. You can also mix in a bit of citrus zest. Lemon or orange zest brightens the dish. Experiment with these options to find your favorite flavor combo. Making it your own adds a fun twist to the Easy Peach Custard Dessert. For the full recipe, check the main section. To keep your Easy Peach Custard Dessert fresh, store it in an airtight container. You can also cover the dish tightly with plastic wrap. Make sure it cools completely before sealing it. This step helps prevent moisture buildup, keeping the custard creamy. When stored properly, your dessert lasts about 3 to 4 days in the fridge. After this time, the peaches may become soggy. If you notice any off smell or change in texture, it's best to toss it out. Always check before enjoying leftovers. To reheat, place individual portions in the microwave. Heat in short bursts of 15 seconds. Stir in between to ensure even warming. Avoid heating the entire dish at once, as this can change the texture. Enjoy your dessert warm, with a fresh scoop of ice cream if you like! Yes, you can use canned peaches! Just make sure to drain them well. Canned peaches can work in a pinch. They might be softer than fresh peaches. This can affect the texture a bit. If you prefer a firmer bite, fresh is best. If you need a substitute for heavy cream, try using whole milk. You can also mix milk with butter. A 1/4 cup of butter mixed with 3/4 cup of milk works well. This will give you a creamy texture, but it won't be as rich. For a lighter option, use coconut cream for a dairy-free choice. The custard is set when it looks firm and slightly jiggly. You can poke it gently with a knife. If it comes out clean, it's ready! The top should be lightly golden. Let it cool a bit before serving, as it will continue to firm up. Yes, you can make this dessert ahead of time! It keeps well in the fridge for up to three days. Just cover it with plastic wrap or foil. This way, the flavors can meld together nicely. You may need to warm it slightly before serving for best taste. For the full recipe, check the previous section. In this post, we explored how to make an easy peach custard dessert. We covered essential ingredients, step-by-step instructions, and great tips to avoid common mistakes. You can try different fruits or make a dairy-free version for variety. Remember to store leftovers properly to keep them fresh. With these ideas and tricks, you can create a delicious dessert. Enjoy your baking and share this tasty treat with others!](https://toastedrecipes.com/wp-content/uploads/2025/06/227e00db-4353-44f7-80d4-f253e5756327.webp)
If you love sweet, creamy desserts, you’ll adore this Easy Peach Custard Dessert! In this simple guide, I’ll show you how to whip up a delightful treat using fresh peaches …
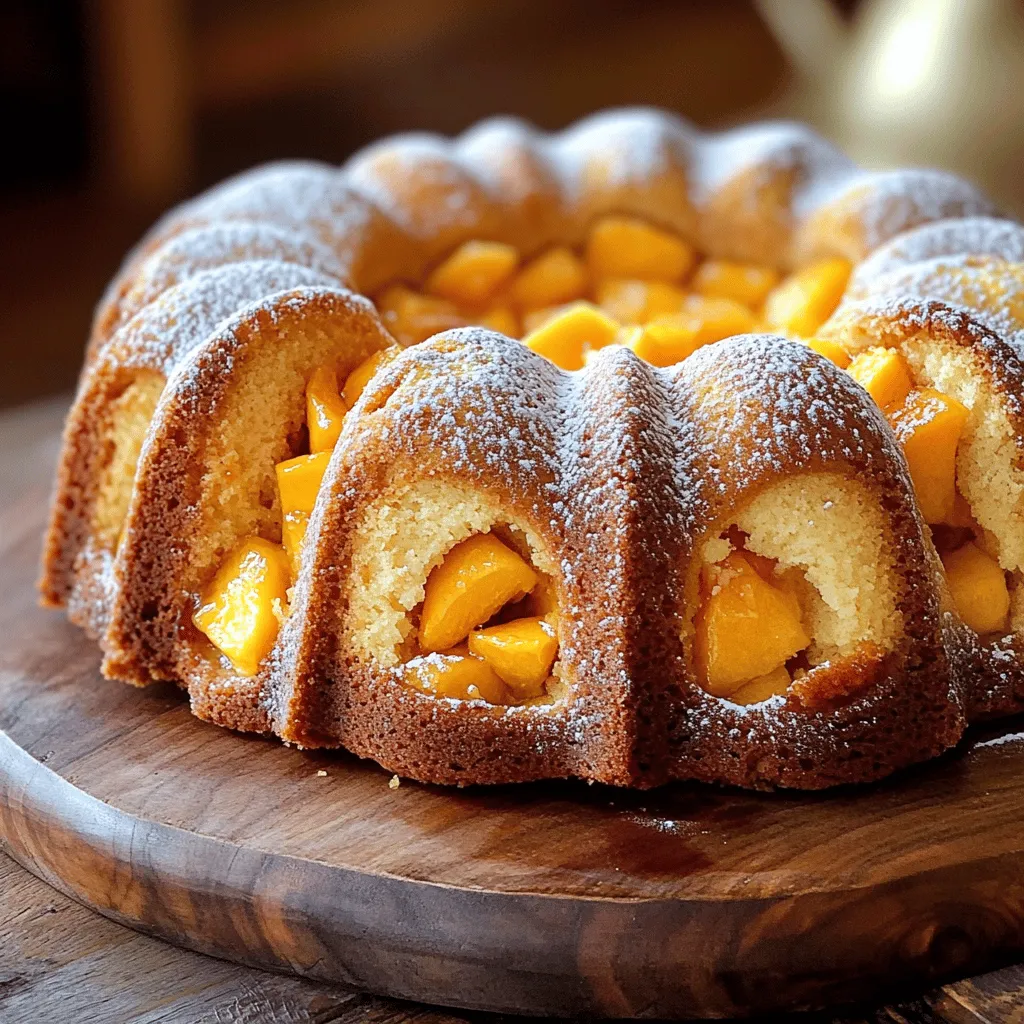
Are you ready to elevate your dessert game? In this article, I’m sharing my Peach Cobbler Cream Cheese Pound Cake Recipe. This cake perfectly blends the rich creaminess of cream …

Are you ready to fire up the grill? Pinchos, or Puerto Rican chicken skewers, are a must-try! This easy grilling recipe is perfect for a fun cookout or a quick …
![To make the best baked mac and cheese, gather these simple items: - 8 oz elbow macaroni - 2 tablespoons unsalted butter - 2 tablespoons all-purpose flour - 2 cups milk (whole or 2%) - 1 teaspoon Dijon mustard - 1/2 teaspoon garlic powder - 1/2 teaspoon onion powder - 1/4 teaspoon cayenne pepper (optional) - 2 cups shredded sharp cheddar cheese - 1 cup shredded mozzarella cheese - Salt and pepper to taste - 1/2 cup breadcrumbs (for topping) - 2 tablespoons olive oil - Fresh parsley for garnish (optional) Using quality ingredients makes a big difference. Here are some tips: - Cheese: Use sharp cheddar for a bold flavor. Mixing in mozzarella adds creaminess. - Milk: Whole milk will give a rich taste. If you want lower fat, use 2%. - Pasta: Cook the macaroni until just al dente. It will cook more in the oven. - Butter and Flour: Make a roux for a smooth cheese sauce. Cook it just until bubbly. You can swap some ingredients based on your taste or needs: - Pasta: Any short pasta works well, such as shells or cavatappi. - Cheese: Try gouda or fontina for a different flavor. - Breadcrumbs: Use crushed crackers or panko for crunch. - Milk: For a dairy-free option, use almond or oat milk. - Spices: Add spices like paprika or nutmeg for extra warmth. Feel free to explore the Full Recipe for detailed steps and tips! To start, gather all your ingredients. You will need: - 8 oz elbow macaroni - 2 tablespoons unsalted butter - 2 tablespoons all-purpose flour - 2 cups milk (whole or 2%) - 1 teaspoon Dijon mustard - 1/2 teaspoon garlic powder - 1/2 teaspoon onion powder - 1/4 teaspoon cayenne pepper (optional) - 2 cups shredded sharp cheddar cheese - 1 cup shredded mozzarella cheese - Salt and pepper to taste - 1/2 cup breadcrumbs (for topping) - 2 tablespoons olive oil - Fresh parsley for garnish (optional) Next, preheat your oven to 350°F (175°C). This ensures even cooking for the mac and cheese. Boil water in a pot and cook the elbow macaroni according to the package instructions until it's al dente. Then, drain the macaroni and set it aside. In a large saucepan, melt the butter over medium heat. Once melted, add the flour. Whisk it for about a minute until it forms a paste. This step helps get rid of the raw flour taste. Gradually add the milk while whisking to avoid lumps. Keep stirring until the sauce thickens and bubbles, which takes about 5-7 minutes. Once the sauce is thick, take it off the heat. Stir in the Dijon mustard, garlic powder, onion powder, and cayenne pepper if you like a little heat. Season it with salt and pepper. Now, add 1 1/2 cups of shredded cheddar cheese and all of the mozzarella cheese. Stir until it melts and becomes smooth. Fold in the cooked macaroni with the cheese sauce. Make sure everything is well combined. Transfer this mix into a greased 9x13-inch baking dish. Now for the topping! In a small bowl, mix the breadcrumbs with olive oil until the crumbs are coated. Sprinkle this mixture evenly over the mac and cheese. To make it even cheesier, add the remaining 1/2 cup of shredded cheddar cheese on top of the breadcrumbs. Bake in the preheated oven for 25-30 minutes. You want the top to be golden brown and bubbly. Once done, take it out and let it sit for 5 minutes before serving. If you like, garnish with fresh parsley for a nice touch. This makes the dish pop and look inviting. Feel free to check out the Full Recipe for any details you might need! To get the creamiest mac and cheese, start with a good cheese blend. I recommend using sharp cheddar and mozzarella for the best melt. When making the cheese sauce, cook it slowly over medium heat. This helps the cheese melt evenly. Always whisk the sauce well to avoid lumps. Adding a bit of Dijon mustard enhances the flavor and creaminess. Lastly, avoid overcooking the pasta; it should be al dente before mixing with the sauce. This prevents it from getting mushy in the oven. One common mistake is using low-fat milk. Whole milk or 2% milk gives the best texture. Another issue is not seasoning enough. Salt and pepper are key for flavor. Make sure to taste the cheese sauce before adding the pasta. Also, don’t skip the breadcrumbs on top. They add a nice crunch that balances the creamy dish. Lastly, avoid cooking the mac and cheese too long in the oven; you want it bubbly and golden, not dry. To boost the flavor of your baked mac and cheese, use fresh spices. Garlic powder and onion powder add depth. If you want a little heat, cayenne pepper works great. For a gourmet touch, consider adding cooked bacon or sautéed vegetables. You can also stir in some grated Parmesan cheese for a salty kick. Lastly, let the dish rest for a few minutes after baking. This helps the flavors meld and makes serving easier. For the full recipe, check out the Ultimate Creamy Baked Mac and Cheese. {{image_2}} You can easily boost the flavor of baked mac and cheese. Try adding cooked bacon, ham, or sausage. These meats add a nice savory touch. Veggies also work well; think broccoli, spinach, or even tomatoes. You can mix in some sautéed onions or peppers for a sweet crunch. This makes the dish more colorful and fun. Adding a splash of hot sauce or a sprinkle of smoked paprika can also enhance the taste. Feel free to get creative! While cheddar and mozzarella are classic, don't stop there. You can mix different cheeses for a unique taste. Gouda gives a creamy and smoky flavor. Fontina melts beautifully and adds richness. Try pepper jack for a spicy kick. You can even use blue cheese for a bold twist. Each cheese has its own character, so explore until you find your favorite blend. This keeps your baked mac and cheese exciting every time. If you want a healthier version, swap out the elbow macaroni for whole wheat or chickpea pasta. This adds fiber and protein. Use low-fat milk and cheese to cut calories. You can also add cauliflower or zucchini to the cheese sauce. This makes it creamy while sneaking in extra veggies. For a gluten-free option, use gluten-free pasta and flour. These changes keep the dish tasty while making it a bit better for you. Check the [Full Recipe] for detailed instructions on making the perfect baked mac and cheese! After enjoying your baked mac and cheese, store any leftovers in an airtight container. Let it cool down to room temperature first. You can keep it in the fridge for up to three days. This will help maintain its taste and texture. Make sure to cover it well to prevent drying out. When you're ready to enjoy your leftovers, reheating is simple. Preheat your oven to 350°F (175°C). Place the mac and cheese in a baking dish and add a splash of milk. This keeps it creamy. Cover with foil to avoid burning the top. Bake for about 15-20 minutes or until heated through. You can also use a microwave. Heat in short bursts, stirring in between. This helps it heat evenly. Freezing baked mac and cheese is a great way to enjoy it later. First, let it cool completely. Then, place it in a freezer-safe container or wrap it tightly in plastic wrap and foil. It can last up to three months in the freezer. When you're ready to eat, thaw it overnight in the fridge. Reheat it in the oven for the best results. This way, you’ll have a delicious meal ready when you need it! For the full recipe, check out the Ultimate Creamy Baked Mac and Cheese. This Baked Mac and Cheese stands out because of its rich and creamy cheese sauce. I use sharp cheddar and mozzarella for the best flavor. The blend creates a perfect gooey texture. I also add a hint of Dijon mustard and spices for depth. The golden breadcrumb topping gives it a nice crunch. Each bite feels like a warm hug on a plate. These small details make it truly the best. Yes, you can swap elbow macaroni for other pasta shapes. Penne, shells, or fusilli work well too. Just choose a pasta that holds the cheese sauce well. Make sure to cook it al dente to avoid mushiness in the oven. Each shape brings a unique twist to the dish. This dish takes about 25 to 30 minutes to bake. You want the top to turn golden brown and bubbly. Preheating your oven to 350°F (175°C) helps achieve that perfect texture. The wait is worth it when you see that cheesy goodness! Absolutely! You can prepare this dish a day ahead. Just follow the recipe and assemble it in the baking dish. Cover it with plastic wrap and store it in the fridge. When you’re ready to bake, remove the wrap and bake as directed. It’s a great time-saver for busy days or gatherings. Yes, you can make a vegan version! Use plant-based pasta and dairy-free cheeses. Almond milk or oat milk works well to replace regular milk. Nutritional yeast can add a cheesy flavor too. Make sure to check the labels for vegan-friendly ingredients. This way, everyone can enjoy a comforting bowl of mac and cheese. For the full recipe, check out the Ultimate Creamy Baked Mac and Cheese. In this post, we covered key ingredients, cooking steps, and helpful tips for the best baked mac and cheese. We also explored yummy variations, smart storage ideas, and answered common questions. Remember, great mac and cheese has the right blend of flavors and textures. Use these tips to craft a dish everyone will love. With practice, you’ll create your perfect version. Enjoy making this comfort food classic!](https://toastedrecipes.com/wp-content/uploads/2025/06/924175aa-d854-4bd3-88e5-ef49f63c79c5.webp)
Are you ready to dig into a bowl of the BEST Baked Mac and Cheese? This dish is the ultimate comfort food, perfect for any meal. With rich flavors, creamy …