Skip to content
toastedrecipes.com
  • Home
  • Appetizers
  • Desserts
  • Salads
  • Breakfast
  • Dinner
  • Privacy Policy
  • Contact
  • About

Chef Theo

Crispy Homemade Chicken Tenders Easy and Flavorful Meal

June 25, 2025 by Chef Theo
- 1 lb boneless, skinless chicken breasts - 1 cup buttermilk - 1 cup all-purpose flour - 1 cup panko breadcrumbs - 1 tsp garlic powder - 1 tsp onion powder - 1 tsp paprika - 1/2 tsp cayenne pepper - Salt and pepper to taste - Vegetable oil for frying Gather these ingredients for crispy homemade chicken tenders. You start with boneless, skinless chicken breasts. Cut them into strips. Buttermilk makes the chicken tender and adds flavor. The flour and panko breadcrumbs create a crunchy outer layer. Next, the seasoning components give the chicken flavor. Garlic powder, onion powder, and paprika add depth. Cayenne pepper gives a kick, but you can adjust its amount. Salt and pepper enhance all flavors. Finally, you need vegetable oil for frying. It helps achieve that golden brown color. This full recipe gives you a delicious meal that is easy to make. To start, you need to marinate the chicken strips. Take your boneless, skinless chicken breasts and cut them into strips. Then, place them in a large bowl. Pour in 1 cup of buttermilk and mix well. The buttermilk helps tenderize the chicken. Let the chicken sit in the fridge for at least 30 minutes. This step is key for juicy, flavorful tenders. Next, prepare your breading stations. In a separate bowl, mix together 1 cup of all-purpose flour with the seasonings. Add 1 teaspoon of garlic powder, 1 teaspoon of onion powder, 1 teaspoon of paprika, and half a teaspoon of cayenne pepper. Season with salt and pepper to taste. Stir until it’s well combined. Now, set up your panko breadcrumb station. Pour 1 cup of panko breadcrumbs into another bowl. This will give your chicken tenders that delightful crunch. It’s time to cook! Heat vegetable oil in a large skillet over medium-high heat. You'll want it hot but not smoking. To test the oil, drop in a breadcrumb. If it sizzles, you're ready to go. Take the marinated chicken out of the buttermilk. Let the excess liquid drip off. First, dredge each strip in the seasoned flour. Shake off any extra flour. Then, dip each strip in the panko breadcrumbs. Press gently to make sure the crumbs stick well. Fry the chicken tenders in batches to avoid overcrowding the pan. Cook each side for about 3-4 minutes. Look for a golden brown color and a crispy texture. When flipping, use tongs to handle the strips carefully. Once they are cooked, remove the tenders from the skillet. Place them on a plate lined with paper towels to soak up the extra oil. This step helps keep them crispy. Enjoy your crispy homemade chicken tenders! For the full recipe, check the previous section. To get that perfect crunch, marinating time matters. I suggest at least 30 minutes in buttermilk. This time helps tenderize the meat and adds great flavor. The best frying temperature is key too. Heat the oil to medium-high heat, around 350°F. If it's too cool, the chicken will soak up oil. Too hot, and it will burn before cooking through. For dipping sauces, I love honey mustard and ranch. They add a nice kick to the crispy chicken. You can also try barbecue sauce for a smoky taste. Pair your chicken tenders with fries for a classic combo. A fresh salad works well too, adding a nice crunch and balance. If you want a healthier option, baking chicken tenders is easy. Preheat your oven to 400°F. Place the breaded chicken on a baking sheet with parchment paper. Bake for about 20-25 minutes, flipping halfway through. An air fryer is another great choice. It cooks the chicken evenly and gives a nice crisp without too much oil. Just set it to 400°F and cook for 10-12 minutes. You get great flavor with less fat. {{image_2}} To make spicy chicken tenders, you can change the seasoning. Add more cayenne pepper or use hot sauce. You can also mix in chili powder or crushed red pepper. These changes bring a bold taste. You’ll feel the heat with every bite. Adjust the spice to fit your taste. This way, you can enjoy a kick without it being too much for you. For a gluten-free version, swap out the flour and breadcrumbs. Use almond flour or coconut flour instead. For the breadcrumbs, try gluten-free panko or crushed cornflakes. These swaps still give a nice crunch. The flavor remains rich and satisfying. Your gluten-free friends will love this option. It's a great way to share tasty chicken tenders with everyone. You can add different seasonings or herbs for unique flavors. Try mixing in Italian seasoning, lemon zest, or fresh parsley. These additions brighten up the dish. You could also use smoked paprika for a deeper flavor. Experiment with what you like best. Customizing your chicken tenders makes them even more fun to eat. For the full recipe, check out the complete guide above. To keep your chicken tenders fresh, place them in an airtight container. Let them cool completely before sealing. Store them in the fridge for up to three days. If you want to keep them longer, freezing is a great option. To reheat your chicken tenders, use an oven or air fryer. Preheat your oven to 375°F (190°C) for ten minutes. Place the tenders on a baking sheet. Bake for about ten minutes, or until they’re hot and crispy. An air fryer works well too; set it to 350°F (175°C) for five to seven minutes. For freezing, separate your chicken tenders into uncooked and cooked. For uncooked tenders, freeze them on a baking sheet first. Once frozen, transfer them to a freezer bag for up to three months. For cooked tenders, allow them to cool, then place them in a freezer-safe container. They’ll last for about two months in the freezer. I recommend marinating chicken for at least 30 minutes. This time helps the chicken soak up the buttermilk. It makes the meat tender and adds flavor. If you have more time, marinating for up to 2 hours is even better. Just keep the chicken in the fridge while it soaks. Yes, you can use regular breadcrumbs. However, panko breadcrumbs give a lighter, crispier texture. They are larger and coarser than regular breadcrumbs. This means they fry up crunchier. If you use regular breadcrumbs, your tenders may not be as crispy. Many sauces pair perfectly with chicken tenders. Here are some popular options: - Honey mustard - Ranch dressing - Barbecue sauce - Buffalo sauce - Ketchup You can try different sauces to find your favorite. Each one adds a unique flavor to the tenders. For the full recipe, check out the complete guide to making crispy homemade chicken tenders. This article covered how to make delicious chicken tenders from scratch. You learned about the key ingredients, step-by-step cooking methods, and handy tips for crispy results. We also explored variations to suit different tastes and dietary needs. Remember, properly marinating and frying makes a big difference. Keep these tips in mind for tasty meals that everyone will love. Enjoy your cooking and feel free to experiment with flavors!

Looking for a tasty meal that’s easy to make? You’ve come to the right place! These crispy homemade chicken tenders are packed with flavor and simple to prepare. Made with …

Read more

Categories Appetizers

Fresh Peach Cake Delightfully Sweet Summer Treat

June 25, 2025 by Chef Theo
- 2 cups fresh peaches, peeled and diced - 1 ½ cups all-purpose flour - 1 cup granulated sugar Fresh peaches are the star of this cake. Their sweet and juicy flavor shines through each bite. Make sure to choose ripe peaches for the best taste. All-purpose flour gives the cake structure. Granulated sugar adds sweetness and helps create a tender crumb. - Powdered sugar for dusting - Spices: cinnamon and nutmeg You can add powdered sugar on top for a lovely finish. Cinnamon and nutmeg enhance the cake's flavor. They bring warmth and depth, making each slice even more delightful. - Choosing ripe peaches - Recognizing the best varieties When selecting peaches, look for ones that are slightly soft but not mushy. The skin should have a rich color, often yellow or reddish. I love using Freestone peaches because they easily come off the pit. They are sweet and juicy, perfect for baking. Always smell the peaches; they should have a sweet aroma that signals ripeness. Start by preheating your oven to 350°F (175°C). Grease and flour a 9-inch round cake pan. This helps your cake come out easily. Now, in a large mixing bowl, cream together the softened butter and granulated sugar. Mix until it looks light and fluffy. This step is key to a soft cake. Next, add the eggs one at a time. Mix well after each addition. Pour in the vanilla extract for extra flavor. In another bowl, combine the flour, baking powder, baking soda, salt, cinnamon, and nutmeg. These spices add warmth to your cake. Gradually add this dry mix to the creamed butter and sugar. Alternate with the buttermilk. Start and end with the flour mix. Mix until just combined; don’t overdo it. Now, gently fold in the diced peaches. Be careful not to mix too much. Pour the batter into your prepared cake pan. Smooth the top with a spatula to make it even. Bake in your preheated oven for 35-40 minutes. Check if it's done by inserting a toothpick in the center. If it comes out clean, your cake is ready! Let it cool in the pan for 10 minutes. After that, move it to a wire rack to cool completely. You can dust it with powdered sugar if you like. Enjoy your Fresh Peach Cake Delightfully Sweet Summer Treat! For complete instructions, check the Full Recipe. Buttermilk is key to a moist cake. It adds richness and tang. The acid in buttermilk breaks down the gluten, giving a tender crumb. To enhance flavor, use ripe, sweet peaches. Fresh fruit makes a big difference. Always taste your peaches before baking. The sweeter they are, the better your cake will be. Avoid overmixing the batter. Mix just until the flour blends in. Overmixing leads to a dense cake. When baking, keep an eye on your cake. Check it at the 35-minute mark. A toothpick should come out clean but moist. After baking, cool the cake in the pan for 10 minutes. This helps it set and keeps it from breaking. This cake pairs well with ice cream or whipped cream. A scoop of vanilla ice cream makes every bite special. For a pretty presentation, dust the top with powdered sugar. You can also add fresh peach slices for color. Serve it on a nice plate, and your guests will be impressed. For the full recipe, refer to the earlier section. {{image_2}} You can switch up your peach cake in fun ways. One great style is the upside-down fresh peach cake. This cake has juicy peaches on the bottom. When you flip it, the peaches sit on top, making it look pretty. The caramelized peaches add a sweet touch that everyone loves. Another option is a peach cake with almond extract. This adds a nutty flavor that pairs well with peaches. Just swap some vanilla extract for almond extract in your batter. You’ll get a new taste that surprises your friends! Don't feel stuck with just peaches! You can use other fruits, too. Seasonal fruits like plums or cherries work well. They add different flavors and colors to your cake. Mixing berries with peaches is also a fun idea. Try blueberries or raspberries for a fruity burst. Just make sure to adjust the amount of sugar since berries can be tart. This mix will give you a vibrant and delicious cake. If you need gluten-free options, you’re in luck! You can use almond flour or a gluten-free blend. Make sure to adjust the baking time, as these flours can change how the cake bakes. Want a healthier cake? You can reduce the sugar in the recipe. Start by cutting the sugar by a third. This way, you can enjoy your cake without feeling guilty. You still get the sweet taste from the fresh peaches. Store your fresh peach cake at room temperature for up to three days. Wrap it in plastic wrap to keep it moist. If you want to keep it longer, place it in the fridge. However, be aware that storing in the fridge can dry it out. To keep your cake fresh longer, use an airtight container. This will help to maintain its texture and flavor. To freeze your cake, first let it cool completely. Wrap it tightly in plastic wrap. Place the wrapped cake in a freezer-safe bag or container. This helps prevent freezer burn and keeps the cake fresh. When you’re ready to enjoy it, move the cake to the fridge overnight. Thawing it slowly keeps it moist. You can also reheat slices in the microwave for a warm treat. Your fresh peach cake lasts about three days at room temperature. In the fridge, it can last up to a week. If frozen, it stays good for about three months. Watch for signs of spoilage, like a dry texture or mold. If it smells off or looks strange, it's best to toss it. Enjoy your cake while it's fresh for the best taste! To keep your fresh peach cake from sinking, follow a few simple steps. First, make sure to coat the diced peaches in a bit of flour before adding them to the batter. This helps them stay afloat during baking. Second, avoid overmixing the batter after you fold in the peaches. Gently combine the ingredients to keep air in the batter. This air helps the cake rise and stay fluffy. Lastly, don't add too many peaches. Stick to the amount listed in the Full Recipe to maintain balance. Yes, you can make this peach cake ahead of time with ease. I recommend baking it a day in advance. Once cooled, wrap the cake tightly in plastic wrap. This keeps it fresh. You can store it at room temperature for up to two days. If you want to keep it longer, consider freezing it. Wrap the cake well and place it in the freezer. When ready to serve, just thaw it overnight in the fridge. To ripen peaches quickly, place them in a paper bag. The bag traps ethylene gas, which speeds up ripening. Add a ripe banana to the bag for faster results. Keep the bag at room temperature for one to two days. Check the peaches daily. When they feel soft, they are ready to use in your cake. In this post, I covered key ingredients, step-by-step instructions, and helpful tips for making fresh peach cake. I shared variations to suit different tastes and dietary needs, plus storage info to keep your cake fresh. Remember, using ripe peaches and proper mixing techniques makes a big difference. Whether you enjoy it on its own or with ice cream, this cake is sure to please. Now you can create your own delicious peach cake and impress your friends and family.

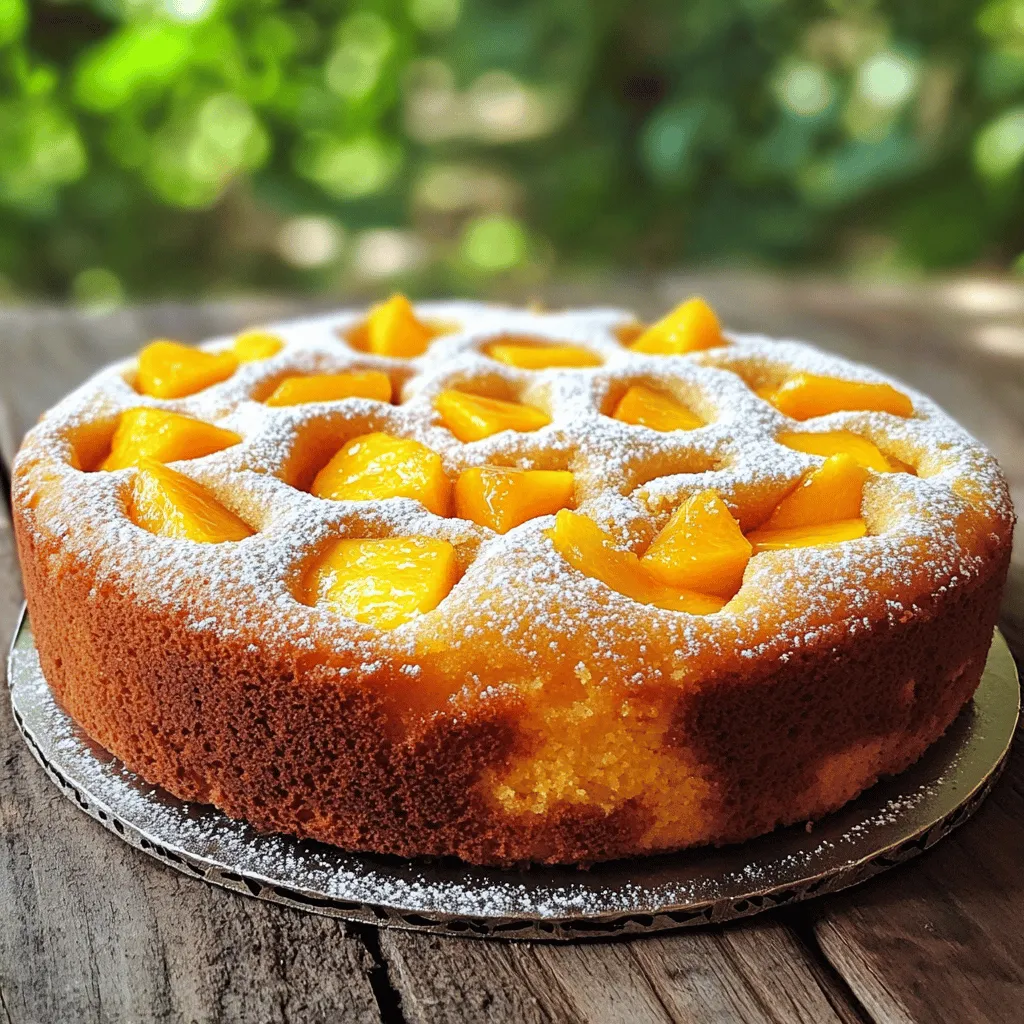
Summer is here, and it’s time to enjoy sweet and juicy peaches! This Fresh Peach Cake is the perfect way to celebrate the season. It combines ripe peaches with a …

Read more

Categories Desserts

Cheddar Ranch Chicken Juicy and Flavorful Delight

June 24, 2025 by Chef Theo
- 4 boneless, skinless chicken breasts - 1 cup cheddar cheese, shredded - 1 cup ranch dressing - 1/2 cup plain breadcrumbs - 1/2 cup panko breadcrumbs - 1 tablespoon garlic powder - 1 teaspoon onion powder - 1 teaspoon smoked paprika - 1/2 teaspoon salt - 1/2 teaspoon black pepper - Fresh parsley, chopped (for garnish) To make Cheddar Ranch Chicken, you need fresh chicken breasts. I love using boneless, skinless chicken because it cooks evenly. You also need shredded cheddar cheese and ranch dressing. The cheese melts beautifully, giving a creamy touch. The ranch adds a zesty flavor that makes each bite special. For the coating, mix plain and panko breadcrumbs. This combo gives a great crunch. I also add some spices for extra flavor. Garlic powder and smoked paprika bring warmth, while onion powder enhances the taste. Salt and black pepper round it all out. Once cooked, fresh parsley makes a perfect garnish. It adds color and freshness to the dish. If you want to see the full process, check the Full Recipe. Enjoy cooking this delicious meal! - Preheat the oven: Start by preheating your oven to 375°F (190°C). This step is crucial for even cooking. - Prepare chicken for cooking: Take your chicken breasts and place them between two sheets of plastic wrap. Use a meat mallet or rolling pin to gently pound them to an even thickness of about 1 inch. This helps the chicken cook evenly. - Make seasoning mix: In a small bowl, mix together garlic powder, onion powder, smoked paprika, salt, and black pepper. This blend adds a delicious kick to your chicken. - Coat chicken with ranch dressing: Take the pounded chicken breasts and rub the seasoning mix all over them. Then, dip each piece into ranch dressing. Make sure every part is coated well. Allow any extra dressing to drip off. - Prepare breadcrumb mixture: In another bowl, combine plain breadcrumbs with panko breadcrumbs. These will create a crispy coating. Add half of the shredded cheddar cheese to this mixture and stir well. - Bread the chicken: Dredge the ranch-coated chicken breasts in the breadcrumb and cheese mixture. Press down gently so the mixture sticks well. - Baking instructions and timing: Place the breaded chicken in a greased baking dish. Bake for about 25-30 minutes. The chicken should reach an internal temperature of 165°F (75°C) when done. - Cheese topping instructions: In the last 5 minutes of baking, pull the dish out and sprinkle the remaining cheddar cheese on top. Put it back in the oven until the cheese melts and bubbles. Follow these steps, and you will have a tasty Cheddar Ranch Chicken, ready to impress! For the complete recipe, check out the [Full Recipe]. To keep your chicken juicy, start with the right thickness. Pound the chicken breasts to about 1 inch. This helps them cook evenly. Use a meat thermometer to check the internal temperature. It should reach 165°F (75°C). This ensures the chicken is safe to eat and juicy. For a crispy coating, use a mix of plain and panko breadcrumbs. The panko adds extra crunch. Press the breadcrumbs onto the chicken firmly. This helps them stick during baking. Bake the chicken at 375°F (190°C) for 25-30 minutes for the best results. Want to kick up the flavor? Try adding more spices to your seasoning mix. You can include cayenne pepper for heat or Italian herbs for a twist. If you love garlic, add more garlic powder for a stronger taste. For dips, ranch dressing pairs well. You can also serve it with honey mustard or barbecue sauce. These dips add great flavor and fun to your meal. Serving your Cheddar Ranch Chicken nicely makes it even more appealing. Place the chicken on a wooden cutting board for a rustic look. Garnish with fresh parsley for color. Pair your chicken with roasted vegetables or a fresh salad. This adds color and nutrition to your plate. A colorful meal makes it more inviting and enjoyable. For the full recipe, check out the detailed instructions above. {{image_2}} You might want to swap out ranch dressing. A great choice is Greek yogurt mixed with herbs. You can also try homemade ranch using buttermilk, mayo, and spices. For cheese, if you lack cheddar, use mozzarella or Monterey Jack. Both melt well and add nice flavor. You can make Cheddar Ranch Chicken in an air fryer. It cooks faster and gives a crispy texture. Set the air fryer to 375°F and cook for 15-20 minutes. Check the chicken’s internal temp is 165°F. Grilling is another option. It adds a smoky taste. Preheat the grill and cook each side for about 6-7 minutes. Baking keeps the chicken juicy. Each method has its perks! You can prepare Cheddar Ranch Chicken ahead of time. Season and coat the chicken, then store it in the fridge. Cook it the next day for a quick meal. For leftovers, let the chicken cool. Place it in an airtight container and store it in the fridge for up to three days. If you want to freeze the chicken, wrap it tightly in foil or freezer bags. It keeps well for up to three months. Just thaw in the fridge before reheating. For the full recipe, check out the Cheddar Ranch Chicken recipe. To keep your Cheddar Ranch Chicken fresh, store leftovers right after cooling. Place the chicken in an airtight container. This helps avoid any unwanted moisture. You can also wrap it tightly in plastic wrap and then place it in a container. - Use glass or plastic containers with lids for best results. - If you want to save space, use a vacuum-sealed bag. Reheating your chicken carefully is key to keeping it juicy. For best results, use an oven or microwave. If using an oven, preheat it to 350°F (175°C). - Place the chicken in a baking dish. - Cover it with foil to keep moisture in. - Heat for about 15-20 minutes, or until warm. If using a microwave, place the chicken on a microwave-safe plate. Heat on medium power for 2-3 minutes. Always check the internal temperature. It should reach 165°F (75°C) before serving. Enjoy your delicious meal again! What can I serve with Cheddar Ranch Chicken? You can serve Cheddar Ranch Chicken with many sides. I love pairing it with roasted vegetables or a fresh salad. Mashed potatoes or rice also work well. These sides complement the rich flavors of the chicken. Can I make this recipe gluten-free? Yes, you can make this recipe gluten-free. Just use gluten-free breadcrumbs instead of regular ones. Many brands offer gluten-free options that taste great. Check the ranch dressing label too, as some may contain gluten. How long does it take to cook chicken in the oven? It takes about 25 to 30 minutes to cook chicken in the oven at 375°F (190°C). The chicken should be cooked through and reach an internal temperature of 165°F (75°C). Always use a meat thermometer for best results. Can I use frozen chicken for this recipe? You can use frozen chicken, but it’s best to thaw it first. Cooking from frozen can lead to uneven cooking. If you must use frozen chicken, extend the cooking time to ensure it’s fully cooked. How many calories are in Cheddar Ranch Chicken? Cheddar Ranch Chicken has around 400 calories per serving. This can vary based on the specific brands of ingredients you use. Always check the labels for accurate information. Is this recipe suitable for meal prep? Yes, this recipe is great for meal prep. You can make it ahead and store it in the fridge for up to four days. It reheats well in the oven or microwave, making it easy to enjoy later. For the full recipe, check the earlier sections. You now have a clear and fun way to make Cheddar Ranch Chicken. We covered ingredients, preparation steps, and tips for success. You can adjust flavors, try different cooking methods, and even meal prep for later. Store leftovers wisely and reheat like a pro. This dish is simple, yummy, and perfect for any night. Enjoy every bite and impress your friends with your skills! Happy cooking!

Are you looking for a simple yet delicious dinner idea? Let’s talk about Cheddar Ranch Chicken! This dish features juicy chicken, creamy ranch dressing, and cheesy goodness. It’s easy to …

Read more

Categories Dinner

How To Make Quick-Pickled Red Onions Easily

June 24, 2025 by Chef Theo
- 1 large red onion, thinly sliced - 1 cup apple cider vinegar - 1 cup water - 2 tablespoons granulated sugar - 1 tablespoon salt - 1 teaspoon black peppercorns - 1 teaspoon mustard seeds - 1 clove garlic, thinly sliced - Optional: fresh herbs (like dill or thyme) for added flavor To make quick-pickled red onions, you need a few simple items. First, grab one large red onion. Slice it thinly, so it soaks up the brine well. You’ll also need one cup of apple cider vinegar. This vinegar adds a tangy taste that makes the onions pop. Next, gather one cup of water to balance the vinegar. Add two tablespoons of granulated sugar for sweetness. This sugar helps to cut through the acidity. Then, use one tablespoon of salt to enhance the flavor and help preserve the onions. For extra taste, you can add a teaspoon each of black peppercorns and mustard seeds. These spices bring warmth and depth. You can also include one thinly sliced clove of garlic. This step adds a nice punch. If you like, toss in some fresh herbs like dill or thyme. They will add a lovely aroma to your pickles. All these ingredients come together to make a delicious brine. This brine is the key to your quick-pickled red onions. For the full recipe, refer to the Zesty Quick-Pickled Red Onions section. - Peel and slice the red onion thinly. - Place the sliced onions in a clean, airtight jar or container. - In a medium saucepan, combine apple cider vinegar, water, sugar, salt, black peppercorns, mustard seeds, and sliced garlic. - Bring the mixture to a gentle boil over medium heat. Stir until the sugar and salt dissolve. - Pour the hot pickling liquid over the onions in the jar. - Ensure the onions are fully submerged and press down if necessary. - Allow the jar to cool to room temperature. - Seal tightly and refrigerate for at least 30 minutes. This quick-pickling method adds a zesty touch to any meal. You can find the full recipe for these quick-pickled red onions above! To make great quick-pickled red onions, you need fresh onions. Look for red onions that feel firm and heavy. They should have smooth skin without soft spots. Uniform slicing is key. Thin slices allow the onions to pickle evenly. Use a sharp knife or a mandoline for the best results. You can add extra spices for more flavor. Try cumin seeds or coriander seeds for a twist. Adding a pinch of chili flakes gives a nice kick. Balancing sweetness and acidity is important. If you find the pickles too sweet, add a splash more vinegar. If too sour, add a bit of sugar. Taste as you go! Quick-pickled red onions add a burst of flavor to many dishes. Use them on tacos, sandwiches, or salads. They also work well as a garnish for grilled meats. Pair them with rich foods to brighten up the meal. Their tangy taste can enhance almost any dish! For more ways to enjoy them, check out the Full Recipe. {{image_2}} You can use different types of vinegar for your quick-pickled red onions. White vinegar is a popular choice. It gives a clean, crisp flavor. It also has a strong acidity. This makes your pickles zesty and tangy. Rice vinegar is another great option. It has a milder taste and balances the sweetness well. It works well if you want a softer flavor. Try both to see which one you like best! You can spice up your pickled onions with extra ingredients. Adding chili flakes gives a nice heat. Just a pinch can change the taste. If you prefer milder flavors, skip the chili. Using fresh herbs can also enhance the taste. Cilantro works well and adds a fresh note. You can also try dill or thyme for a unique twist. Experiment with herbs to find your favorite mix! Not a fan of granulated sugar? No problem! You can use honey or maple syrup instead. Both options add sweetness and a bit of flavor. Honey gives a floral note, while maple syrup has a warm, earthy taste. Feel free to adjust the sweetness to match your taste. Start with less and add more if you want. Making quick-pickled red onions is all about personal preference. You can find your perfect balance! To keep your quick-pickled red onions fresh, use a glass jar with a tight lid. Mason jars work great for this. Avoid plastic containers, as they can affect the taste. Always clean your jar well before using it. This helps prevent any unwanted bacteria. After preparing your pickles, store them in the fridge. This keeps the onions crisp and tasty. Quick-pickled red onions last about 2 weeks in the fridge. The vinegar helps preserve them, but always check for signs of spoilage. If you see any mold or an off smell, throw them away. They may lose crunch over time, but the flavors will deepen. You can freeze quick-pickled onions, but it may change their texture. If you decide to freeze them, use freezer-safe bags or containers. Make sure to leave some space for expansion. Thaw them in the fridge before use. This way, they stay as fresh as possible. For best results, enjoy them fresh rather than frozen. Check out the Full Recipe for all the details on making these zesty onions! Quick-pickled red onions last about 2 weeks when kept in the fridge. Store them in a clean glass jar with a tight lid. As time goes on, they may lose some crunch but still taste great. Yes, you can use other onions. Sweet onions and yellow onions work well too. Each type brings a different flavor. Experiment to find your favorite! Pickled red onions are great on many dishes. They add a punch to tacos, sandwiches, and salads. Try them on burgers or as a simple snack with cheese. The bright flavor makes any meal pop! To spice up your pickles, add chili flakes or sliced jalapeños. You can also use spicy mustard seeds. Adjust the heat to your taste. Start small; you can always add more! Yes, you can easily double or halve the recipe. Just adjust the ingredients in the same ratio. This way, you can make more or less as needed. Enjoy experimenting with your flavors! For the full recipe, check out the details for making zesty quick-pickled red onions. Pickling red onions is simple and rewarding. We covered essential ingredients, step-by-step instructions, and tips for flavor and storage. You can customize your pickles by trying different vinegars or adding spices. Remember to store them correctly for the best taste. With these easy steps, you can enjoy crunchy, tangy pickled onions in just thirty minutes. Experiment with flavors and enjoy the freshness they bring to your dishes. Happy pickling!

Pickling red onions is quick and easy, bringing a burst of flavor to many dishes. With just a few ingredients, you can create a fresh, tangy topping that elevates salads, …

Read more

Categories Dinner

Heavenly Summer Peach Bars Easy and Delicious Treat

June 24, 2025 by Chef Theo
For these heavenly summer peach bars, you need 2 cups of fresh peaches. Make sure to peel and dice them. Choose ripe peaches for the best flavor. They give the bars a sweet and juicy taste. You can use white or yellow peaches based on your preference. Next, gather the dry ingredients. You will need: - 1 cup all-purpose flour - 1 cup rolled oats - ½ cup brown sugar - ½ cup white sugar - 2 teaspoons baking powder - ½ teaspoon ground cinnamon - ¼ teaspoon salt These ingredients form the crust and topping. The oats add nice texture. The sugars give sweetness, while the baking powder helps the bars rise. Now, let's move to the wet ingredients. You need: - ½ cup unsalted butter, melted - 1 teaspoon vanilla extract - 1 tablespoon lemon juice The melted butter binds everything together. The vanilla adds a lovely aroma. Lemon juice keeps the peaches fresh and brightens their flavor. You can find the full recipe here. Start by preheating your oven to 350°F (175°C). Grease a 9x9-inch baking pan with butter or non-stick spray. This helps the bars come out easily after baking. Take 2 cups of fresh peaches. Peel and dice them into small pieces. Toss the diced peaches with 1 tablespoon of lemon juice. This adds flavor and keeps the peaches bright. Let them sit for about 10 minutes to soak in the juice. In a large bowl, mix together the dry ingredients. Combine 1 cup of all-purpose flour, 1 cup of rolled oats, ½ cup of brown sugar, ½ cup of white sugar, 2 teaspoons of baking powder, ½ teaspoon of ground cinnamon, and ¼ teaspoon of salt. Stir well to blend everything together. Melt ½ cup of unsalted butter and add it to the dry mixture. Also, mix in 1 teaspoon of vanilla extract. Stir until the mixture is crumbly. Press about half of this mixture into the bottom of your greased pan. Spread the marinated peaches evenly over the crust. If you want extra crunch, sprinkle 1 cup of granola on top. Finally, crumble the remaining mixture over the peaches. Bake in the preheated oven for 30-35 minutes. Check for a golden brown top and bubbly peaches. Once baked, remove the pan from the oven and let it cool completely. This step is key before cutting them into bars. Enjoy your heavenly summer peach bars! For the full recipe, check out the earlier section. For these peach bars, I recommend using ripe, fresh peaches. Look for peaches that are slightly soft to the touch. They should smell sweet and fragrant. Yellow peaches are great, but white peaches add a nice twist too. Avoid hard peaches; they won't soften well during baking. To get the right texture, you need to balance the wet and dry ingredients. Diced peaches add moisture, but do not overmix the batter. Mixing too much can lead to tough bars. Press half of the crumb mixture firmly into the pan for a sturdy base. This way, the top layer remains crumbly and light. To make your peach bars look stunning, dust them with powdered sugar before serving. You can also add fresh peach slices on top. A few mint leaves create a nice pop of color. Serve them on a pretty platter for a special touch. For a fun twist, drizzle some honey or caramel sauce over the bars. For the complete recipe, refer to the Full Recipe provided. {{image_2}} You can elevate your peach bars with spices. Cinnamon is a classic choice. It adds warmth and depth. A pinch of nutmeg can also work wonders. You might even try cardamom for a unique twist. Mix your chosen spice into the dry ingredients. Just a little adds a lot of flavor. If you need a gluten-free version, it's simple. Swap all-purpose flour for gluten-free flour. Many brands work well in baking. You can also use almond flour for a nutty taste. Just make sure your oats are certified gluten-free. This way, everyone can enjoy these bars. Adding nuts or seeds is a great way to boost texture. Chopped almonds or walnuts add crunch. They also give a nice nutty flavor. If you prefer seeds, try sunflower or pumpkin seeds. Just fold them into the crumb mixture. This makes your bars even more delicious and filling. For more delicious ideas, check out the Full Recipe. To keep your peach bars fresh, place them in an airtight container. Make sure to let them cool completely before sealing. Store them at room temperature for up to three days. If it’s hot, consider putting them in the fridge. This helps keep them from getting too warm and soft. You can freeze these peach bars for longer storage. First, let them cool fully. Wrap each bar in plastic wrap, then place them in a freezer bag. This keeps them fresh for up to three months. When you want to enjoy them, just take out a bar and let it thaw at room temperature. To reheat your peach bars, preheat the oven to 350°F (175°C). Place the bars on a baking sheet. Heat for about 10 to 15 minutes until warm. You can also use a microwave if you want a quicker option. Heat for 15 to 20 seconds at a time until they are warm but not hot. Enjoy your Heavenly Summer Peach Bars! For the full recipe, check the earlier section. You can tell when the peach bars are done by looking at the top. It should be a nice golden brown. You can also check if the peaches are bubbly around the edges. A toothpick can help too. Insert it in the center. If it comes out clean, your bars are ready! Yes, you can use frozen peaches! Just remember to thaw and drain them first. This helps remove excess water. You want your bars to stay firm and not too soggy. Fresh peaches give a better flavor, but frozen works in a pinch. If you need a butter substitute, try using coconut oil or applesauce. Both work well in baking. They add moisture and keep your bars soft. You can also use margarine if you prefer. Just make sure it’s a similar amount as the butter in the recipe. Peaches are tasty and good for you! They are low in calories and high in vitamins. They contain vitamin C, which helps your immune system. Peaches also have fiber, which is great for digestion. Eating peaches can support healthy skin, too. You can boost the nutrition of your peach bars easily! Add some chia seeds or flaxseeds into the mixture. This adds healthy fats and fiber. You can also swap some white flour for whole wheat flour. Using less sugar or natural sweeteners can make it even better. Check out the Full Recipe for more ideas! You learned about making delicious peach bars from fresh ingredients. We covered each step, from preparing peaches to baking them perfectly. I shared tips for texture, storage, and even variations to try. Remember, using the right peaches and adding your favorite ingredients can make a big difference. Enjoy your peach bars fresh or frozen, and feel free to get creative with flavors. With this guide, you can bake tasty snacks that everyone will love. Happy baking!

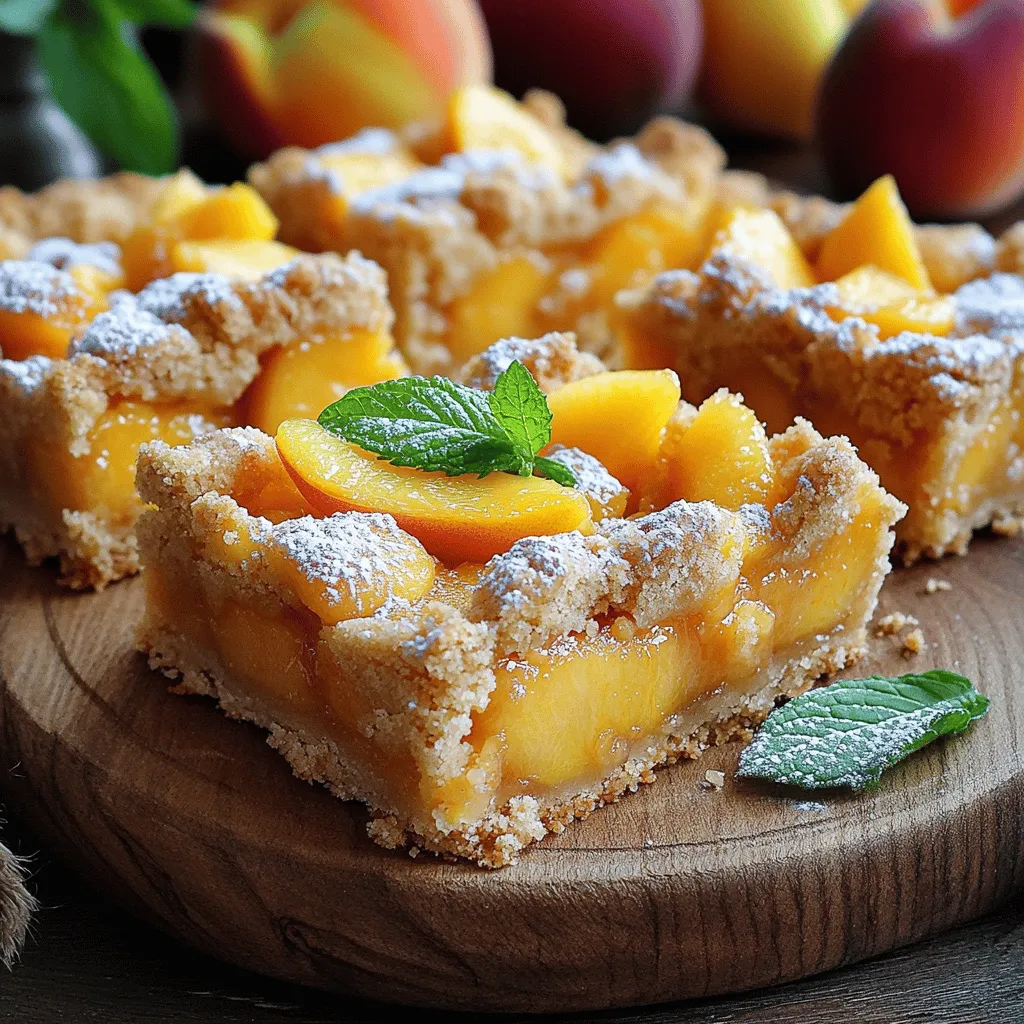
Summer is the perfect time to enjoy fresh peaches, and I’m excited to share my easy recipe for Heavenly Summer Peach Bars! These sweet treats are simple to make and …

Read more

Categories Desserts

Oven-Roasted Corn in Foil with Garlic Butter Delight

June 24, 2025 by Chef Theo
For this tasty dish, you need: - 4 ears of fresh corn, husked - 1/2 cup unsalted butter, softened - 4 cloves garlic, minced - 2 tablespoons fresh parsley, chopped - 1 teaspoon smoked paprika - 1 teaspoon salt - 1/2 teaspoon black pepper - Aluminum foil These ingredients create a rich flavor that makes the corn shine. The garlic butter adds a lovely touch to the sweet corn. You can customize your corn by adding extra ingredients. Here are some ideas: - Crushed red pepper flakes for heat - Cheese, like Parmesan or feta, for creaminess - Lemon juice for a bright twist Feel free to mix and match based on your taste. These add-ins can bring new life to the recipe. To make this dish, you will need: - A baking sheet or oven rack - A small mixing bowl - A sharp knife for husking the corn - A spoon or spatula for mixing Having the right tools makes the cooking process smoother. With these ingredients and equipment, you are ready to enjoy oven-roasted corn in foil with garlic butter. For the full recipe, check the main article. Start by husking the corn. Remove all the green leaves and silk strands. This step is key for a great taste. Make sure you have clean ears of corn. Rinse them under cool water to wash away any dirt. Pat them dry with a towel. Set your corn aside while you prepare the garlic butter. In a small bowl, combine the softened butter and minced garlic. Use a fork to mix them well. Add in the chopped parsley for a fresh taste. Next, sprinkle in the smoked paprika, salt, and black pepper. Stir the mixture until it’s smooth and creamy. This garlic butter is the magic that makes the corn so tasty! Take a large piece of aluminum foil for each ear of corn. Lay the corn in the center of the foil. Use a spoon to spread a generous amount of the garlic butter over the corn. Make sure every side is coated. After that, fold the foil tightly around the corn. This keeps the steam in while it cooks. Place the wrapped corn on an oven rack or a baking sheet. Roast it in the oven at 400°F for 25-30 minutes. The corn should be tender and smell amazing. When it’s ready, unwrap the foil carefully. Watch out for the hot steam! Serve the corn warm, drizzling any leftover garlic butter over the top. Enjoy this delicious treat! For the complete recipe, check out the [Full Recipe]. To make the best garlic butter, start with soft butter. Use a small bowl to mix it. Add minced garlic, chopped parsley, smoked paprika, salt, and black pepper. Stir until smooth. This step is key. You want a great balance of flavors. Feel free to get creative with your seasonings. Try adding a squeeze of lemon juice for brightness. You can also use chili powder for a spicy kick. Don’t forget about cheese. A sprinkle of Parmesan or feta works wonders. These tweaks can make your corn even better. Roasting corn in foil traps steam. This keeps it tender and juicy. Make sure to fold the foil tightly. This prevents the steam from escaping. Roast the corn for 25 to 30 minutes. Check for tenderness by piercing it with a fork. If it feels soft, it’s ready! Enjoy this easy and tasty dish from the Full Recipe. {{image_2}} You can change the taste of oven-roasted corn in foil easily. Try adding lime juice for a zesty kick. A sprinkle of chili powder adds heat and excitement. You can swap garlic butter for herb butter, too. Mixing in basil or cilantro gives a fresh twist. For a cheesy touch, sprinkle grated Parmesan before wrapping. Your corn can become a new dish with these ideas. This oven-roasted corn recipe is naturally gluten-free. All ingredients are safe for those avoiding gluten. Just ensure your butter is pure and free from additives. If you want extra flavor, use gluten-free seasoning mixes. You can add fresh herbs like thyme or dill for even more taste. Enjoy your corn worry-free! The recipe is vegetarian, making it perfect for all diets. You can keep it simple with the classic garlic butter. For a vegan twist, use vegan butter instead. Try adding nutritional yeast for a cheesy flavor without dairy. You can also mix in different veggies, like bell peppers or zucchini, for a colorful side. This way, you can enjoy a hearty dish full of flavor and nutrients. After enjoying your oven-roasted corn, store any leftovers in the fridge. Place the corn in an airtight container. This keeps the corn fresh and tasty. You can also wrap it tightly in plastic wrap. Store it in the fridge for up to three days. To reheat your corn, use the oven for the best results. Preheat your oven to 350°F (175°C). Wrap the corn in foil to keep it moist. Heat for about 10-15 minutes. You can also use the microwave. Place the corn on a plate and cover it with a damp paper towel. Heat in short bursts of 30 seconds, checking until warm. If you want to save corn for later, freezing is a great option. First, cook the corn as per the recipe. Let it cool completely before freezing. Wrap each ear in plastic wrap and place them in a freezer bag. This way, they stay fresh for up to six months. When you’re ready to use, thaw them in the fridge overnight before reheating. For a quick fix, you can also toss them in hot water for a few minutes. Enjoy your corn later with ease! Roast corn in foil for 25 to 30 minutes. This time gives the corn a tender bite. Make sure your oven is preheated to 400°F (200°C) for best results. Check the corn after 25 minutes. If it is not tender, roast for another 5 minutes. Using frozen corn is not ideal for this recipe. Fresh corn gives the best taste and texture. Frozen corn may not cook evenly in the oven. If you must use frozen corn, thaw it first. Then, follow the same steps to wrap and roast. You can use many herbs in garlic butter. Basil, cilantro, or dill work great. Each herb adds a unique flavor twist. For a spicy kick, try adding some red pepper flakes. Mix and match herbs to find your favorite blend. Enjoy experimenting with flavors! In this blog post, we covered key ingredients and equipment for roasting corn. I shared step-by-step instructions for prepping, making garlic butter, and roasting the corn. Tips on perfecting flavor and best practices were included, along with fun variations and storage info. Roasting corn is easy and fun. Explore flavors and ways to enjoy this dish, even with leftovers. Try your favorite seasonings to make it your own. Enjoy great corn today!

Looking for a tasty side dish that’s simple and packed with flavor? Oven-Roasted Corn in Foil with Garlic Butter Delight is your answer! This easy recipe takes sweet corn to …

Read more

Categories Appetizers

Easy Canned Peach Cobbler Simple and Tasty Delight

June 24, 2025 by Chef Theo
To make the easiest canned peach cobbler, you need just a few simple ingredients. This recipe is all about keeping it simple yet delicious. Here’s what you will need: - 2 cans of sliced peaches in syrup (15 oz each) - 1 cup all-purpose flour - 1 cup granulated sugar (divided) - 1 cup milk - 1/2 cup unsalted butter (melted) - 2 teaspoons baking powder - 1 teaspoon vanilla extract - 1/2 teaspoon ground cinnamon - A pinch of salt The canned peaches give this cobbler a sweet and juicy base. The sugar adds a nice touch of sweetness, while the flour helps create that perfect, thick batter. Milk and butter make the batter rich and creamy. Baking powder helps it rise, giving that lovely light texture. Feel free to explore optional toppings like whipped cream or vanilla ice cream to make it even better. These extras can turn an already tasty dessert into a showstopper. For the full recipe, check out the details provided above. - Preheating the oven Start by preheating your oven to 350°F (175°C). This step is key for even cooking. - Mixing the batter In a medium bowl, mix melted butter and 1 cup of sugar. Stir well to blend. Next, add flour, baking powder, milk, vanilla extract, ground cinnamon, and a pinch of salt. Mix until you have a thick batter. - Layering ingredients Pour the batter into a greased 9x13-inch baking dish. Spread it evenly. Carefully layer the canned peaches on top, including the syrup. Avoid stirring; the batter will rise around the peaches while baking. - Pouring and layering Once your peaches are layered, sprinkle the remaining 1/4 cup of sugar over the top. This adds extra sweetness and a nice finish. - Baking time and temperature Place the dish in your preheated oven. Bake for about 35-40 minutes. - Checking for doneness To check if it’s done, insert a toothpick into the center. It should come out clean. The top will be golden brown. Let it cool for about 10 minutes before serving. For the full recipe, check out the details above. Enjoy your peach cobbler! To make the best cobbler, you need a thick batter. This helps keep the peaches from sinking. When you mix the batter, do not overwork it. Just stir until the dry and wet ingredients blend. When layering peaches, spread them evenly over the batter. Pour the peaches gently on top. Let the batter rise around the peaches as it bakes. This creates a lovely texture. Keep an eye on the baking time. Bake at 350°F for 35-40 minutes. The top should turn a nice golden brown. Use a toothpick to check for doneness. If it comes out clean, your cobbler is ready! Serve your peach cobbler warm for the best taste. A scoop of vanilla ice cream adds a creamy touch. You can also use whipped cream for a lighter option. For garnish, sprinkle a bit of cinnamon on top. This adds flavor and makes it look nice. You can also add fresh mint leaves for a pop of color. Enjoy your delicious treat! {{image_2}} Adding spices Spices can boost the taste of your cobbler. Try adding nutmeg or ginger for a warm flavor. A dash of cardamom can also add a unique twist. Each spice gives a new taste that makes your cobbler special. Using different canned fruits You can switch out peaches for other canned fruits. Try using pears, cherries, or apricots. Each fruit offers a different flavor and sweetness. Mixing fruits can also create a fun, colorful cobbler. Incorporating nuts Nuts add crunch and flavor to your cobbler. Chopped pecans or walnuts work well. They also add healthy fats and protein. Sprinkle them on top before baking for a nice texture. Low-sugar options You can cut sugar in this recipe. Use half the amount or try a sugar substitute. Applesauce can also replace some sugar. This lets you enjoy the cobbler with less sweetness. Gluten-free substitutions If you need gluten-free options, use gluten-free flour instead of all-purpose flour. Many brands offer great taste and texture. This way, everyone can enjoy the cobbler without worry. Dairy-free options To make a dairy-free version, switch milk with almond or oat milk. Use vegan butter instead of regular butter. These swaps keep the cobbler rich and creamy without dairy. For the full recipe, follow the instructions carefully. Enjoy creating your own version of this easy canned peach cobbler! To keep your peach cobbler fresh, store it in the fridge. Place it in an airtight container or cover it tightly with plastic wrap. This will help avoid drying out or picking up other food smells. It should last up to four days in the fridge. If you want to save it longer, freezing is a great option. For freezing, first let the cobbler cool completely. Then, cut it into individual portions. Wrap each piece in plastic wrap, then place them in a freezer-safe bag. Remember to label the bag with the date. This way, you can enjoy your cobbler later, up to three months later. When it’s time to enjoy your leftovers, reheating is easy. For the best results, use the oven. Preheat it to 350°F (175°C). Place the cobbler in an oven-safe dish. Cover it with foil to keep it moist. Heat for about 15-20 minutes or until warmed through. If you’re in a hurry, the microwave works too. Place a serving in a microwave-safe bowl. Heat it in 30-second intervals until warm. Be careful, as it can get hot quickly. Enjoy your peach cobbler warm, just as it should be! Can I use fresh peaches instead? Yes, you can use fresh peaches. Peel and slice about 4-5 ripe peaches. This adds a fresh taste and makes your cobbler even better. Just make sure to adjust the syrup. You might need to add a bit of sugar to match the sweetness of canned peaches. How do I know when the cobbler is done? Check the cobbler after 35 minutes. The top should be golden brown. Insert a toothpick in the center. If it comes out clean, your cobbler is ready. If not, bake a little longer and check again. Can I make it ahead of time? Yes, you can make it ahead. Bake the cobbler and let it cool. Store it in the fridge for up to 2 days. Reheat it in the oven before serving. This keeps it warm and fresh. What to do if the cobbler is too soggy? If your cobbler is soggy, try baking it longer. Increase the time by 5-10 minutes. You can also cover the top with foil to prevent burning while it cooks more. Fixing a burnt top If the top is burnt, cover it with foil. This prevents further burning while the inside cooks. You can also serve it with whipped cream to hide any burnt parts. Adjusting for a thicker batter If your batter is too runny, add a little more flour. Start with 1 tablespoon and mix well. This should help thicken it up without changing the flavor. This blog post covered everything you need to know about making peach cobbler. We talked about the ingredients, preparation, baking process, and perfecting your dish. I shared tips on serving and variations for unique flavors. Lastly, we explored storage and reheating to keep your cobbler fresh. Remember, cooking is fun. Don’t hesitate to make it your own. Enjoy each bite of your homemade peach cobbler!

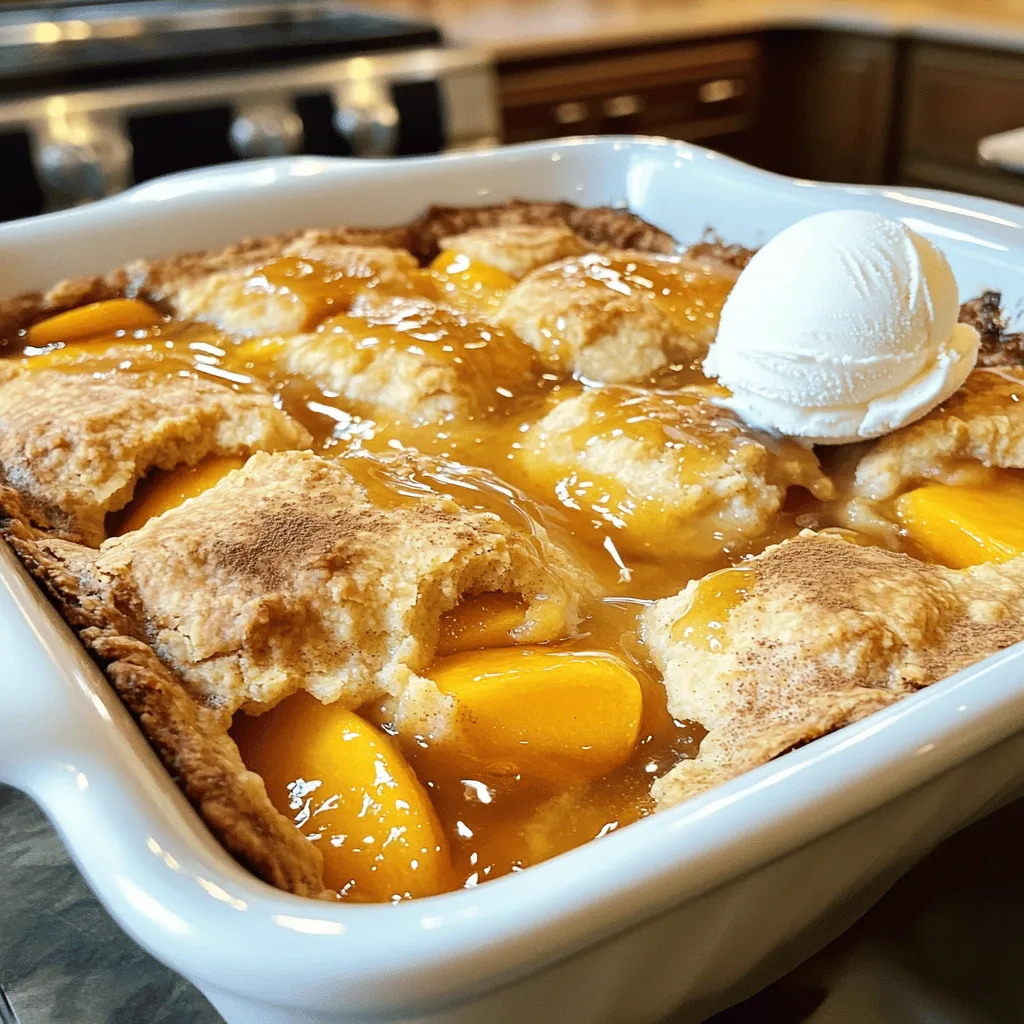
Craving a sweet treat that’s quick and easy? You’ll love this Easy Canned Peach Cobbler! With just a few simple ingredients, you can whip up a delicious dessert that warms …

Read more

Categories Desserts

Raspberry Peach Cobbler Delightful and Simple Recipe

June 24, 2025 by Chef Theo
- 2 cups fresh raspberries - 2 cups fresh peaches, peeled and sliced - 1 cup granulated sugar, divided - 1 teaspoon ground cinnamon - 1 cup all-purpose flour - ½ teaspoon salt - 1 teaspoon baking powder - 1 tablespoon lemon juice - 1 teaspoon vanilla extract - 1 cup milk - ½ cup unsalted butter, melted When I make raspberry peach cobbler, the fresh fruit shines. I choose ripe raspberries and juicy peaches. These fruits are sweet and full of flavor. You can find them at local markets or stores. Fresh fruit makes the dish vibrant and tasty. For the dry ingredients, I use granulated sugar for sweetness. Ground cinnamon adds warmth and spice. All-purpose flour forms the base, giving structure to the cobbler. Baking powder helps it rise, while salt balances the sweetness. In the wet ingredients, I add lemon juice for brightness. Vanilla extract gives a lovely aroma. Milk makes the batter creamy. Finally, melted unsalted butter adds richness. Together, these ingredients create a delicious blend. I recommend using the [Full Recipe] for exact amounts and details. This cobbler is easy to make and a joy to serve! - Preheat your oven to 375°F (190°C). - Grease a 9x13-inch baking dish with cooking spray or butter. - Toss the fresh raspberries and sliced peaches in a large bowl. - Add ½ cup of granulated sugar, lemon juice, vanilla extract, and ground cinnamon. Mix well. - Spread the fruit mixture evenly in the bottom of your prepared baking dish. - In another bowl, mix the flour, baking powder, the remaining ½ cup of granulated sugar, and salt. - Pour in the milk and melted butter. Stir gently until just combined. - The batter will be lumpy, and that is okay. - Pour the batter over the fruit mixture in the baking dish. - Make sure it covers the fruit as evenly as possible. Some fruit may peek through. - Bake in the preheated oven for 35-40 minutes. The top should be golden brown. - Check doneness by inserting a toothpick into the cobbler; it should come out clean. Enjoy this delicious dessert! For the full recipe, check out the [Full Recipe]. To select ripe peaches, look for ones that give slightly when you squeeze them. They should smell sweet and have a warm, golden color. You want peaches that are juicy and flavorful. A good peach will make your cobbler shine. For a golden crust, keep an eye on your oven. Bake at 375°F (190°C) until the top turns golden brown. This usually takes about 35-40 minutes. You can brush the top with melted butter for extra color and flavor. When serving your cobbler, whipped cream or vanilla ice cream is a great choice. Both add a creamy touch that balances the fruit's tartness. You can also serve it warm for a cozy dessert experience. For drinks, consider pairing with sweet tea or a light white wine. These options enhance the fresh flavors of the cobbler. One common mistake is overmixing the batter. This can make your cobbler tough. Mix just until the dry ingredients are wet, and lumps are fine. Another mistake is not letting it cool before serving. Allow the cobbler to cool for about 10 minutes. This helps it set and makes it easier to serve. Enjoy your delicious creation! For the full recipe, check out the Raspberry Peach Cobbler Delight section above. {{image_2}} You can make this cobbler even more fun by adding other fruits. Blueberries and blackberries mix well with raspberries and peaches. They add a nice pop of flavor and color. You can also use frozen fruit instead of fresh. Just be sure to thaw and drain it first. This keeps your cobbler from getting too watery. If you need a gluten-free option, swap out regular flour for gluten-free flour. Many brands offer one-to-one substitutes, making it easy. You can also use almond flour or oat flour for a unique twist. Just remember to check labels to ensure they are gluten-free. Want to boost the flavor? Add spices like nutmeg or ginger. These spices bring warmth and depth to the dish. You can also use flavored extracts, like almond or coconut. Just a few drops can transform your cobbler into something special. For the full recipe, be sure to check the main section. To store your raspberry peach cobbler, let it cool completely. Place it in an airtight container. This keeps it fresh and tasty. You can also cover it with plastic wrap. In the fridge, it lasts about three to four days. If you want to keep it longer, freezing is a great option. For freezing, cut the cobbler into portions. Wrap each piece in plastic wrap tightly. Then place the wrapped pieces in a freezer bag. This helps prevent freezer burn. Your cobbler can stay frozen for up to three months. When you're ready to eat it, thaw the cobbler overnight in the fridge. To reheat, place it in an oven set to 350°F (175°C). Heat for about 20 minutes, or until warm. This keeps the crust nice and crisp. Enjoy your cobbler just like it was fresh! Raspberry peach cobbler is a warm dessert made with fresh fruit and a soft topping. It has roots in the Southern United States, where people often used local fruits. The dish combines sweet raspberries and juicy peaches, creating a perfect mix of flavors. The topping is like a cake that bakes over the fruit. This dessert is easy to make and delicious for any occasion. Yes, you can make cobbler ahead of time. Prepare the fruit mixture and batter separately. Store each in the fridge for up to two days. When ready to bake, combine them in the dish and bake as directed. This helps the flavors meld together. You can also bake it in advance and reheat it later. Just warm it gently in the oven before serving. Check for a golden brown top on the cobbler. Insert a toothpick into the center. If it comes out clean, the cobbler is ready. The fruit should be bubbling around the edges. If the top looks too dark, cover it with foil and bake a little longer. Enjoy your delicious dessert when it’s perfectly baked! Raspberry peach cobbler combines fresh fruit, simple ingredients, and easy steps. We learned how to prep the oven, mix fruits, and create a sweet batter. Tips can help you choose ripe peaches and avoid common mistakes. Whether you stick to the original recipe or explore variations, this dessert stays fun. Enjoy your cobbler warm, topped with ice cream or whipped cream. It’s simple yet satisfying. Make this delightful treat to share with friends or family and savor every bite!

Are you ready to indulge in a sweet and fruity treat? This Raspberry Peach Cobbler combines juicy raspberries and peaches for a delightful dessert. With its warm, buttery crust and …

Read more

Categories Desserts

Garden Frittata with Goat Cheese & Potatoes Delight

June 24, 2025 by Chef Theo
To make a delicious garden frittata with goat cheese and potatoes, you need simple, fresh ingredients. Here’s what you’ll need: - 4 large eggs - 1 cup spinach, chopped - 1 medium potato, peeled and diced - 1 small zucchini, diced - 1/2 red bell pepper, diced - 1/2 cup goat cheese, crumbled - 1/4 cup milk - 1 small onion, diced - 2 tablespoons olive oil - Salt and pepper to taste - Fresh herbs (like parsley or chives) for garnish These ingredients blend together to create a colorful dish. The eggs form a fluffy base, while the vegetables add flavor and nutrition. The goat cheese gives it a creamy touch. Together, they make a meal that is both tasty and satisfying. When picking your vegetables, look for fresh options. Organic produce often tastes better and is good for the earth. The goat cheese should be soft and crumbly, adding a rich flavor to your frittata. You can find this recipe in the [Full Recipe] section for complete details. Set your oven to 400°F (200°C). This step is key for a fluffy frittata. In a skillet, heat 1 tablespoon of olive oil over medium heat. Add the diced potato and cook for 5-7 minutes. Stir it often. You want the potato to be golden and tender. Next, add the diced onion and bell pepper. Sauté them for 3-4 minutes until they soften. Then, stir in the zucchini and chopped spinach. Cook until the spinach wilts, about 2 minutes. Season with salt and pepper to taste. In a mixing bowl, whisk together 4 large eggs and 1/4 cup of milk until blended. Gently fold in half of the goat cheese. This adds a creamy flavor to the frittata. Pour the egg mixture over the sautéed vegetables in the skillet. Cook on the stovetop for 2-3 minutes until the edges set. Sprinkle the rest of the goat cheese on top. Transfer the skillet to the oven and bake for 10-12 minutes. Look for the frittata to puff up and the center to set. Remove it from the oven, let it cool for a few minutes, and slice into wedges. Garnish with fresh herbs. For the full recipe, check out the earlier section. When making a garden frittata, fresh vegetables make a big difference. Look for vibrant colors. Choose firm and unblemished produce. Spinach should be bright green, and zucchini should be smooth. The potato must feel heavy for its size. Fresh herbs like parsley or chives add flavor and beauty. Always wash your veggies well before use. This ensures they are clean and ready to shine in your dish. Your frittata will taste better with quality ingredients. The egg mixture is key to a fluffy frittata. Use large eggs for the best texture. Whisk them well with milk until frothy. This adds air, making the frittata light. For added flavor, fold in half of the goat cheese into the egg mix. This creates pockets of creamy goodness in every bite. Don’t forget to season the mixture with salt and pepper. Taste it before cooking to ensure it’s just right. The right blend makes a big difference in your dish's final taste. Baking times can vary based on your oven. I recommend checking the frittata around the 10-minute mark. Look for puffiness and a set center. If it’s jiggly in the middle, give it more time. Keep an eye on it to avoid overcooking. The edges should be golden brown. If you use a larger skillet, you may need to adjust the bake time. Remember, every oven is different, and a little patience goes a long way. Enjoy the process, and your frittata will turn out great! {{image_2}} You can make your garden frittata even better by adding more greens. Kale and Swiss chard work great. They boost the flavor and add nutrition. Just chop them up and toss them in with the other veggies. Using different cheeses can also change the taste. Feta gives a tangy kick, while cheddar adds a sharp flavor. Both melt well and blend nicely with the eggs. Mix and match to find your favorite combo. This frittata pairs well with crusty bread or a fresh salad. The bread soaks up any extra flavors. A light salad adds a crisp touch. Both options make for a delightful meal. You can serve this dish at brunch, lunch, or dinner. It’s perfect for family gatherings or casual get-togethers. Everyone loves a slice of frittata, and it looks great on the table. For the full recipe, check out the instructions above to create your own delicious garden frittata with goat cheese and potatoes! To keep your garden frittata fresh, let it cool first. Then, slice it into wedges. Place the slices in an airtight container. Store them in the fridge. They will last for about 3-4 days. For the best taste, eat your leftovers within the first two days. When you're ready to enjoy your frittata again, I recommend reheating it in the oven. Preheat your oven to 350°F (175°C). Place the slices on a baking sheet. Heat for about 10-15 minutes. This method keeps the frittata soft and tasty. You can also use the microwave for quick reheating. Just cover it with a damp paper towel and heat for 30-60 seconds. If you want to save your frittata for later, freezing works well. Wrap each slice in plastic wrap. Then, place them in a freezer bag. Make sure to remove as much air as you can. Your frittata can stay frozen for up to 2 months. When you want to eat it, thaw it overnight in the fridge before reheating. Enjoy your delicious garden frittata anytime! For the full recipe, check out the earlier sections. Yes, you can make this frittata ahead of time. Cook it fully, then let it cool. Store it in the fridge for up to three days. When you're ready to eat, you can warm it in the oven or microwave. It tastes great even after a day or two! If you want to swap goat cheese, try feta cheese for a tangy flavor. Cream cheese works well too, giving a creamy texture. For a milder taste, use ricotta. Each cheese will change the frittata's flavor but will still be delicious! To cut the frittata neatly, let it rest for a few minutes before slicing. Use a sharp knife or a pizza cutter for clean edges. Wipe the knife between cuts to avoid sticking. This way, you get nice, even slices. You can tell the frittata is done when it puffs up and the center is set. A toothpick inserted should come out clean. If it jiggles too much, give it a few more minutes in the oven. It should be firm yet moist. For the full recipe, check out the Garden Frittata with Goat Cheese & Potatoes. This frittata recipe uses fresh vegetables, cheese, and eggs for a tasty meal. You learned how to cook it step-by-step and discovered tips for making it better. You can easily switch up the ingredients to fit your taste or occasion. Lastly, I showed you how to store and reheat leftovers. Enjoy this simple dish that is full of flavor and good for any time!

Ready to elevate your breakfast game? This Garden Frittata with Goat Cheese & Potatoes is not just easy to make, but it’s packed with flavor and nutrients. I’ll guide you …

Read more

Categories Breakfast

Old School Fried Chicken Crispy and Flavorful Delight

June 24, 2025 by Chef Theo
- Chicken pieces (legs and thighs preferred) - Buttermilk and optional hot sauce - Seasonings: paprika, garlic powder, onion powder, oregano, salt, and pepper - Flour for dredging - Vegetable oil for frying When making Old School Fried Chicken, select fresh chicken pieces. I prefer legs and thighs. They stay juicy and tender. Buttermilk adds flavor and helps the chicken stay moist. You can add hot sauce to the buttermilk if you want a kick. The seasonings are key. Paprika gives color and flavor. Garlic powder and onion powder add depth. Oregano adds a nice herb taste. Don’t forget salt and pepper. They enhance all the flavors. For dredging, use all-purpose flour. It creates that crunchy coating we all love. Finally, vegetable oil is needed for frying. It has a high smoke point, making it perfect for crispy chicken. These ingredients work together to create a crispy and flavorful delight. Ready to make some? Check out the Full Recipe for all the steps! To make your chicken tender and tasty, start with buttermilk. In a large bowl, mix 1 cup of buttermilk with 1 teaspoon of hot sauce if you want heat. Place your chicken in the bowl. Make sure each piece is fully covered by the buttermilk. Cover the bowl with plastic wrap. Let it sit in the fridge for at least 2 hours. For the best flavor, leave it overnight. This soaking helps the chicken soak up moisture and flavor. Next, it's time to prepare the coating. In another bowl, add 2 cups of all-purpose flour. Mix in 1 teaspoon of paprika, garlic powder, onion powder, oregano, salt, and pepper. Stir this well. To get a thick, crispy coating, press the chicken into the flour mix. Make sure each piece is well-covered. The more flour sticks, the crunchier it will be when fried. Now, we’ll cook the chicken. Heat about 1 inch of vegetable oil in a large skillet. Aim for a temperature of 350°F (175°C). You can use a thermometer to check this. Carefully add the chicken pieces to the hot oil. Do not crowd the pan; fry in batches if needed. Cook each side for about 8 to 10 minutes. The chicken should turn golden brown. Check the internal temperature; it must reach 165°F (75°C). After frying, place the chicken on a wire rack. This helps keep it crispy. Let the chicken rest for 5 minutes before serving. Enjoy your Old School Fried Chicken! To get that perfect crunch, use a wire rack after frying. This allows air to flow around the chicken. It keeps the bottom dry and crispy. If you skip this step, the chicken can get soggy. To avoid soggy chicken, don’t cover it right after frying. Let it breathe for a few minutes. This will help maintain that delightful crunch. You can change the flavor by adjusting your seasoning mix. Try adding cayenne pepper for more heat. You can also use smoked paprika for a deeper taste. If you want to kick it up a notch, add your favorite hot sauce. Mix some into the buttermilk for a spicy marinade. This gives your chicken a nice kick that you’ll love. One common mistake is overcrowding the frying pan. When you add too much chicken, the oil cools down. This leads to oily, unevenly cooked chicken. Fry in small batches to keep the oil hot. Another mistake is not letting the chicken rest. After frying, let it sit for five minutes. This helps the juices settle, making each bite tender and juicy. For more details, check the Full Recipe. {{image_2}} Baking chicken gives you a healthier option. You still get great flavor but with less oil. To bake, preheat your oven to 400°F (200°C). Place coated chicken on a baking rack above a sheet pan. Bake for 35 to 40 minutes. Flip halfway through for even crispiness. The chicken will be golden and tender without frying. If you want a gluten-free version, swap all-purpose flour for gluten-free flour. Almond flour or chickpea flour works well too. These options keep the taste and crunch you love. Serve with dipping sauces like honey mustard or ranch for added flavor. Fried chicken pairs well with classic Southern sides. Think of creamy coleslaw, buttery cornbread, or mashed potatoes. Each side enhances the meal. You can even try green beans or macaroni and cheese for variety. These sides make your fried chicken feast feel complete. Check out the Full Recipe for more ideas! Store leftover fried chicken in an airtight container. This keeps it fresh and tasty. Place a paper towel in the container to absorb moisture. This helps stop sogginess. Fried chicken lasts about 3 to 4 days in the fridge. Always check for signs of spoilage. If it smells off or has a slimy texture, throw it away. To keep your fried chicken crispy, reheating is key. Use an oven rather than a microwave. Preheat your oven to 375°F (190°C). Place the chicken on a baking sheet. Heat for about 15 to 20 minutes. Make sure it reaches an internal temperature of 165°F (75°C). This way, it stays juicy and crispy. For extra crunch, you can use a toaster oven if you have one. The best oils for frying chicken are vegetable oil, canola oil, and peanut oil. These oils have high smoke points. This means they can handle the heat without burning. They also provide a neutral flavor. This allows the chicken's taste to shine through. Using these oils helps create that golden, crispy skin we all love. Yes, you can use boneless chicken. Boneless chicken cooks faster and is easier to eat. However, it may not have the same juicy flavor. Bone-in chicken often retains moisture better. It also adds more taste to the dish. So, while boneless works, bone-in chicken is often the best choice for flavor. The secret to crispy fried chicken lies in a few key factors: - Marination: Soaking chicken in buttermilk adds flavor and moisture. - Coating: A thick layer of seasoned flour gives the crispy texture. - Oil Temperature: Frying at 350°F (175°C) ensures even cooking and crispiness. - Resting: Letting chicken rest on a wire rack allows excess oil to drip off. These tips will help you achieve that perfect crunch in each bite. For the full recipe, check out the Old School Fried Chicken section above. Fried chicken is a tasty dish when made right. We covered key ingredients, from chicken to spices, and how to marinate for the best flavor. I shared tips for getting that perfect crispy coating and avoiding common mistakes. There are also options for baking and gluten-free versions. In the end, proper storage and reheating keep leftovers tasty. Whether you’re a beginner or an expert, these steps help you serve delicious chicken every time. Enjoy your cooking journey and have fun experimenting!

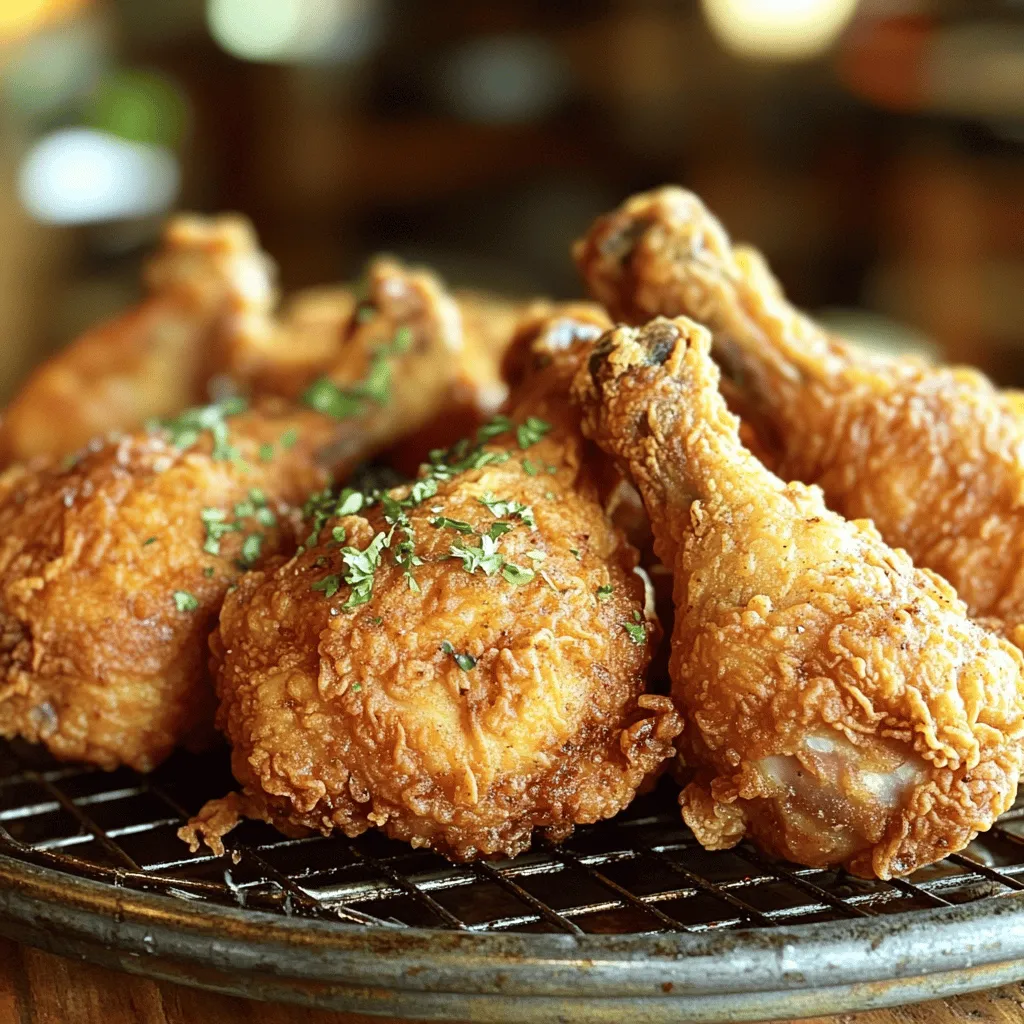
Are you ready to dive into the world of Old School Fried Chicken? This crispy and flavorful delight is more than just a meal; it’s an experience. With the right …

Read more

Categories Dinner
Older posts
Newer posts
← Previous Page1 … Page44 Page45 Page46 … Page105 Next →

TOASTED RECIPES

Where ideas are warm, crisp, and ready to serve! 🍞

PAGES

Home About Contact Privacy Policy Terms & Conditions Cookie Policy GDPR Policy Copyright Policy Disclaimer

CATEGORIES

Appetizers Desserts Salads Breakfast Dinner

Contact

  • Pinterest
  • Mail
Copyright © 2025 Toasted Recipes. All rights reserved.