Skip to content
toastedrecipes.com
  • Home
  • Appetizers
  • Desserts
  • Salads
  • Breakfast
  • Dinner
  • Privacy Policy
  • Contact
  • About

Chef Theo

No-Fuss Fried Chicken Crunchy and Flavorful Recipe

June 26, 2025 by Chef Theo
- 4 chicken thighs (bone-in, skin-on) - 1 cup buttermilk - 1 cup all-purpose flour - 1 teaspoon garlic powder - 1 teaspoon onion powder - 1 teaspoon smoked paprika - ½ teaspoon cayenne pepper (optional) - Salt and pepper to taste - Vegetable oil for frying I love using chicken thighs for this recipe. They stay juicy and crispy. The skin gives you that great crunch. Buttermilk is key. It makes the chicken tender and adds flavor. You can mix in spices like garlic and onion powder to boost the taste. Smoked paprika adds a nice smoky note. If you like heat, cayenne pepper is a good choice. Just a little can make a big difference. You can use regular milk mixed with vinegar if you need a buttermilk substitute. For gluten-free options, try almond flour or a gluten-free blend. Adjust spices to fit your taste. You can even add herbs like thyme or rosemary for a unique twist. - Skillet or deep pan for frying - Mixing bowls - Dredging station setup A heavy skillet works best for frying. Make sure it is deep enough for the oil. You need a few mixing bowls for the marinade and flour. Setting up a dredging station really helps keep things organized. This makes the whole process smooth and easy. For the full recipe, check out the detailed steps! To get deep flavor, prepare a buttermilk mixture. In a large bowl, add: - 1 cup buttermilk - 1 teaspoon garlic powder - 1 teaspoon onion powder - 1 teaspoon smoked paprika - ½ teaspoon cayenne pepper - Salt and pepper to taste Mix well. This blend adds moisture and taste. Add the chicken thighs to this mixture, ensuring they are submerged. Cover the bowl with plastic wrap. Marinate for at least 1 hour. For the best flavor, marinate overnight. Heat about 1 inch of vegetable oil in a large skillet over medium-high heat. You want it hot, around 350°F (175°C). To check if the oil is ready, drop a small piece of bread in. If it sizzles, it's time to fry. Always take care while frying. Use a splatter guard if you have one. Keep a nearby bowl of ice water to cool any burns. Coating the chicken is key to that crispy texture. Set up a dredging station. In a shallow dish, mix: - 1 cup all-purpose flour - A pinch of salt and pepper Remove each chicken thigh from the buttermilk, letting excess drip off. Dredge it in the flour mixture until fully coated, then shake off the extra flour. Fry in batches to avoid crowding. Place the chicken skin-side down in the hot oil. Cook for about 7-9 minutes on each side. Look for a golden brown color and check that it reaches 165°F (74°C) inside. When done, place the chicken on a plate lined with paper towels to drain oil. Let your chicken rest for a few minutes before serving for the best flavor. Enjoy your crunchy and flavorful creation! For detailed steps, refer to the Full Recipe. To get the best crunch, heat your oil to 350°F (175°C). This hot temperature seals the coating fast. If the oil is too cool, the chicken absorbs more oil and becomes soggy. Use a thermometer for the best results. For a crunchy coating, mix flour with seasonings. Adding garlic powder, onion powder, and smoked paprika gives great flavor. You can also mix in cornstarch for extra crunch. It absorbs moisture and creates a crisp layer. To boost flavor, add herbs or spices to the flour. Dried thyme, oregano, or rosemary pair well. You can also use Cajun seasoning for a kick. This makes your chicken stand out. Marinades are key to juicy chicken. Besides buttermilk, you can use yogurt or pickle juice. Marinade for at least an hour. Longer marinating adds more flavor. One common mistake is overcrowding the pan. This cools the oil and leads to uneven cooking. Fry in small batches. This helps each piece cook evenly and get crispy. Another mistake is skipping the resting time. Let the chicken rest after frying. This helps juices redistribute. Resting also prevents sogginess. Enjoy your crispy fried chicken at its best! {{image_2}} You can use various cuts of chicken for this recipe. Drumsticks and wings are great options. They cook well and pack a lot of flavor. The skin crisps up nicely, giving you that satisfying crunch. If you prefer boneless options, go for chicken breasts. They are leaner but can still be juicy. Marinate them just like the thighs for the best taste. You can switch up flavors to match your taste. For a Southern-style twist, add spices like cayenne and black pepper. This gives the chicken a nice kick. If you want something different, try an Asian-inspired fried chicken. Use soy sauce, ginger, and garlic in your marinade. It will offer a unique taste that surprises everyone. You don’t have to fry your chicken in oil. An air fryer is a great option for healthy frying. It uses hot air, which gives you crispy chicken without much oil. You can also bake the chicken in the oven for a lighter version. Coat it in flour, then spray with oil. Bake at 425°F until golden. This method keeps the chicken moist and still tasty. For more details, check the Full Recipe. Enjoy your cooking! To store leftover fried chicken, let it cool first. Place it in an airtight container. This keeps it fresh and safe. You can also wrap it tightly in foil. The best containers for storage are glass or plastic with tight seals. These help prevent moisture loss and keep the chicken tasty. When reheating, I prefer the oven over the microwave. The oven keeps the chicken crispy. Preheat it to 375°F (190°C). Place the chicken on a baking tray. Heat for about 10 to 15 minutes. If you use the microwave, cover the chicken with a damp paper towel. This keeps it moist but may not keep it crispy. To freeze fried chicken, let it cool completely. Wrap each piece in plastic wrap. Then, place the wrapped chicken in a freezer bag. This helps avoid freezer burn. When it’s time to eat, thaw the chicken in the fridge overnight. The best practices for flavor preservation include not storing it for too long. Use it within three months for the best taste. For more details, check the Full Recipe. Marinate the chicken for at least 1 hour. For best flavor, marinate overnight. This helps the chicken soak up the buttermilk and spices. The longer the chicken sits, the more flavor it gains. All-purpose flour is not gluten-free. You can use gluten-free flour blends instead. Almond flour or rice flour also works well. These options help achieve a crunchy coating without gluten. Vegetable oil is a great choice for frying chicken. It has a high smoke point and neutral flavor. Canola oil and peanut oil are good alternatives. They also fry chicken well without burning. Oily chicken can be due to a few reasons. The oil may not be hot enough when frying. Overcrowding the pan can also cause oil absorption. Always ensure the chicken is golden brown and cooked through. To keep fried chicken crispy, use a wire rack. This allows air to circulate around the chicken. Avoid stacking the chicken, as moisture will make it soggy. For extra crunch, pack the chicken in a paper bag. For the full recipe, check out the Crispy No-Fuss Fried Chicken. In this article, we explored the essential ingredients and methods for making perfect fried chicken. We detailed marinating techniques and frying tips to achieve great flavor and texture. Remember to use substitutes if needed and avoid common mistakes for the best results. With these tips, you can enjoy different variations and store your chicken properly. I hope you feel confident to try this at home. Happy cooking!

Craving crispy, flavorful fried chicken? Look no further! This No-Fuss Fried Chicken recipe makes it easy to whip up a delicious meal. With just a handful of ingredients and straightforward …
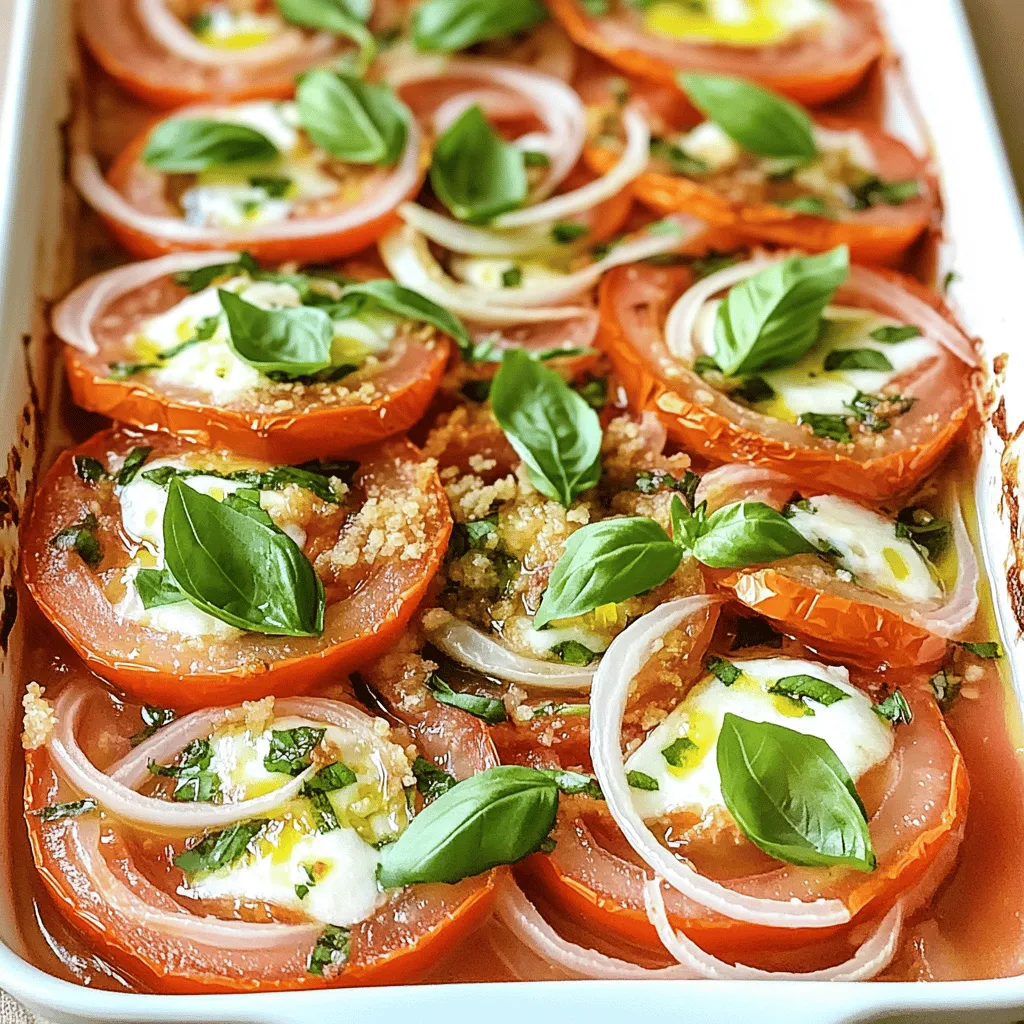
Read more

Categories Dinner

Smoked Paprika Garlic Butter Corn Delightfully Simple

June 26, 2025 by Chef Theo
Here’s what you need for smoked paprika garlic butter corn: - 4 ears of fresh corn, husked and cleaned - 4 tablespoons unsalted butter - 3 cloves garlic, minced - 1 teaspoon smoked paprika - 1 teaspoon sea salt - 1/2 teaspoon black pepper - 1 tablespoon fresh parsley, chopped (for garnish) - Lime wedges (for serving) When selecting corn, look for ears that feel firm with bright green husks. The kernels should be plump and shiny. Avoid corn with dry or brown husks. Fresh corn makes a big difference in flavor. If you can't find fresh corn, frozen corn works too. Just thaw and cook it according to the package instructions. You can also swap unsalted butter with olive oil for a lighter option. If you want a vegan dish, use plant-based butter. Enjoy experimenting with different flavors! You can cook corn by boiling or grilling. Boiling is quick and easy. Grilling adds a nice smoky flavor. For boiling, bring a large pot of water to a boil. Add the corn and cook for 5-7 minutes. You want the corn to be tender but still crisp. For grilling, preheat your grill to medium-high. Grill the corn for about 10-15 minutes. Turn occasionally to cook evenly. To ensure perfect doneness, watch the color. Fresh corn should be bright yellow. If it looks dull, it may be overcooked. Timing can vary based on corn size. Larger ears may need extra time. Always check for tenderness with a fork. Sautéing garlic correctly is key to great flavor. Start by melting the butter in a small saucepan over medium heat. Once melted, add the minced garlic. Cook just until fragrant, about 1-2 minutes. Do not let it brown; burnt garlic tastes bitter. Adjusting salt and spice levels can enhance your dish. Taste your garlic butter as you mix in smoked paprika, salt, and black pepper. This way, you can find the perfect balance. For a smooth garlic butter, mix well. Ensure there are no lumps; it should be creamy and rich. Brushing on the garlic butter is an art. Use a pastry brush to coat the corn evenly. Don’t be shy; more butter means more flavor! For best presentation, place the corn on a serving platter. Drizzle any leftover garlic butter over the top to make it look fancy. Add a pop of color with chopped parsley for garnish. This also adds fresh flavor. Serve with lime wedges on the side. A squeeze of lime adds a bright, zesty kick. For side dish ideas, think simple. A fresh salad or grilled veggies pair well. You want to keep it light to let the corn shine. For the Full Recipe, be sure to check the details above. To boost the flavor of your smoked paprika garlic butter corn, try adding some extra spices. A pinch of cayenne can add heat. You can also sprinkle some cumin for a warm, earthy taste. Fresh herbs like cilantro or basil can give a fresh twist. Balancing the richness of butter is key. Adding a squeeze of lime juice cuts through the fat. This makes each bite taste bright and fresh. You can also mix in a touch of honey for sweetness. Using flavored butters is a great way to change things up. Try garlic herb butter or chili lime butter. These options can bring new flavors to the dish without much effort. If you want different textures for your corn, try grilling or roasting. Grilling adds a smoky flavor and a little char. Roasting brings out the natural sweetness of the corn. Boiling is great for a classic taste but can be softer. For storing leftover corn, keep it in an airtight container. It will stay fresh for about 3 to 5 days in the fridge. You can also freeze it for up to one month if you want to save it longer. When reheating, keep the flavor intact. Use a stovetop pan to warm the corn gently. This helps keep the texture nice. If you use a microwave, cover the corn with a damp paper towel. This helps prevent it from drying out. {{image_2}} You can make smoked paprika garlic butter corn even more exciting. Try a Mexican street corn style. Just add lime juice, chili powder, and crumbled cheese. This mix gives the corn a fresh twist. Adding cheese can also enhance the dish. Feta works well for a tangy taste. Parmesan adds a nutty flavor that is hard to resist. Just sprinkle it on top before serving. For extra heat, try cayenne pepper. Mix in a pinch when you prepare the garlic butter. This will give your corn a spicy kick. Adjust the amount based on your taste. If you want a vegan option, simply swap regular butter for plant-based butter. This keeps the flavor while making it dairy-free. For those needing gluten-free options, this recipe fits the bill. Corn is naturally gluten-free. Just be sure to check your butter and spices for hidden gluten. If you need a low-sodium diet, cut back on the sea salt. You can also use salt-free seasoning blends. These will still give you flavor without extra sodium. Explore these variations to make smoked paprika garlic butter corn your own. Check the Full Recipe for the basic steps. To keep your smoked paprika garlic butter corn fresh, follow these steps: - Refrigeration: Place leftover corn in an airtight container. It will stay fresh for up to 3 days. - Freezing: You can freeze the corn. Cut it off the cob and store it in a freezer bag. Use it within 3 months for the best taste. - Maintaining Flavor: To keep the flavor strong, add a little extra garlic butter before storing. This helps keep the taste rich and delicious. When it comes to reheating, you want to do it right: - Best Methods: The stovetop works best. Heat a skillet over medium heat and add a bit of butter. This keeps the corn juicy. - Avoiding Mushiness: Make sure not to overheat it. This will keep the corn firm and tasty. - Microwave vs. Stovetop: The microwave is quick but can make the corn soft. The stovetop requires a bit more time but keeps the texture better. Choose the method that fits your time and taste! Fresh corn cooks quickly. You should boil it for about 5 to 7 minutes. This time helps the corn become tender and sweet. If you want a bit more crunch, cook it for just 5 minutes. Yes, you can use frozen corn! Just thaw it first. Cook it in boiling water for 3 to 4 minutes. This will keep the flavor and texture close to fresh corn. The best way to garnish this dish is with fresh parsley. Chop it finely and sprinkle it on top. You can also serve lime wedges on the side for a zesty touch. Absolutely! You can try regular paprika for a milder taste. If you like heat, add cayenne pepper or chili powder. Each spice gives the dish a unique twist. Corn pairs well with grilled meats and salads. It also works great as a side for tacos or burgers. Serve it hot and watch everyone enjoy! This blog post covered the key ingredients, cooking methods, and flavor tips for making delicious garlic butter corn. You learned how to choose and cook corn perfectly, plus how to make a rich garlic butter. We explored ways to enhance flavor, different variations, and proper storage for leftovers. In my experience, these steps will make your corn dishes stand out. With the right ingredients and techniques, you can enjoy tasty corn every time. Now, go ahead and get cooking!

If you’re looking to elevate your corn game, you’ve landed in the right spot! In this post, I’ll show you how to make Smoked Paprika Garlic Butter Corn that’s both …

Read more

Categories Appetizers

Copycat KFC Fried Chicken Crispy Flavorful Delight

June 26, 2025 by Chef Theo
- Chicken: Use 10 pieces of legs and thighs for authentic flavor - Buttermilk: Essential for marination to tenderize the meat - Flour and Seasonings: The blend of spices for the perfect coating To make Copycat KFC fried chicken, gather the following items: - 10 pieces of chicken (legs and thighs preferred) - 2 cups buttermilk - 2 cups all-purpose flour - 1 teaspoon paprika - 1 teaspoon garlic powder - 1 teaspoon onion powder - 1 teaspoon salt - 1/2 teaspoon black pepper - 1/2 teaspoon cayenne pepper (adjust for spice preference) - 1 teaspoon dried thyme - 1 teaspoon dried basil - Vegetable oil (for frying) Each ingredient plays a key role. The chicken provides the main flavor, while buttermilk helps make it tender. The flour and seasonings create that crispy, tasty coating we all love. Using legs and thighs gives a rich taste and juicy meat. Buttermilk acts like a magic potion, soaking into the chicken, making it soft. The flour and spices mix together to form a crunchy shell. This combination sets the stage for a true fried chicken delight. For the full recipe, check the instructions later in the article! To start, take your chicken pieces and place them in a large bowl. Pour in the buttermilk, making sure all of the chicken is well-coated. This step is crucial as the buttermilk tenderizes the meat and adds great flavor. Cover the bowl and refrigerate the chicken for at least 4 hours. If you can, let it marinate overnight for even better results. Next, grab another large bowl for the coating. Combine the flour with the spices: paprika, garlic powder, onion powder, salt, black pepper, cayenne pepper, thyme, and basil. Mix these ingredients well. A thorough mixture ensures every bite of chicken is flavorful. Take your time to blend the spices into the flour. Now it’s time to cook! Heat about 2 inches of vegetable oil in a heavy-bottomed skillet or deep fryer over medium-high heat. Aim for a temperature of 350°F (175°C). Use a thermometer to check the oil. When it’s hot, carefully add the coated chicken pieces. Avoid overcrowding the pan, as this can lower the oil temperature. Fry each piece for 12-15 minutes, flipping halfway through. The chicken should be golden brown and reach an internal temperature of 165°F (75°C). Once done, transfer the chicken to a wire rack over a baking sheet to drain excess oil. Let it rest for about 5-10 minutes. This helps achieve maximum crispiness. For the full recipe, don't forget to check back to the beginning! To get that perfect crispy crust, oil temperature is key. Heat the vegetable oil to 350°F (175°C). Use a thermometer to check the heat. If the oil is too cool, the chicken will absorb oil and get greasy. If it's too hot, the outside may burn before the inside cooks. Resting the chicken after frying is also important. Once you take it out of the oil, let it sit for 5-10 minutes on a wire rack. This step helps keep the crust crispy. It allows steam to escape, so the coating stays crunchy. One big mistake is overcrowding the pan. If you place too many pieces in at once, the temperature drops. This makes the chicken cook unevenly and lose its crispiness. Always fry in batches. Another mistake is not marinating long enough. For the best flavor and tenderness, let the chicken soak in buttermilk for at least 4 hours or overnight. This extra time makes a huge difference. It helps the spices penetrate the meat and keeps it juicy. For the full recipe, check the detailed steps and ingredients. {{image_2}} If you love heat, try adjusting the cayenne pepper in the recipe. You can add more for a hotter kick or use less if you prefer a milder flavor. Adding extra spices like chili powder or smoked paprika can create a unique flavor profile. These spices will add depth and a nice twist to the classic taste. Experiment and find your perfect level of spice! Herbs can elevate your fried chicken to new heights. Consider adding dried oregano, rosemary, or parsley to the flour mixture. Each herb brings its own flavor, making your chicken unique and tasty. You can also try using cornmeal as part of your coating. Cornmeal gives a different texture and a slight sweetness. It’s a fun way to switch things up while keeping that crispy goodness. For a full recipe with all the details, check the Full Recipe section. To keep your Copycat KFC Fried Chicken fresh, store it right. First, let the chicken cool down to room temperature. Then, place it in an airtight container. You can refrigerate it for up to 3 days. If you want to keep it longer, freeze the chicken. Wrap each piece in plastic wrap, then place them in a freezer bag. This way, the chicken stays good for up to 3 months. Reheating chicken can be tricky. You want to keep it crispy, not soggy. The best way is to use an oven. Preheat your oven to 375°F (190°C). Place the chicken on a baking sheet. Bake it for about 15-20 minutes. This helps restore the crispiness. You can also use an air fryer. Set it to 350°F (175°C) and cook for about 10 minutes. Both methods ensure even heating and great taste. For the best flavor, marinate the chicken for at least 4 hours. I prefer marinating overnight. This time allows the buttermilk to tenderize the meat. It also helps the spices soak in deeply. The longer you wait, the better the taste. Yes, you can use chicken breasts. However, thighs and legs give more flavor. Breasts cook faster, so they can dry out. Thighs and legs have more fat, making them juicier. If you choose breasts, watch the cooking time closely. Vegetable oil works well for frying chicken. It has a high smoke point, which is perfect for deep frying. You can also use peanut oil or canola oil. Both have similar benefits and flavors. These oils help achieve a crispy coating without burning. In this blog post, we explored key ingredients for great fried chicken, like marinated chicken, buttermilk, and the right coatings. I shared step-by-step instructions, from marinating to frying. We discussed tips for peak crispiness and how to avoid common mistakes. You also learned about fun variations to spice things up and how to properly store leftovers. With this knowledge, you can create your perfect fried chicken masterpiece at home. Enjoy the cooking process and the delicious results!

Are you ready to recreate that famous KFC taste at home? In this blog post, I’ll show you how to make Copycat KFC Fried Chicken that’s crispy and flavorful. With …

Read more

Categories Dinner

Paula Deen’s Tomato Pie Flavorful and Simple Dish

June 26, 2025 by Chef Theo
- 1 pre-made pie crust - 4 large ripe tomatoes, sliced - 1 cup shredded mozzarella cheese - 1 cup shredded sharp cheddar cheese - 1/2 cup mayonnaise - 1 tablespoon Dijon mustard - 1/4 cup fresh basil, chopped - 1 teaspoon garlic powder - Salt and pepper to taste - 1/4 cup green onions, chopped To make Paula Deen's Tomato Pie, you need fresh ingredients. The tomatoes are the star. Make sure they are ripe and juicy. They bring great flavor to the dish. The mozzarella and cheddar cheeses add creaminess and depth. Mayonnaise and Dijon mustard create a rich sauce. Fresh basil gives a lovely aroma. Garlic powder adds an extra kick. You can change a few ingredients if needed. For the cheeses, try gouda or pepper jack for a twist. If you want a gluten-free option, use a gluten-free pie crust. This keeps the dish yummy while fitting your diet. When choosing tomatoes, look for beefsteak or heirloom varieties. These types are juicy and flavorful. The best time for fresh tomatoes is late summer. You will find them at local markets. For basil, spring and summer are prime. Always pick bright green, fragrant leaves for the best taste. For the full recipe, check out the Heavenly Southern Tomato Pie. It's a delightful dish to enjoy! - Preheat your oven to 375°F (190°C). - Line a pie dish with the pre-made pie crust. Press it into the corners. Prick the bottom with a fork. This helps prevent bubbling. - In a bowl, mix mayonnaise, Dijon mustard, garlic powder, and half of the chopped basil. Stir until creamy. - For the first layer, place half of the sliced tomatoes in the pie crust. Season with salt and pepper. - Spread half of the mayonnaise mixture over the tomatoes. Then, add half of the mozzarella and cheddar cheeses. - For the second layer, repeat with the remaining tomatoes, seasoning, and mayonnaise mixture. Top with the rest of the cheeses. - Bake in the preheated oven for 35-40 minutes. Look for bubbling and a golden-brown top. - Let the pie cool for 10 minutes before slicing and serving. This helps the layers set. Enjoy making Paula Deen's Tomato Pie with these clear steps. You can find the full recipe along with tips for perfecting this dish! To get the pie crust just right, start with a good pre-made pie crust. You can also make your own if you prefer. Make sure to press it into the dish firmly. Prick the bottom with a fork. This helps keep it from bubbling up. For a flaky crust, chill it for 15 minutes before baking. Keep it cool when you add the filling. When layering the ingredients, think about balance. Start with a layer of tomatoes. Be sure to season them with salt and pepper. This brings out their natural sweetness. Spread half of the creamy mayonnaise mix over them. Then add a mix of mozzarella and cheddar cheese. Repeat this process to build height and flavor. Tomato pie shines when served with fresh sides. A light salad with greens and vinaigrette pairs well. You can also serve it with roasted veggies. For garnish, sprinkle fresh basil on top before serving. This adds color and a fresh taste. Arrange slices on a colorful plate to impress your guests. One common mistake is overcooking the pie. Keep an eye on it while it bakes. The top should be golden brown, but not burned. If you overbake it, the filling can become too dry. Using unripe tomatoes is another mistake. Always choose ripe, juicy tomatoes for the best flavor. Look for tomatoes that are slightly soft to the touch. They should also have a deep color. This ensures your pie is both tasty and juicy. For more details, check the Full Recipe for Paula Deen's Tomato Pie. {{image_2}} Southern tomato pie shines with its rich flavors. In the South, we often add ingredients like corn or bell peppers. These add sweetness and crunch. You can also use different types of cheese. Try pepper jack for a spicy kick or goat cheese for creaminess. Each region has its twist, making this dish unique. If you want a vegetarian option, simply skip the meat. Instead, add more veggies like zucchini or mushrooms. You can boost flavor with herbs such as thyme or oregano. For those on a keto diet, swap regular crust for a cauliflower crust. Use cream cheese instead of mayonnaise for a low-carb twist. Want to enhance the taste? Add crispy bacon for a smoky touch. Spinach gives a healthy boost and pairs well with tomatoes. You can also try spices like paprika or cayenne for heat. A sprinkle of fresh herbs like parsley or chives adds a pop of color and flavor. These little changes make a big difference in taste! For the full recipe, check out the detailed steps I shared earlier. To keep your tomato pie fresh, store it in the fridge. Place it in an airtight container. This helps keep moisture in and prevents it from drying out. If you don't have a container, cover it tightly with plastic wrap or foil. This will protect the flavors and keep it tasty. When reheating your tomato pie, use the oven. Preheat it to 350°F (175°C). Place the pie on a baking sheet. Heat it for about 15-20 minutes. This method warms the pie evenly and keeps the crust crisp. You can also cover it with foil to keep moisture in. Be sure to check it so it doesn't overcook! To freeze tomato pie before cooking, wrap it tightly in plastic wrap. Then, place it in a freezer bag or container. This will help prevent freezer burn. When ready to cook, move it to the fridge to thaw overnight. Once thawed, bake it as directed in the Full Recipe. Enjoy the fresh flavors just like when you first made it! Can I make this dish in advance? Yes, you can make tomato pie ahead of time. Prepare it, then cover and chill. Bake it later. Serve it warm for the best taste. What can I serve with tomato pie? Tomato pie pairs well with a side salad or coleslaw. You can also enjoy it with grilled veggies or crusty bread. These sides balance the flavors perfectly. What is traditional tomato pie? Traditional tomato pie is a savory dish made with fresh tomatoes and cheese. It often includes herbs and a creamy base. The combination creates a rich, delicious flavor. How long does homemade tomato pie last? Homemade tomato pie lasts about three to four days in the fridge. Store it in an airtight container. Reheat it when ready to serve. Can I use fresh herbs for added flavor? Yes, fresh herbs add great flavor. Basil is a classic choice. You can also try thyme or oregano for a twist. What is the best way to slice tomatoes for this recipe? Slice tomatoes about 1/4 inch thick. This thickness allows them to cook well without becoming mushy. Keep the slices even for a nice look and texture. In this blog post, I shared a simple and tasty tomato pie recipe. I covered ingredients, preparation steps, and tips to help you succeed. You learned about variations and how to store leftovers. Remember, using ripe tomatoes and the right cheese makes all the difference. Don't be afraid to add your twist for flavor. Enjoy your cooking and savor every bite of homemade tomato pie!

Are you ready to savory a dish that screams comfort and Southern charm? Paula Deen’s Tomato Pie is a flavorful and simple delight, perfect for any meal or gathering. With …

Read more

Categories Dinner

Easy Baked Tomato Casserole Simple and Flavorful Meal

June 26, 2025 by Chef Theo
- 4 large ripe tomatoes, sliced - 1 medium onion, sliced - 2 cloves garlic, minced - 1 cup fresh basil, chopped - 1 cup mozzarella cheese, shredded - 1/2 cup breadcrumbs - 1/4 cup olive oil - 1 teaspoon dried oregano - Salt and pepper to taste Gathering the right ingredients is key to making this dish shine. Fresh tomatoes bring the best flavor. Use ripe ones for a sweet taste. The onion adds depth, while garlic gives it a nice kick. Fresh basil brightens every bite. Mozzarella cheese melts beautifully and creates a creamy texture. Breadcrumbs add a lovely crunch to the top. Olive oil keeps everything moist and rich. Dried oregano enhances the taste and adds warmth. Don’t forget salt and pepper; they balance all the flavors well. - Baking dish - Knife and cutting board - Measuring cups and spoons - Aluminum foil Having the right tools makes cooking easier. A baking dish is essential for holding all the layers. A good knife and cutting board help you slice the tomatoes and onion. Measuring cups and spoons ensure you get the right amounts. Aluminum foil is great for covering the dish while it bakes. All these tools make the process smooth and enjoyable. For the full recipe, check out the detailed instructions. - Preheat your oven to 375°F (190°C). - In a baking dish, lay half of the sliced tomatoes. - Add half of the sliced onion and garlic on top. - Sprinkle half of the chopped basil over the layers. - Season with salt, pepper, and half of the dried oregano. - Layer on half of the mozzarella cheese and breadcrumbs. - Repeat the layers with the remaining ingredients. - Drizzle olive oil evenly over the top of the casserole. - Cover the dish with aluminum foil and bake for 30 minutes. - After 30 minutes, carefully remove the foil. - Bake for an additional 15-20 minutes until golden brown. - Allow the casserole to cool for a few minutes before serving. - For a beautiful presentation, serve warm in the baking dish. - Garnish with extra basil leaves for a pop of color. You can find the full recipe details to enhance your cooking experience. You can easily swap ingredients in your casserole. If you want a different cheese, try Parmesan or feta cheese. These cheeses add a nice twist and flavor. For a quicker option, use canned tomatoes. They save time and still taste great. To get that cheese perfectly melted, cover the dish with foil at first. This keeps the heat in and helps the cheese melt evenly. For the best results with tomatoes, arrange them in a single layer. This helps them cook evenly and prevents sogginess. Pair your casserole with a simple green salad or garlic bread. These sides add freshness and texture. For drinks, a light white wine or sparkling water works well. These beverages balance the rich flavors of the casserole. Feel free to check out the Full Recipe for more details! {{image_2}} You can make this dish even better with veggies. Try adding zucchini or bell peppers. Just slice them thin and layer them in with the tomatoes. They bring nice color and flavor. Fresh herbs also add a twist. Use thyme or parsley for a new taste. You can mix and match to find your favorite blend! Adding meat can turn this dish into a hearty meal. Cooked ground meat or sausage works well. Brown the meat before adding it to the layers. This gives your casserole added protein and flavor. It makes the dish more filling, too. Kids and adults alike will love it! If you need a gluten-free option, choose gluten-free breadcrumbs. They work just like regular ones. You can even crush gluten-free crackers for a crunchy topping. When serving guests, be sure to check all ingredients. This way, everyone can enjoy the meal without worry. To store your Easy Baked Tomato Casserole, let it cool first. Then, place leftovers in an airtight container. Use glass or plastic containers for best results. Make sure to cover it well to keep it fresh. This way, your meal stays tasty for later. If you want to save some for later, freezing works great. Cut the casserole into portions. Wrap each piece tightly in plastic wrap. Then, place them in a freezer-safe bag. To reheat, set your oven to 350°F (175°C). Bake the frozen casserole for about 30-40 minutes. Check that it's hot all the way through before serving. In the fridge, your casserole stays fresh for about 3-4 days. Look for signs of spoilage, like a bad smell or mold. If it smells funny or has changed color, it's best to throw it away. Always trust your senses when it comes to food safety! It takes about one hour to bake this casserole. You need 15 minutes for prep. Then, bake it for 30 minutes covered. After that, remove the foil and bake for another 15-20 minutes. This makes the top crispy and golden. Yes, you can use other cheeses. Parmesan adds a nutty taste. Feta gives a tangy flavor. Each cheese changes the dish's taste. Just keep the amount the same to ensure good texture. This casserole pairs well with many sides. A fresh green salad adds crunch. Garlic bread complements the flavors nicely. You might also serve rice or pasta. These sides help soak up the tasty juices. This recipe is quite healthy. It uses fresh tomatoes and basil full of nutrients. Mozzarella provides protein and calcium. You control the amount of oil and salt, keeping it light. The dish is rich in vitamins and antioxidants. To make it kid-friendly, reduce the garlic and herbs. Kids often like milder flavors. You can add a bit of sugar to balance the acidity of tomatoes. Also, let them help layer the ingredients. This makes them more excited to eat it. This baked tomato casserole is easy to make and full of flavor. We covered the key ingredients, tools you need, and simple steps to follow. You also learned tips for variations and storage. Try this recipe to enjoy fresh veggies and delicious cheese. It’s a wholesome meal that you can modify for your taste. Happy cooking!

Are you craving a simple yet delicious meal? You’ll love this Easy Baked Tomato Casserole! With just a few fresh ingredients, you can create a dish that’s full of flavor …

Read more

Categories Dinner

Grilled Corn in Foil Delicious and Easy Recipe

June 26, 2025 by Chef Theo
- 4 ears of fresh corn, husked - 1/4 cup unsalted butter, softened - 1 tablespoon chili powder - 1 teaspoon smoked paprika - 1 lime, zested and juiced - 1/4 cup grated cotija cheese - 1/4 cup fresh cilantro, chopped - Salt and pepper to taste - Aluminum foil To make grilled corn in foil, you need fresh corn. Look for sweet, tender ears at the store. Husk the corn and remove all the silk. Next, use softened butter to add flavor. Mix in chili powder, smoked paprika, lime zest, and a bit of salt and pepper. This mix makes the corn taste amazing. I love to add toppings after grilling. Cotija cheese adds a salty kick. Fresh cilantro gives a bright touch. A squeeze of lime juice at the end is a must. It brightens every bite! - Grill - Aluminum foil - Mixing bowl You will need a grill to cook the corn. Preheat it to medium-high heat. Use aluminum foil to wrap each ear of corn tightly. This keeps the steam in and cooks the corn evenly. A mixing bowl helps you combine the butter and spices easily. Having these tools ready makes the process smooth and fun! For the full recipe, check out the detailed steps to enjoy this tasty dish. - First, husk the corn. Remove all the green leaves and silk. Rinse the ears under cold water. This keeps your corn clean and fresh. - Next, prepare the seasoned butter. In a small bowl, mix 1/4 cup of softened unsalted butter with 1 tablespoon of chili powder, 1 teaspoon of smoked paprika, the zest of 1 lime, and a pinch of salt and pepper. Stir until all the ingredients blend well. This butter adds a great taste. - Now it’s time to wrap the corn in foil. Lay out four sheets of aluminum foil. Place one ear of corn in the center of each sheet. Spread a good amount of the seasoned butter over each ear. Squeeze half of the lime juice on top. - Preheat your grill to medium-high heat, around 400°F (200°C). Place the foil-wrapped corn directly on the grill grates. Close the lid and grill for about 15 to 20 minutes. Turn the corn occasionally. This makes sure it cooks evenly and absorbs all the flavors. - When the time is up, carefully unwrap the corn. Be careful of the hot steam that escapes. Using tongs, remove the corn from the foil. - To finish, sprinkle crumbled cotija cheese and fresh chopped cilantro on top. Drizzle a bit more lime juice for extra zest. Now your grilled corn is ready to enjoy! For the complete recipe, check out the Full Recipe section. To make your grilled corn really pop, try different butter mixtures. I love mixing unsalted butter with chili powder and smoked paprika. This combo adds a nice kick. You can also try a garlic butter mix. Just blend butter, minced garlic, and a pinch of salt. For a twist, mix in some fresh herbs like basil or parsley. Want something sweet? Drizzle honey or maple syrup over the corn before grilling. This gives a nice contrast to the savory flavors. You can even add a sprinkle of cheese for a rich taste. The right grill temperature is key. Set your grill to medium-high heat, around 400°F. This helps the corn cook evenly. Place the foil-wrapped corn directly on the grates. Make sure to turn the corn every five minutes. This ensures every side gets that beautiful char. You want your corn to be tender but not mushy. With these tips, you’ll have delicious grilled corn that everyone will love. Want to check the full recipe? Look for the Grilled Corn Fiesta! {{image_2}} You can spice up your grilled corn in many ways. One fun option is to add jalapeños. These peppers give the corn a nice heat. Simply chop a few jalapeños and mix them into the butter. Spread this mix on the corn before wrapping it up. You will love the kick! Another tasty choice is to make sweet corn. You can drizzle honey or maple syrup over the corn. This adds a lovely sweetness that balances well with the savory butter. Just remember to add these sweeteners before wrapping the corn in foil. If you follow a vegan diet, don't worry! You can still enjoy grilled corn. Use plant-based butter instead of regular butter. It works just as well and tastes great. Find a plant-based option with a flavor you like. For those who need gluten-free meals, this recipe is already a winner. All the ingredients are gluten-free. Just make sure your toppings, like cheese, are also gluten-free. Enjoy your delicious meal without worry! For the full recipe, check out the Grilled Corn Fiesta recipe above. After you finish enjoying your grilled corn, let it cool first. This helps keep the flavor and texture. Wrap each ear in plastic wrap or foil. You want to seal it tight to keep out air. Place the wrapped corn in a container. A sturdy plastic or glass container works best. This keeps the corn fresh and tasty. To reheat corn, the grill is the best choice. Just unwrap the corn and place it back on the grill. Heat it for about 5-7 minutes. Turn it occasionally to warm it evenly. If you prefer using an oven, preheat it to 350°F (175°C). Place the corn on a baking sheet and cover it with foil. Heat for about 10-15 minutes until warm. You can also use a microwave. Just place the corn on a plate and cover it with a damp paper towel. Heat in 30-second bursts until warm. Each method keeps the corn moist and delicious. Enjoy your grilled corn again! Grill corn in foil for 15-20 minutes. This time helps the corn cook well. The heat makes the corn tender and juicy. It is best to turn the corn every 5 minutes. This way, it cooks evenly. Yes, you can grill corn without foil. Grilling corn directly on the grill gives it a smoky flavor. You should husk the corn and soak it in water first. Soaking helps keep the corn moist. Grill it for about 10-15 minutes, turning often. The kernels will char nicely, but they may dry out faster. You can add many toppings to grilled corn. Here are some popular choices: - Crumbled cotija cheese - Chopped fresh cilantro - Lime juice - Chili powder - Smoked paprika - Garlic powder - Hot sauce Feel free to mix and match. You can also try adding ingredients like jalapeños for heat or honey for sweetness. These toppings make your grilled corn even more tasty. For the full recipe, check out the Grilled Corn Fiesta. Grilling corn is simple and tasty. Fresh corn, butter, and seasonings are key. You learned to husk, wrap, and grill it with care. Use the tips for flavor and grilling techniques to get the best results. You can try different flavor mixes or dietary options, too. Store leftovers properly for another meal. Enjoy your grilled corn adventure and impress your friends at the next cookout!

Grilled corn in foil is a tasty and easy way to enjoy summer flavors. With just a few simple steps, you can have sweet, smoky corn ready in no time. …

Read more

Categories Appetizers

Cake Mix Peach Cobbler Simple and Sweet Delight

June 25, 2025 by Chef Theo
To make a tasty cake mix peach cobbler, gather these simple ingredients: - 1 box of yellow cake mix - 4 cups fresh or canned peaches (sliced, if fresh) - 1/2 cup unsalted butter (melted) - 1 cup granulated sugar (adjust based on sweetness of peaches) - 1 teaspoon vanilla extract - 1 teaspoon cinnamon - 1/4 teaspoon nutmeg - 1/2 cup milk - Ice cream for serving (optional) When measuring, use the right tools. For dry ingredients, like sugar and cake mix, use a dry measuring cup. Fill it, then level it off with a knife. For liquids, use a liquid measuring cup. Pour until you reach the right line. This helps keep your cobbler perfect. It ensures the right balance of flavors and textures. If you don’t have some ingredients, try these swaps: - Instead of yellow cake mix, use vanilla or butter cake mix for a different taste. - Fresh peaches can be replaced with canned ones. Just check for added sugar. - Use coconut oil or margarine instead of butter for a dairy-free option. - Swap out the milk for almond milk or oat milk for a lighter touch. With these tips, you can customize your cake mix peach cobbler to fit your taste or what you have on hand. For the full recipe, check out the earlier steps. Enjoy your sweet creation! Start by preheating your oven to 350°F (175°C). This step is key for baking. Next, grab a 9x13 inch baking dish. Grease it well. Use butter or non-stick spray. This will stop the cobbler from sticking. It helps keep the edges nice and clean. Now, let’s get to the peaches. If you use fresh peaches, peel and slice them first. If you have canned peaches, just drain them. In a big bowl, mix the sliced peaches with 1/2 cup of sugar. Add the cinnamon, nutmeg, and vanilla extract. Stir it well until the peaches are coated. Spread this peach mixture evenly in the bottom of your greased dish. In another bowl, prepare the cake mix. Follow the package instructions, but use milk instead of water for half the amount. This makes the cake richer. Stir in the melted butter until smooth. Pour the cake batter over the peach layer. Make sure to cover all the peaches. Do not mix them together. The batter will rise while baking, creating a nice top layer. For the full recipe, check the Cooking section. Bake your cake mix peach cobbler at 350°F (175°C). This temperature helps the cake rise perfectly. The baking time is key. Aim for 40 to 45 minutes. The top should turn golden brown. To check if it's done, insert a toothpick in the center. If it comes out clean, your cobbler is ready! Let your cobbler cool for a few minutes before serving. This helps the layers settle. Cut it into squares for easy serving. You can serve it warm, or at room temperature. For a special touch, add a scoop of vanilla ice cream on top. Ice cream melts into the warm cobbler, making each bite sweet and creamy. Present your cobbler in a way that wows your guests. Use the peach syrup from the bottom of the dish. Drizzle it over the top for extra flavor. A sprinkle of cinnamon adds a warm touch. For a pop of color, garnish with fresh peach slices. This makes your dish look inviting and delicious! {{image_2}} To boost flavor, use ripe peaches. Fresh peaches give the best taste. If you use canned peaches, drain them well. This keeps your cobbler from being too soggy. Add a pinch of salt to the cake mix. It balances sweetness and enhances flavor. You can also mix in nuts for crunch. Walnuts or pecans work great. If you want a twist, try adding almond extract instead of vanilla. This gives a nice nutty flavor. Sometimes, the top might not brown well. If this happens, increase the oven temperature by 25°F for the last 5-10 minutes. Another issue could be a soggy bottom. This can happen if the peaches release too much juice. To fix this, sprinkle a little cornstarch over the peaches before adding the batter. This helps to thicken any extra juice. If your cobbler is too dry, try adding more milk to the batter next time. You can prepare the peach mixture a day in advance. Just store it in the fridge. When you’re ready to bake, make the cake batter and pour it over the peaches. Bake as directed. If you want to serve it later, cool it completely before covering it. Store it in the fridge. Reheat in the oven at 350°F until warm. Always serve it with ice cream for a delightful treat! You can find the full recipe above. You can switch up the fruit in your cobbler. Try using apples, pears, or berries. Each fruit brings its own taste. For apples, add some lemon juice for zing. For berries, mix in a bit of sugar to balance the tartness. You can even blend fruits together for a unique twist. Don’t be afraid to experiment! If you want a lighter cobbler, consider using whole wheat cake mix. This adds fiber and nutrients. You can also reduce the sugar. Try using honey or maple syrup instead of granulated sugar. These natural sweeteners can give a nice taste and cut calories. Consider using less butter too. Applesauce works well as a substitute! To make this recipe vegan, replace the butter with coconut oil or a plant-based spread. Use a non-dairy milk like almond or oat milk. For a gluten-free version, choose a gluten-free cake mix. Check labels to avoid any hidden gluten. These options keep the cobbler tasty and suitable for many diets. Yes, you can use frozen peaches. They work well in this recipe. Just thaw them first. Drain any excess liquid to avoid a soggy cobbler. The flavor will still shine through, and your dessert will taste great! To store leftovers, let the cobbler cool completely. Cover it with plastic wrap or foil. You can keep it in the fridge for up to three days. Reheat slices in the oven or microwave before serving. This way, the cobbler stays warm and tasty. Yes, you can prepare the peach mixture a day in advance. Keep it in the fridge until you are ready to bake. Just mix the cake batter right before baking. This helps the cobbler taste fresh and delicious. Peach cobbler is great on its own, but adding ice cream makes it even better! Vanilla pairs nicely with the warm, sweet cobbler. You can also sprinkle some nuts or fresh mint on top for extra flavor. Enjoy this sweet delight with friends and family! We explored all the key parts of making a peach cobbler. You learned about the ingredients, measurements, and alternatives to fit your needs. I shared step-by-step instructions for making the perfect treat, along with baking tips and how to serve it well. You also discovered ways to enhance flavors and troubleshoot common issues. Finally, we covered variations for different diets and tastes. With this guide, you can create a delicious peach cobbler that everyone will love. Enjoy making your own sweet version at home!

If you crave a sweet treat but want it easy, you’re in the right place! This Cake Mix Peach Cobbler is a simple recipe that uses easy-to-find ingredients. With a …

Read more

Categories Desserts

Easy Crispy Cheddar Chicken Simple and Flavorful Meal

June 25, 2025 by Chef Theo
To make this dish, you will need: - 4 boneless, skinless chicken breasts - 1 cup cheddar cheese, shredded - 1 cup breadcrumbs (preferably panko for extra crunch) - 1/2 cup all-purpose flour - 2 large eggs - 1 teaspoon garlic powder - 1 teaspoon paprika - 1/2 teaspoon salt - 1/2 teaspoon black pepper - 1/4 teaspoon cayenne pepper (optional for a kick) - Cooking spray or olive oil Each ingredient plays a key role. The chicken forms the base. The cheese gives it flavor and melty goodness. Panko breadcrumbs create a wonderful crunch. To add a twist to your chicken, consider these options: - Fresh herbs like parsley or thyme - A squeeze of lemon juice for brightness - Hot sauce for more heat - Different cheese types, like mozzarella or pepper jack These extras can elevate your dish. Fresh herbs add freshness. A splash of lemon brightens flavors. Hot sauce brings a fun kick. You will need a few tools for this recipe: - Baking sheet lined with parchment paper - Three shallow bowls for coating - Meat thermometer for checking doneness - Whisk for beating the eggs Having the right tools makes cooking easier. A lined baking sheet prevents sticking. Shallow bowls help with coating the chicken evenly. A meat thermometer ensures safe cooking. For the complete method, check the Full Recipe. Start with fresh chicken breasts. Make sure they are boneless and skinless. Rinse them under cold water, then pat them dry with paper towels. This helps the coating stick better. In three bowls, set up your breading station. First, mix flour, garlic powder, paprika, salt, black pepper, and optional cayenne in one bowl. In the second bowl, beat two eggs until combined. The last bowl will hold the breadcrumbs mixed with half of the shredded cheddar cheese. Now, take a chicken breast. Coat it evenly in the flour mix first. Shake off any extra flour. Next, dip it into the beaten eggs. Let any excess egg drip off. Finally, place the chicken in the breadcrumb mix. Press down to help the crumbs stick. Repeat until all breasts are coated. Preheat your oven to 400°F (200°C). Line a baking sheet with parchment paper. Place your coated chicken breasts on the sheet. Lightly spray or drizzle them with olive oil for extra crispiness. Bake for 25-30 minutes. The chicken should be golden and crispy when done. Use a meat thermometer to check for 165°F (75°C) inside. In the last 5 minutes, sprinkle the rest of the cheddar on top. Watch it melt into a cheesy delight. Let the chicken cool for a few minutes before serving. For the full recipe, refer back to the ingredients and instructions listed earlier. To get your chicken super crispy, use panko breadcrumbs. Panko gives a light, airy crunch. Make sure to coat each chicken piece well. Press the breadcrumbs firmly onto the chicken. This helps them stick better. Lightly spray the top with cooking spray. This adds even more crispiness. One common mistake is not shaking off excess flour. Too much flour can make the coating heavy. Another mistake is skipping the egg wash. This step helps the breadcrumbs stick. Lastly, avoid overcrowding the baking sheet. Space out the chicken for even cooking and crisping. Use a shallow bowl for the flour mix. This makes it easier to coat the chicken. A whisk helps beat the eggs well. For the breadcrumbs, use a third bowl. A silicone mat or parchment paper helps prevent sticking. A meat thermometer ensures your chicken is safe to eat. {{image_2}} You can switch up the cheese in this recipe. If you want a bold flavor, try pepper jack cheese. This cheese adds a nice kick. For a milder taste, use mozzarella. It melts well and keeps the chicken juicy. You could also mix cheeses for more depth. Cheddar pairs nicely with gouda or fontina. Experiment and find your favorite combo! To make spicy cheddar chicken, add heat! Just include more cayenne pepper in the breading. You can also mix in diced jalapeños with the cheese. This adds flavor and heat. Another option is to drizzle hot sauce on the chicken before baking. It gives a nice kick without changing the recipe too much. Your taste buds will thank you! For a gluten-free version, swap regular breadcrumbs with gluten-free ones. Look for panko-style options for that extra crunch. You can also use almond flour instead of all-purpose flour. This keeps the crispy texture while making it safe for gluten-free diets. Always check labels to ensure products are gluten-free. Enjoy your crispy cheddar chicken without worry! For the full recipe, check the Easy Crispy Cheddar Chicken above! To keep your leftover Easy Crispy Cheddar Chicken fresh, use an airtight container. Place the chicken in the container and seal it tightly. Store it in the fridge for up to 3 days. Make sure to let it cool before you store it. This helps keep the chicken crispy for your next meal. When you’re ready to eat the leftovers, reheat them in the oven. Preheat the oven to 350°F (175°C). Place the chicken on a baking sheet and cover it with foil. Heat for about 15 to 20 minutes, or until hot. This method keeps the coating crispy. You can also use a microwave if you’re in a hurry, but the coating may get soggy. If you want to freeze your chicken, it’s best to do this right after cooking. Let the chicken cool completely. Then, wrap each piece in plastic wrap and place them in a freezer bag. This way, you can enjoy them later. They can stay in the freezer for up to 3 months. When you’re ready to eat, thaw them in the fridge overnight before reheating. This keeps the chicken tasty and safe. Yes, you can use chicken thighs. They are juicier and have more flavor. Just adjust the cooking time. Thighs may need a bit more time to cook fully. Aim for an internal temperature of 165°F (75°C) to ensure safety. You can serve this chicken with many sides. Here are some great ideas: - Steamed broccoli - Mashed potatoes - Rice pilaf - A fresh garden salad - Roasted vegetables These sides make your meal balanced and delicious. Check the internal temperature with a meat thermometer. It should read 165°F (75°C). The juices should run clear, and the coating should be golden brown. If you don’t have a thermometer, cut into the thickest part. The meat should be white, not pink. Yes, using an air fryer works well! Preheat the air fryer to 380°F (193°C). Cook the chicken for about 12-15 minutes. Flip halfway through for even cooking. Check the temperature to ensure it reaches 165°F (75°C). You can make a few easy swaps: - Use whole wheat breadcrumbs instead of regular ones. - Substitute olive oil with a light spray. - Add veggies to the side for extra nutrients. These changes keep the taste while making it healthier. For the full recipe, check out the earlier section. You learned how to make Easy Crispy Cheddar Chicken with great flavor and crunch. We covered the key ingredients, step-by-step cooking, and tips to avoid mistakes. You can even mix things up with cheese variations or adapt the recipe for gluten-free diets. To keep your leftovers tasty, we shared storage tips and reheating methods. Enjoy cooking this dish and impress your family and friends with your skills!

Looking for a quick and tasty dinner idea? Let me show you how to make Easy Crispy Cheddar Chicken. This simple dish is packed with flavor and only takes a …

Read more

Categories Dinner

Vegetable Frittata Simple and Tasty Recipe Guide

June 25, 2025 by Chef Theo
To make a tasty vegetable frittata, you need these main ingredients: - 6 large eggs - 1/4 cup milk (or a dairy-free alternative) - 1 cup cherry tomatoes, halved - 1 bell pepper (any color), diced - 1 small zucchini, diced - 1 small red onion, finely chopped - 1 cup fresh spinach, roughly chopped - 1/2 cup feta cheese, crumbled - 2 tablespoons olive oil - Salt and pepper to taste These ingredients come together to create a fluffy frittata filled with flavor and nutrients. The eggs serve as a great base, while the veggies add color and taste. You can customize your frittata with these optional ingredients: - Mushrooms, sliced - Broccoli florets - Asparagus, chopped - Fresh herbs like parsley or dill - Different cheeses such as cheddar or goat cheese - Avocado, diced Feel free to mix and match these extras. They let you create a dish that suits your taste and the season. To cook your frittata, you'll need: - A large mixing bowl - A whisk or fork - An oven-safe skillet - A spatula - An oven preheated to 375°F (190°C) Having the right tools makes cooking easier and more fun. An oven-safe skillet is key for baking the frittata evenly. Remember, this recipe is all about making it your own. You can find the full recipe for a garden delight vegetable frittata in the section above. Enjoy your cooking! Start by gathering all the ingredients. You will need: - 6 large eggs - 1/4 cup milk (or a dairy-free alternative) - 1 cup cherry tomatoes, halved - 1 bell pepper (any color), diced - 1 small zucchini, diced - 1 small red onion, finely chopped - 1 cup fresh spinach, roughly chopped - 1/2 cup feta cheese, crumbled - 2 tablespoons olive oil - Salt and pepper to taste - Fresh basil leaves, for garnish Next, wash all the vegetables. Chop them into small pieces. This helps them cook evenly. Set your chopped veggies aside. In a large bowl, whisk the eggs and milk. Add salt and pepper to taste. This mixture will become the base of your frittata. Heat the olive oil in a large, oven-safe skillet over medium heat. I like to use a cast-iron skillet for even cooking. Add the chopped red onion and bell pepper. Sauté them for about 3-4 minutes until they soften. The colors should brighten and the aroma will fill your kitchen. Now, add the diced zucchini. Cook for another 2-3 minutes. After that, toss in the halved cherry tomatoes and spinach. Stir until the spinach wilts. This keeps the veggies fresh and vibrant in your dish. Once everything is cooked, pour the egg mixture over the sautéed veggies. Gently stir to combine. This ensures every bite has a mix of flavors. Now, sprinkle the crumbled feta cheese on top for added creaminess. Allow the frittata to cook on the stovetop for about 3-4 minutes. You want the edges to start setting. After that, carefully transfer the skillet to your preheated oven at 375°F (190°C). Bake for 15-20 minutes. You’ll know it’s done when it’s fully set and slightly golden on top. Once baked, let it cool for a few minutes before slicing. This will help it hold its shape. Serve it warm, garnished with fresh basil leaves. You can cut it into wedges for a lovely presentation. Enjoy it with a fresh green salad for a complete meal. For the full recipe, check the details above. To get a perfect frittata, focus on cooking times. Start on the stovetop. This helps set the edges. When you transfer it to the oven, watch for golden color. A toothpick should come out clean from the center. If it’s still wet, bake a bit longer. This gives you that fluffy texture everyone loves. Seasoning makes a big difference. I love adding fresh herbs like basil or parsley. You can also try a pinch of smoked paprika for extra warmth. For a kick, add a dash of red pepper flakes. Taste as you go to find your perfect blend. Don't forget to use salt and pepper to balance the flavors. One common mistake is overcooking the frittata. Keep an eye on your oven. Another mistake is not whisking the eggs well. You want a light and airy mix. Lastly, avoid overcrowding the skillet with too many veggies. This can lead to a soggy frittata. Stick to the amounts in the Full Recipe for best results. {{image_2}} You can easily make a low-carb frittata. Skip the milk and use just eggs. Opt for veggies like spinach, mushrooms, and bell peppers. These choices keep it low in carbs. You might add cheese like cheddar or mozzarella for flavor. Avoid starchy vegetables like potatoes to stay keto-friendly. To make a dairy-free frittata, replace milk with almond or oat milk. For a vegan option, swap eggs for tofu or chickpea flour. Blend the chickpea flour with water and spices to get a smooth mix. Add your favorite veggies, and bake as usual. This way, you can enjoy the same great taste without dairy or eggs. Feel free to mix up your veggies. Try broccoli, asparagus, or kale for a new twist. Each vegetable brings its own taste and texture. You can also change the cheese. Use goat cheese for a tangy flavor or mozzarella for a milder taste. This flexibility lets you create a unique frittata each time you cook. You can find the full recipe here [Full Recipe]. To store leftover frittata, let it cool first. Then, place it in an airtight container. Keep it in the fridge for up to four days. If you want to keep it longer, consider freezing it. To reheat your frittata, use the oven or microwave. For the oven, preheat it to 350°F (175°C). Place the frittata on a baking sheet. Heat for about 10-15 minutes until warm. For the microwave, slice the frittata and heat for 30-60 seconds. Make sure it is hot throughout. Freezing is a great way to save your frittata. Slice it first for easy serving. Wrap each piece tightly in plastic wrap. Then, place the slices in a freezer bag. Make sure to remove excess air. Your frittata will last in the freezer for up to three months. When ready to eat, thaw it overnight in the fridge before reheating. This keeps the taste fresh and delicious. You can find the Full Recipe for more tasty ideas. Yes, you can make a Vegetable Frittata in advance. It stores well in the fridge. After cooking, let it cool completely. Then, wrap it tightly in plastic wrap or store it in an airtight container. It will last for up to four days. You can easily reheat it in the oven or microwave. This makes it a great option for busy mornings. Many cheeses work well in a frittata. Feta adds a nice tangy flavor. Cheddar gives a rich, creamy taste. Goat cheese adds a unique, soft texture. You can also use mozzarella for a milder flavor. Feel free to mix different cheeses for more depth. Just remember to crumble or shred the cheese for even melting. Adding protein to your frittata is simple. You can include cooked meats like ham, bacon, or sausage. Tofu is a good choice for a vegan option. You can also mix in beans like black beans or chickpeas for added nutrition. Just make sure to cook any raw meat before adding it to the frittata. This keeps your dish safe and tasty. If you want, you can check the Full Recipe for more ideas. A vegetable frittata is easy to make with simple ingredients and tools. You can customize it with your favorite flavors and vegetables. Remember to avoid common mistakes for the best texture. Store leftovers properly to enjoy them later. With the tips and variations provided, you can create many delicious frittatas. Explore this dish and make it your own. Enjoy each bite of your tasty creation!

Looking for a quick, healthy meal? A vegetable frittata is perfect for breakfast, lunch, or dinner. With simple ingredients and easy steps, you can whip up a tasty dish the …

Read more

Categories Breakfast

Baked Ranch Chicken Juicy and Flavorful Delight

June 25, 2025 by Chef Theo
To make Baked Ranch Chicken, you need a few key items. Here’s what you will need: - 4 boneless, skinless chicken breasts - 1 cup buttermilk - 1 packet ranch seasoning mix - 1 cup panko breadcrumbs - ½ cup grated Parmesan cheese - 1 teaspoon garlic powder - ½ teaspoon onion powder - Salt and pepper to taste - Fresh parsley, chopped (for garnish) These ingredients blend together to create juicy, flavorful chicken. The buttermilk helps tenderize the chicken and adds moisture. The ranch seasoning mix gives that classic flavor we all love. You can elevate the dish with some optional seasonings. Consider adding a pinch of smoked paprika for a hint of smoke or cayenne for some heat. Lemon zest can add brightness, giving your chicken a fresh kick. For garnishes, you can use sliced green onions or more fresh parsley. These options enhance the look and taste of your meal. Baked Ranch Chicken pairs well with many sides. Here are some great options: - Roasted vegetables like carrots, broccoli, or Brussels sprouts - A fresh garden salad with mixed greens and a light vinaigrette - Creamy mashed potatoes or baked potatoes - Rice pilaf or quinoa for a hearty addition These sides bring color and flavor to your plate. They also balance the richness of the chicken. Whether you choose a salad or hearty potatoes, your meal will shine. For the full recipe, check out the details above. First, take your chicken breasts out. Rinse them under cold water. Pat them dry with paper towels. This step helps remove any extra moisture. It also helps the coating stick better. Trim any fat from the chicken. This makes the chicken look neat and cook evenly. In a medium bowl, mix the buttermilk and ranch seasoning. Whisk until it's smooth. Now, place the chicken breasts in this mix. Make sure they are fully covered. This marinade adds flavor and keeps the chicken juicy. Let the chicken soak for at least 30 minutes. You can also let it marinate for up to 2 hours in the fridge for even more flavor. In another bowl, combine the panko breadcrumbs, Parmesan cheese, garlic powder, onion powder, and a bit of salt and pepper. This mix gives the chicken a crunchy texture. Take the marinated chicken out of the buttermilk. Let any excess liquid drip off. Now, dip each piece into the breadcrumb mix. Press gently so the crumbs stick well. Place the coated chicken in a greased baking dish. Bake in a preheated oven at 400°F (200°C) for 25 to 30 minutes. The chicken should be golden and cooked through. Let it rest for 5 minutes before serving. This helps the juices settle for extra flavor. For a special touch, sprinkle chopped parsley on top. Enjoy this Baked Ranch Chicken Delight! For the full recipe, check the details above. To get that perfect crispy crust, use panko breadcrumbs. They are light and airy. Mix in grated Parmesan cheese for extra flavor. Press the breadcrumbs firmly onto the chicken. This helps them stick better. Bake at a high temperature. This ensures the coating gets golden brown and crunchy. A cooking spray on top can also add more crispiness. Marinating is key for juicy chicken. Use buttermilk for moisture and flavor. Combine it with ranch seasoning for a tasty mix. Let the chicken sit in the marinade for at least 30 minutes. If you have time, marinate it for up to 2 hours. This gives the flavors time to soak in. Always cover the bowl and refrigerate it. This keeps your chicken fresh and safe. Baked Ranch Chicken looks great on a platter. Serve it with roasted vegetables for color and nutrition. A fresh salad adds crunch and freshness. You can also drizzle ranch dressing around the platter. This makes it fun and flavorful. For a complete meal, pair it with rice or mashed potatoes. Your family will love this tasty dish! For the full recipe, check out the Baked Ranch Chicken Delight! {{image_2}} You can change the flavor of your baked ranch chicken easily. Try spicy ranch seasoning for a kick. You can also find garlic or herb ranch mixes. Each type gives a new twist. Use your favorite flavor to keep it fresh and fun. If you want a gluten-free option, use crushed rice cereal or gluten-free breadcrumbs. Almond flour works well too. These alternatives still give a nice crunch and flavor. They help keep the dish enjoyable for everyone. Adding vegetables makes this dish even better. Carrots, broccoli, or bell peppers work great. Just chop them into bite-sized pieces. Spread them around the chicken in the baking dish. They cook well and soak up the tasty ranch flavor. This makes your meal colorful and healthy. For the full recipe, check the earlier section. To keep leftover Baked Ranch Chicken fresh, place it in an airtight container. Make sure the chicken is cool before sealing it. This helps prevent moisture loss. You can store it in the fridge for up to four days. If you want to keep it longer, consider freezing it. When you are ready to eat the leftovers, preheat your oven to 350°F (175°C). Place the chicken on a baking sheet. Cover it with foil to keep it moist. Heat for about 15-20 minutes. Check that it is warm all the way through. This method keeps the chicken juicy and the coating crispy. To freeze Baked Ranch Chicken, wrap each piece in plastic wrap. Then, place them in a freezer bag. Squeeze out as much air as you can. Label the bag with the date. You can freeze it for up to three months. When you want to eat it, thaw it overnight in the fridge before reheating. Enjoy your flavorful delight any time! For the full recipe, check out the details above. Yes, you can use chicken thighs. Thighs stay juicier than breasts. They also have more flavor. Just follow the same steps in the Full Recipe. Adjust the cooking time to ensure they reach 165°F (74°C). Marinating for at least 30 minutes works well. If you have time, try up to 2 hours. This helps the chicken absorb the buttermilk and ranch flavors. The longer you marinate, the tastier it gets. Baked Ranch Chicken pairs nicely with many sides. Roasted vegetables or a fresh salad are great options. You can also serve it with mashed potatoes or rice. A drizzle of ranch dressing adds extra flavor. In this article, we explored how to make Baked Ranch Chicken. We covered key ingredients, step-by-step instructions, and tips for crispy results. We also discussed tasty variations and proper storage methods to keep your leftovers fresh. Enjoying this dish is easy with the right seasonings and side dishes. Try adding your own twist for extra flavor. With these tips, you can cook a meal that pleases everyone. Get ready for some delicious bites!

Are you ready to elevate your dinner game? Baked Ranch Chicken is your answer to a juicy, flavorful delight that comes together easily. I will guide you through each step, …

Read more

Categories Dinner
Older posts
Newer posts
← Previous Page1 … Page43 Page44 Page45 … Page105 Next →

TOASTED RECIPES

Where ideas are warm, crisp, and ready to serve! 🍞

PAGES

Home About Contact Privacy Policy Terms & Conditions Cookie Policy GDPR Policy Copyright Policy Disclaimer

CATEGORIES

Appetizers Desserts Salads Breakfast Dinner

Contact

  • Pinterest
  • Mail
Copyright © 2025 Toasted Recipes. All rights reserved.