Skip to content
toastedrecipes.com
  • Home
  • Appetizers
  • Desserts
  • Salads
  • Breakfast
  • Dinner
  • Privacy Policy
  • Contact
  • About

Chef Theo

Grilled Zucchini and Squash Fresh Flavorful Treat

July 11, 2025 by Chef Theo
- 2 medium zucchinis - 2 medium yellow squashes - 1 red bell pepper - 1 tablespoon olive oil - 1 teaspoon garlic powder - 1 teaspoon Italian seasoning - Salt and pepper to taste - Fresh basil leaves - Feta cheese When you pick your vegetables, choose fresh ones. Look for zucchinis and squashes that feel firm. They should have shiny skins. A bright red bell pepper adds a nice crunch and color. The oil and spices are key to giving your vegetables flavor. Olive oil adds richness, while garlic powder and Italian seasoning bring out the best in your dish. Salt and pepper are essential. They help balance the flavors. If you want to make your grilled zucchini and squash extra special, consider adding fresh basil leaves or crumbled feta cheese as a garnish. These options add freshness and a creamy touch. For the complete recipe, check out the Full Recipe section. Enjoy grilling! Preheat your grill to medium-high heat. This step is key to getting nice grill marks. A hot grill helps the veggies cook evenly and quickly. It also adds great flavor. In a large bowl, combine the sliced zucchini, yellow squash, and red bell pepper. Drizzle 1 tablespoon of olive oil over the veggies. Then, sprinkle on 1 teaspoon of garlic powder and 1 teaspoon of Italian seasoning. Add salt and pepper to taste. Toss everything until the vegetables are well coated. This mix helps bring out the best flavors. Now, place the seasoned vegetables directly on the grill. Grill for about 3-4 minutes on each side. Look for them to become tender and have nice grill marks. After grilling, remove the vegetables from the heat. Let them rest for a few minutes. This resting time allows the flavors to settle. You can then arrange your grilled zucchini and squash medley on a serving platter. If you like, sprinkle crumbled feta cheese on top and garnish with fresh basil leaves. For the complete recipe, check the Full Recipe section! To get the best grill marks, timing is key. Start with a hot grill, around medium-high heat. Place your zucchini and squash on the grill for about 3-4 minutes. Then flip them and grill for another 3-4 minutes. This time helps them get those beautiful, dark marks and stay tender. If you cook them too long, they may become mushy. For extra flavor, consider using marinades. A simple mix of olive oil, garlic powder, and Italian seasoning works wonders. You can also try balsamic vinegar for a tangy twist. Always coat your vegetables well before grilling. This step ensures they soak up all the flavors during cooking. Adding fresh herbs can elevate your grilled veggies. Basil, for example, pairs perfectly with zucchini and squash. Just sprinkle some on right before serving. You can also chop fresh parsley or thyme for added flavor. These herbs bring freshness and brightness to your dish. Enjoy your grilled zucchini and squash as a tasty side or a light main dish. For the full recipe, check out the Grilled Zucchini & Squash Medley. {{image_2}} You can easily make your grilled zucchini and squash cheesy. Just add feta or mozzarella. Both cheeses melt well and add great flavor. If you like a tangy taste, feta is the best choice. Mozzarella gives a creamy texture. To add cheese, sprinkle it over the veggies just before they finish grilling. The heat will melt the cheese, making a delicious topping. If you enjoy some heat, try adding chili flakes or jalapeños. You can sprinkle chili flakes on the veggies before grilling. For a bolder flavor, slice fresh jalapeños and toss them with the zucchini and squash. Both options bring a spicy kick that wakes up the dish. Adjust the amount to your taste. This spicy twist makes your grilled vegetables exciting. You don’t have to stop with just zucchini and squash. Mixing in other grilled vegetables can create a colorful medley. Bell peppers and asparagus pair nicely with zucchini and squash. Simply slice them up and add to the bowl with your other veggies. This mix adds more flavor and nutrition to your meal. You can try different combinations based on what you have on hand. Explore these variations to make your grilled zucchini and squash even more delightful. For the full recipe, check the earlier section. To keep your grilled zucchini and squash fresh, place them in an airtight container. Store them in the fridge. They will stay good for about 3 to 4 days. Make sure to cool them down before sealing the container. This step helps prevent moisture build-up, which can make them soggy. To reheat without losing texture, use the stovetop. Heat a non-stick pan over medium heat. Add the grilled veggies to the pan. Stir them gently for about 3 to 4 minutes. You can also reheat them in the oven at 350°F. Place them on a baking sheet for 10 minutes. Avoid using the microwave, as it can make them mushy. If you want to freeze grilled zucchini and squash, wait until they are cool. Place them in a freezer-safe bag. Remove as much air as possible before sealing. Label the bag with the date. You can keep them frozen for up to 3 months. When ready to use, thaw in the fridge overnight before reheating. This way, they will taste fresh when you cook them again. To keep zucchini and squash firm, use the right grill techniques. - Slice evenly: Cut the vegetables into 1/4-inch thick rounds. This helps them cook evenly. - Preheat the grill: Always preheat your grill to medium-high heat. This seals in moisture and adds great flavor. - Oil the veggies: Toss them in olive oil before grilling. This helps create a nice crust. - Don’t overcrowd: Place the slices in a single layer on the grill. This prevents steaming. - Watch the time: Grill for 3-4 minutes on each side. Remove when they are tender but still crisp. Following these steps ensures you enjoy grilled zucchini and squash with the perfect texture. Yes, you can use other vegetables in this recipe. Grilling is versatile! - Bell Peppers: Red, yellow, or green bell peppers add color and sweetness. - Eggplant: Sliced eggplant brings a rich flavor and meaty texture. - Asparagus: Thin asparagus spears grill quickly and add a nice crunch. - Mushrooms: Portobello or cremini mushrooms absorb flavors well when grilled. - Onions: Grilled onion slices add sweetness and depth to your dish. Feel free to mix and match based on your taste. Each vegetable will add its unique touch to your grilled medley. Grilled zucchini and squash pair well with many dishes. Here are some tasty ideas: - Quinoa Salad: A light quinoa salad with lemon dressing complements the veggies. - Grilled Chicken: Juicy grilled chicken adds protein to your meal. - Pasta: Toss grilled vegetables with pasta and olive oil for a quick dish. - Rice: Serve with seasoned rice or a grain bowl for a healthy option. - Sandwiches: Add grilled zucchini and squash to sandwiches for extra flavor. These pairings make your grilled zucchini and squash a fresh and flavorful treat! For the detailed preparation, check the Full Recipe. In this blog post, we explored how to grill fresh zucchini and squash. You learned about key ingredients, like colorful veggies and flavorful seasonings. We discussed step-by-step grilling methods to get perfect grill marks and taste. You also discovered storage tips and creative variations. Grilled veggies are healthy, tasty, and easy to make. Use what you learned to impress friends and enjoy delicious meals. Happy grilling!

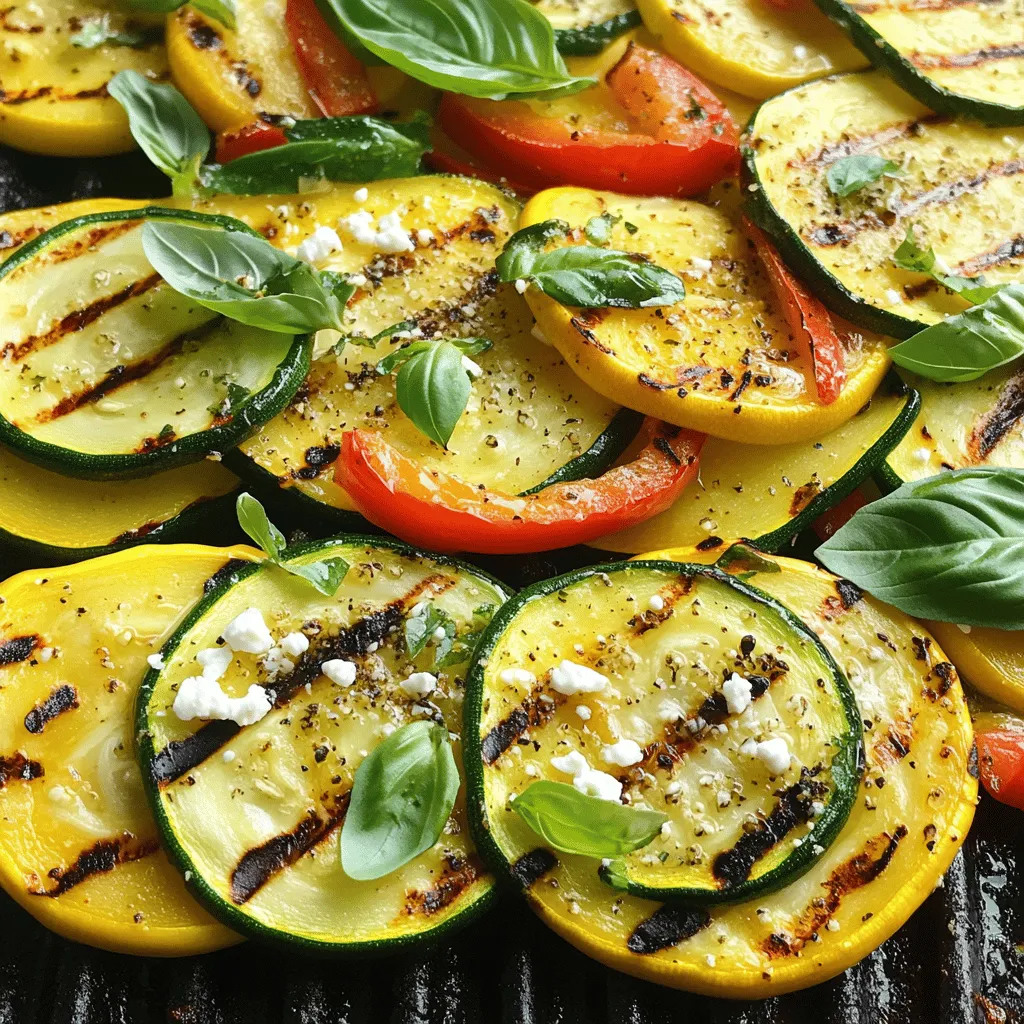
Welcome to my kitchen! Today, we’re diving into a fresh, flavorful treat: Grilled Zucchini and Squash. This dish is packed with vibrant colors and simple ingredients. Whether you’re a grilling …

Read more

Categories Dinner

Easy Baked Zucchini and Mushrooms Flavorful Delight

July 11, 2025 by Chef Theo
- Zucchini - Mushrooms - Red bell pepper - Garlic - Olive oil - Dried oregano - Smoked paprika - Salt and pepper - Parmesan cheese - Fresh parsley The main stars of this dish are zucchini and mushrooms. They work well together and create a great base. Zucchini has a mild taste, while mushrooms add umami. Red bell pepper adds sweetness and color. Garlic gives a nice kick. I use olive oil for a rich flavor and to help the spices stick. Dried oregano gives a classic touch, while smoked paprika adds depth. Salt and pepper heighten all these flavors. Do not forget the Parmesan cheese! It melts beautifully and adds creaminess. If you prefer a vegan option, you can use nutritional yeast instead. Fresh parsley is perfect for garnish. It adds a pop of color and freshness. You can swap out the Parmesan cheese for vegan cheese options like cashew cheese or store-bought alternatives. For seasonings, feel free to get creative. Try Italian seasoning, lemon zest, or even chili flakes for some heat. Each change can give the dish a new twist. Each serving of this dish has about 150 calories. Here's the macronutrient breakdown: - Carbohydrates: 12g - Protein: 6g - Fat: 10g This dish is light yet satisfying. It's a great way to enjoy veggies while keeping your meal balanced. To start, you will need to slice your zucchinis. Take 2 medium zucchinis and cut them into half-moons. Each slice should be about a half-inch thick. Next, grab 1 cup of mushrooms. You can use button or cremini mushrooms. Slice them into thin pieces, similar in thickness to the zucchini. Now, let’s dice the red bell pepper. Cut the pepper in half, remove the seeds, and chop it into small bits. Aim for about a cup of diced red bell pepper. Now it’s time to create the olive oil mixture. In a small bowl, whisk together 2 tablespoons of olive oil, 3 cloves of minced garlic, 1 teaspoon of dried oregano, and 1 teaspoon of smoked paprika. Add salt and pepper to taste. This mixture adds a lot of flavor. Once mixed, pour it over the sliced vegetables. Toss everything together until all the veggies are evenly coated. This step is key. An even coating ensures every bite is tasty. Next, we need to preheat the oven. Set it to 400°F (200°C). This temperature helps the vegetables roast nicely. Once preheated, spread your vegetable mixture on a baking sheet. Use parchment paper or grease the sheet lightly. Bake your veggies for 20 minutes. Remember to stir them halfway through. This helps them cook evenly. After 20 minutes, check if they are tender and golden. If they are, sprinkle 1/2 cup of grated Parmesan cheese on top. Bake for another 5 minutes. This will melt the cheese and make it bubbly. Enjoy the aroma as it fills your kitchen! To make your baked zucchini and mushrooms shine, consider these seasoning tips: - Add a squeeze of lemon juice for brightness. - Try adding a pinch of cayenne for heat. - Swap smoked paprika with regular paprika for a milder taste. For the best texture, aim for even slicing. Cut your zucchini and mushrooms into similar sizes. This helps them cook at the same rate. Stir the vegetables halfway through baking. This ensures they brown evenly and get that nice golden touch. This dish pairs well with grilled chicken or fish. Serve it on a bed of rice or quinoa for a hearty meal. You can also enjoy it as a side with pasta. Garnishing adds a lovely finish. Sprinkle fresh parsley on top just before serving. You can also add some lemon zest to brighten the dish. One common mistake is overcooking the vegetables. They should be tender but still firm. Keep an eye on the baking time. Another mistake is uneven seasoning. Be sure to coat the vegetables thoroughly with the seasoning mix. This helps every bite taste great. {{image_2}} You can boost your baked zucchini and mushrooms by adding protein. Chicken and tofu work great. They soak up flavors well. - Chicken: Use cooked, shredded chicken for a tasty twist. - Tofu: Firm tofu absorbs flavors nicely. Press it to remove water, then cube it. Best proteins to pair with this dish include: - Grilled chicken for a smoky flavor. - Baked tofu for a healthy, vegan option. If you want more veggies, try adding others. Bell peppers, spinach, or cherry tomatoes can mix well. - Bell Peppers: They add color and a sweet crunch. - Spinach: It wilts down nicely and adds nutrients. For cheese alternatives, consider: - Nutritional yeast for a cheesy flavor without dairy. - Vegan cheese shreds that melt well. You can make this dish mild or spicy. For a mild flavor, stick with the basic recipe. To amp up the spice, try these options: - Red pepper flakes: Add a pinch for heat. - Cayenne pepper: Use sparingly for an extra kick. Recommended spices to enhance flavor include: - Cumin for a warm, earthy taste. - Curry powder for a unique twist. These variations let you customize your dish. Be creative and enjoy your meal! For the Full Recipe, check the ingredients above. To keep your baked zucchini and mushrooms fresh, store them in the fridge. First, let the dish cool to room temperature. Then, place it in an airtight container. This helps keep the flavors intact and prevents drying out. Glass or plastic containers work well. Make sure they are sealed tightly to avoid exposure to air. You can enjoy your leftovers within three to four days. If you want to store the dish for longer, freezing is a great choice. Start by letting the dish cool completely. Then, portion it into freezer-safe bags or containers. Remove as much air as possible to prevent freezer burn. Label the bags with the date. This way, you won’t forget about them. When you're ready to eat, thaw the dish in the fridge overnight. This method ensures even thawing and better texture. Reheating baked zucchini and mushrooms is easy. The best method is using the oven. Preheat your oven to 350°F (175°C). Place the leftovers on a baking sheet and cover them with foil. This keeps moisture in and prevents burning. Heat for about 15 to 20 minutes. If you prefer, you can also use a microwave. Just heat in short intervals to avoid overcooking. Enjoy your meal by maintaining its flavor and texture! It takes about 25 minutes to bake zucchini and mushrooms. First, you preheat the oven to 400°F (200°C). Bake the veggies for 20 minutes, stirring halfway. Then, add cheese and bake for another 5 minutes. Yes, you can prep this dish in advance. Slice the zucchini and mushrooms, and store them in the fridge. You can mix the olive oil and spices ahead too. Just combine everything right before baking. This dish pairs well with many meals. Serve it alongside grilled chicken or fish for protein. It also complements rice or quinoa nicely. For a light meal, enjoy it with a fresh salad. You can find the full recipe for this delightful dish [here](#)
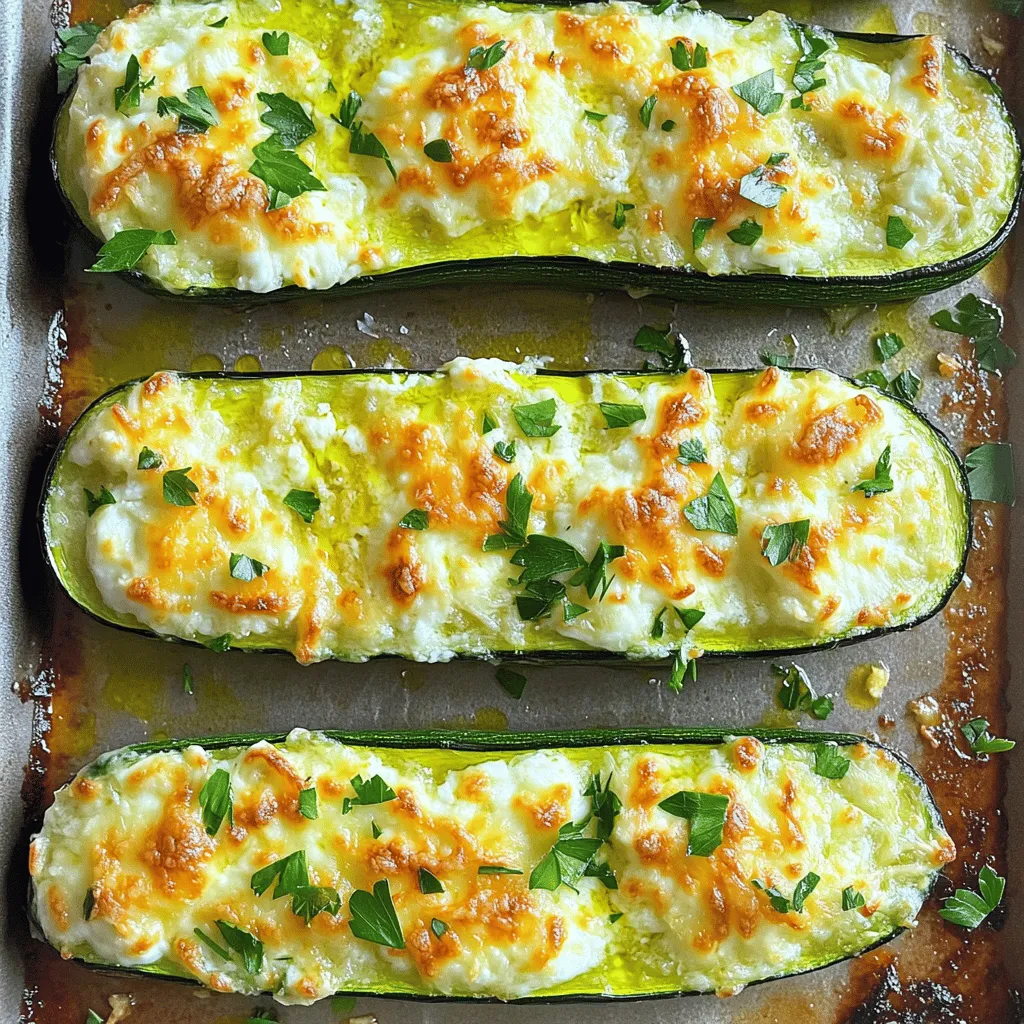
. The detailed steps will guide you to make the perfect baked zucchini and mushrooms. This blog post covered a delicious and healthy dish made with zucchini, mushrooms, and more. We explored ingredient options and substitutions, ensuring everyone can enjoy this meal. The preparation steps guide you through slicing, mixing, and baking. I shared tips to elevate the flavor and avoid common mistakes. Remember, you can customize the recipe with proteins or different spices. Follow the storage and reheating advice for leftovers. And if you want the full recipe, look for the link. Enjoy cooking and experimenting!

Looking for an easy and tasty side dish? My Easy Baked Zucchini and Mushrooms recipe is a hit! With fresh zucchini, mushrooms, and vibrant spices, this dish packs a flavorful …

Read more

Categories Dinner

Chocolate Zucchini Cupcakes Rich and Moist Delight

July 11, 2025 by Chef Theo
To make these rich and moist cupcakes, you need: - 1 cup grated zucchini (about 1 medium zucchini) - 1 cup all-purpose flour - 1/2 cup unsweetened cocoa powder - 1 teaspoon baking soda - 1/2 teaspoon baking powder - 1/4 teaspoon salt - 1/2 cup granulated sugar - 1/2 cup brown sugar, packed - 1/2 cup vegetable oil - 2 large eggs - 1 teaspoon vanilla extract - 1/2 cup chocolate chips (dark or semi-sweet) These ingredients come together to create a cupcake that is both tender and full of chocolate flavor. The grated zucchini adds moisture without changing the taste. You can easily swap out some ingredients based on what you have. Here are a few ideas: - Use whole wheat flour instead of all-purpose flour for a healthier option. - Substitute applesauce for oil to cut down on fat and add natural sweetness. - If you don’t have eggs, try using 1/4 cup of unsweetened applesauce per egg. - For a dairy-free option, use almond milk instead of regular milk if you want to add a splash. These substitutions let you customize the recipe to fit your needs without losing flavor. To make your cupcakes even more special, consider adding: - A pinch of cinnamon for warmth and depth. - Chopped nuts, like walnuts or pecans, for a crunchy texture. - A splash of coffee or espresso to boost the chocolate flavor. - A hint of orange zest for a fresh twist. These extras can take your cupcakes to the next level and surprise your taste buds! Check out the Full Recipe for detailed instructions on how to combine these ingredients perfectly. First, set your oven to 350°F (175°C). This temperature makes the cupcakes rise well. Next, grab a muffin tin. Line it with cupcake liners to prevent sticking. This step makes cleanup easy. In a medium bowl, mix the dry ingredients. Combine 1 cup of all-purpose flour, 1/2 cup of unsweetened cocoa powder, 1 teaspoon of baking soda, 1/2 teaspoon of baking powder, and 1/4 teaspoon of salt. Whisk them together until they blend well. This mix gives the cupcakes their structure and flavor. Take a large bowl and add 1/2 cup of granulated sugar and 1/2 cup of packed brown sugar. Pour in 1/2 cup of vegetable oil. Whisk these ingredients until smooth. Next, add 2 large eggs, one at a time. Mix well after each egg. Finally, stir in 1 teaspoon of vanilla extract for a lovely taste. Now, gently add the dry mix to the wet ingredients. Stir carefully until just combined; do not overmix. Fold in 1 cup of grated zucchini and 1/2 cup of chocolate chips. This step adds moisture and richness to your cupcakes. Spoon the batter into the lined muffin tin. Fill each liner about 2/3 full. Bake in the oven for 18-20 minutes. Check with a toothpick; it should come out clean. Let the cupcakes cool in the tin for 5 minutes. Then, move them to a wire rack to cool completely. For the full recipe, check the instructions above! Enjoy your baking adventure! To get moist cupcakes, here are my best tips. First, do not overmix your batter. Overmixing can make them tough. Mix until just combined for the best texture. Second, use fresh ingredients. Fresh eggs and oil help keep your cupcakes soft. Lastly, bake them until just done. Check with a toothpick around 18 minutes. If it comes out clean, they are ready! Using fresh zucchini is key for flavor and moisture. Choose medium-sized zucchinis. They have the best flavor and texture. Grate the zucchini finely for even mixing. Do not squeeze out the moisture. The water in the zucchini helps keep the cupcakes moist. If you have extra zucchini, you can add a bit more to enhance the flavor. After cooling, you can make your cupcakes look amazing. Top them with whipped cream for a creamy finish. A light dusting of powdered sugar adds a nice touch too. For extra flair, sprinkle chocolate shavings on top. You can even add a small slice of zucchini for fun! These small touches make your cupcakes stand out and taste even better. For the full recipe, check the recipe section above. {{image_2}} You can make vegan chocolate zucchini cupcakes by swapping a few ingredients. Use flaxseed meal for eggs. Mix 1 tablespoon of flaxseed with 2.5 tablespoons of water. Let it sit for 5 minutes to thicken. Replace the vegetable oil with a plant-based option, like coconut oil. For the milk, use almond or oat milk. These swaps keep the cupcakes moist and rich. To make gluten-free chocolate zucchini cupcakes, choose a gluten-free flour blend. Look for blends that work well in baking. You can also use almond flour or coconut flour, but adjust the amount. Start with 3/4 cup of coconut flour, as it absorbs more moisture. Always check the labels to avoid cross-contamination if you have severe allergies. Adding different flavors can take your cupcakes to the next level. Try mixing in nuts like walnuts or pecans for crunch. You can also add spices such as cinnamon or nutmeg for warmth. For a fun twist, fold in dried fruit like raisins or cherries. These small changes can create a new taste experience while keeping the base recipe in mind. For more detailed steps and tips, check out the Full Recipe. To keep your chocolate zucchini cupcakes fresh, let them cool first. Place them in an airtight container. Store them at room temperature for up to three days. If you want to keep them longer, refrigerate them. They will stay good for about a week in the fridge. You can freeze these cupcakes to enjoy later. First, cool the cupcakes completely. Wrap each cupcake tightly in plastic wrap. Then, place them in a freezer-safe bag or container. They can last for up to three months in the freezer. When you're ready to eat one, just take it out and let it thaw at room temperature. To reheat your cupcakes, preheat your oven to 350°F (175°C). Place the cupcakes on a baking sheet. Heat them for about 10 minutes. This will make them warm and soft again. If you prefer, you can also use a microwave. Heat the cupcake for about 15-20 seconds. Enjoy your delicious treat just like fresh from the oven! Yes, you can use yellow squash! Yellow squash has a similar texture and moisture level as zucchini. The flavor will be slightly different, but it will still taste great. Just make sure to grate it the same way you do with zucchini. You can even mix both for a fun twist. To check if the cupcakes are done, insert a toothpick into the center of one. If it comes out clean or with a few moist crumbs, your cupcakes are ready. If the toothpick is wet with batter, bake them a bit longer. Keep an eye on them, as overbaking can make them dry. Absolutely! These cupcakes are fun and tasty for any party. The rich chocolate flavor and moist texture make them a hit. You can decorate them to match your theme. Add colorful sprinkles, themed toppers, or even a drizzle of icing for extra flair. You have several options for egg substitutes. You can use applesauce, mashed bananas, or yogurt. Each of these adds moisture and binding. For each egg, replace it with 1/4 cup of applesauce or mashed banana, or 1/4 cup of yogurt. These swaps work well and keep the cupcakes delicious. You learned how to make tasty chocolate zucchini cupcakes. We covered key ingredients, tasty swaps, and fun add-ins. I shared easy steps to bake them perfectly moist and how to store your treats. You can even try vegan or gluten-free versions! These cupcakes are great for any occasion and easy to customize. Enjoy your baking and the delicious flavors!

If you’re looking for a sweet treat that sneaks in some veggies, you’re in the right place! These Chocolate Zucchini Cupcakes are rich and moist, perfect for satisfying your chocolate …

Read more

Categories Desserts

Blueberry Bread Delightful and Easy Recipe

July 11, 2025 by Chef Theo
- 2 cups all-purpose flour - 1 cup fresh blueberries (or frozen, if preferred) - 1/2 cup granulated sugar - 1/4 cup brown sugar, packed To make great blueberry bread, start with quality ingredients. All-purpose flour gives the bread structure. Fresh blueberries burst with flavor. You can use frozen ones, too, if you want. The sugars add sweetness and moisture, helping the bread rise nicely. - 1 teaspoon baking powder - 1/2 teaspoon baking soda - 1/2 teaspoon salt - 1/2 cup unsalted butter, melted - 2 large eggs - 1 teaspoon vanilla extract - 1/2 cup buttermilk (or milk with a splash of vinegar as a substitute) - Zest of 1 lemon Next, we need some leavening agents. Baking powder and baking soda help the bread rise. Salt enhances the flavors. Melted butter keeps the bread moist and adds richness. Eggs bind the mix and add texture. Vanilla extract brings warmth, while buttermilk makes the bread tender. Finally, lemon zest brightens the taste. For the full recipe, you can check out the Blueberry Bliss Bread 🫐. First, preheat your oven to 350°F (175°C). This helps the bread bake evenly. While the oven heats, grease a 9x5 inch loaf pan with butter or cooking spray. You can also line the pan with parchment paper for easy removal. This step keeps the bread from sticking and makes cleanup quick. In a large bowl, add the dry ingredients. Use a whisk to mix together the all-purpose flour, granulated sugar, brown sugar, baking powder, baking soda, and salt. Whisking well ensures no lumps remain. A thorough mix gives your bread a nice rise and even texture. In a separate bowl, mix the wet ingredients. Combine the melted butter, eggs, vanilla extract, buttermilk, and lemon zest. Stir until everything is smooth. This mix adds moisture and flavor to your bread. The lemon zest gives a bright taste that pairs well with blueberries. Now, pour the wet mix into the bowl with the dry ingredients. Gently fold them together using a spatula. Be careful not to overmix; some lumps are okay. Overmixing can make the bread tough. The goal is to combine the ingredients without losing air. After mixing, gently fold in the blueberries. This ensures they spread evenly through the batter. Transfer the batter into the prepared loaf pan. Smooth the top with a spatula. Bake in the preheated oven for 50-60 minutes. To check if it’s done, insert a toothpick into the center. If it comes out clean, the bread is ready. Once baked, remove it from the oven. Let it cool in the pan for about 10 minutes. Then, transfer it to a wire rack. Allow it to cool completely before slicing. This helps the bread set and makes it easier to cut. Enjoy your delicious Blueberry Bread! For the full recipe, refer to the provided ingredients and steps. To get the best texture, mixing is key. Mix the dry and wet ingredients gently. Overmixing can make your bread tough. Aim for a few lumps in the batter. This keeps the bread soft and fluffy. When choosing fats, consider butter or oil. Butter adds a rich flavor. Oil can make the bread moist. Both work well, so choose based on your taste. Adding spices or extracts can boost flavor. Try cinnamon or nutmeg for warmth. A splash of almond extract can add a nice twist. Using lemon zest is a great way to brighten the bread. It adds a fresh taste. Use a fine grater to get just the yellow part. Avoid the white pith, as it can be bitter. For serving, slice the bread and enjoy it warm. Dusted powdered sugar adds a nice touch. You can also garnish with a sprig of mint. Serve with a small bowl of whipped cream for a treat. This adds a creamy contrast to the bread. Enjoy your Blueberry Bliss Bread with family and friends! {{image_2}} You can enjoy blueberry bread while meeting different diet needs. To make it gluten-free, swap all-purpose flour with almond or coconut flour. For a dairy-free version, use almond milk instead of buttermilk. These swaps let everyone enjoy this treat. Want to mix things up? You can add nuts like walnuts or pecans for a nice crunch. Dried fruits like cranberries or raisins also work well. These additions can bring new tastes to your blueberry bread without much effort. Love chocolate? You can make chocolate chip blueberry bread easily! Just fold in 1 cup of chocolate chips after mixing the wet and dry ingredients. This will give your bread a sweet and rich taste. Enjoy every slice with this tasty twist! For full details on making blueberry bread, check the Full Recipe and get started on this delightful bake! Store your blueberry bread in an airtight container. This keeps it fresh and moist. Place it at room temperature for up to three days. If you want it to last longer, refrigerate it. Just remember, refrigeration may change the texture a bit. You can also wrap it tightly in plastic wrap for added protection. To freeze blueberry bread, slice it first. This way, you can take out just what you need. Wrap each slice in plastic wrap, then place them in a freezer bag. For whole bread, wrap it well, and store it in a freezer-safe bag. Make sure to remove as much air as possible. This helps avoid freezer burn. Your bread can last up to three months in the freezer. Reheat your blueberry bread in the oven. Preheat the oven to 350°F (175°C). Place the slices on a baking sheet. Heat for about 10 minutes. This keeps the bread warm and soft. You can also microwave it for a quick fix. Just heat for 15-20 seconds. Enjoy your bread warm for the best taste. For the full recipe, refer to the earlier section. Yes, you can use frozen blueberries. They work well in this recipe. However, there are a few things to keep in mind. First, do not thaw them before adding to the batter. Thawing can make them mushy and may turn your batter blue. Second, frozen blueberries may release some juice while baking. This can add extra moisture and flavor, making your bread even more delightful. To check if your bread is done, use the toothpick test. Insert a toothpick into the center of the bread. If it comes out clean or with a few crumbs, your bread is ready. If it has wet batter on it, bake for a few more minutes. Keep a close eye on it, as overbaking can make it dry. Blueberry bread tastes great on its own, but you can enhance it. Serve it warm with a dusting of powdered sugar. You can add a sprig of mint for color. A small bowl of whipped cream or a dollop of yogurt also pairs well. For a twist, try cream cheese or a fruit spread. Blueberry bread will stay fresh for about 3 to 5 days when stored properly. Keep it in an airtight container at room temperature. If you want it to last longer, you can freeze it. Wrap it tightly in plastic wrap, then in aluminum foil. It can last for up to 3 months in the freezer. You learned how to make blueberry bread from scratch. We covered key ingredients like flour and blueberries. I shared step-by-step instructions for a perfect loaf. You found tips for great texture and flavor. You can try different variations to suit your taste. Remember to store your bread for freshness and explore pairing options. Baking is fun and rewarding. Enjoy your blueberry bread journey and share it with others!

Are you ready to bake a treat that’s both simple and delicious? This Blueberry Bread recipe brings joy to your kitchen with its vibrant flavors and soft texture. I’ll guide …

Read more

Categories Desserts

Zucchini Fritters Crisp and Flavorful Snack Delight

July 10, 2025 by Chef Theo
To make tasty zucchini fritters, gather these main ingredients: - 2 medium zucchinis, grated - 1 teaspoon salt (for zucchini) - 1 cup all-purpose flour - 1/2 cup grated Parmesan cheese - 2 large eggs - 1/4 cup green onions, finely chopped - 1 clove garlic, minced - 1/2 teaspoon black pepper - 1/2 teaspoon smoked paprika - Olive oil for frying - Sour cream or Greek yogurt (for serving) These ingredients create a great flavor and texture. The grated zucchini is key. It adds moisture and nutrition. The cheese gives it a nice salty bite. Eggs hold everything together. You’ll need some simple tools to make your fritters: - Grater - Colander - Mixing bowl - Non-stick skillet - Spoon or ice cream scoop - Paper towels Using the right tools helps make the cooking process smooth. A non-stick skillet is best. It prevents sticking and makes flipping easy. Feel free to get creative! Here are some optional ingredients you can add: - Fresh herbs like dill or parsley - Chopped bell peppers - Feta cheese for a tangy twist - Chili flakes for heat These extras enhance the taste and give your fritters a personal touch. You can mix and match them to suit your taste. For the full recipe, check out the Zesty Zucchini Fritters section above! To start, grate the zucchini using a box grater. This step breaks down the zucchini into small pieces. Place the grated zucchini in a colander and sprinkle it with 1 teaspoon of salt. The salt helps pull out extra moisture. Let it rest for about 10-15 minutes. This allows the zucchini to sweat. After that, use a clean kitchen towel to wring out the zucchini. Remove as much water as you can. This is key for crunchy fritters. In a mixing bowl, combine the squeezed zucchini with the following ingredients: - 1 cup all-purpose flour - 1/2 cup grated Parmesan cheese - 2 large eggs - 1/4 cup finely chopped green onions - 1 clove minced garlic - 1/2 teaspoon black pepper - 1/2 teaspoon smoked paprika Mix everything well until you form a thick batter. This batter will hold the fritters together. Heat a generous amount of olive oil in a non-stick skillet over medium heat. Once the oil is hot, drop spoonfuls of batter into the skillet. Use a spoon to flatten them slightly. Cook for about 3-4 minutes on each side. You want them golden brown and crispy. If your pan is small, fry in batches. After cooking, place the fritters on a paper towel-lined plate. This absorbs extra oil. Serve them warm with sour cream or Greek yogurt. For a full recipe, check out the details above. To get the best texture in your zucchini fritters, start with the zucchini. Grate it well and sprinkle salt on it. Let it sit for about 10-15 minutes. This step pulls out extra water. After resting, wring the zucchini in a towel. Removing moisture is key for crisp fritters. If you skip this, your fritters might be soggy. Mix the dry and wet ingredients well, but don’t overmix. A lumpy batter helps keep the fritters light and airy. One common mistake is not salting the zucchini. This step is vital to remove moisture. Another mistake is overcrowding the pan while frying. This leads to steaming instead of frying. Fry in batches to keep the heat high. Lastly, don’t skip the resting time for the batter. Let it sit for a few minutes before frying. This helps the flavors meld together for a richer taste. Use a non-stick skillet for best results. Heat the olive oil on medium heat. The oil should shimmer before you add the batter. Use a spoon or scoop to drop the batter into the pan. Flatten them slightly for even cooking. Fry for 3-4 minutes until golden brown. Flip them carefully to avoid breaking. Once done, place them on paper towels to absorb excess oil. Serve them warm for a delightful snack! Check out the Full Recipe for more details. {{image_2}} You can change the taste of zucchini fritters by adding herbs and spices. Fresh herbs like basil or dill bring bright flavors. Try adding a teaspoon of dried oregano or thyme for a savory kick. You can also use spices like cumin or chili powder for heat. Experimenting with different herbs and spices can make each batch unique. Cheese adds a creamy texture to fritters. If you want a twist, try different cheeses. Feta cheese gives a tangy flavor. Cheddar adds sharpness, while mozzarella makes them gooey and delicious. You can even use vegan cheese for a plant-based option. Mixing cheeses can create a rich and tasty experience. You can easily make zucchini fritters gluten-free. Substitute all-purpose flour with gluten-free flour or almond flour. This swap keeps the fritters light and tasty. You may need to adjust the amount of flour to get the right consistency. Enjoy these fritters without worrying about gluten! For the complete recipe, check out the Full Recipe for Zesty Zucchini Fritters. After enjoying your fritters, let them cool. Place them in an airtight container. Store them in the fridge for up to three days. This keeps them fresh and tasty. If you want to keep them longer, consider freezing. To reheat, use an oven for best results. Preheat the oven to 350°F (175°C). Place fritters on a baking sheet. Bake for about 10 minutes. This method restores their crispiness. You can also use a skillet. Heat a little olive oil and cook on medium heat for a few minutes on each side. For freezing, first cool the fritters completely. Lay them on a baking sheet in a single layer. Freeze them for about one hour until firm. Then, transfer them to a zip-top freezer bag, removing as much air as possible. These can stay in the freezer for up to three months. When you’re ready to eat, just reheat them directly from the freezer. Enjoy your zesty zucchini fritters anytime! You can find the full recipe above. You can serve zucchini fritters with a variety of tasty sides. Here are some ideas: - Sour cream or Greek yogurt adds a creamy touch. - A fresh salad pairs well with the fritters. - Serve with a tangy dipping sauce for extra flavor. - For a heartier meal, add grilled chicken or fish. These options enhance the zucchini fritters and make them a full meal. To keep your fritters crisp, follow these simple steps: - Always squeeze out excess moisture from the grated zucchini. - Use a clean kitchen towel or cheesecloth for best results. - Avoid adding too much flour; it can make them dense. - Fry in hot oil until golden brown for a crispy outside. These tips will help you achieve the perfect texture. Yes, you can prepare zucchini fritters in advance. Here’s how: - Mix the batter and store it in the fridge for up to 2 hours. - Cook the fritters, then let them cool completely. - Store cooked fritters in an airtight container in the fridge. When ready to eat, reheat them in a skillet for a few minutes. You can find the full recipe to guide you in making these delicious snacks. Enjoy! Zucchini fritters are simple and fun to make. We explored key ingredients, tools, and extra flavor tips. I shared step-by-step instructions for easy cooking. I provided useful tips for perfect texture and common mistakes to avoid. You can get creative with herbs, spices, and even cheese. Storing and reheating tips help keep your fritters fresh. Now, you can enjoy these tasty bites anytime! Embrace your cooking journey and enjoy every delicious crunch.

Craving a tasty snack that’s both crisp and flavorful? Zucchini fritters are perfect for you! They’re easy to make and packed with fresh taste. In this post, I’ll guide you …

Read more

Categories Appetizers

Best Baked Chicken with Cream of Chicken Soup Flavor

July 10, 2025 by Chef Theo
- 4 boneless, skinless chicken breasts - 1 can (10.5 oz) cream of chicken soup - 1 cup sour cream - 1 cup shredded cheddar cheese - 1 cup broccoli florets (fresh or frozen) - 1 teaspoon garlic powder - 1 teaspoon onion powder - 1 tablespoon olive oil - Salt and pepper to taste - 1 cup seasoned breadcrumbs Baked chicken with cream of chicken soup is a simple yet tasty dish. I love how the cream of chicken soup gives the chicken a rich, creamy flavor. Using sour cream adds a nice tang, too. For the main ingredients, I always use fresh, boneless chicken breasts. They cook evenly and are so tender. The cream of chicken soup is the star here. It brings everything together. Sour cream helps make the sauce smooth and creamy. When it comes to additional ingredients, I like to add broccoli florets. They add a pop of color and nutrition. Shredded cheddar cheese is a must for that cheesy goodness. The garlic powder gives a subtle flavor that really enhances the dish. For seasoning, I keep it simple. Onion powder adds depth. Olive oil keeps the chicken moist. Salt and pepper bring out all the flavors. Finally, seasoned breadcrumbs give the dish a nice crunch on top. If you want the full recipe, check out the link provided. You’ll find all the steps to create this delicious meal. - Preheat your oven to 375°F (190°C). - Grease a 9x13-inch baking dish. This will help the chicken not stick. - In a large bowl, combine the cream of chicken soup, sour cream, garlic powder, onion powder, salt, and pepper. - Mix well until smooth. This creamy sauce is key to the flavor. - Place the chicken breasts in the greased baking dish and drizzle with olive oil. - Pour the creamy mixture over the chicken. Make sure to coat each piece evenly. - Scatter broccoli florets on top. This adds color and nutrition. - Sprinkle shredded cheddar cheese over the broccoli and chicken. Finally, add seasoned breadcrumbs on top for texture. - Cover the dish with aluminum foil and bake for 30 minutes. - After 30 minutes, remove the foil and continue baking for another 15-20 minutes. - Your chicken is done when it reaches an internal temperature of 165°F and the top is golden brown and bubbly. - Let it rest for 5 minutes before serving to keep it juicy. For more details, check the Full Recipe. To get that golden brown top, you need to bake your dish just right. After covering your chicken with foil, bake for 30 minutes. Then, remove the foil and let it bake for another 15 to 20 minutes. This step helps the breadcrumbs turn crispy and the cheese to bubble. Using fresh broccoli gives a better texture than frozen. Fresh broccoli stays slightly crunchy, which adds a nice contrast to the creamy chicken. If you only have frozen broccoli, it will work too. Just make sure to thaw and drain it well before adding it to the dish. You can save time by preparing your ingredients in advance. Chop the broccoli the day before and store it in the fridge. Also, mix the creamy sauce ahead of time. This way, you can pull everything together faster when you are ready to cook. Using pre-cooked chicken cuts down your prep time even more. You can shred or cube the chicken and mix it into the creamy sauce. This makes the dish come together in no time. To boost the flavor, try adding more spices. A pinch of paprika or a sprinkle of Italian seasoning can make a big difference. You can also use fresh herbs like thyme or parsley for a pop of freshness. Adding more vegetables can increase nutrition. Think about adding sliced carrots or bell peppers. They blend well with the dish and add color. You can even mix in some spinach for extra greens. For the full recipe, check out the full recipe section! {{image_2}} You can switch up the protein in this dish. Instead of chicken breasts, try thighs or drumsticks. Dark meat adds a richer flavor and stays juicy. It also cooks well with the creamy sauce. If you want a vegetarian option, consider plant-based proteins. Use chickpeas or tofu for a hearty twist. They soak up the flavors from the cream of chicken soup nicely. While cream of chicken soup is great, you can explore other sauces. Cream of mushroom or cream of celery soup work well. Each brings a unique taste to the dish. Adding herbs can boost the flavor even more. Try rosemary for a fresh touch or thyme for warmth. These herbs enhance the creamy sauce, making it even more delightful. Pair your chicken bake with tasty side dishes. Steamed rice is a classic choice. It absorbs the creamy sauce well. You can also serve it with crusty bread to soak up all the goodness. If you have leftovers, get creative! Shred the chicken and add it to salads or wraps. This dish is perfect for meal prepping, making weeknight dinners easier. For the full recipe, check out the [Full Recipe]. To freeze leftover baked chicken, let it cool first. Then, cut the chicken into pieces. Place the chicken in airtight containers or freezer bags. Squeeze out the air to prevent freezer burn. Label the containers with the date. I recommend using glass containers or heavy-duty freezer bags for best results. Store the baked chicken in the fridge within two hours of cooking. Use an airtight container to keep it fresh. Properly stored, it lasts about 3 to 4 days. Enjoy it cold in salads or reheat it for a warm meal. To reheat the chicken bake, use the oven or microwave. For the oven, preheat to 350°F (175°C). Cover the dish with foil to keep moisture in. Heat for about 20 minutes or until warm. In the microwave, place a piece on a microwave-safe plate. Heat in 1-minute intervals until hot. To keep the chicken juicy, avoid overheating. Enjoy the creamy goodness just like before! Yes, but cooking times may vary. Skin-on chicken adds flavor and moisture. Just remember to check the chicken's doneness carefully. If you use skin-on chicken, it might need a few extra minutes in the oven. Alternatives include homemade white sauce or another creamy soup. You can mix milk with flour and butter to make your own. Other creamy soups, like cream of mushroom, also work well. Just pick a flavor you enjoy. Check for an internal temperature of 165°F (75°C). Use a meat thermometer to check the thickest part of the chicken. If it reaches that temperature, it’s safe to eat. Juices should run clear, and the meat should not be pink. Yes, it stores well and can be easily reheated. After cooking, let it cool down before storing. You can keep it in the fridge for up to four days. When you're ready to eat, simply reheat in the oven or microwave. This makes it perfect for busy weeknights! This chicken bake is easy and tasty. We explored its main ingredients, from chicken to creamy sauces. Then, we covered step-by-step instructions for a perfect bake. I shared tips for great texture and time-saving options. You learned about flavor twists and how to store leftovers, too. In summary, this dish offers comfort and convenience. Enjoy making it for family or meal prep. Happy cooking!

Are you ready to elevate your chicken game? This Best Baked Chicken with Cream of Chicken Soup recipe combines juicy chicken breasts with a creamy, flavorful sauce that can’t be …

Read more

Categories Dinner

Pumpkin Zucchini Bread Flavorful and Easy Recipe

July 10, 2025 by Chef Theo
- 1 cup grated zucchini - 1 cup canned pumpkin puree - 1/2 cup vegetable oil - 1 cup brown sugar - 1/2 cup granulated sugar - 3 large eggs - 1 teaspoon vanilla extract - 2 cups all-purpose flour - 1 teaspoon baking soda - 1 teaspoon baking powder - 1 teaspoon ground cinnamon - 1/2 teaspoon ground nutmeg - 1/2 teaspoon salt - 1 cup chopped walnuts or pecans (optional) - 1/2 cup raisins or chocolate chips (optional) The ingredients in pumpkin zucchini bread create a warm and rich flavor. Each one plays a key role. Grated zucchini adds moisture and a subtle taste. Canned pumpkin puree gives a rich, earthy base. Vegetable oil keeps the bread soft. Brown sugar provides a deep sweetness. Granulated sugar adds a light touch. Eggs help bind everything together. Vanilla extract enhances the flavor. All-purpose flour gives structure. Baking soda and baking powder help the bread rise. Cinnamon and nutmeg bring warmth. Salt balances the sweetness. You can add walnuts or pecans for crunch. Raisins or chocolate chips can add extra sweetness and fun. This recipe is simple and perfect for sharing. I suggest checking out the Full Recipe for all the steps. - Preheat the oven to 350°F (175°C). - Grease or line the loaf pan. Start by making your kitchen warm and inviting. Preheating the oven helps the bread bake evenly. Next, prepare your loaf pan. You can grease it with oil or line it with parchment paper. This step prevents the bread from sticking. It makes serving easier. - Combine zucchini, pumpkin, and other wet ingredients. In a large bowl, combine the grated zucchini and canned pumpkin puree. This mix adds moisture and flavor. Next, stir in the vegetable oil, brown sugar, granulated sugar, eggs, and vanilla extract. Mix well until everything blends smoothly. This step is key for a tasty bread. - Whisk together dry ingredients in a separate bowl. In another bowl, whisk together the all-purpose flour, baking soda, baking powder, cinnamon, nutmeg, and salt. These dry ingredients give your bread structure and flavor. Make sure they are well combined. This ensures even flavor and texture in every bite. - Mix wet and dry until combined, fold in optional ingredients, and bake. Now, gradually add the dry mixture to the wet ingredients. Stir gently until just combined. Be careful not to overmix; a few lumps are okay. If you want extra flavors, fold in the walnuts or pecans and raisins or chocolate chips. Pour the batter into the prepared loaf pan. Smooth the top with a spatula. Bake for 60-70 minutes. Check with a toothpick to see if it’s done. If it comes out clean, your bread is ready! To check for doneness, use a toothpick. Insert it into the center of the bread. If it comes out clean, the bread is ready. If it has wet batter, bake a little longer. This simple trick ensures your bread is perfectly cooked. For the best results, use a 9x5 inch loaf pan. This size helps the bread rise evenly. It also allows the heat to circulate well. A dark or non-stick pan may brown the bread too much. If you use one, keep an eye on it. Do not overmix the batter. Overmixing can make the bread tough. Stir the wet and dry ingredients until just combined. A few lumps are okay. This keeps the bread light and fluffy. When adding nuts or fruits, fold them in gently. Use a spatula to incorporate them without breaking the batter. This helps keep the texture nice and even throughout. For a tasty garnish, try a dollop of cream cheese or butter. It adds a rich flavor that pairs well with the bread. You can also sprinkle some cinnamon on top for added warmth. Serve slices on a wooden board for a lovely presentation. If you want to make it a meal, consider pairing it with a warm cup of tea or coffee. This makes a cozy snack or breakfast option. Enjoy your Pumpkin Zucchini Bread with friends or family! {{image_2}} You can mix up the flavor of your Pumpkin Zucchini Bread in fun ways. Adding spices like ginger or clove can give it a warm kick. These spices add depth and make each bite exciting. You can also try different sweeteners. For example, maple syrup or honey can replace brown sugar. Using oils like coconut instead of vegetable oil can change the taste too. Each option brings a unique twist to this classic recipe. If you follow a vegan diet, you can replace the eggs and milk with alternatives. Flax eggs work well; just mix one tablespoon of ground flaxseed with three tablespoons of water. Let it sit until it thickens. For milk, almond or soy milk can be great substitutes. If you need a gluten-free option, consider using almond flour or a gluten-free blend. Just make sure to adjust the liquid in your recipe, as these flours absorb moisture differently. Adding fun mix-ins can enhance your Pumpkin Zucchini Bread. Try folding in chopped nuts, like walnuts or pecans, for crunch. You can also add raisins or chocolate chips for sweetness. Dried cranberries or even fresh blueberries work well too. These additions can make each slice unique and delightful. Get creative and find your favorite combinations! For the full recipe, check out the detailed instructions in the earlier sections. To keep your Pumpkin Zucchini Bread fresh, store it at room temperature. Wrap it tightly in plastic wrap or aluminum foil. This helps prevent it from drying out. Place it in an airtight container if you have one. It should stay fresh for about three days. If you notice any mold, it’s best to toss it out. Freezing your bread is easy and effective. To freeze, slice the bread first. Wrap each slice in plastic wrap. Then, place all the wrapped slices in a freezer bag. Remove as much air as possible before sealing. You can also freeze whole loaves. Wrap the loaf tightly and place it in a freezer bag. Pumpkin Zucchini Bread can last up to three months in the freezer. When you want to enjoy your bread again, reheating is key. For a whole loaf, preheat the oven to 350°F (175°C). Unwrap the loaf and place it in the oven for about 15 to 20 minutes. If you are reheating slices, use the toaster or oven. This keeps the bread moist and warm. Enjoy it with butter or cream cheese for a tasty treat! Pumpkin Zucchini Bread can last up to three days at room temperature. Keep it in an airtight container to stay fresh. If you store it in the fridge, it can last up to a week. Just make sure to wrap it well to prevent it from drying out. Yes, you can make this delicious bread ahead of time. Bake it one or two days before you need it. Let it cool completely, then wrap it tightly. Store it at room temperature or in the fridge. This way, the flavors will blend nicely. If you can't find zucchini, don't worry! You can use grated carrots or even apples. Both will add moisture and sweetness to your bread. Just make sure to keep the same amount as the zucchini in the recipe. Using fresh pumpkin is possible! First, cook the pumpkin until it's soft. Then, mash it into a smooth puree. Make sure to measure out one cup for the recipe. Fresh pumpkin can give your bread a richer taste. Yes, Pumpkin Zucchini Bread has some healthy benefits. Zucchini adds fiber and vitamins. Pumpkin brings antioxidants and more fiber. You can also use less sugar or replace it with honey for a healthier option. Overall, it's a tasty treat that can fit into a balanced diet. For the full recipe, check out the recipe above. In this blog post, I covered how to make delicious Pumpkin Zucchini Bread, from the key ingredients to step-by-step instructions. I shared tips for mixing, baking, and storing your bread. You can customize the recipe with various add-ins and flavors. Remember, this soft and moist bread not only tastes great but also packs health benefits too. Enjoy your baking, and savor every slice!

Looking for a tasty treat that’s easy to make? This Pumpkin Zucchini Bread is perfect for you! With its rich flavors and moist texture, it combines the best of pumpkin …

Read more

Categories Desserts

Cheesy Garlicky Zucchini Steaks Simple and Savory Dish

July 10, 2025 by Chef Theo
- 2 medium zucchinis - 4 cloves of garlic, minced - 1 cup shredded mozzarella cheese - ½ cup grated Parmesan cheese - 2 tablespoons olive oil - 1 teaspoon Italian seasoning - Salt and black pepper to taste - Fresh parsley, chopped (for garnish) When choosing zucchinis, look for firm ones that are bright green. Avoid zucchinis that are soft or have blemishes. Fresh zucchinis will give you the best flavor and texture. You can swap the mozzarella and Parmesan cheeses for other types. Try using cheddar for a sharp taste or a blend of Italian cheeses for more depth. For a dairy-free version, use vegan cheese. It melts well and adds great flavor. Prepping the zucchini steaks Start by washing two medium zucchinis. Cut them lengthwise into thick slices, about half an inch thick. These will be your zucchini steaks. Make sure the slices are even; this helps them cook well. Making the garlic marinade In a large bowl, mix four minced garlic cloves, two tablespoons of olive oil, one teaspoon of Italian seasoning, and salt and black pepper to taste. Stir well to combine. This garlic marinade adds flavor to the zucchini. Arranging zucchini on the baking sheet After marinating, brush both sides of the zucchini steaks with the garlic marinade. Let them sit for about 10 minutes. Then, place them on a baking sheet lined with parchment paper. Arrange them in a single layer to ensure even cooking. Baking time and temperature details Preheat your oven to 400°F (200°C). Once ready, bake the zucchini steaks for 15 to 20 minutes. You want the cheese to melt and turn golden brown. The zucchini should be tender when done. Ideas for side dishes These cheesy garlicky zucchini steaks pair well with a fresh salad or some roasted potatoes. You can also serve them with grilled chicken for a hearty meal. Tips for plating When serving, sprinkle freshly chopped parsley on top for a pop of color. Arrange the zucchini steaks neatly on a plate. This makes the dish look inviting and delicious. For the full recipe, check the earlier section. To keep zucchini steaks firm, cut them thick. Aim for about ½ inch. When baking, avoid overlapping them. This way, they cook evenly. Use a high oven temperature of 400°F (200°C). This helps them roast well. For the perfect cheesy topping, add cheese towards the end of cooking. This prevents it from burning. You can add extra herbs for more flavor. Fresh basil or thyme work great. They add a nice touch. If you like heat, try adding red pepper flakes. A pinch can really kick up the taste. A good baking sheet is key. I recommend using one lined with parchment. This makes for easy cleanup. You'll also need a sharp knife for slicing the zucchini. A mixing bowl is useful for the marinade. A brush can help spread the marinade evenly. You might also want a spatula for serving. These tools make your cooking process smooth and fun. For the complete recipe, check out the Full Recipe. {{image_2}} You can switch up the cheese for fun flavors. Try gouda for a smoky taste. Cheddar gives a sharp bite, while feta adds a nice tang. If you want a dairy-free option, look for vegan mozzarella or almond-based cheeses. These can melt well and keep the dish creamy. Add more veggies to the dish for extra nutrition. Bell peppers or cherry tomatoes pair well with zucchini. If you want protein, grilled chicken or shrimp can make this a full meal. For more flavor, try adding a pinch of smoked paprika or a dash of cayenne pepper to the garlic mix. You can grill or bake these zucchini steaks. Grilling gives a charred flavor, perfect for summer. Baking is easy and keeps the kitchen cool. If you have an air fryer, use it! It cooks quickly and makes the cheese crispy. Just set it to 375°F (190°C) and cook for about 10 minutes. For the full recipe, check the earlier section. Store any leftover cheesy garlicky zucchini steaks in an airtight container. Keep them in the fridge to stay fresh. They will last about 3 to 4 days. Make sure they cool down before sealing the container. This helps keep the texture nice. To reheat, use the oven for the best taste. Set it to 350°F (175°C). Place the zucchini steaks on a baking sheet and heat for about 10 minutes. This keeps the cheese melty and the zucchini tender. If you use a microwave, the zucchini may get soggy. To avoid this, place a paper towel over the zucchini while reheating. Freezing zucchini steaks is an option, but it may change the texture. To freeze, first let them cool completely. Wrap each steak in plastic wrap, then place them in a freezer bag. They can stay frozen for up to 3 months. When you want to eat them, thaw in the fridge overnight. Reheat them in the oven for the best results. This way, they stay tasty and enjoyable. For detailed cooking steps, refer to the Full Recipe. To keep zucchini steaks from being watery, you can follow these tips: - Choose firm zucchinis. Look for ones that feel solid and heavy. - Salt before cooking. Sprinkle salt on the sliced zucchinis and let them sit for 10-15 minutes. This draws out moisture. - Pat them dry. Use a paper towel to remove excess water after salting. - Don’t overcrowd the pan. Give each steak space to cook evenly. These tips help ensure your cheesy garlicky zucchini steaks stay firm and tasty. Yes, you can prepare them ahead of time. Here are some suggestions: - Cut and marinate. Slice the zucchinis and apply the garlic marinade a few hours before. - Store in the fridge. Place the marinated steaks in an airtight container. They can last up to 2 days. - Bake when ready. Just pop them in the oven when you’re ready to eat. This makes meal prep easy and saves time for busy days. Cheesy garlicky zucchini steaks pair well with many dishes. Consider these options: - Grilled chicken or fish. These proteins complement the flavors nicely. - A fresh salad. A light green salad will add freshness. - Quinoa or rice. These grains provide a hearty side. - Wine or iced tea. A crisp white wine or herbal iced tea works well with this dish. These pairings enhance your meal and create a balanced plate. You can tell zucchini steaks are done by looking for these signs: - Cheese is bubbly. The cheese should be golden and melted. - Zucchini is tender. A fork should easily pierce through the steak. - Edges are slightly crisp. The outer edges should have a nice, light browning. These signs ensure your cheesy garlicky zucchini steaks are perfect and ready to enjoy. In this article, I showed you how to make cheesy garlicky zucchini steaks, from selecting ingredients to serving suggestions. You learned the best practices for prepping and cooking, plus tips to keep them firm and flavorful. Remember, you can easily modify this dish with different cheeses or cooking methods. I hope these tips help you create a delicious meal that impresses your family and friends. Enjoy your cooking adventure!

Are you ready to elevate your veggie game? These Cheesy Garlicky Zucchini Steaks are simple, savory, and oh-so-satisfying! With just a few fresh ingredients, including garlic, mozzarella, and Parmesan, you’ll …

Read more

Categories Appetizers

Healthy Chocolate Zucchini Muffins Simple and Tasty

July 10, 2025 by Chef Theo
To make healthy chocolate zucchini muffins, gather these simple ingredients: - 1 medium zucchini, grated - 1 cup whole wheat flour - 1/2 cup cocoa powder - 1/2 teaspoon baking soda - 1 teaspoon baking powder - 1/4 teaspoon salt - 1/2 cup honey or maple syrup - 1/4 cup unsweetened applesauce - 1/4 cup coconut oil, melted - 2 large eggs - 1 teaspoon vanilla extract - 1/2 cup chocolate chips (dark or semi-sweet) - Optional: 1/4 cup chopped nuts (walnuts or pecans) I love making this recipe easy. If you run out of whole wheat flour, feel free to use all-purpose flour. You can swap honey for maple syrup too. For a lower-calorie option, use unsweetened yogurt instead of applesauce. If you prefer a nut-free option, skip the nuts. The chocolate chips can also be replaced with dried fruit for a different taste. These muffins are not only tasty but healthy too! Each muffin has about: - Calories: 130 - Protein: 3g - Carbohydrates: 18g - Fiber: 2g - Sugars: 8g - Fat: 5g This recipe gives you a guilt-free treat. You can enjoy them without worry! For the full recipe, check the detailed instructions above. Start by preheating your oven to 350°F (175°C). This step is crucial for even baking. While the oven heats, line your muffin tin with paper liners or lightly grease it. This will prevent the muffins from sticking. Having everything ready makes the process smooth and simple. In a medium bowl, grab your grated zucchini and add it to the mix. Pour in 1/4 cup of melted coconut oil, 1/2 cup of honey or maple syrup, and 1/4 cup of unsweetened applesauce. Then, crack in 2 large eggs and add 1 teaspoon of vanilla extract. Stir everything together until it is nice and smooth. This mixture brings moisture and flavor to your muffins. In a large bowl, whisk together 1 cup of whole wheat flour, 1/2 cup of cocoa powder, 1/2 teaspoon of baking soda, 1 teaspoon of baking powder, and 1/4 teaspoon of salt. Mixing these ingredients well helps to evenly distribute the leavening agents. This step is key to getting those muffins to rise perfectly. Now, it's time to bring the wet and dry mixtures together. Pour the wet ingredients into the dry ones and stir gently. Be careful not to overmix; just combine until you see no dry flour. Then, fold in 1/2 cup of chocolate chips and optional 1/4 cup of chopped nuts. This adds a delightful crunch and extra chocolatey goodness. Spoon the batter into your prepared muffin cups, filling each about 3/4 full. This allows space for the muffins to rise without spilling over. Bake them for 18-20 minutes. To check for doneness, insert a toothpick into the center of a muffin. If it comes out clean, you’re good to go! Once baked, let the muffins cool in the pan for about 5 minutes. Then, transfer them to a wire rack to cool completely. They taste best warm or at room temperature. Serve them as a snack or breakfast treat. For a fun twist, try spreading a bit of nut butter on top! For the full recipe, check out the details above. When picking zucchini, look for ones that are firm. They should feel heavy for their size. Choose ones that are bright green. Avoid any with soft spots or blemishes. Fresh zucchini adds moisture to your muffins. It helps keep them soft and tasty. For great texture, grate the zucchini finely. This helps it blend well into the batter. You can also squeeze out excess water using a clean towel. This step keeps your muffins from getting soggy. For flavor, use fresh ingredients. High-quality cocoa powder makes a big difference. Adding a pinch of cinnamon can enhance the taste too. To keep your muffins fresh, store them in an airtight container. You can leave them at room temperature for a few days. If you want to keep them longer, freeze them. Wrap each muffin in plastic wrap, then place in a freezer bag. When ready to eat, thaw them at room temperature. Reheat in the oven for a warm treat. {{image_2}} You can change some ingredients to make these muffins healthier or fit your diet. Try using almond flour instead of whole wheat flour. This swap gives a nutty taste and works well with chocolate. You can also use Greek yogurt instead of applesauce. This adds extra protein and keeps the muffins moist. If you want less sugar, swap honey or maple syrup for mashed bananas. This keeps the muffins sweet and tasty. Adding spices can make these muffins even better. A pinch of cinnamon gives warmth and pairs well with chocolate. If you like a bit of zing, add a dash of ginger. You can also use almond extract for a nutty flavor or peppermint extract for a fresh twist. These small changes can transform the muffins and surprise your taste buds. If you want to make these muffins vegan or dairy-free, it's easy! Replace the eggs with flax eggs. Mix one tablespoon of ground flaxseed with three tablespoons of water. Let it sit for a few minutes until it thickens. Use plant-based milk like almond or oat milk instead of cow's milk. For the coconut oil, substitute with any neutral oil like canola. With these swaps, everyone can enjoy these delicious muffins! For the complete recipe, check out the Full Recipe. To keep your healthy chocolate zucchini muffins fresh, store them in an airtight container. Place a paper towel inside to absorb moisture. This helps maintain a soft texture. Keep the container at room temperature for up to three days. If you want to store them longer, refrigeration is another option. Just remember, it might change the texture slightly. Freezing is a great way to preserve your muffins. First, let them cool completely. Then, wrap each muffin in plastic wrap. Place the wrapped muffins in a freezer-safe bag. Label the bag with the date. You can freeze them for up to three months. When you’re ready to eat, just thaw them overnight in the fridge. Reheating muffins is simple. You can use a microwave or an oven. For the microwave, heat one muffin for about 15-20 seconds. For the oven, preheat to 350°F (175°C). Wrap the muffin in foil and heat for 10-15 minutes. This will help them taste fresh and warm! Enjoy your delicious muffins! For the full recipe, see below. Yes, you can use different types of flour. Almond flour or oat flour works well too. Just remember that the texture may change. Whole wheat flour gives a nice taste and adds fiber. To check if the muffins are ready, use a toothpick. Insert it into the center of a muffin. If it comes out clean, your muffins are done. They should also spring back when lightly pressed. You can replace honey with sugar. Use about half the amount of sugar because it is sweeter. If you use granulated sugar, add a bit of extra liquid to the mix. Yes, these muffins are great for kids! They are tasty and have hidden veggies. The chocolate flavor makes them fun and appealing. Plus, they are healthier than regular muffins. If you want to skip chocolate chips, try dried fruit or nuts. Chopped walnuts or pecans add a nice crunch. You can also use carob chips for a different flavor. For the full recipe, check above! We covered the key ingredients needed for delicious muffins and how to mix them. You learned about baking steps, from prep to serving. Tips help you choose and store zucchini. Variations, like healthy swaps, can change flavors. By following these easy steps, you can bake yummy muffins that everyone loves. Enjoy sharing them with family or friends! Keep experimenting to find your favorite recipe. Happy baking!

Do you crave something sweet but want to keep it healthy? Try my Healthy Chocolate Zucchini Muffins! These simple and tasty treats sneak in veggies for guilt-free indulgence. They’re perfect …

Read more

Categories Desserts

Quick Pickled Vegetables Crisp and Flavorful Recipe

July 10, 2025 by Chef Theo
- Cucumbers - Carrots - Radishes - Red Onion For quick pickled vegetables, you need fresh, crisp veggies. I love using cucumbers because they stay crunchy. Carrots add a nice sweetness. Radishes bring a peppery kick, while red onion adds color and sharpness. You can mix and match based on what you have. - Apple Cider Vinegar - Water - Sugar - Salt The pickling liquid is key to the flavor. Apple cider vinegar gives a nice tang. You mix it with water to balance the acidity. Sugar adds a hint of sweetness, and salt enhances the taste. This blend makes the vegetables pop! - Black Peppercorns - Mustard Seeds - Red Pepper Flakes Seasonings can elevate your pickles. Black peppercorns add warmth, while mustard seeds bring a subtle crunch. If you like heat, add red pepper flakes. These extras give your pickled veggies a unique twist. For the full recipe, check out my detailed guide! To make the pickling liquid, start by gathering your ingredients. In a medium saucepan, combine: - 1 cup apple cider vinegar - 1 cup water - 2 tablespoons sugar - 1 tablespoon salt - 1 teaspoon black peppercorns - 1 teaspoon mustard seeds - 1 teaspoon red pepper flakes (optional) Heat the mixture over medium heat. Stir until the sugar and salt dissolve completely. This step is key for a balanced flavor. Once dissolved, remove the pan from heat and let it cool for about 5 minutes. Now it's time to layer your vegetables. Take a large glass jar or bowl and start arranging the sliced cucumbers, julienned carrots, sliced radishes, and thinly sliced red onion. - For a colorful presentation, alternate the layers. - You can start with cucumbers, then carrots, followed by radishes, and finish with red onions. This not only looks nice but also helps the flavors mix well. After layering your vegetables, pour the cooled pickling liquid over them. Make sure all the veggies are fully submerged. This is important for even pickling. Next, seal the jar or cover the bowl. You have two options for the pickling time: - Let it sit at room temperature for at least 30 minutes for a quick pickle. - If you want a deeper flavor, refrigerate for a few hours or even overnight. You can find the full recipe for more details. Enjoy your crispy, flavorful quick pickled vegetables! To get the best flavor from your quick pickled vegetables, use fresh ingredients. Fresh cucumbers, carrots, radishes, and onions make a big difference. They add crunch and bright taste. Next, adjust the seasoning to fit your taste. You can add more sugar for sweetness or salt for extra flavor. Taste the pickling liquid before you pour it over the veggies. Make it just how you like it. The maximum time to soak for the best results is about 30 minutes. This gives the veggies a nice tangy flavor without losing their crunch. For deeper flavor, let them sit in the fridge for a few hours. I love serving these quick pickled veggies as a snack, condiment, or side dish. They add a pop of color and flavor to any meal. You can also toss them in salads or sandwiches for a zesty kick. Choose the right jars for pickling. Glass jars work best because they are non-reactive. You can use pint-sized or quart-sized jars based on how much you make. For tools, a small saucepan is great for heating your pickling liquid. A funnel helps pour the liquid into jars without a mess. Using a sharp knife for slicing makes prep quick and easy. For the full recipe, check out the Quick Pickled Vegetables section. {{image_2}} You can get creative with your quick pickled vegetables. Start with the basics, like cucumbers, carrots, radishes, and red onion. But why stop there? - Adding different vegetables: Try bell peppers, zucchini, or even snap peas. Each vegetable brings a unique taste and crunch. - Seasonal ingredient swaps: Use what’s fresh and in season. In summer, add cherry tomatoes. In fall, try cauliflower or beets. The options are endless! Flavors can change the whole dish. Quick pickles are easy to customize. - Experimenting with herbs and spices: Add fresh dill, thyme, or even cilantro. These herbs can bring bright flavors. Spice lovers might enjoy garlic, ginger, or turmeric for extra kick. - Sweetness adjustments: If you like it sweet, increase the sugar. For a tangier taste, cut back. Find what suits your palate best! Give your quick pickles a global flair. - Asian-style pickled vegetables: Use rice vinegar, sesame oil, and soy sauce. This mix works well with cucumbers and carrots. It adds a savory, umami flavor. - Mediterranean-inspired variations: Try olive oil, lemon juice, and oregano. This combination pairs nicely with bell peppers and olives. It brings a fresh, vibrant taste that’s perfect for summer meals. These variations make quick pickled vegetables fun and exciting. You can mix and match until you find your perfect blend! For the complete recipe, check out the Full Recipe section. To keep your quick pickled vegetables fresh, use glass jars with tight lids. Mason jars work well. They are safe and won’t react with the vinegar. Store them in the fridge. A cool, dark place helps keep the pickles crisp. Avoid direct sunlight, as it can affect the flavor and color. Quick pickles last about two weeks in the fridge. Always check them before using. If they smell off or look cloudy, toss them. A slimy texture is also a sign of spoilage. For the best taste, enjoy them sooner rather than later. You can reuse the pickling liquid for more veggies. Just strain it and bring it to a boil again. This will refresh the flavors. Use it within a week for the best results. You can also add new vegetables to the same liquid. Try using it in salad dressings or marinades for added flavor. Quick pickling takes just 30 minutes for a basic flavor. If you let them sit longer, like a few hours, they will taste even better. The longer they sit, the more the flavors blend and deepen. For best results, try to wait at least an hour before diving in. Yes, you can use distilled vinegar instead. It has a sharper taste. Apple cider vinegar adds a mild sweetness and fruity note. If you want a different flavor, try rice vinegar or white wine vinegar. Each type gives your pickles a unique twist. For quick pickling, I love using: - Cucumbers - Carrots - Radishes - Red onions These veggies have great crunch and flavor. You can also try bell peppers, green beans, or even cauliflower. Feel free to mix and match based on your taste. Remember, the key is to choose fresh, crisp vegetables for the best results. Quick pickling is simple and fun. You learned about crucial vegetables like cucumbers and carrots. The right pickling liquid, using apple cider vinegar, makes a big difference. Layering your veggies creates a beautiful jar. Don't forget the optional seasonings for extra flavor! With fresh ingredients and the right care, your pickles will taste great. Remember to experiment with combinations and flavors, and know how to store them. Enjoy your pickling journey—I know you'll love the results!

Are you ready to transform your favorite veggies into a crispy, tangy delight? In this blog post, I’ll show you how to make quick pickled vegetables that burst with flavor …

Read more

Categories Salads
Older posts
Newer posts
← Previous Page1 … Page32 Page33 Page34 … Page105 Next →

TOASTED RECIPES

Where ideas are warm, crisp, and ready to serve! 🍞

PAGES

Home About Contact Privacy Policy Terms & Conditions Cookie Policy GDPR Policy Copyright Policy Disclaimer

CATEGORIES

Appetizers Desserts Salads Breakfast Dinner

Contact

  • Pinterest
  • Mail
Copyright © 2025 Toasted Recipes. All rights reserved.