Skip to content
toastedrecipes.com
  • Home
  • Appetizers
  • Desserts
  • Salads
  • Breakfast
  • Dinner
  • Privacy Policy
  • Contact
  • About

Chef Theo

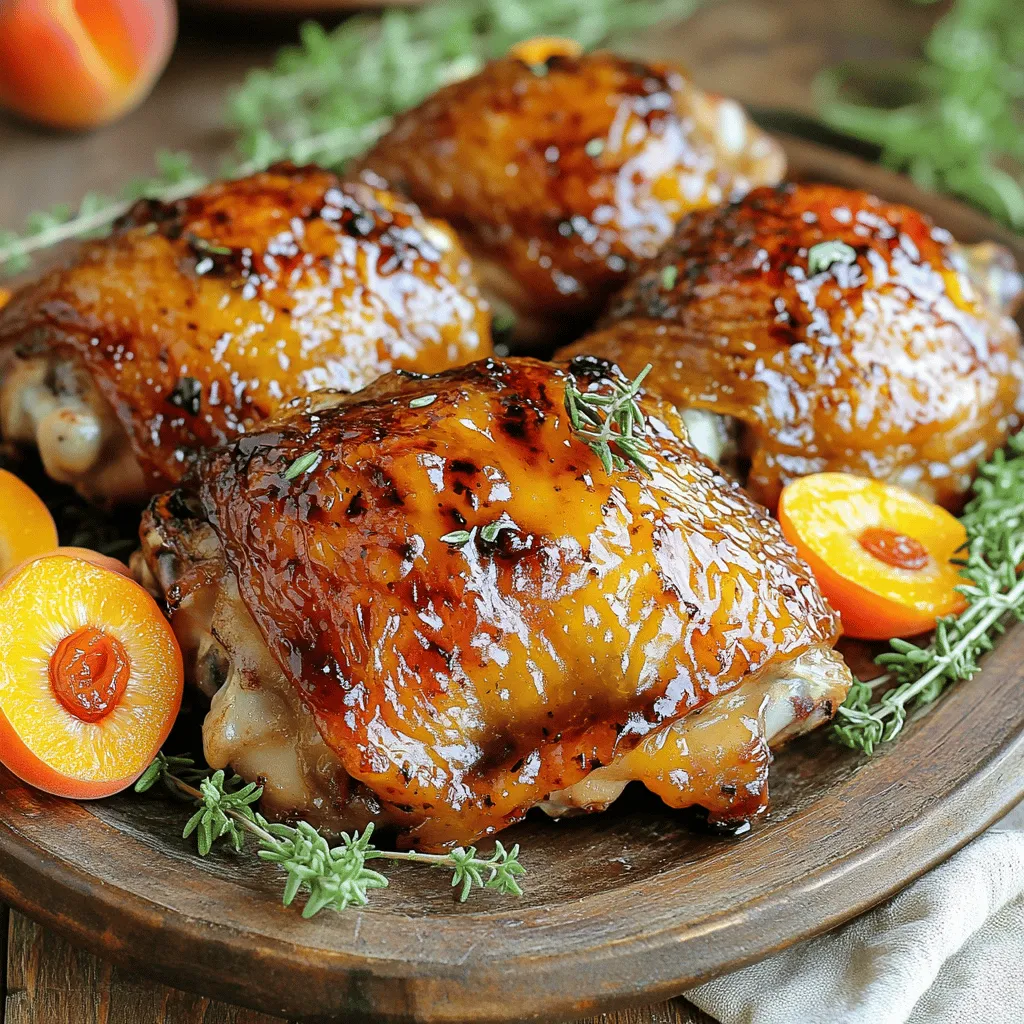
Sweet Hawaiian Crock Pot Chicken Easy and Flavorful Dish

July 15, 2025 by Chef Theo
- 2 lbs boneless, skinless chicken thighs - 1 cup pineapple juice - 1/2 cup low-sodium soy sauce - 1/4 cup honey - 2 cloves garlic, minced - 1 tablespoon freshly grated ginger - 1 red bell pepper, sliced - 1 green bell pepper, sliced - 1 onion, sliced - Chopped green onions and sesame seeds for garnish To create Sweet Hawaiian Crock Pot Chicken, start with the main ingredients. The chicken thighs are tender and soak up all the flavors. Pineapple juice adds sweetness, while soy sauce brings that savory touch. Next, we add more flavor. Honey gives a nice glaze. Garlic adds depth, and ginger brings a warm spice. These flavors work together to create a dish that feels special. For the veggies, bell peppers and onion add color and crunch. They cook down nicely and mix in with the chicken. Don’t forget the garnish! Chopped green onions and sesame seeds bring a fresh finish. When you gather these ingredients, you set yourself up for a great meal. Each element plays a role in making this dish easy and flavorful. For the full recipe, check out the link to create this delicious dish today! To start, gather your ingredients. In a large bowl, combine: - 1 cup pineapple juice - 1/2 cup low-sodium soy sauce - 1/4 cup honey - 2 cloves garlic, minced - 1 tablespoon freshly grated ginger Stir well to mix everything. This marinade brings a sweet and savory flavor to your dish. The pineapple juice adds a bright taste, while the soy sauce gives it depth. Honey adds sweetness, and garlic and ginger bring warmth. Next, take the chicken thighs and place them in the crock pot. Pour the marinade over the chicken, ensuring it is well-coated. This helps the chicken absorb all those wonderful flavors. Now, add your vegetables on top of the chicken. I like to use: - 1 red bell pepper, sliced - 1 green bell pepper, sliced - 1 onion, sliced These veggies not only add color but also enhance the dish's taste. Cover the crock pot and set it to cook on low for 6-7 hours, or high for 3-4 hours. The chicken should be tender and fully cooked when done. Once the cooking time is up, carefully remove the chicken from the crock pot. Use two forks to shred the chicken into bite-sized pieces. To thicken the sauce, mix 1 tablespoon cornstarch with 2 tablespoons cold water in a small bowl. Add this slurry to the liquid in the crock pot. Stir well and cook on high for an additional 15 minutes. This step makes the sauce rich and velvety. Return the shredded chicken to the crock pot and mix well with the thickened sauce. Season with salt and pepper to your liking. Serve this sweet Hawaiian chicken over cooked rice for a complete meal. Garnish with chopped green onions and sesame seeds for a nice touch. For the full recipe, check out the details above. Enjoy your meal! To make your chicken juicier, cooking time is key. If you cook on low, aim for 6 to 7 hours. For high, stick to 3 to 4 hours. Overcooking can dry it out. Always check for doneness by ensuring the chicken reaches 165°F. For rice, I like to use jasmine or basmati. They soak up the sauce well and add a nice aroma. If you want something different, try coconut rice. It pairs perfectly with the sweet flavors of the dish. Pair your Sweet Hawaiian Chicken with fresh steamed veggies. Broccoli or snap peas add a nice crunch and color. You can also serve it with a simple green salad for a refreshing side. If you have leftovers, get creative! Use the chicken in tacos or salads. You can also make a Hawaiian bowl with quinoa or brown rice, topped with avocado and salsa. The options are endless! For the complete recipe, check out the [Full Recipe]. {{image_2}} You can change the protein in this dish. Try using turkey or tofu instead of chicken. Both options work well with the sweet sauce. Turkey gives a hearty flavor, while tofu soaks up the marinade nicely. You can also switch up the vegetables. Instead of just bell peppers and onion, add carrots or snap peas. These will bring more color and taste to your meal. You can even mix in some broccoli for extra crunch. Do you want your dish to be sweeter or more savory? Adjust the honey and soy sauce ratio to fit your taste. If you love sweetness, add a bit more honey. For a saltier flavor, increase the soy sauce. You can also add spices like black pepper or red pepper flakes for a kick. This will create a nice balance between sweet and savory. Experimenting with these adjustments gives you the chance to find your perfect flavor. To store leftovers safely, let the chicken cool first. Then, place it in an airtight container. Make sure to cover it tightly. This helps keep the flavors fresh. You can store it in the fridge for up to four days. If you plan to eat it later, don’t wait too long to put it away. You can freeze Sweet Hawaiian Crock Pot Chicken for longer storage. Make sure the chicken is cool before freezing. Place it in a freezer-safe container or bag. Remove as much air as possible to prevent freezer burn. When you’re ready to eat, thaw it overnight in the fridge. Reheat it gently in a pot or microwave until warm. The chicken lasts about four days in the fridge. If you freeze it, it can last up to three months. After that, the taste may not be as good. Always check for any signs of spoilage before eating. Enjoy this dish fresh for the best flavor! To make Sweet Hawaiian Crock Pot Chicken, follow these steps: 1. Start by mixing the pineapple juice, soy sauce, honey, minced garlic, and grated ginger together in a bowl. This mix acts as a tasty marinade. 2. Take your chicken thighs and place them in the crock pot. Pour the marinade over the chicken, ensuring it's fully coated. 3. Add the red and green bell peppers and onion on top of the chicken. 4. Cover the crock pot and set it to cook for 6-7 hours on low or 3-4 hours on high. This makes the chicken tender and delicious. 5. Once cooked, take the chicken out and shred it with two forks. 6. In a small bowl, mix the cornstarch with cold water to create a slurry. Add this to the liquid in the crock pot. 7. Stir well and cook on high for an additional 15 minutes to thicken the sauce. 8. Return the shredded chicken to the pot and mix it with the thickened sauce. Add salt and pepper to taste. 9. Serve this sweet dish over cooked rice and garnish with chopped green onions and sesame seeds. These simple steps make it easy for anyone to enjoy a tasty meal at home. You can find the complete details in the Full Recipe. Yes, you can cook Sweet Hawaiian Chicken on high. If you choose this method, the cooking time will change. Cook it for about 3-4 hours on high. The chicken will still be juicy and flavorful. Cooking on low takes longer at 6-7 hours but often results in even more tender chicken. If you are short on time, cooking on high works well too. Just check the chicken to ensure it is fully cooked. Sweet Hawaiian Chicken pairs well with many sides. Here are some ideas: - Cooked Rice: It soaks up the delicious sauce and balances the flavors. - Steamed Vegetables: Broccoli or snap peas add a nice crunch. - Coleslaw: The crunchy texture complements the dish. - Pineapple Salad: Fresh pineapple can enhance the tropical taste. - Noodles: Serve over rice noodles or soba for a fun twist. These side options help create a well-rounded meal that everyone will enjoy. This blog post shared a tasty recipe for Sweet Hawaiian Crock Pot Chicken. You learned about the key ingredients, like chicken thighs and pineapple juice. I provided step-by-step instructions to make cooking simple. You now have tips for perfecting this dish and ideas for storage and variations. Remember, you can swap ingredients to fit your taste. Whether serving guests or enjoying leftovers, this meal brings joy. Try it out, and you'll see how easy and rewarding it is!

Looking for a simple and tasty dinner? Sweet Hawaiian Crock Pot Chicken is your answer! This dish combines juicy chicken thighs with sweet pineapple juice and savory soy sauce. It …

Read more

Categories Dinner

Neapolitan 5-Layer Birthday Cake Delightful Recipe

July 15, 2025 by Chef Theo
For the Neapolitan 5-Layer Birthday Cake, you need the following key ingredients: - 2 cups all-purpose flour - 2 cups granulated sugar - 1 cup unsweetened cocoa powder - 1 tablespoon baking powder - 1 teaspoon baking soda - 1 teaspoon salt - 1 cup buttermilk - ½ cup vegetable oil - 4 large eggs - 2 teaspoons vanilla extract - 1 cup boiling water - 1 cup strawberry puree (fresh or frozen) - 1 cup vanilla frosting (store-bought or homemade) - 1 cup chocolate frosting (store-bought or homemade) These ingredients work together to create a moist and rich cake. The combination of cocoa powder, buttermilk, and eggs gives the cake its soft texture. The strawberry puree adds a fruity twist, while the frostings make it extra sweet and beautiful. To elevate your cake, consider adding: - Fresh strawberries - Chocolate shavings These garnishes not only enhance the look of your cake but also add fresh flavors. Placing fresh strawberries on top adds a pop of color. Chocolate shavings provide a rich finish that delights the eyes and palate. You can view the Full Recipe for detailed instructions on how to bring this cake to life. First, preheat your oven to 350°F (175°C). Grease and flour five 9-inch round cake pans. This keeps the cakes from sticking. In a large bowl, mix these dry ingredients: - 2 cups all-purpose flour - 2 cups granulated sugar - 1 cup unsweetened cocoa powder - 1 tablespoon baking powder - 1 teaspoon baking soda - 1 teaspoon salt Mix them until everything is well combined. This ensures a good rise and flavor in your cake. In another bowl, whisk together: - 1 cup buttermilk - ½ cup vegetable oil - 4 large eggs - 2 teaspoons vanilla extract Whisk until it is smooth and creamy. This adds moisture to the cake. Gradually add this wet mixture to your dry ingredients, mixing until it is just combined. Don’t overmix, or your cake will be tough. Next, carefully stir in 1 cup of boiling water to the batter. This step makes the cake moist. The batter will be thin, which is normal. Now, divide the batter into three separate bowls. - In the first bowl, fold in 1 cup of strawberry puree. - Leave the second bowl as chocolate. - Keep the third bowl plain for vanilla. Pour the strawberry batter into one prepared cake pan, the chocolate into another, and the vanilla into the last three pans. Bake for 25-30 minutes. A toothpick inserted in the center should come out clean. Cool the cakes in their pans for 10 minutes, then move them to wire racks to cool completely. When the cakes are cool, level the tops if needed. Start stacking your layers. Place the strawberry layer on a serving plate or cake stand. Spread vanilla frosting on top. Add the second layer, which is chocolate. Spread chocolate frosting on it. Next, add the third layer, the vanilla. Spread more vanilla frosting on top. Then, stack the fourth layer, which is strawberry. Top this with chocolate frosting. Finally, add the fifth layer, which is vanilla. Spread the remaining vanilla and chocolate frosting over the top and sides of the cake. You can create a marbled look or keep it solid. Garnish the cake with fresh strawberries and sprinkle chocolate shavings on top for a beautiful finish. Enjoy this masterpiece, or find the Full Recipe for more details! - Ensuring the correct baking temperature: Always preheat your oven to 350°F (175°C). This step is key for even baking. - Using an oven thermometer: An oven thermometer checks the actual temperature. This tool helps avoid surprises when baking. - Achieving a smooth finish: Use a spatula to spread frosting evenly. Start from the center and move outwards. A light touch helps you get that smooth look. - How to create a marbled effect: To make a marbled cake, use both vanilla and chocolate frosting. Swirl them gently with a spatula for a pretty design. - Not properly measuring ingredients: Use measuring cups and spoons for accuracy. Too much or too little can change the cake's texture. - Over or underbaking the layers: Keep an eye on baking time. Test doneness with a toothpick. It should come out clean when the cake is ready. Remember, these tips will help you make the Neapolitan 5-Layer Birthday Cake perfectly every time. For the full recipe, check out the instructions I shared earlier! {{image_2}} You can change the flavors of your Neapolitan cake easily. Instead of strawberry puree, try raspberry or blueberry. Both will add a fresh twist. You can also use different frostings. Cream cheese frosting can give a nice tangy taste. Buttercream frosting is rich and sweet. Mixing these options can make your cake unique and fun. Not everyone needs a big cake. You can make a smaller cake or even cupcakes. Use the same batter but fill smaller pans. Check your baking times. Cupcakes need around 15-20 minutes. For a smaller cake, try baking for 20-25 minutes. Adjust the ingredients by half for a smaller yield. If you need gluten-free options, use gluten-free flour instead of all-purpose flour. Many brands work well in cakes. For dairy-free options, substitute buttermilk with almond or oat milk. You can also use dairy-free margarine in the frosting. These swaps allow almost anyone to enjoy this cake. For the full recipe, check out the complete guide. To keep your Neapolitan 5-Layer Birthday Cake fresh, refrigerate it. Wrap each slice in plastic wrap. Store it in an airtight container. This keeps the cake moist and tasty for about 3 to 5 days. If you have leftover baked layers, place them in a single layer. Use parchment paper between layers to avoid sticking. Cover them tightly and keep them in the fridge. For long-term storage, you can freeze the cake. You can freeze the assembled cake or just the layers. If freezing, wrap the cake in plastic wrap and then in foil. This protects it from freezer burn. The cake can last up to 3 months in the freezer. When you want to enjoy it, move it to the fridge overnight to thaw. To refresh the cake, reheat it in the oven at a low temperature for a few minutes. This helps restore its soft texture. This cake stays fresh for about 3 to 5 days. Store it in the fridge. Use an airtight container or wrap it well with plastic wrap. This keeps it moist and tasty. Yes, you can make the cake ahead. Bake the layers a day or two in advance. Let them cool completely, then wrap each layer tightly. Store them in the fridge or at room temperature. Frost the cake on the day you plan to serve it for the best taste. You can find this cake at many bakeries. Look for ones that specialize in custom cakes. Some online shops also sell them. Check local listings for great options. Enjoy the flavors without the hassle of baking from scratch. For a delicious homemade version, you can follow the Full Recipe. We covered how to make a Neapolitan 5-layer birthday cake. You learned about key ingredients like buttermilk and cocoa powder, and how to mix them. I shared tips on baking and frosting for a smooth finish. You also discovered ways to adapt and store this cake. As you make this cake, remember to have fun! Enjoy the process and treat yourself to a delicious dessert. Happy baking!

Ready to celebrate in style? This Neapolitan 5-Layer Birthday Cake is sure to wow your guests! With layers of rich chocolate, fresh strawberry, and creamy vanilla, it’s a treat for …

Read more

Categories Desserts

Balsamic Apricot Glazed Chicken Thighs Savory Delight

July 14, 2025 by Chef Theo
- 4 chicken thighs, bone-in and skin-on - 1/2 cup balsamic vinegar - 1/4 cup apricot preserves - 2 tablespoons Dijon mustard - 1 tablespoon olive oil - 3 cloves garlic, minced - 1 teaspoon fresh rosemary, chopped (or 1/2 teaspoon dried rosemary) - Salt and pepper to taste - Fresh apricot slices and rosemary sprigs for garnish These ingredients blend together to create a flavorful glaze for your chicken. The balsamic vinegar adds a tangy kick. Apricot preserves bring sweetness and depth. Dijon mustard gives it a nice bite. Each ingredient plays a role in making this dish sing. Using fresh rosemary enhances the flavor while garlic adds warmth. The chicken thighs are juicy and rich, perfect for holding the glaze. Don't skip the garnish of fresh apricot slices and rosemary sprigs. They add a pop of color and freshness. I always recommend using high-quality ingredients for the best taste. You can find these items at your local grocery store or farmer's market. If you want to make it special, try to source organic chicken and local apricot preserves. For the full recipe, check the section above. Enjoy creating this savory delight! Whisk together balsamic vinegar, apricot preserves, Dijon mustard, olive oil, minced garlic, chopped rosemary, salt, and pepper. Make sure all ingredients blend well for optimal flavor. This marinade is key to making the chicken taste amazing. Use a resealable bag or a shallow dish to marinate the chicken. Pour the marinade over the chicken, ensuring each piece is well coated. Seal the bag or cover the dish tightly. I suggest marinating for at least 1 hour. If you want more flavor, marinate for up to 4 hours. The longer, the better! Preheat your oven to 375°F (190°C). Heat a large oven-safe skillet over medium-high heat. Take the chicken from the marinade, and set the marinade aside. Place the chicken skin-side down in the skillet. Sear for about 5-7 minutes, until the skin is browned and crispy. Flip the chicken and sear the other side for another 3-4 minutes. Now, pour the reserved marinade over the seared chicken thighs. Transfer the skillet to the preheated oven. Bake for 25-30 minutes, or until the chicken reaches an internal temperature of 165°F (74°C). To check doneness, use a meat thermometer for accuracy. In the last 5 minutes, switch the oven to broil. This step caramelizes the glaze, adding a nice finish. Keep a close eye on it to avoid burning. When done, let the chicken rest for a few minutes before serving. This recipe is truly a savory delight. For the full recipe, refer to the complete guide above. To get that beautiful caramelized finish on your Balsamic Apricot Glazed Chicken Thighs, use the broil setting at the end of cooking. Broiling adds a lovely char and enhances the glaze's flavor. Keep the chicken in the oven for just a few minutes. - Watch Closely: Always keep an eye on your chicken while broiling. It cooks fast and can burn quickly if you aren’t careful. - Adjust Racks: Place the oven rack about 6 inches from the broiler for best results. Pair your chicken with sides that balance the sweet and savory notes. Here are some ideas: - Roasted Vegetables: Carrots, broccoli, and Brussels sprouts work well. - Fresh Salad: A light arugula salad with lemon dressing adds brightness. - Rice or Quinoa: These grains soak up the glaze nicely. For a stunning presentation, serve the chicken on a large platter. Drizzle the remaining glaze over the chicken. Add fresh apricot slices and sprigs of rosemary for a colorful touch. This simple step makes your dish look gourmet. Enjoy your meal with friends or family. They will love it! {{image_2}} You can switch up the apricot preserves in this recipe. Try using peach or mango preserves instead. Both options add a fruity twist that still complements the chicken well. If you want to change the herbs, feel free to experiment! Fresh thyme or sage can replace rosemary, giving your dish a new flavor. You can also add spices like paprika or cayenne for a little heat. These swaps let you create a dish that fits your taste. You can cook Balsamic Apricot Glazed Chicken Thighs in different ways. Grilling gives the chicken a smoky flavor. Just marinate as usual, then grill the thighs over medium heat. Cook for about 6-8 minutes per side. Baking is easy and requires less hands-on time. Follow the full recipe for oven instructions. If you prefer a slow cooker, it’s simple! After marinating the chicken, place it in the slow cooker. Pour the marinade over the top. Cook on low for 4-6 hours or high for 2-3 hours. This method keeps the chicken very tender and juicy. Both methods yield delicious results, so choose whichever fits your mood! To keep your Balsamic Apricot Glazed Chicken Thighs fresh, store them in an airtight container. Place them in the fridge right after they cool. This way, they stay tasty and safe to eat. Your chicken will last for about 3 to 4 days in the fridge. If you want to make sure it stays fresh, label your container with the date. You can also freeze the chicken for later. To do this, wrap each thigh tightly in plastic wrap or foil. Then, place them in a freezer bag or container. Make sure to remove as much air as possible to prevent freezer burn. They can stay good for up to 3 months in the freezer. When you're ready to eat, thaw the chicken overnight in the fridge. For reheating, simply place the chicken in the oven at 350°F (175°C) for about 20-25 minutes. This keeps the chicken juicy and the glaze flavorful. If you're in a hurry, you can use the microwave, but the oven gives the best results. To check if your chicken is done, look for a few signs. The inside of the chicken should reach an internal temperature of 165°F (74°C). Use a meat thermometer for accuracy. Also, the juices should run clear, not pink. If you cut into the thigh, the meat should not look raw. Yes, you can use chicken breasts. However, thighs are more juicy and flavorful. Breasts can dry out if overcooked. Thighs also hold up better with the glaze. If you prefer breasts, cook them just until they are done. Absolutely! This recipe works well for meal prep. Cook the chicken and let it cool. Portion it into containers for easy meals. Store in the fridge for up to four days. You can also freeze it for longer storage. Just make sure to thaw it safely before reheating. You can adjust the glaze's sweetness to your taste. If you want it less sweet, use less apricot preserves. You can also add a splash of vinegar for more acidity. Balance is key, so taste as you go. This blog post shared a complete guide for Balsamic Apricot Glazed Chicken Thighs. We went from gathering ingredients to cooking and serving tips. Each step helps enhance your dish's flavor and presentation. Remember, marinating is key for great taste. Feel free to adjust the glaze sweetness to fit your preference. Enjoy creating a meal that looks and tastes amazing! With these tips, you'll impress your family and friends at any dinner. Happy cooking!

Looking for a dish that balances sweet and savory perfectly? You’re in for a treat! Balsamic Apricot Glazed Chicken Thighs bring a juicy, rich flavor to your table. With just …

Read more

Categories Dinner

The Best Green Bean Casserole Easy and Flavorful Dish

July 14, 2025 by Chef Theo
To make the best green bean casserole, you need a few key ingredients. Here’s what you will need: - 1 pound fresh green beans, trimmed and cut into 2-inch pieces - 1 cup sliced mushrooms (button or cremini) - 1 medium onion, chopped - 2 cloves garlic, minced - 1 cup heavy cream - 1 cup vegetable broth - 1 tablespoon soy sauce - 1 teaspoon Dijon mustard - 1 teaspoon dried thyme - ½ teaspoon black pepper - 1 cup French fried onions (store-bought or homemade) - 1 cup shredded cheddar cheese - Salt to taste These ingredients blend together to create a rich, creamy dish with a delightful crunch on top. Not all fresh ingredients are always available. Here are some easy swaps: - Green Beans: You can use frozen green beans. They save time and work well. - Mushrooms: If you don’t have fresh mushrooms, use canned mushrooms. Just drain them well. - Heavy Cream: Substitute with half-and-half for a lighter option. - Vegetable Broth: Chicken broth works great if you’re not vegetarian. These substitutions help you make the casserole without losing its tasty charm. Want to make your casserole even better? Try these add-ins: - Bacon or Ham: Cooked and chopped, they add a smoky flavor. - Parmesan Cheese: Mix in some for a cheesy boost. - Corn: Sweet corn adds a nice pop of color and taste. - Spices: Try adding a pinch of cayenne pepper for some heat. These options let you customize your casserole to fit your taste. For the full recipe, check out the Ultimate Green Bean Casserole Delight. Making the best green bean casserole is easy and fun. First, you gather your ingredients. Next, you prep the green beans and sauté the mushrooms and onions. After that, you mix everything together. Finally, you bake it until golden brown. 1. Preheat your oven to 350°F (175°C). This helps cook the casserole evenly. 2. Blanch the green beans. Boil salted water in a large pot. Add the green beans and cook for 4-5 minutes. They should be bright green and slightly tender. Drain the beans and plunge them into ice water to stop cooking. Drain again and set aside. 3. Sauté the vegetables. In a skillet over medium heat, add chopped onion and sliced mushrooms. Cook for about 5 minutes until the onions are clear. Add minced garlic and stir for 1 more minute. 4. Mix the sauce. In a bowl, combine heavy cream, vegetable broth, soy sauce, Dijon mustard, dried thyme, black pepper, and salt. Whisk until smooth. 5. Combine ingredients. In a large bowl, mix the blanched beans, sautéed vegetables, and sauce. Add half the French fried onions and half the cheddar cheese. Stir well. 6. Transfer to a baking dish. Pour the mixture into a greased 9x13 inch dish. Smooth the top and sprinkle the remaining cheese and fried onions. 7. Bake the casserole. Place it in the oven for 25-30 minutes. It should be bubbly and the top golden brown. 8. Let it rest. After baking, let it sit for 5 minutes before serving. This helps it set. - When blanching, don’t overcook the beans. They should stay bright and crisp. - Stir the sautéed veggies often to prevent burning. - Whisk the sauce well for a smooth mix. This makes the casserole creamy. - Adjust the salt to taste as needed. Each broth can vary in saltiness. - Letting the dish sit after baking enhances the flavors. It also makes serving easier. This recipe is a foolproof way to make a warm, comforting green bean casserole. For the full recipe, check out Ultimate Green Bean Casserole Delight. One common mistake is overcooking the green beans. Blanch them just until bright green. This helps keep their crunch. Another mistake is not seasoning enough. Add salt and pepper to every layer for great flavor. Avoid using canned soup for the base; it lacks depth. Instead, make your own creamy mix with heavy cream and broth. To boost flavor, add fresh herbs like thyme or parsley. They add brightness and freshness. A splash of lemon juice can also enhance taste. For a savory kick, try adding bacon bits or crispy pancetta. Mixing in some cheese during cooking makes it rich and creamy. Use a blend of cheeses for more complexity. Texture is key for a good casserole. Start with blanched green beans for crunch. Combine the beans with sautéed mushrooms and onions for depth. Don’t skimp on the French fried onions. They add that crucial crunch on top. Bake it long enough for a golden finish, but don’t let it dry out. A perfect casserole should be creamy inside with a crispy topping. For the complete recipe, check out the [Full Recipe]. {{image_2}} You can make green bean casserole special for any season. For spring, add fresh peas for a bright touch. In fall, mix in roasted butternut squash for sweetness. During the holidays, try adding crispy bacon or ham for a savory twist. You can even use seasonal herbs like sage or rosemary for an extra flavor boost. If you want a lighter version, swap heavy cream for Greek yogurt. This keeps the creaminess but cuts the fat. Use vegetable broth to reduce calories too. For gluten-free options, choose gluten-free fried onions. You can also use almond milk instead of dairy cream for a dairy-free dish. Simply adjust the seasonings to match your taste. Making a smaller or larger casserole is easy. If you want less food, half the recipe and use a smaller dish. For a crowd, double the recipe and use a larger pan. This dish is great for gatherings, so you can always adjust it. Make sure to keep the same baking time, but check for doneness as sizes change. For the full recipe, check the Ultimate Green Bean Casserole Delight. Once you finish your meal, let the green bean casserole cool down. Store it in an airtight container. This keeps the flavors fresh and the dish safe. You can keep it in the fridge for up to three days. If you want to keep it longer, consider freezing it. When you're ready to enjoy leftovers, preheat your oven to 350°F (175°C). Place the casserole in an oven-safe dish. Cover it with aluminum foil to keep it moist. Heat for about 20-25 minutes or until it's hot all the way through. If you want a crispy top, remove the foil for the last 5 minutes. To freeze your green bean casserole, first let it cool completely. Then, place it in a freezer-safe container. Make sure to label it with the date. It can last up to three months in the freezer. When you're ready to eat it, thaw it in the fridge overnight. Then, reheat in the oven as mentioned above for the best taste. For the full recipe, check out the Ultimate Green Bean Casserole Delight. The key to a creamy green bean casserole is using heavy cream and a good broth. Heavy cream adds richness, while vegetable broth gives depth. Mixing them with seasonings, like soy sauce and Dijon mustard, enhances the flavor. You want a smooth sauce that coats the green beans well. This makes every bite rich and satisfying. Yes, you can prepare this dish ahead of time. It’s a great choice for busy days. You can assemble the casserole up to a day in advance. Just cover it and keep it in the fridge. When you're ready to eat, bake it straight from the fridge. Just add a few extra minutes to the baking time, so it heats through. Making green bean casserole without mushrooms is easy! You can replace mushrooms with sautéed onions or even diced bell peppers. Both options add flavor and texture. You can also use extra cheese to keep the creaminess. Adjust the seasonings to ensure it tastes great. Your dish will still be delicious and comforting! For the full recipe, check out the Ultimate Green Bean Casserole Delight. In this post, we explored how to make the best green bean casserole. We covered key ingredients, suggested substitutions, and optional add-ins. You learned the step-by-step process for perfect results and tips to enhance flavor and texture. We also discussed variations for different occasions and storage information. Green bean casserole is easy to adapt and makes a great dish for any meal. With practice, you can create your version that everyone will love. Enjoy making this tasty recipe your own!

Looking for the best green bean casserole recipe that will wow your family? You’re in the right place! I’ll guide you through easy steps to make a flavorful dish everyone …

Read more

Categories Dinner

Blueberry Torte Recipe Simple and Delicious Treat

July 14, 2025 by Chef Theo
To make the perfect blueberry torte, gather these key ingredients: - 1 cup almond flour - 1 cup all-purpose flour - 1 teaspoon baking powder - 1/2 teaspoon baking soda - 1/4 teaspoon salt - 1/2 cup unsalted butter, softened - 1 cup granulated sugar - 3 large eggs - 1 teaspoon vanilla extract - 1/2 cup Greek yogurt - 2 cups fresh blueberries - Powdered sugar for dusting (optional) These simple ingredients come together to create a moist and flavorful torte. Almond flour adds a nutty taste and helps keep the torte tender, while fresh blueberries burst with flavor. If you have dietary needs, don’t worry! Here are some easy substitutes: - Replace almond flour with oat flour for a gluten-free option. - Use coconut oil instead of butter for a dairy-free torte. - Swap Greek yogurt with dairy-free yogurt or applesauce for a lighter touch. - If you need a vegan option, use flax eggs instead of regular eggs. These swaps maintain the integrity of the torte while catering to different diets. You can enjoy this treat without missing out. When measuring your ingredients, use the right tools for accuracy. Here are some tips: - Use a kitchen scale for precise measurements, especially for flours. - Always sift your flour to avoid lumps and ensure even mixing. - Choose fresh blueberries that are firm and plump for the best flavor. Quality ingredients make a big difference in taste. Opt for organic where possible, especially for fruits. This will elevate your blueberry torte. For the full recipe, check the earlier section. First, set your oven to 350°F (175°C). This is the perfect temperature to bake your torte. Next, take a 9-inch round cake pan. Grease the sides and bottom with butter. Then, line the bottom with parchment paper. This will help the torte come out easily later. Now, grab a medium bowl. Add 1 cup of almond flour, 1 cup of all-purpose flour, 1 teaspoon of baking powder, 1/2 teaspoon of baking soda, and 1/4 teaspoon of salt. Whisk these together. Make sure there are no lumps. This step is crucial for a smooth torte. In a large bowl, beat 1/2 cup of softened butter and 1 cup of granulated sugar. Use an electric mixer on medium speed. Mix until the mixture is light and fluffy. This takes about 3 to 5 minutes. Then, add 3 large eggs, one by one. Mix well after each egg. Now, add 1 teaspoon of vanilla extract and 1/2 cup of Greek yogurt. Mix until smooth and creamy. Next, it's time to combine the mixtures. Gradually add the dry ingredients to the wet mixture. Use a spatula to fold them gently. Be careful not to overmix. Now, gently fold in 2 cups of fresh blueberries. Save some blueberries for the top. This adds a nice look and taste. Pour the batter into the prepared cake pan. Spread it evenly with a spatula. Sprinkle the reserved blueberries on top. Place the pan in the oven and bake for 30 to 35 minutes. To check if it’s done, stick a toothpick in the center. If it comes out clean, it’s ready. After baking, let the torte cool in the pan for 10 minutes. Then, move it to a wire rack to cool completely. If you like, dust it with powdered sugar before serving. Enjoy your delicious treat! For the full recipe, check back to the earlier sections. To keep your blueberry torte moist, use fresh blueberries. Their juice helps add moisture as they bake. Another tip is to use Greek yogurt. It adds creaminess and keeps the texture soft. Mixing the wet and dry ingredients just until combined also helps. Overmixing can lead to a dry torte. Always preheat your oven to 350°F (175°C) before baking. This step ensures even cooking. Grease your cake pan well and use parchment paper. It helps the torte come out easily. Check the torte at 30 minutes. Insert a toothpick; if it comes out clean, it’s ready. If not, bake a few more minutes. For a lovely presentation, dust the cooled torte with powdered sugar. Top it with fresh blueberries for color. You can also add a dollop of whipped cream. Serve it on rustic plates to enhance the look. Pair it with vanilla ice cream for a tasty treat. For the full recipe, check out the details above. {{image_2}} To make a gluten-free blueberry torte, swap the all-purpose flour for a gluten-free blend. Almond flour works great because it adds moisture and flavor. Combine it with a good gluten-free mix. This way, everyone can enjoy a slice! You can add more zing with lemon zest. Just grate the outer peel of a lemon. Mix in about a tablespoon with the wet ingredients. This small change brightens the torte and brings out the blueberries. You could also try orange zest for a different twist. While powdered sugar is nice, you can dress your torte in other ways. Fresh whipped cream adds creaminess. You might try a scoop of vanilla ice cream for warmth. If you love crunch, sprinkle some sliced almonds or granola on top. Each option gives a new layer of taste! To keep your blueberry torte fresh, store it in an airtight container. This method prevents it from drying out. Place the torte at room temperature for up to three days. If you won't eat it in that time, refrigeration is best. Cover it well with plastic wrap before placing it in the fridge. This keeps moisture in and protects it from other odors. You can freeze blueberry torte for up to three months. First, let it cool completely. Then, wrap it tightly in plastic wrap. After that, place it in a heavy-duty freezer bag. Make sure to remove as much air as possible. When you want to enjoy it, thaw the torte in the fridge overnight. This keeps the texture nice and soft. To enjoy warm blueberry torte, you can reheat it easily. Preheat your oven to 300°F (150°C). Place slices on a baking sheet. Cover them lightly with foil. Heat for about 10-15 minutes, or until warm. You can also microwave a slice for about 20-30 seconds. Just be careful not to overheat it, or it may dry out. Enjoy your delicious treat again! You can use frozen blueberries. First, do not thaw them. Just add them straight into the batter. This keeps them from getting mushy. The torte will still taste great. Frozen berries also add a nice chill to the cake. Yes, you can switch the blueberries. Try raspberries, strawberries, or peaches. Each fruit will change the flavor. Adjust the sugar if you use tart fruits. Experimenting keeps baking fun! Serve slices warm or at room temp. Add whipped cream or ice cream on top. Fresh berries make a beautiful garnish. You can also dust it with powdered sugar for a sweet touch. You can keep it for about two days at room temp. Just cover it with plastic wrap or a cake dome. If you want it to last longer, store it in the fridge. It can stay fresh for up to a week. A slice has about 250 calories. It contains 10 grams of fat and 30 grams of carbs. It also provides some protein from the Greek yogurt and eggs. To get more details, check the [Full Recipe]. Making a blueberry torte is easy and fun. You learned about key ingredients like blueberries, flour, and sugar. We discussed tips for keeping your torte moist and tasty. You also saw ways to modify the recipe for different diets. In the end, this torte brings joy to anyone who tries it. Enjoy every slice, and share this delicious dessert with friends and family. Happy baking!

Are you ready for a sweet treat that’s both simple and delicious? My Blueberry Torte Recipe brings a burst of flavor with minimal fuss. With fresh blueberries and basic pantry …

Read more

Categories Desserts

Easy Blueberry Zucchini Bread Quick and Simple Recipe

July 14, 2025 by Chef Theo
- 1 cup grated zucchini - 1 cup fresh blueberries - 1/2 cup granulated sugar - 1/4 cup brown sugar - 1/3 cup vegetable oil - 2 large eggs - 1 teaspoon vanilla extract - 1 teaspoon baking soda - 1/2 teaspoon baking powder - 1/2 teaspoon salt - 1 teaspoon ground cinnamon - 1 1/2 cups all-purpose flour - Optional: 1/2 cup chopped nuts When you gather your ingredients, focus on freshness. Grated zucchini brings moisture and a subtle taste. Blueberries add sweetness and a burst of color. Using both granulated and brown sugar creates depth in flavor. Vegetable oil keeps the bread moist. Eggs bind everything together while adding richness. Vanilla enhances the overall taste. Baking soda and baking powder help the bread rise. Salt balances sweetness, and cinnamon brings warmth. Lastly, all-purpose flour gives structure. If you like nuts, they add crunch and flavor. - Coconut oil vs. vegetable oil: You can swap vegetable oil for melted coconut oil. It adds a hint of coconut flavor. - Brown sugar alternatives: If you don’t have brown sugar, use an equal amount of granulated sugar. You can also mix white sugar with a bit of molasses. - Gluten-free flour options: For a gluten-free version, substitute all-purpose flour with a gluten-free flour blend. Check for a blend that has xanthan gum for better texture. - Health benefits of zucchini: Zucchini is low in calories and high in vitamins. It keeps the bread moist and adds fiber. - Antioxidants in blueberries: Blueberries are rich in antioxidants. They help fight free radicals and are good for your heart. - Benefits of using whole ingredients: Whole ingredients provide better nutrition. They often contain more vitamins and minerals than processed ones. Using fresh ingredients enhances flavor and texture. 1. First, preheat your oven to 350°F (175°C). This helps the bread bake evenly. 2. Prepare your loaf pan by greasing it with non-stick spray. You can also use parchment paper for easy removal. 3. In a medium bowl, mix the grated zucchini, granulated sugar, brown sugar, and vegetable oil. Stir until everything is well blended. 4. Next, add the eggs and vanilla extract to the zucchini mixture. Mix again until the eggs are fully incorporated. 5. In a separate bowl, whisk together the baking soda, baking powder, salt, ground cinnamon, and flour. This step ensures an even rise. 1. Gradually add the dry ingredients to the wet ingredients. Stir gently until just combined. Remember, it’s okay if there are a few lumps. Overmixing can make the bread tough. 2. Now, fold in the blueberries and optional nuts. Make sure they are evenly spread throughout the batter. 3. Pour the batter into the prepared loaf pan. Smooth the top using a spatula. 4. Bake in the preheated oven for 50-60 minutes. Check for doneness by inserting a toothpick in the center. It should come out clean. 1. Once the bread is done, let it cool in the pan for about 10 minutes. This makes it easier to remove. 2. Transfer the bread to a wire rack to cool completely. This helps keep the crust nice and crisp. 3. For serving, slice the bread when it is cool. You can enjoy it warm or at room temperature. 4. Try adding a dollop of cream cheese or butter for extra flavor. A sprinkle of powdered sugar on top can make it look special. Enjoy it with tea or coffee! To achieve moist bread, use fresh zucchini. Grate it and measure one cup. Don't squeeze out the moisture; it helps keep the bread soft. Avoid common mistakes by checking your baking soda and powder. If they are old, they may not rise well. Also, mix just until combined. Overmixing can make your bread tough. The best toppings for blueberry zucchini bread include cream cheese and butter. A light spread adds richness. You can also sprinkle powdered sugar for a sweet touch. Pair your bread with a warm cup of tea or coffee. It also goes well with yogurt or a fresh fruit salad. For added flavor, consider adding spices like nutmeg or ginger. A bit of lemon zest brightens the bread too. You can also mix in other fruits like raspberries or chopped apples. Nuts like walnuts or pecans add crunch and richness. For the Full Recipe, you can check out the recipe section for all the details. {{image_2}} To make this blueberry zucchini bread a bit healthier, you can reduce the sugar. I often use half the sugar listed in the recipe. This change still keeps the bread sweet but cuts down on calories. You can also swap in whole-grain flour for all-purpose flour. Whole grains add fiber and nutrients, making your bread more filling. If you want a vegan version, simply replace the eggs with flaxseed meal. Mix 1 tablespoon of flaxseed meal with 2.5 tablespoons of water for each egg. This substitution works great and keeps the bread moist. You can also add chocolate chips or other fruits like raspberries or peaches. These additions create fun flavor twists that surprise your taste buds. Using seasonal fruits can enhance your bread. In summer, try adding fresh peaches or strawberries. In autumn, a touch of pumpkin puree or diced apples works well. You can also adjust spices according to the season. For a fall twist, add nutmeg or ginger for extra warmth. Each season brings new flavors to explore in your baking. To store leftover bread, wrap it in plastic wrap. This keeps the bread moist. You can also use a sealed container. Store the bread at room temperature for up to three days. If you live in a hot area, refrigeration might help. However, it can make the bread dry. For best taste, keep it at room temperature. To freeze blueberry zucchini bread, let it cool completely. Then, wrap it tightly in plastic wrap. You may also use aluminum foil for extra protection. Place the wrapped bread in a freezer bag. It can last up to three months in the freezer. When you're ready to eat it, take it out and thaw it in the fridge overnight. To reheat, slice and warm it in the oven at 350°F for about 10 minutes. Blueberry zucchini bread lasts about three days at room temperature. If stored in the fridge, it can last up to a week. Watch for signs of spoilage, like mold or a sour smell. If the bread feels too hard or dry, it’s best to toss it. Keeping an eye on the bread helps you enjoy it at its best. You can use several egg substitutes. Here are some great options: - 1/4 cup unsweetened applesauce - 1/4 cup mashed banana - 1 tablespoon ground flaxseed mixed with 2.5 tablespoons water These options help bind the ingredients. They add moisture, too. Yes, you can use frozen blueberries. Just thaw them first. Pat them dry with a paper towel. This helps prevent too much liquid in the bread. Frozen blueberries may be softer than fresh ones. If your bread is dense, try these tips: - Ensure you measure flour correctly. Use a spoon to fill the cup, then level it off. - Do not overmix the batter. Mix just until combined. - Check your baking powder and baking soda. They should be fresh and active. To check if the bread is done, use a toothpick. Insert it in the center of the loaf. If it comes out clean, the bread is ready. If it has batter on it, bake for a few more minutes. You can find the Full Recipe in the recipe section. It has all the steps and details you need. Enjoy making your blueberry zucchini bread! In this post, we covered key ingredients and steps to make blueberry zucchini bread. You learned about ingredient swaps, their benefits, and tips for perfect baking. Remember the importance of proper mixing and cooling for great flavor. Consider trying variations for health or seasonal tastes. With the right storage, your bread can last longer. Now, gather your ingredients and enjoy baking! You’ll love sharing this wholesome treat. Your kitchen will smell amazing, and friends will ask for the recipe. Happy baking!

Are you ready to try a delicious twist on classic zucchini bread? This Easy Blueberry Zucchini Bread recipe is quick, simple, and packed with flavor. With fresh blueberries and healthy …

Read more

Categories Desserts

Irresistible Zucchini Cake Easy and Delicious Recipe

July 14, 2025 by Chef Theo
For a great zucchini cake, you need a few key items: - 2 cups grated zucchini (about 2 medium zucchinis) - 1 ½ cups all-purpose flour - 1 cup granulated sugar - ½ cup brown sugar, packed - 1 teaspoon baking soda - 1 teaspoon baking powder - 1 teaspoon ground cinnamon - ½ teaspoon nutmeg - ½ teaspoon salt - ¾ cup vegetable oil - 3 large eggs - 2 teaspoons vanilla extract These ingredients work together to create a moist and tasty cake. The grated zucchini adds moisture and a subtle flavor. The sugars give it sweetness, while the spices add warmth. You can add fun extras to your cake. Consider these options: - 1 cup chopped walnuts or pecans - 1 cup shredded coconut These add-ins give your cake crunch and texture. You can mix and match to find your favorite combination. For the perfect topping, you need simple ingredients for the frosting: - 8 oz cream cheese, softened - ½ cup unsalted butter, softened - 4 cups powdered sugar - 2 teaspoons vanilla extract You can also try flavor variations, such as: - Lemon zest for a fresh twist - Cocoa powder for a chocolate version This creamy frosting adds richness to your cake. It balances the sweetness and gives a lovely finish. For the full recipe, check out the detailed instructions. 1. Preheat oven and prepare the baking pan: Set your oven to 350°F (175°C). Greasing and flouring a 9x13 inch baking pan helps the cake come out easily. You can also line it with parchment paper for quick removal. 2. Allow zucchini to release moisture: In a big bowl, mix the grated zucchini with both sugars. Let this sit for about 10 minutes. This time allows the zucchini to release extra moisture. This step is key for a moist cake. 1. Combine wet and dry ingredients: In another bowl, whisk together the flour, baking soda, baking powder, cinnamon, nutmeg, and salt. This blend makes your dry mix. Next, add the vegetable oil, eggs, and vanilla to the zucchini mix. Stir until well combined. 2. Folding in nuts and coconut: Slowly add the dry mix to the wet mix. Stir gently until just combined. If you want a bit of crunch, fold in chopped walnuts or pecans. You can also add shredded coconut for extra flavor. 1. Pouring batter into pan: Pour the batter into your prepared baking pan. Use a spatula to spread it evenly. This helps the cake bake evenly. 2. Baking time and testing for doneness: Bake the cake for 30-35 minutes. Check if it's done by inserting a toothpick in the center. If it comes out clean, the cake is ready. Let it cool in the pan for about 15 minutes before moving it to a wire rack to cool completely. For the full recipe, refer to the earlier sections. To get a great texture in your zucchini cake, manage moisture well. Grate the zucchini and let it sit. This helps it release water. Use a clean towel to squeeze out extra moisture before mixing it in. Too much water can make the cake soggy. When mixing the batter, use a folding technique. This means gently combining the wet and dry ingredients. Stir until just mixed. Over-mixing can make the cake tough. You want it soft and fluffy! For a tasty finish, apply cream cheese frosting with care. Start from the center and spread out. Use a spatula for smooth edges. If you like, add extra toppings like chopped nuts or shredded coconut for texture. When serving, cut the cake into squares. Place them on a pretty platter. Add a sprinkle of coconut on top for a nice touch. You can also add fresh herbs like basil for color. To keep your zucchini cake fresh, store it in an airtight container. It stays moist this way. You can keep it at room temperature for a few days. If you want it to last longer, put it in the fridge. When reheating, use the microwave for quick warming. A few seconds at a time works best. You can also use the oven at a low temperature. This keeps the cake soft and tasty. {{image_2}} You can customize your zucchini cake to suit your taste buds. One fun option is a chocolate zucchini cake. Just add cocoa powder to the dry mix. The chocolate pairs well with the zucchini, making it rich and moist. Another great idea is to spice it up. Try adding ginger or cloves for a warm kick. This will give your cake a cozy flavor, perfect for chilly days. Want to make your cake a bit healthier? You can substitute sugars. Use honey or maple syrup instead of granulated sugar. This change can cut down on refined sugars. Another option is to use whole wheat flour. This gives your cake more fiber and nutrients. If you need a gluten-free cake, try almond flour or a gluten-free blend. Both can work well in this recipe. Making mini zucchini muffins or cupcakes can be a fun twist. These bite-sized treats are perfect for kids or parties. Just adjust the bake time to about 15-20 minutes for smaller servings. You can also use mini loaf pans for individual servings. This way, everyone gets their own little cake. Just keep an eye on them while baking to avoid overcooking. For the full recipe, check out the Irresistible Zucchini Cake section. What drinks go with zucchini cake? I love pairing it with a hot cup of tea or coffee. The warmth of these drinks balances the sweet flavors of the cake. A cold glass of milk also works well. For a fun twist, try serving it with a fruity iced tea. What sides or salads work well with zucchini cake? A light fruit salad adds freshness. You can mix berries and citrus for a bright touch. A simple green salad with a tangy vinaigrette also complements the cake nicely. How can I enhance summer gatherings? For summer, serve zucchini cake chilled. Add a scoop of vanilla ice cream on top for a refreshing treat. You can also top it with fresh berries to make it pop. What festive ideas can I use for holidays? During the holidays, decorate the cake with festive sprinkles or edible glitter. You can also use seasonal fruits like cranberries or pomegranate seeds to add color and flavor. What are some breakfast options? Zucchini cake makes a great morning treat. You can slice it and toast it lightly. A dollop of yogurt on top adds creaminess and tang. How can I use zucchini cake as a dessert? You can turn leftovers into a fun dessert. Serve it with whipped cream and a drizzle of chocolate sauce. This twist makes it perfect for any dinner party. For the full recipe, check out the Irresistible Zucchini Cake. How to prevent soggy zucchini cake? To stop your zucchini cake from being soggy, you should remove excess moisture. After grating the zucchini, place it in a clean towel and squeeze out the water. This step helps keep your cake light and fluffy. Also, do not overmix the batter. Mixing too much can add air and lead to a dense cake. Can I freeze zucchini cake? Yes, you can freeze zucchini cake! After it cools, wrap it in plastic wrap. Then place it in a freezer bag. It can stay fresh for up to three months. To enjoy, simply thaw it in the fridge overnight. What can I use instead of eggs? If you need an egg substitute, use unsweetened applesauce. One quarter cup of applesauce equals one egg. You can also try mashed bananas or flaxseed meal mixed with water. These options work well in keeping the cake moist. Can I substitute zucchini with other vegetables? You can! Grated carrots or apples are great substitutes. These vegetables add their own flavor and moisture. If you use apples, consider reducing the sugar slightly, as they are sweet. How do I know when my zucchini cake is done? To check if your cake is ready, insert a toothpick in the center. If it comes out clean, the cake is done. If you see wet batter on the toothpick, bake it for a few more minutes. What if I don’t have cream cheese for frosting? If you lack cream cheese, you can use butter or Greek yogurt instead. Mix butter with powdered sugar and a splash of vanilla for a nice frosting. Greek yogurt adds tang and creaminess, too. For the full recipe, check out the Irresistible Zucchini Cake section. Zucchini cake is a delightful treat that stands out. You need grated zucchini, flour, sugars, and eggs for a tasty base. Add nuts or coconut for extra flavor. Remember to manage moisture well and layer on that cream cheese frosting. You can try fun variations like chocolate or healthier options, too. Enjoy this versatile cake at gatherings or as an everyday snack. With these tips, you'll create a delicious dessert that everyone will love. Zucchini cake can be a new favorite at your table!

Are you ready to bake something incredible? This easy and delicious Irresistible Zucchini Cake will wow your taste buds. With soft, moist layers and creamy frosting, it’s perfect for any …

Read more

Categories Desserts

Grilled Chicken with Balsamic Glaze Savory Delight

July 14, 2025 by Chef Theo
- 4 boneless, skinless chicken breasts - 1/2 cup balsamic vinegar - 3 tablespoons honey - 2 tablespoons olive oil - 3 cloves garlic, minced - 1 teaspoon dried oregano - 1 teaspoon salt - 1/2 teaspoon black pepper - Fresh basil leaves for garnish - Optional: cherry tomatoes and arugula for serving Gather these ingredients before you start. The chicken breasts are the star. The balsamic vinegar and honey mix gives a nice sweet flavor. Olive oil keeps the chicken moist. Garlic, oregano, salt, and pepper add savory notes. Fresh basil gives a pop of color and taste. If you want, add cherry tomatoes and arugula on the side. They make the plate look nice and add freshness. This simple list makes a tasty dish. You can find the full recipe in the article. Enjoy the cooking process! To start, you need to make a rich balsamic glaze. First, take a small saucepan and add: - 1/2 cup balsamic vinegar - 3 tablespoons honey Place the saucepan over medium heat. Bring the mixture to a gentle simmer. Stir it occasionally. This helps blend the flavors well. After it starts to simmer, reduce the heat to low. Let it cook for about 10 to 15 minutes. The goal is to thicken the glaze. Once thickened, remove it from the heat and set it aside to cool. Next, focus on marinating the chicken. In a bowl, whisk together these ingredients: - 2 tablespoons olive oil - 3 cloves garlic, minced - 1 teaspoon dried oregano - 1 teaspoon salt - 1/2 teaspoon black pepper This mixture will add a lot of flavor. Now, take your chicken breasts and place them in a large resealable bag or a shallow dish. Pour the marinade over the chicken. Seal the bag or cover the dish. You should refrigerate it for at least 30 minutes. For better flavor, let it sit for up to 2 hours. Now it’s time to grill the chicken. Preheat your grill to medium-high heat. This step is very important for even cooking. Once preheated, remove the chicken from the marinade and discard the leftover marinade. Place the chicken on the grill. Cook it for about 6 to 7 minutes on each side. The chicken is ready when it reaches an internal temperature of 165°F (75°C). You want it to be nicely charred on the outside. In the last few minutes of grilling, brush the chicken with the balsamic glaze. This adds a shiny finish and intense flavor. Once cooked, take the chicken off the grill and let it rest for a few minutes. This helps keep it juicy. Slice and serve it with a drizzle of glaze and fresh basil leaves. If you like, add cherry tomatoes and arugula for a nice touch. For the full recipe, check out the earlier section. To get the best grilled chicken, start with the right grill. Preheat your grill to medium-high heat, around 375°F to 450°F. This temperature gives a great sear and cooks the chicken evenly. Grill the chicken for 6-7 minutes on each side. You want the chicken to reach an internal temperature of 165°F. Use a meat thermometer to check this. Marination is key for flavor. I suggest marinating the chicken for at least 30 minutes. For a deeper flavor, go for 2 hours. This helps the chicken soak up the balsamic vinegar and honey. Balancing sweetness and acidity is important too. The honey adds sweetness, while the balsamic vinegar brings acidity. Adjust these to your taste before grilling. When serving, think about presentation. Slice the chicken and arrange it on a nice platter. Drizzle more balsamic glaze on top for a glossy finish. Add fresh basil leaves for a pop of color. You can also serve with cherry tomatoes and arugula for added freshness. Great sides include roasted veggies, rice, or a simple salad. These will pair well with the chicken and make a complete meal. For the full recipe, check the details above. {{image_2}} You can switch up the flavor of grilled chicken by trying different marinades. A citrus marinade adds a bright touch. Use lemon juice or orange juice mixed with olive oil and herbs. This gives your chicken a fresh, zesty twist. Another option is to use an herb-based marinade. Mix fresh herbs like rosemary, thyme, or parsley with olive oil. This adds a fragrant note and enhances the chicken's taste. Want some heat? Add spices like chili powder or cayenne. A sprinkle can transform your dish into a spicy delight. To make this dish gluten-free, simply check your balsamic vinegar for any added gluten. Most brands are safe, but it's always good to read labels. If you're looking for low-carb options, skip the honey in the glaze. You can use a sugar-free sweetener instead. This keeps the dish tasty without the extra carbs. Feel free to substitute chicken with other proteins. Turkey works well and has a similar flavor. For a plant-based twist, use tofu. Just make sure to press the tofu to remove extra moisture before marinating. This helps it absorb the flavors better. These variations allow you to customize grilled chicken with balsamic glaze to fit your taste and dietary needs. Enjoy exploring different flavor profiles! To store leftover grilled chicken, first let it cool down. Then, wrap the chicken tightly in plastic wrap or foil. You can also place it in an airtight container. This helps keep the chicken fresh. Store it in the fridge for up to four days. When reheating, place the chicken on a microwave-safe plate. Cover it with a damp paper towel to keep it moist. Heat in short bursts, about 30 seconds at a time. Check the temperature often. The chicken should reach 165°F (75°C) before you eat it. For best results, you can also reheat it on the stovetop or in the oven. This keeps the outside crispy. Yes, you can freeze grilled chicken! Freezing is a great way to keep it longer. To freeze, let the chicken cool completely. Wrap each piece tightly in plastic wrap, then place them in freezer bags. Make sure to remove as much air as possible. Label the bags with the date. You can freeze it for up to three months. To thaw, place the frozen chicken in the fridge overnight. This keeps it safe to eat. If you need it faster, you can use the microwave’s defrost setting. Just remember to cook it right away after thawing. This way, you’ll enjoy that tasty grilled chicken later! For the full recipe of Grilled Chicken with Balsamic Glaze, check out the detailed instructions above. What is the best way to ensure the chicken stays juicy? To keep chicken juicy, marinate it. The marinade helps to infuse flavor and moisture. Let it soak for at least 30 minutes. The longer, the better. Also, avoid overcooking the chicken. Aim for an internal temperature of 165°F. Can I make the balsamic glaze in advance? Yes, you can make the balsamic glaze ahead of time. Cook it, then let it cool. Store it in the fridge for up to a week. Reheat it gently before using. How long can grilled chicken be stored in the fridge? Grilled chicken can last in the fridge for about 3 to 4 days. Keep it in an airtight container to maintain freshness. Is it safe to reheat grilled chicken? Yes, it is safe to reheat grilled chicken. Heat it to an internal temperature of 165°F. This ensures it is safe to eat. What sides go well with Grilled Chicken with Balsamic Glaze? Pair grilled chicken with fresh salads, roasted vegetables, or garlic bread. Quinoa or rice also complements the dish well. These sides balance the flavors of the glaze. Can I use bone-in chicken for this recipe? You can use bone-in chicken, but adjust the cooking time. Bone-in pieces take longer to cook. Ensure they reach 165°F for safe eating. In this blog post, we explored a tasty grilled chicken recipe with balsamic glaze. We covered key ingredients, step-by-step instructions, and tips for perfect grilling. You learned about variations and storage tips to keep your chicken fresh. As you cook this dish, remember to enjoy the process. Grilled chicken with balsamic glaze is versatile and delicious. So, gather your ingredients, fire up the grill, and impress your friends and family!

Welcome to my savory delight: Grilled Chicken with Balsamic Glaze! This dish combines tender chicken with a sweet and tangy glaze, creating a taste that excites every bite. With just …

Read more

Categories Dinner

Baked Neapolitan Doughnuts Delightful and Easy Recipe

July 14, 2025 by Chef Theo
To make Baked Neapolitan Doughnuts, you will need these key ingredients: - 1 cup all-purpose flour - 1/2 cup granulated sugar - 1/2 tsp baking powder - 1/4 tsp baking soda - 1/4 tsp salt - 1/2 cup plain yogurt - 1 large egg - 1 tsp vanilla extract - 1/4 cup melted coconut oil - 1/4 cup cocoa powder - 1/2 cup strawberry puree (fresh or store-bought) - 1/3 cup powdered sugar (for icing) - 1 tbsp milk (for icing) - Sprinkles for decoration You can use substitutes for some items if you have dietary needs. For instance: - Swap all-purpose flour for almond flour for a gluten-free option. - Use a non-dairy yogurt to make this recipe vegan. - Replace granulated sugar with coconut sugar for a healthier choice. These adjustments let you enjoy this tasty treat while keeping your needs in mind. Check out the Full Recipe for detailed instructions on how to bring these delightful doughnuts to life! To make Baked Neapolitan Doughnuts, start by mixing your dry ingredients. In a large bowl, sift together: - 1 cup all-purpose flour - 1/2 cup granulated sugar - 1/2 tsp baking powder - 1/4 tsp baking soda - 1/4 tsp salt This step helps combine the ingredients evenly. Next, prepare your wet mix. In another bowl, whisk together: - 1/2 cup plain yogurt - 1 large egg - 1 tsp vanilla extract - 1/4 cup melted coconut oil Make sure it is smooth and well mixed. Combine this wet mix with the dry ingredients. Stir gently until just incorporated. Do not overmix; this keeps the doughnuts fluffy. Now, prepare your doughnut pans. Preheat your oven to 350°F (175°C). Grease your doughnut pan with non-stick spray to ensure easy removal after baking. For the marbled effect, divide the batter into three bowls. In one bowl, mix in: - 1/4 cup cocoa powder (for chocolate batter) In another bowl, add: - 1/2 cup strawberry puree Leave the third bowl as the vanilla batter. Using a piping bag or spoon, fill each doughnut mold with the three batters. Start with vanilla, then strawberry, and finish with chocolate. This layering creates a lovely marbled look. Bake in the preheated oven for 10-12 minutes. Check doneness by inserting a toothpick. If it comes out clean, your doughnuts are ready. Let them cool for a few minutes in the pan before transferring them to a wire rack. Now let’s prepare the icing. In a bowl, mix: - 1/3 cup powdered sugar - 1 tbsp milk Stir until smooth. Once your doughnuts are cool, dip the tops into the icing. For decoration, sprinkle colorful sprinkles on top. This adds a fun touch. Enjoy your Baked Neapolitan Doughnuts! For the full recipe, refer to the earlier section. To get the best texture, avoid overmixing. When you mix too much, the doughnuts can turn tough. Mix until you see no dry flour. This keeps them light and fluffy. Incorporate flavors evenly by layering the batters. Use a piping bag for neat layers. One common mistake is overfilling doughnut molds. Fill each mold about two-thirds full. This allows room for the doughnuts to rise without spilling over. Another mistake is baking time discrepancies. Ovens vary, so check your doughnuts a few minutes early. Use a toothpick to test for doneness. You can prepare the doughnut batter a day ahead. Store it in the fridge, covered. This saves time on baking day. For serving, try adding fresh fruit on top. You can also serve with chocolate sauce or whipped cream. Get creative with toppings like coconut or nuts. For the full recipe, check the previous sections. {{image_2}} You can get creative with the batters for these doughnuts. Try using different fruit purees like mango or blueberry. These add bright flavors and colors. For fall, use pumpkin puree with warm spices for a cozy twist. In winter, mix in peppermint extract for a festive touch. The key is to keep the base of the batter the same, but switch out the flavoring for fun. Want something different for the icing? You can use dark chocolate or white chocolate for a rich taste. A simple lemon glaze adds a nice zing. For healthier options, try a yogurt-based icing. Just mix yogurt with honey and a sprinkle of lemon juice. This way, you keep some sweetness while cutting down on sugar. You can also use maple syrup for a natural sweetener. Each option adds a unique flavor to your doughnuts. For the full recipe, check out the details above! To keep your baked Neapolitan doughnuts fresh, store them in an airtight container. Use parchment paper between layers to prevent sticking. This method helps maintain their softness and flavor. You can keep them at room temperature for up to three days. If you want to store them longer, consider freezing. To freeze your doughnuts, let them cool completely first. Then, wrap each doughnut in plastic wrap. Place the wrapped doughnuts in a freezer-safe bag or container. This prevents freezer burn and keeps them fresh. When you're ready to enjoy them, take the doughnuts out and thaw them at room temperature. To keep the texture nice, avoid using a microwave. Instead, let them sit for about an hour. This way, they stay soft and delicious! Neapolitan doughnuts come from Naples, Italy. They blend three flavors: chocolate, vanilla, and strawberry. This treat became popular due to its fun colors and tasty mix. It reflects the love of food in Italian culture. Now, many people enjoy them worldwide, both fried and baked. Yes, you can use different flours. Almond flour adds a nutty taste, while whole wheat flour makes them healthier. Gluten-free flour works well too, but the texture may change. Always check the flour's absorbency. You might need to adjust the liquid in the recipe. To test if the doughnuts are done, use a toothpick. Insert it into the center of a doughnut. If it comes out clean, they're ready. If it has wet batter, bake for a few more minutes. They should be golden and spring back when pressed lightly. Yes, you can prepare these doughnuts ahead. Bake them and let them cool completely. Store them in an airtight container at room temperature. They stay fresh for up to two days. For longer storage, freeze them. Just thaw them before icing and serving. Baked Neapolitan doughnuts are healthier than fried ones. Baking uses less oil, reducing fat and calories. They also have more moisture from yogurt. This adds nutrients without excess sugar. Enjoying baked doughnuts gives you a tasty treat without the guilt. Check the Full Recipe for tips on making them even better! Baked Neapolitan doughnuts bring joy to every bite. This guide covered ingredients, preparation steps, and storage tips. You learned how to avoid common mistakes and make tasty variations. Whether you want to try new flavors or decorate with ease, these doughnuts offer endless fun. Remember, baking success comes from using the right ingredients and techniques. Enjoy your delicious creations, and share them with friends and family for even more joy. Happy baking!

Do you crave a sweet treat that’s both fun and easy to make? Baked Neapolitan doughnuts are your answer! With their rich chocolate, creamy vanilla, and sweet strawberry flavors, these …

Read more

Categories Desserts

Grilled Shrimp Bowl with Avocado Corn Salsa Delight

July 13, 2025 by Chef Theo
- 1 pound large shrimp, peeled and deveined - 2 tablespoons olive oil - 1 teaspoon smoked paprika - 1 teaspoon garlic powder - 1 teaspoon cumin - Salt and pepper to taste The main star of this dish is large shrimp. I love using fresh shrimp, but frozen works too. The key is to peel and devein them well. Olive oil helps the spices stick and adds flavor. For seasoning, I use smoked paprika, garlic powder, and cumin. These spices bring a warm, smoky taste. Don't forget salt and pepper to enhance all the flavors. - 1 ripe avocado, diced - 1 cup corn kernels (fresh, canned, or frozen) - 1 small red onion, finely chopped - 1 cup cherry tomatoes, halved - 1 lime, juiced - Fresh cilantro for garnish Fresh produce makes this dish vibrant. Avocado adds creaminess, while corn brings a sweet crunch. I like red onion for its bite and color. Cherry tomatoes add juiciness and freshness. A squeeze of lime juice brightens it all up. Finally, fresh cilantro gives an extra layer of flavor. - 1 cup cooked quinoa Quinoa is the perfect base for this bowl. It is packed with protein and fiber. Cooking quinoa is easy. Just rinse it, boil it in water, and let it fluff up. It absorbs the flavors from the shrimp and salsa well. You can also swap it for brown rice or couscous if you prefer. For the full recipe, check out the complete guide to make this delightful dish. First, take a bowl and combine these ingredients for the marinade: - 2 tablespoons olive oil - 1 teaspoon smoked paprika - 1 teaspoon garlic powder - 1 teaspoon cumin - Salt and pepper to taste Next, toss the large shrimp into the bowl. Make sure each shrimp gets coated well. Let the shrimp sit in the marinade for about 15-20 minutes. This helps the flavors soak in. While the shrimp marinates, you can prepare the corn salsa. In a separate bowl, mix together: - 1 ripe avocado, diced - 1 cup corn kernels (fresh, canned, or frozen) - 1 small red onion, finely chopped - 1 cup cherry tomatoes, halved - Juice of 1 lime - A pinch of salt and pepper Gently stir all these ingredients together. This salsa adds a fresh, bright taste to the bowl. Now, it’s time to grill the shrimp. Preheat your grill to medium-high heat. If you use wooden skewers, soak them in water for 30 minutes to prevent burning. Skewer the marinated shrimp, leaving a little space between each one. Grill the shrimp for 2-3 minutes on each side. You want them to be opaque and cooked through. To make the bowl, start with a base of cooked quinoa. Add a layer of grilled shrimp on top. Spoon the avocado corn salsa generously over the shrimp. For a finishing touch, sprinkle fresh cilantro on top. This bowl is now ready to enjoy! For the full recipe, click [here](#). How do I avoid overcooking shrimp? To keep shrimp juicy, don’t leave them on the grill too long. Cook them for 2-3 minutes on each side. They turn pink and opaque when done. If you see that color, they are ready! What are the best grill temperature settings? Preheat your grill to medium-high heat. This range is around 400°F to 450°F. This temp helps cook shrimp evenly and gives them those nice grill marks. What additional ingredients can boost flavor? Consider adding lime zest for zestiness. Fresh jalapeños bring heat, while diced mango adds sweetness. You can also mix in some black beans for extra protein. How do I adjust seasoning levels? Taste the salsa as you mix. Add salt, pepper, or lime juice as needed. If you like it spicy, add more jalapeños. If it’s too tangy, balance it with honey or sugar. How can I create a beautiful bowl assembly? Start with a layer of quinoa at the bottom. Then, neatly arrange grilled shrimp on top. Spoon the salsa generously over the shrimp for a colorful look. What are some garnish ideas for visual appeal? Chop fresh cilantro and sprinkle it on top. You can add lime wedges on the side for color. Slices of avocado or edible flowers can also add a nice touch. For the complete recipe, check out the [Full Recipe]. {{image_2}} You can change the protein in this dish easily. If you prefer chicken, use diced chicken breast. Simply grill it like the shrimp. For a vegetarian option, tofu works well. Press and cube the tofu, then marinate it in the same mix as the shrimp. If you enjoy seafood, try scallops or a firm fish like salmon. These options add variety while keeping the dish tasty. Want to spice things up? Add jalapeños to the corn salsa for a kick. You can mix in black beans for added protein and fiber. Feta cheese can add a creamy, salty flavor that pairs well with the fresh ingredients. Get creative! You can even try adding fresh herbs like basil or mint to change the taste profile. Instead of quinoa, you can swap it for brown rice or couscous. Both grains add a nice texture and flavor. If you want a low-carb option, consider a lettuce base. Use large leaves like romaine or butter lettuce to hold everything. This creates a fresh and crunchy bowl that is fun to eat. Explore these variations to find your favorite mix for the grilled shrimp bowl with avocado corn salsa. For the full recipe, check out the details above! To store leftovers, place the grilled shrimp and avocado corn salsa in separate airtight containers. This helps keep both fresh longer. You can keep the shrimp in the fridge for up to three days. The salsa is best used within two days for great taste. You can freeze cooked shrimp for later use. Place the shrimp in a freezer-safe bag, removing as much air as possible. It will stay good for up to three months. For the salsa, avoid freezing it as the avocado will brown and change texture. If you must, freeze it without the avocado, and add fresh avocado when you thaw it. When reheating shrimp, the best method is to use a skillet over medium heat. Heat the shrimp for about two to three minutes until warm. Avoid cooking it too long, as this can dry it out. For the salsa, serve it cold or at room temperature to keep its fresh taste. If you need to warm it slightly, do so gently in a bowl over simmering water. To make this dish, follow these simple steps: 1. Marinate the Shrimp: Mix olive oil, smoked paprika, garlic powder, cumin, salt, and pepper in a bowl. Add the shrimp and toss to coat well. Let it sit for 15-20 minutes. 2. Prepare the Corn Salsa: In another bowl, combine diced avocado, corn, red onion, cherry tomatoes, and lime juice. Add salt and pepper to taste. Gently mix and set aside. 3. Grill the Shrimp: Preheat your grill to medium-high heat. If using wooden skewers, soak them in water for 30 minutes. Skewer the shrimp and grill for 2-3 minutes on each side until they turn opaque. 4. Assemble the Bowl: Place cooked quinoa at the bottom of each bowl. Top with grilled shrimp and spoon the avocado corn salsa generously over everything. 5. Garnish and Serve: Sprinkle fresh cilantro on top and serve with lime wedges for added flavor. You can find the complete recipe above. Yes, you can use frozen shrimp. Just make sure to thaw them first. Here’s how: - Thawing: Place frozen shrimp in the fridge overnight or run them under cold water for about 15 minutes. Avoid using hot water, as it can cook the shrimp. - Using Frozen Shrimp: Frozen shrimp may be slightly less tender than fresh shrimp. However, they can still taste great when cooked properly. You can enhance your meal with these side dishes: - Salads: A light mixed green salad pairs well with the shrimp bowl. - Grilled Veggies: Grilled zucchini, bell peppers, or asparagus add color and flavor. - Rice Dishes: Serve with cilantro lime rice for extra zest. - Bread: Warm, crusty bread or tortillas are great for scooping up the salsa. These sides will complement the flavors in your grilled shrimp bowl perfectly! This blog post explored making a grilled shrimp bowl with avocado corn salsa. We covered the key ingredients, from shrimp to fresh produce. You learned step-by-step how to marinate shrimp, prepare salsa, and assemble your dish. I shared expert tips for grilling, enhancing flavors, and presenting your bowl. Remember, feel free to customize this recipe with alternative proteins and grains. Enjoy the process of creating a flavorful, healthy meal that you can adapt to your tastes. Your new dish awaits!

Are you ready to take your taste buds on a delicious journey? In this Grilled Shrimp Bowl with Avocado Corn Salsa Delight, I’ll show you how to create a fresh, …

Read more

Categories Dinner
Older posts
Newer posts
← Previous Page1 … Page29 Page30 Page31 … Page105 Next →

TOASTED RECIPES

Where ideas are warm, crisp, and ready to serve! 🍞

PAGES

Home About Contact Privacy Policy Terms & Conditions Cookie Policy GDPR Policy Copyright Policy Disclaimer

CATEGORIES

Appetizers Desserts Salads Breakfast Dinner

Contact

  • Pinterest
  • Mail
Copyright © 2025 Toasted Recipes. All rights reserved.