Skip to content
toastedrecipes.com
  • Home
  • Appetizers
  • Desserts
  • Salads
  • Breakfast
  • Dinner
  • Privacy Policy
  • Contact
  • About

Chef Theo

Savory Street Corn Chicken Rice Bowl Delight

July 16, 2025 by Chef Theo
- 1 cup jasmine rice - 2 cups chicken broth - 1 lb boneless, skinless chicken thighs - 1 cup corn kernels (fresh or frozen) - 1 red bell pepper, diced - 1/2 cup red onion, diced - 2 cloves garlic, minced - 1 tablespoon smoked paprika - 1 teaspoon cumin - Salt and pepper to taste - 1/2 cup cotija cheese, crumbled - 1 avocado, sliced - 1/4 cup fresh cilantro, chopped - Juice of 1 lime This recipe makes a vibrant and tasty Street Corn Chicken Rice Bowl. Each ingredient adds its own flair. The jasmine rice serves as a soft base. The chicken thighs add rich protein. Corn gives a sweet crunch, while peppers and onions bring color and flavor. Using chicken broth instead of water makes the rice more flavorful. The spices like smoked paprika and cumin add warmth and depth. They transform simple chicken into a tasty star. For toppings, cotija cheese adds a salty kick. Avocado offers creaminess, while cilantro adds a fresh touch. The lime juice ties everything together, giving it a bright finish. Try this recipe for a delightful meal that is easy to make. You can find the Full Recipe to guide you through each step. Enjoy the flavors and colors that this dish brings to your table! Start by rinsing 1 cup of jasmine rice in cold water. This helps remove extra starch. Keep rinsing until the water runs clear. In a medium saucepan, combine the rice with 2 cups of chicken broth. This adds flavor. Bring the mixture to a boil, then reduce the heat to low. Cover and simmer for 15 minutes or until the rice is tender. After that, remove it from heat and let it sit for 5 minutes. Fluff the rice with a fork to make it light. While the rice cooks, season 1 pound of boneless, skinless chicken thighs. Use smoked paprika, cumin, salt, and pepper for a great taste. Mix it well so every piece is coated. Heat 1 tablespoon of olive oil in a large skillet over medium-high heat. Add the seasoned chicken thighs and cook for about 6-7 minutes on each side. Cook until each piece is golden brown and fully cooked. This is key for flavor. Remove the chicken from the heat and let it rest for a few minutes. After resting, slice the chicken into bite-sized pieces. In the same skillet, add 1/2 cup of diced red onion, 1 diced red bell pepper, and 2 minced garlic cloves. Cook these for about 3-4 minutes. You want the veggies to be tender but not mushy. After that, add 1 cup of corn kernels. Cook for another 2-3 minutes, stirring often to mix the flavors. Now, it's time to layer the bowls. Start with a base of the fluffy rice. Then, add the sliced chicken and the sautéed vegetables on top. Make sure to spread everything evenly for a nice presentation. For the final touch, sprinkle 1/2 cup of crumbled cotija cheese over the top. Then, add slices of 1 avocado and a sprinkle of 1/4 cup chopped fresh cilantro. Squeeze the juice of 1 lime over everything for a burst of flavor. This adds freshness and a zesty kick. Enjoy your savory street corn chicken rice bowl delight! To make fluffy jasmine rice, rinse it well. This removes extra starch. Use chicken broth instead of water for a richer taste. When cooking, bring it to a boil first. Then, lower the heat and cover it tightly. Let it simmer for 15 minutes without lifting the lid. After that, let it rest for 5 minutes. Fluff it gently with a fork to keep it light. To avoid mushy rice, be careful not to overcook it. Follow the cooking times closely. Make sure the pot is covered while it simmers. This traps steam and helps the rice cook evenly. If you see water left after the time, cook it a little longer. For juicy chicken, season it well before cooking. Use smoked paprika and cumin for great flavor. Heat olive oil in a skillet until it's hot. Cook the chicken thighs until they are golden brown on both sides. This gives a nice crust. Let the chicken rest for a few minutes after cooking. Resting allows the juices to settle. This keeps the chicken moist when you slice it. Use fresh, colorful vegetables for the best taste. Red bell pepper and corn add sweetness. Diced red onion gives a nice crunch. You can also add zucchini or squash for variety. When seasoning veggies, taste as you go. Adjust salt, pepper, and spices as needed. This way, you can find the perfect balance. Remember, fresh herbs like cilantro add a pop of flavor at the end. {{image_2}} You can easily switch the chicken for shrimp or tofu. Shrimp cooks fast and adds a sweet taste. Just sauté it for 3-4 minutes until pink. For tofu, use firm or extra-firm. Press it to remove moisture, then cut it into cubes. Sauté the cubes in olive oil until golden and crispy. Both options keep the dish tasty and fun. Want to spice things up? Add spices like chili powder or cayenne for heat. Fresh herbs such as parsley or oregano can brighten the dish. You can also mix in lime zest to give a fresh burst. These small changes can make a big difference in your meal. You can make this dish vegan by switching to plant-based ingredients. Use vegetable broth instead of chicken broth. For protein, add black beans or lentils. Top it with vegan cheese or skip the cheese altogether. Load it with fresh veggies like zucchini or mushrooms for extra texture and flavor. Enjoy a delicious vegan street corn rice bowl! For the full recipe, check out the detailed instructions above. To keep your Street Corn Chicken Rice Bowl fresh, cool it down quickly. Spread the leftovers in a shallow dish. This helps the heat escape. Once cooled, place the dish in the fridge. Make sure to cover it tightly with plastic wrap or a lid. This keeps out air and moisture. You can store the bowl for up to four days. If you want to save it longer, consider freezing it. Divide the food into portions and use freezer-safe bags. Don’t forget to label them with the date! To enjoy your leftovers, reheat them safely. The best way is to use the microwave. Place the food in a microwave-safe bowl. Add a splash of water to keep it moist. Cover the bowl with a microwave-safe lid or plate. Heat it in short bursts, checking every minute. Stir well to ensure even heating. You can also reheat it on the stove. Just add a little oil to a pan. Warm it over medium heat until hot, stirring often. For your ingredients, proper storage is key. Keep jasmine rice in a cool, dry place. A sealed container works well. Chicken broth should stay in the fridge after opening. Use it within a week or freeze it in ice cube trays. For the corn, store it in a bag in the freezer if you’re not using fresh. Fresh veggies like bell pepper and onion last about a week in the fridge. Check for signs of spoilage often. Always store cotija cheese in an airtight container. This keeps it fresh for up to two weeks. To make this dish gluten-free, swap out the chicken broth for vegetable broth. Check that your broth is gluten-free. Use gluten-free sauces or seasonings as needed. Jasmine rice is gluten-free, so you can keep that as is. Absolutely! To meal prep, cook a large batch of rice and chicken. Store them in separate containers. You can also pre-chop your veggies. This helps save time on busy days. Reheat everything before serving. Keep your toppings fresh for best flavor. If you can’t find cotija cheese, try feta or queso fresco. Both add a salty flavor. For a vegan option, use cashew cheese or nutritional yeast. These alternatives can give a nice taste without dairy. This recipe has a mild spice level. The smoked paprika and cumin add warmth but not heat. If you like it spicier, add jalapeños or chili powder. You can also use hot sauce as a topping for extra kick. This dish combines wholesome ingredients like jasmine rice, chicken, and fresh veggies. You learned how to cook each part step by step. I provided tips to help you perfect the textures and flavors. Remember, you can switch proteins and adapt ingredients to fit your taste. Enjoy your delicious creation, and don’t forget to make it your own! Experimentation is key to finding the best version for you. Happy cooking!

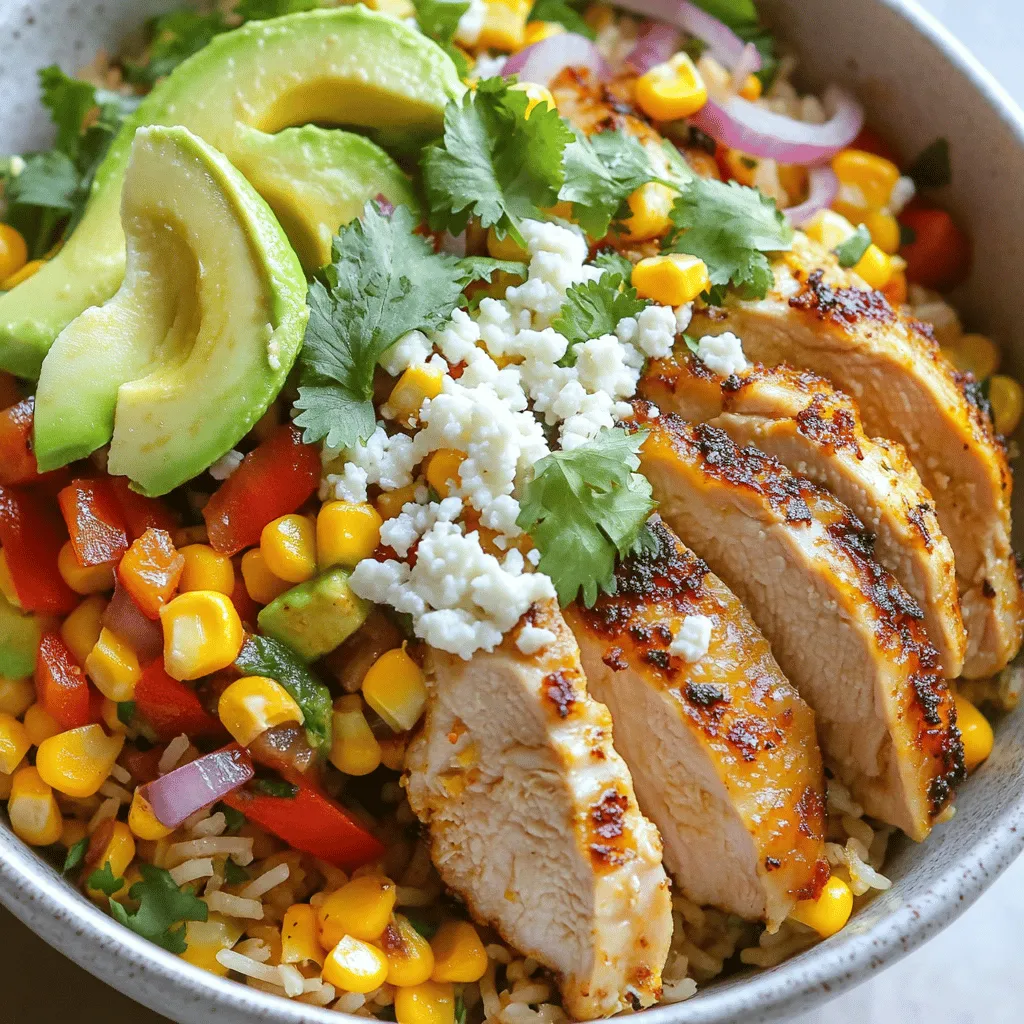
Are you ready to experience a burst of flavor with my Savory Street Corn Chicken Rice Bowl Delight? This dish combines tender chicken, fresh veggies, and creamy toppings, making it …

Read more

Categories Dinner

High Protein Creamy Beef Pasta Quick and Easy Recipe

July 16, 2025 by Chef Theo
- 8 oz whole grain pasta - 1 lb lean ground beef - 1 cup Greek yogurt These main ingredients create a strong base for the dish. Whole grain pasta adds fiber and a nutty flavor. Lean ground beef is packed with protein and gives the meal depth. Greek yogurt adds creaminess and a healthy twist. - 1 tablespoon olive oil - 3 cloves garlic, minced - 1 medium onion, finely chopped - 1 teaspoon Italian seasoning Olive oil helps sauté the garlic and onion, bringing out their flavors. Garlic adds aroma, while onion provides sweetness. Italian seasoning gives the dish a classic touch and enhances the overall taste. - Fresh basil - Additional parmesan cheese Garnishes add color and freshness. Fresh basil brightens the dish and adds a lovely aroma. Extra parmesan gives a savory finish and enhances the creamy texture. You can find the full recipe [here](#). To cook whole grain pasta, fill a large pot with salted water. Bring it to a boil. Add the pasta and stir. Cook according to the package instructions, usually about 8-10 minutes. Taste a piece to check the texture before draining. You want it al dente, which means firm but cooked. Pour the pasta into a colander to drain. Rinse it briefly with cold water to stop the cooking. This keeps the pasta from becoming mushy. In a large skillet, heat 1 tablespoon of olive oil over medium heat. Add the finely chopped onion. Sauté it for about 3-4 minutes until it looks soft and clear. Then, add 3 minced garlic cloves. Cook for another minute. This step brings out the flavors. Sautéing helps the onions and garlic become fragrant. It forms a great base for the dish. Add 1 pound of lean ground beef to the skillet. Break it apart with a spatula. Cook it for about 5-7 minutes until it's fully browned. Stir often to cook evenly. After cooking, check for any extra fat. If there is fat, pour it out carefully to keep the dish healthy. Turn the heat to low. Add 1 cup of Greek yogurt and 1/2 cup of grated parmesan cheese to the skillet. Mix well until the cheese melts and the sauce is creamy. If it seems too thick, you can add a splash of water or broth. This creates a smooth texture, making the dish rich and flavorful. Now, add the drained whole grain pasta to the skillet. Toss everything together gently. Make sure the pasta is well coated with the creamy beef mixture. This is key for great flavor in every bite. Taste it and add salt and pepper to your liking. Serve hot, and consider garnishing with fresh basil or more parmesan. Enjoy your meal! For detailed instructions, check the Full Recipe. To avoid mushy pasta, cook it al dente. This means the pasta should be firm when bitten. Follow the package directions for time, and taste it a minute before it’s done. Drain it right away to stop the cooking process. For sautéing, heat your skillet before adding oil. When the oil shimmers, toss in the onions. Stir them until soft. Then add garlic for a minute. This method gives great flavor without burning. You can adjust the protein in this dish easily. Use turkey or chicken instead of beef for a leaner option. If you prefer more protein, add beans or lentils. For vegan or vegetarian substitutes, use mushrooms or lentils. Swap Greek yogurt for a plant-based yogurt. This keeps the creamy texture without the dairy. Add spices like paprika or red pepper flakes for a kick. Fresh herbs like thyme or oregano can also boost flavor. To deepen the flavor profile, try adding a splash of beef broth or a spoonful of tomato paste. These ingredients enrich the sauce and make it more savory. For the full recipe, check out the High Protein Creamy Beef Pasta recipe above! {{image_2}} You can switch up the protein in this dish for variety. - Using chicken or turkey: These lean meats work great. Just brown the ground chicken or turkey in the skillet like you would the beef. They cook quickly, so keep an eye on them. The taste will be lighter but still delicious. - Plant-based protein alternatives: If you want a meat-free option, try lentils or chickpeas. They add protein and fiber. Use cooked lentils in place of beef. They soak up flavors well and give a nice texture. The sauce is key to this dish, and you can make changes based on your needs. - Dairy-free creamy sauces: If you need a dairy-free option, use cashew cream or coconut milk. Blend soaked cashews with water for a creamy texture. Coconut milk can add a hint of sweetness. Both will keep the dish rich and tasty. - Adding more vegetables for a nutritional boost: You can sneak in extra veggies. Try bell peppers, zucchini, or mushrooms. Just chop and sauté them with the onions. They add flavor and color, making your dish even healthier. The type of pasta you use can change the dish's texture and taste. - Gluten-free pasta options: If you need gluten-free pasta, use rice or quinoa pasta. They cook fast and taste good with the creamy sauce. Make sure to check the package for cooking times. - Whole grain vs. traditional pasta: Whole grain pasta gives more fiber and nutrients. It pairs well with the creamy sauce and holds up nicely. Traditional pasta is fine too, but the whole grain adds a healthy twist. For the complete recipe, check out [Full Recipe]. Store any leftovers in an airtight container. This keeps the pasta fresh. Place it in the fridge right away. High Protein Creamy Beef Pasta lasts about 3 to 4 days. Check for any signs of spoilage before eating. To reheat pasta, use the microwave or stovetop. If using the microwave, add a splash of water. This helps prevent it from drying out. For stovetop reheating, warm it gently on low heat. Stir often to keep the sauce creamy. You can freeze creamy beef pasta for later use. Let it cool completely before packing it. Use a freezer-safe container or bag. It stays good in the freezer for up to 3 months. To thaw, place it in the fridge overnight. Reheat as mentioned above for best results. You can boost the protein in this dish by using these options: - Swap lean ground beef for ground turkey or chicken. - Add cooked lentils or chickpeas for plant-based protein. - Stir in cottage cheese with the Greek yogurt for extra protein. - Toss in some shredded chicken if you have leftovers. These simple swaps help you enjoy even more protein in your meal. Yes, you can make this dish in advance! Here are some tips: - Cook the pasta and sauce separately. Mix them just before serving. - Store cooked pasta and sauce in airtight containers. - Keep them in the fridge for up to three days. - You can also freeze the sauce and cook fresh pasta later. This makes meal prep easy and saves time during busy days! You can enjoy this pasta with tasty side dishes like: - A fresh green salad with vinaigrette dressing. - Garlic bread or whole grain rolls for a hearty touch. - Roasted or steamed vegetables like broccoli or carrots. - A light soup, such as minestrone or tomato basil. These sides complement the creamy beef pasta well and add balance to your meal. This blog post covered the key ingredients and steps to make delicious, high-protein creamy beef pasta. We explored essential ingredients like whole grain pasta, lean ground beef, and Greek yogurt. You learned the importance of sautéing veggies and browning beef properly. Remember, you can modify this recipe to suit your taste or diet. In the end, cooking is about experimenting and having fun. Enjoy your meal, and don’t be afraid to try new flavors!

Craving a delicious meal that’s packed with protein? In just minutes, you can whip up my High Protein Creamy Beef Pasta. This quick and easy recipe features hearty whole grain …

Read more

Categories Dinner

Easy Chicken Stir Fry Quick and Tasty Weeknight Meal

July 16, 2025 by Chef Theo
To make a great chicken stir fry, you need some key items. Here’s what you’ll need: - 2 boneless, skinless chicken breasts, sliced thinly - 2 tablespoons sesame oil - 1 red bell pepper, sliced into strips - 1 yellow bell pepper, sliced into strips - 1 cup broccoli florets - 1 carrot, julienned - 3 cloves garlic, minced - 1-inch piece ginger, grated - 3 tablespoons soy sauce (low sodium) - 1 tablespoon honey - 1 tablespoon rice vinegar - 1 teaspoon cornstarch mixed with 2 tablespoons water (for thickening) - 2 green onions, sliced, for garnish - Sesame seeds, for garnish These ingredients give the dish a fresh and lively taste. The chicken provides protein, while the veggies add color and crunch. You can also add a few optional items to boost the taste of your stir fry: - Snow peas or snap peas for extra crunch - Mushrooms for an earthy flavor - Chili flakes if you like some heat - Cashews or peanuts for added texture These extras can make your dish special and cater to your taste. If you do not have some ingredients, you can easily swap them out: - Use olive oil instead of sesame oil if needed. - Chicken thighs can replace chicken breasts for a juicier option. - Any colorful veggies work, like zucchini or green beans. - Maple syrup can substitute honey for sweetness. These substitutions keep your stir fry tasty and allow for creativity. Check the Full Recipe for more details on how to combine these ingredients perfectly. Start by getting your chicken ready. Take 2 boneless, skinless chicken breasts. Slice them thinly. In a bowl, mix the sliced chicken with 1 tablespoon of sesame oil. Add a pinch of salt and pepper. Let it marinate for about 10 minutes. This step adds flavor and keeps the chicken juicy. Next, heat a large skillet or wok over medium-high heat. Add the marinated chicken to the hot skillet. Stir-fry for about 5-7 minutes. You want the chicken to be golden and fully cooked. Once done, remove the chicken from the skillet and set it aside. This keeps the chicken moist and tender. Now, use the same skillet for the veggies. Add the remaining tablespoon of sesame oil. Toss in 3 cloves of minced garlic and 1-inch piece of grated ginger. Stir for about 30 seconds until fragrant. Next, add 1 red bell pepper, 1 yellow bell pepper, 1 cup of broccoli florets, and 1 julienned carrot. Stir-fry these veggies for 3-4 minutes. You want them to be tender but still crisp. This way, they keep their bright colors and nutrients. These steps set the stage for a quick and tasty weeknight meal. For the full recipe, check the details above. Marinading chicken makes it juicy and full of flavor. I like to use sesame oil, salt, and pepper. Let it sit for at least 10 minutes. This short time is enough for the chicken to soak up the oil. You can also add soy sauce to the mix for extra flavor. Try different marinades for fun! To keep your vegetables crisp, do not overcook them. Stir-fry for about 3-4 minutes. I use a mix of bell peppers, broccoli, and carrots for color and taste. Always add garlic and ginger first to wake up the flavors. This method gives you that perfect crunch while keeping them bright and fresh. For a great sauce, balance is key. Use soy sauce, honey, and rice vinegar for sweetness and tang. Mixing cornstarch with water thickens the sauce. Pour it in at the end and stir well. This step ensures your sauce clings to the chicken and veggies. It makes every bite even tastier! You can find the full recipe [Full Recipe]. {{image_2}} You can easily swap chicken for beef, tofu, or shrimp. If you choose beef, use thin slices of flank steak. Sauté until just browned. For tofu, use firm or extra-firm tofu. Press it first to remove excess water, then cut it into cubes. Sauté until golden. Shrimp cooks fast, so add it last. Cook until they turn pink. Feel free to mix in other veggies. Snap peas, zucchini, or mushrooms work well. You can also use bok choy or snow peas. Just make sure to cut them into small pieces. This way, they cook quickly and stay crisp. You can even add leftover veggies from your fridge. They add flavor and color. Want to spice things up? Add sliced jalapeños or red pepper flakes to your stir fry. You can also use chili paste or sriracha. Start with a small amount. You can always add more later. This gives your dish a nice kick without overpowering the other flavors. Enjoy experimenting with heat in your meals! For more ideas, check out the Full Recipe for inspiration! To keep your chicken stir fry fresh, let it cool first. Place it in an airtight container. You can store it in the fridge for up to three days. Make sure to label it with the date. This way, you know when to eat it by. When reheating, the goal is to keep the chicken and veggies tasty. Use a skillet on medium heat. Add a splash of water or broth to keep it moist. Stir often for even heating. You can also use the microwave. Just cover it with a damp paper towel. Heat for one to two minutes, checking in between. You can freeze chicken stir fry to enjoy later. Use a freezer-safe container or bag. Remove as much air as possible to prevent freezer burn. It can last for about three months in the freezer. To reheat, let it thaw in the fridge overnight. Then use the skillet method for best results. Enjoy your Easy Chicken Stir Fry whenever you want! For the full recipe, check out the section above. It takes about 25 minutes to make Easy Chicken Stir Fry. You spend 10 minutes prepping the ingredients. Cooking the chicken and veggies takes 15 minutes. This quick meal is perfect for busy weeknights. Yes, you can make this recipe in advance. Cook the chicken and vegetables, then cool them down. Store them in the fridge for up to three days. When you're ready to eat, just reheat and enjoy. This saves time on your busy nights. You can serve Chicken Stir Fry with rice or noodles. Both options soak up the tasty sauce well. For a healthier side, try steamed vegetables or a fresh salad. Adding these sides makes your meal balanced and filling. For the full recipe, check out the previous section. Easy Chicken Stir Fry is simple and flexible. We covered the key ingredients needed for great taste. You can create a dish you love by mixing flavors and textures. I shared step-by-step instructions to cook your chicken and veggies perfectly. Tips helped you learn how to get the best crunch and sauce. Don't forget variations, like different proteins and added spice. In the end, this dish is fun and quick. With practice, you can impress anyone at your table. Enjoy your cooking journey!

Looking for a quick, tasty meal that will please everyone? You’re in the right place! My Easy Chicken Stir Fry is a life-saver for busy weeknights. With just a few …

Read more

Categories Dinner

The Best Zucchini Brownies You’ll Ever Eat Delight

July 16, 2025 by Chef Theo
To make the best zucchini brownies, you need a few simple items: - 1 cup finely grated zucchini - 1 cup all-purpose flour - 1/2 cup unsweetened cocoa powder - 1/2 cup granulated sugar - 1/2 cup brown sugar, packed - 1/2 cup vegetable oil - 2 large eggs - 1 teaspoon vanilla extract - 1/4 teaspoon baking powder - 1/4 teaspoon baking soda - 1/4 teaspoon salt These ingredients blend well to create a rich, moist brownie. The grated zucchini adds moisture and nutrition, making them extra special. You can make these brownies even better with some add-ins: - 1/2 cup chocolate chips - 1/4 cup chopped walnuts These extras give your brownies a delightful crunch and a burst of flavor. Feel free to mix and match based on your taste. To ensure your brownies taste amazing, pay attention to your ingredients: - Sourcing fresh zucchini: Look for firm, shiny zucchini. The fresher, the better! This will make your brownies moist and tasty. - Choosing the best cocoa powder: Use high-quality cocoa powder for rich flavor. Brands like Valrhona or Ghirardelli are great choices. Using good ingredients makes a big difference in flavor. For the full recipe, check out the complete guide on making these delightful brownies! 1. Start by preheating your oven to 350°F (175°C). This will ensure even baking. 2. Grease a 9x9 inch baking dish. You can also line it with parchment paper. This step makes it easy to remove brownies later. 3. In a medium bowl, whisk together the following dry ingredients: - 1 cup all-purpose flour - 1/2 cup unsweetened cocoa powder - 1/2 teaspoon baking soda - 1/4 teaspoon baking powder - 1/4 teaspoon salt Set this mixture aside for later. 1. In a large mixing bowl, combine the sugars and oil: - 1/2 cup granulated sugar - 1/2 cup brown sugar, packed - 1/2 cup vegetable oil 2. Stir these ingredients until they mix well. This creates a sweet base for your brownies. 3. Add in the eggs and vanilla extract: - 2 large eggs - 1 teaspoon vanilla extract 4. Whisk everything together until the mixture is fully combined. 1. Gradually add the dry ingredients to the wet mixture. Mix just until everything is combined. Be careful not to overmix; this keeps brownies soft. 2. Gently fold in the grated zucchini, which is key to moist brownies. You can also add optional ingredients like: - 1/2 cup chocolate chips - 1/4 cup chopped walnuts 3. Pour the batter into your prepared baking dish. Spread it out evenly. 4. Bake in the preheated oven for 25-30 minutes. Check doneness by inserting a toothpick into the center. It should come out with a few moist crumbs. 5. Let the brownies cool in the pan on a wire rack for about 10 minutes. Then, cut them into squares. For the complete process, check the Full Recipe. Enjoy delicious brownies with a unique twist! To make the best zucchini brownies, moisture is key. Start by finely grating your zucchini. This helps it mix well into the batter. Next, squeeze the grated zucchini to remove excess moisture. This step is crucial. Too much water can lead to soggy brownies. Mixing is also important. After adding the dry ingredients, stir just until combined. Overmixing can lead to dry brownies. A gentle fold is all you need to keep things moist. You can boost the flavor of your brownies by changing the oils or butters you use. For a richer taste, try using melted coconut oil or even unsalted butter. Each option brings its unique flavor to the mix. Adding different types of chocolate also makes a big difference. Use dark chocolate chips for a deeper flavor. Or, mix in some milk chocolate for a sweeter touch. The choice is yours! How you serve your brownies can impress your guests. A simple dusting of powdered sugar adds a nice touch. You can also serve them warm with a scoop of vanilla ice cream. The warm brownies and cold ice cream create a perfect balance. Try pairing your brownies with fresh berries or a drizzle of chocolate sauce. These additions can make your dessert even more special. For full details on making these delicious brownies, check out the Full Recipe! {{image_2}} You can make your brownies healthier with a few easy swaps. For the flour, use whole wheat flour instead of all-purpose. Whole wheat flour adds fiber and nutrients. It makes the brownies a bit denser but still tasty. Another great swap is the sugar. Try using natural sweeteners like honey or maple syrup. You can also use coconut sugar for a lower glycemic index. These options can cut down on refined sugars while keeping your brownies sweet. Spice up your brownies with extra flavors. Adding a teaspoon of cinnamon gives a warm taste. You can also mix in a bit of espresso powder for a rich coffee flavor. Both spices enhance the chocolate taste. Consider adding nuts or dried fruits, too. Chopped walnuts or pecans add crunch. Dried cherries or cranberries can bring in a sweet and tart contrast. These simple changes make your brownies unique every time. If you have dietary needs, there are alternatives for you. For gluten-free brownies, use almond flour or a gluten-free baking mix. This way, everyone can enjoy them without worry. For vegan brownies, replace eggs with mashed bananas or applesauce. You can also swap the vegetable oil with a plant-based oil. These swaps keep the brownies moist and delicious while meeting vegan diets. You can check out the Full Recipe for more details! To keep your brownies fresh, store them at room temperature. Place them in an airtight container. This will help keep them moist. You can leave them out for up to four days. If you want to keep them longer, consider refrigerating them. Just remember to cover them well. This helps maintain their texture and flavor. Freezing brownies is simple and effective. First, cut them into squares. Wrap each square tightly in plastic wrap. Place the wrapped brownies in a freezer bag. Make sure to remove all air from the bag. You can freeze them for up to three months. When you want to enjoy them, take a brownie out and let it sit at room temperature. For the best texture, do not microwave them. This can make them tough. Freshly baked brownies taste best within a few days. If stored well, they can last up to a week at room temperature. In the fridge, they can stay fresh for up to ten days. For frozen brownies, you can expect optimal flavor for three months. After this, they may still be safe but lose some taste. Enjoying your brownies at their best is always the goal! For the full recipe, check out the section above. How do I make zucchini brownies more cake-like? To make your brownies more cake-like, add a bit more flour. You can also increase the baking powder to 1/2 teaspoon. This change gives your batter more lift. Mixing the batter less can also help keep it light. Can I use frozen zucchini for this recipe? Yes, you can use frozen zucchini. Just make sure to thaw and squeeze it well. Removing the extra moisture is key. This step helps keep the brownies from becoming too wet. Are zucchini brownies healthier than regular brownies? Zucchini brownies can be healthier than regular brownies. They have less fat and more fiber. The zucchini adds moisture without extra calories. This makes them a smart choice for a treat. What are the calorie counts per serving? Each brownie has about 150 calories. This number might change if you add chocolate chips or nuts. Always check the ingredients you use for a more accurate count. Why did my brownies turn out dry? Brownies can turn dry for a few reasons. Overbaking is the most common issue. Make sure to check them a bit early. Also, too much flour can cause dryness. How do I get rid of the zucchini taste? If you want less zucchini taste, try adding more cocoa powder. This will help mask the flavor. You can also use spices like cinnamon to enhance the taste. In this post, I covered how to make delicious zucchini brownies. We discussed key ingredients like fresh zucchini, flour, and cocoa powder. Optional add-ins can boost flavor, while quality ingredients yield the best results. I shared step-by-step instructions to help you mix and bake the batter. Tips for enhancing taste and storage methods ensure your brownies stay fresh. Remember, experimenting with flavors or dietary needs makes baking fun. Enjoy your brownies, and don’t hesitate to customize them to suit your taste!

Looking for a tasty treat that sneaks in some veggies? You’ve found it! My zucchini brownies are the best you’ll ever eat. They’re rich, moist, and full of chocolatey goodness. …

Read more

Categories Desserts

Easy Grilled Chimichurri Chicken Breast Recipe Guide

July 16, 2025 by Chef Theo
You will need 4 boneless, skinless chicken breasts. This cut cooks evenly and stays juicy. Make sure they are fresh for the best taste. You can also pound them lightly to ensure even cooking. For the chimichurri sauce, gather these ingredients: - 1 cup fresh parsley, finely chopped - 1/2 cup fresh cilantro, finely chopped - 4 cloves garlic, minced - 1/2 teaspoon red pepper flakes - 1/3 cup olive oil - 3 tablespoons red wine vinegar (or lemon juice) - Salt and pepper to taste These herbs and spices create a bright, fresh flavor that pairs well with grilled chicken. The garlic adds a nice kick, while the vinegar gives it a tangy finish. For a simple garnish, use lemon wedges. They add a zesty touch when served with the chicken. You can squeeze the lemon over the chicken for extra flavor. It brightens the dish and enhances the taste of the chimichurri. For the full recipe, check out Easy Grilled Chimichurri Chicken Breast. To start, gather your ingredients for the chimichurri sauce. You will need fresh parsley, fresh cilantro, garlic, red pepper flakes, olive oil, and red wine vinegar. This sauce gives your chicken a fresh taste. 1. In a medium bowl, combine: - 1 cup fresh parsley, finely chopped - 1/2 cup fresh cilantro, finely chopped - 4 cloves garlic, minced - 1/2 teaspoon red pepper flakes - 1/3 cup olive oil - 3 tablespoons red wine vinegar (or lemon juice) - Salt and pepper to taste 2. Mix everything together well. Make sure all the herbs and spices blend. Set aside a few tablespoons for later. This sauce can also be used as a dip. Now it’s time to marinate the chicken. This step adds flavor and keeps the chicken moist. 1. Take 4 boneless, skinless chicken breasts and place them in a large zip-top bag or shallow dish. 2. Pour half of the chimichurri sauce over the chicken. 3. Seal the bag or cover the dish. 4. Marinate in the refrigerator for at least 30 minutes, or up to 4 hours for more flavor. Marinating makes a big difference. It helps the chicken soak up the tasty sauce. Grilling the chicken is the final step. This is where the magic happens. 1. Preheat your grill to medium-high heat. Clean the grates and lightly oil them. This helps prevent sticking. 2. Remove the chicken from the marinade. Let any excess drip off. 3. Place the chicken on the grill. Grill for about 6-7 minutes per side. 4. Cook until the chicken reaches an internal temperature of 165°F (75°C). Once done, remove the chicken from the grill and let it rest for 5 minutes. This helps keep it juicy. Serve the grilled chicken with the reserved chimichurri sauce drizzled on top. Enjoy your delicious meal! For the full recipe, check out [Full Recipe]. To keep chicken breasts juicy, start with the right cut. Choose boneless, skinless chicken breasts. Next, marinate them for at least 30 minutes. This helps the meat soak up flavor and moisture. Use a mixture of acid, like vinegar or lemon juice, with oil. This blend tenderizes the chicken and keeps it juicy. During grilling, avoid pressing down on the chicken. This can squeeze out important juices. Use a meat thermometer to check for doneness. Aim for 165°F (75°C) inside. Let the chicken rest after grilling. This allows juices to redistribute, making each bite tender and flavorful. Start by preheating your grill to medium-high heat. Clean the grates with a brush to remove any leftover food. Oiling the grates helps prevent sticking. You can use a paper towel dipped in oil, held with tongs. Place the marinated chicken breasts on the grill. Grill each side for about 6-7 minutes. Avoid opening the grill too often. This keeps the heat inside, helping the chicken cook evenly. If using a grill basket, it can make flipping easier and prevent sticking. If you have leftover chimichurri sauce, store it in an airtight container. It will keep in the fridge for up to one week. The flavors will deepen as it sits. You can also freeze chimichurri. Pour it into ice cube trays, freeze, then transfer to a bag. This way, you have easy portions ready for future meals. {{image_2}} You can change the herbs in chimichurri. If you want, swap parsley or cilantro with fresh oregano or basil. These herbs give a new taste while keeping the sauce fresh. Mix and match herbs to find your favorite flavor. You don’t need a grill. You can cook the chicken in the oven or on the stovetop. For the oven, preheat it to 400°F (200°C). Place the chicken on a baking sheet and bake for 20-25 minutes. Check if the chicken reaches 165°F (75°C). If on the stovetop, heat a skillet over medium-high heat. Cook for 6-7 minutes on each side. This way, you still get tasty chimichurri chicken without a grill. Serve your chimichurri chicken with tasty sides. Try it with rice, quinoa, or a fresh salad. Roasted veggies or grilled corn also pair well. You can even add a dollop of chimichurri on top of your sides for extra flavor. This makes each meal colorful and delicious. For more ideas, check out the Full Recipe. Store your grilled chimichurri chicken in an airtight container. This keeps it fresh. It will last for up to three days in the fridge. If you want to keep it safe, make sure it cools down first. You can also keep the chimichurri sauce in a separate container. Use it to add flavor when serving. You can freeze chimichurri sauce if you have leftovers. Simply pour it into an ice cube tray. Once frozen, transfer the cubes to a freezer bag. This way, you can use small portions later. The sauce can last in the freezer for up to three months. Just thaw what you need in the fridge before using. To reheat grilled chicken, use the oven for the best results. Preheat it to 350°F (175°C). Place the chicken on a baking sheet and cover it with foil. Heat for about 15 minutes or until warm. You can also use a microwave, but it may dry the chicken out. Cover it with a damp paper towel to help keep it moist. Chimichurri sauce is a fresh, green sauce from Argentina. It mixes herbs, garlic, and oil. The main herbs are parsley and cilantro. You can also add red pepper flakes for a kick. This sauce is perfect for grilled meats. It adds flavor and brightness to your dish. You should marinate the chicken for at least 30 minutes. This allows the flavors to soak in. For best results, marinate for up to 4 hours. The longer you marinate, the more flavor the chicken will have. Just remember to keep it in the fridge while it marinates. Yes, you can use chicken thighs instead of breasts. Thighs are often juicier and more flavorful. They also hold up well on the grill. If you choose thighs, make sure to adjust the cooking time. Cook them until they reach an internal temperature of 165°F (75°C). This will keep your meal safe and tasty. For the full recipe, check out the Easy Grilled Chimichurri Chicken Breast recipe. This guide has covered delicious chicken breast with chimichurri sauce. You learned to make the sauce, marinate the chicken, and grill it perfectly. I shared tips for juicy chicken and ways to store leftovers. You discovered variations like different herbs and grilling methods. Experiment with recipes and enjoy different flavors. Cooking this dish can be easy and fun. Try it out and share it with friends!

If you’re craving a dish that’s both simple and packed with flavor, you’ve come to the right place. This Easy Grilled Chimichurri Chicken Breast Recipe Guide is your ticket to …

Read more

Categories Dinner

30-Minute Chicken Dinner Quick and Flavorful Meal

July 15, 2025 by Chef Theo
- 4 boneless, skinless chicken breasts - 2 tablespoons olive oil - 3 cloves garlic, minced - 1 teaspoon dried oregano - 1 teaspoon dried thyme - 1 teaspoon paprika - Salt and pepper to taste - 1 red bell pepper, sliced - 1 zucchini, sliced - 1 cup cherry tomatoes - Fresh parsley, chopped (for garnish) For this 30-minute chicken dinner, gather the main ingredients first. The chicken breasts are the star of the dish. They cook quickly and keep the meal light. The olive oil helps to sear the chicken, giving it a nice golden color. Garlic adds a punch of flavor that makes the meal special. Now, let’s talk about the seasoning ingredients. Oregano and thyme bring warmth and earthiness to the dish. A touch of paprika adds a mild smokiness. Don’t forget the salt and pepper! They enhance all the flavors. Next, we have the vegetable ingredients. The red bell pepper and zucchini add color and crunch. Cherry tomatoes bring a burst of sweetness when cooked. Fresh parsley at the end brightens the dish and looks great on the plate. You can find the full recipe for this meal at the end of the article. Use these ingredients to create a tasty dinner that feels gourmet but takes only thirty minutes! To start, season the chicken breasts. Use salt, pepper, oregano, thyme, and paprika. Make sure to coat both sides well. This mix gives great taste to the chicken. After seasoning, let the chicken rest for a few minutes. Resting helps the flavors soak in and keeps the meat juicy. Next, heat a large skillet over medium-high heat. Add two tablespoons of olive oil to the pan. When the oil is hot, add the seasoned chicken breasts. Cook them for about six to seven minutes on each side. You want them golden brown and fully cooked. The inside should reach 165°F (75°C). Once done, remove the chicken from the skillet and set it aside. Now it's time for the veggies! In the same skillet, add three cloves of minced garlic. Sauté the garlic for about 30 seconds until it smells amazing. Then, toss in the sliced red bell pepper, zucchini, and cherry tomatoes. Cook the vegetables for five to six minutes. Stir them often until they are tender and a bit charred. Finally, return the cooked chicken to the skillet with the vegetables. Toss everything together for one to two minutes. This warms the chicken and mixes the flavors. For a lovely touch, sprinkle fresh chopped parsley on top. It adds color and a fresh taste. Enjoy your delicious meal, using the Full Recipe for more details! To keep your chicken juicy, avoid overcooking it. Cook the chicken until it reaches an internal temperature of 165°F. A meat thermometer helps you check this without guesswork. Insert it into the thickest part of the chicken. This step ensures perfect doneness every time. Letting the chicken rest for a few minutes after cooking helps it retain moisture. To make your chicken even tastier, consider adding fresh herbs like basil or cilantro. You can also try spices like cumin or chili powder for a different twist. Marinating the chicken before cooking makes it more flavorful. A simple marinade of olive oil, lemon juice, and herbs works well. Just let it sit for at least 30 minutes before cooking. For a complete meal, serve your chicken with rice or quinoa. These sides soak up the juices and add texture. You can also pair it with a fresh salad or some crusty bread. For plating, arrange the chicken and veggies in a colorful way. This adds visual appeal to your meal. A sprinkle of fresh parsley gives it a nice touch. For the full recipe, check out 30-Minute Garlic Herb Chicken & Veggies. {{image_2}} For those needing gluten-free options, this dish is easy to adapt. Use gluten-free soy sauce or tamari for added flavor. Most fresh veggies are naturally gluten-free, so you can enjoy this meal without worry. If you follow a low-carb diet, replace the bell pepper and zucchini with leafy greens. Spinach or kale sautéed with garlic adds flavor and fits the low-carb plan well. You can swap chicken for other proteins. Tofu or fish works great with the same herbs. Tofu absorbs flavors well, while fish cooks quickly. Seasonal vegetables are a fun twist. In spring, add asparagus or peas. In fall, try butternut squash or Brussels sprouts. Each season offers fresh options. Explore different cuisines for variety. For Italian flavor, add basil and serve with a side of pasta. For a Mexican twist, use cumin and top with avocado or salsa. If you love heat, add red pepper flakes or a hot sauce of your choice. This is a simple way to spice up your meal. Check the Full Recipe for more ideas to make your 30-minute chicken dinner exciting! After enjoying your 30-Minute Garlic Herb Chicken & Veggies, store any leftovers right away. Place the chicken and veggies in airtight containers. This keeps them fresh and safe. Label each container with the date you cooked the meal. This way, you know when to use them. Store the leftovers in the fridge for up to three days. To enjoy your leftovers, reheat them without losing moisture. The best way is to use the microwave or a skillet. If using a microwave, cover the container with a damp paper towel. This helps keep the chicken juicy. Heat for about 1-2 minutes on high. If using a skillet, warm it on medium heat. Add a splash of water or broth to the pan, then cover and heat for 5-7 minutes. This keeps the dish nice and moist. You can freeze this dish for later meals. First, let the chicken and veggies cool completely. Then, place them in freezer-safe containers. Remove as much air as possible to avoid freezer burn. Label the containers with the date. They can last up to three months in the freezer. To eat, thaw the dish in the fridge overnight. Reheat it the next day using the tips above for the best quality. Cooking chicken in a skillet takes about 12 to 15 minutes. If you use thin chicken breasts, they may cook faster, around 6 to 7 minutes on each side. Thicker pieces may need longer, about 8 to 10 minutes per side. Always check the internal temperature. It should reach 165°F (75°C) for safe eating. Yes, you can use frozen chicken. However, it is best to thaw it first. You can thaw chicken in the fridge overnight or use the cold water method. For the cold water method, place the chicken in a sealed bag and submerge it in cold water, changing the water every 30 minutes. Once thawed, follow the recipe as usual. You can add many vegetables to this dish! Some great options include: - Broccoli florets - Asparagus spears - Baby carrots - Green beans - Spinach or kale Feel free to mix and match based on your taste and what you have on hand. Yes, this recipe is perfect for meal prep! You can cook the chicken and veggies ahead of time. Store them in airtight containers in the fridge for up to four days. Just reheat the portions when you are ready to eat. This helps you save time and enjoy a healthy meal throughout the week. For full details, check the Full Recipe. In this blog post, we explored a simple, healthy 30-minute chicken dinner recipe. I shared key ingredients, step-by-step cooking instructions, and tips for making the dish flavorful. We also discussed how to store leftovers and enhance your meal with variations. Take these ideas into your kitchen. Whether you’re cooking for yourself or family, this recipe can be a go-to. Enjoy experimenting with flavors and make it your own. Cooking can be fun and rewarding!

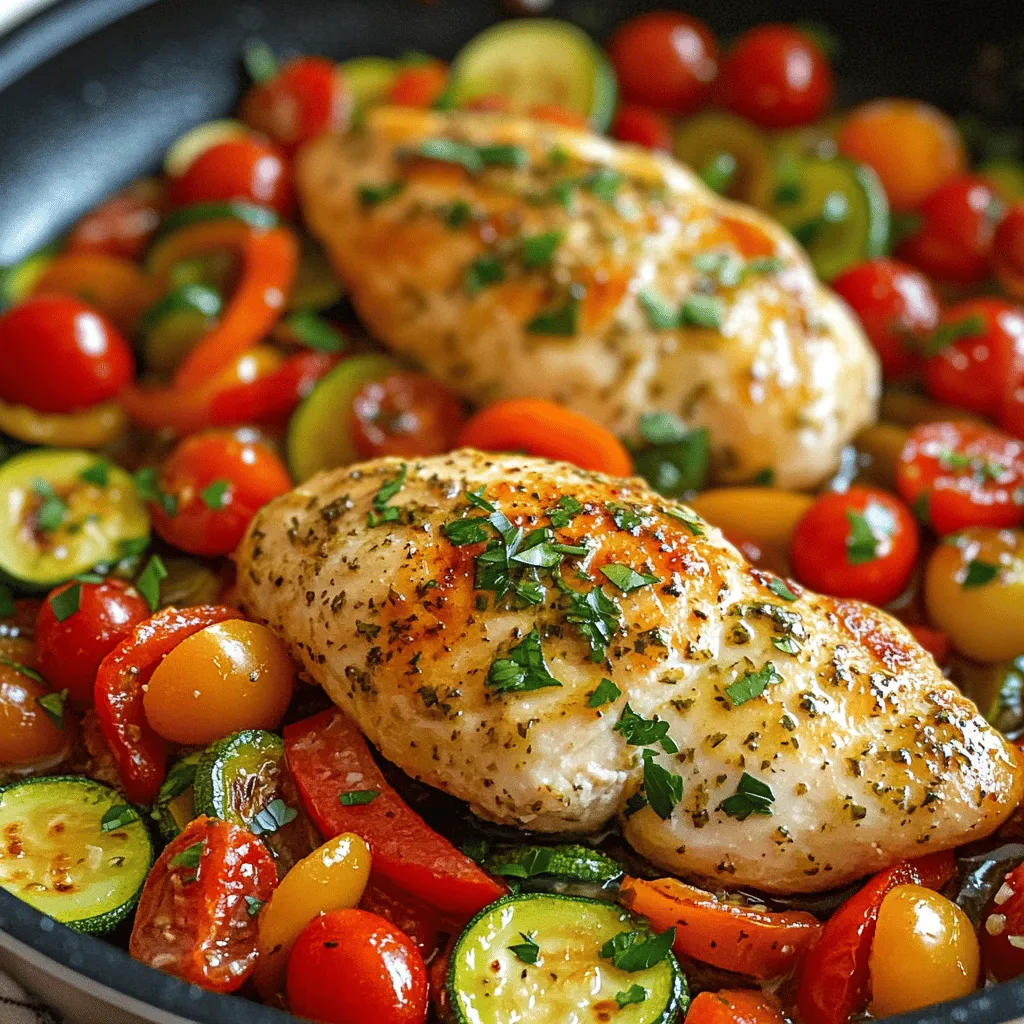
Need a quick, tasty meal? This 30-Minute Chicken Dinner is perfect for you! With juicy chicken breasts and vibrant veggies, it’s packed with flavor and ready in no time. You’ll …

Read more

Categories Dinner

Sheet Pan Chicken and Potatoes Flavorful Dinner Recipe

July 15, 2025 by Chef Theo
- 4 bone-in chicken thighs, skin-on - 1 pound baby potatoes, halved - 2 tablespoons olive oil The main ingredients for this dish are simple yet flavorful. Chicken thighs give juicy meat with crispy skin. The baby potatoes add a nice texture and soak up all the tasty juices. Olive oil helps everything cook evenly and adds richness. - 1 tablespoon garlic powder - 1 teaspoon smoked paprika - 1 teaspoon dried rosemary - 1 teaspoon dried thyme - Salt and black pepper, to taste Seasonings bring life to your food. Garlic powder gives a nice kick. Smoked paprika adds warmth and depth. Dried rosemary and thyme add an earthy flavor. Don’t forget salt and pepper to enhance all the tastes. - 1 lemon, sliced - Fresh parsley, for garnish Lemon slices brighten the dish with freshness. They add a zesty touch that pairs well with chicken. Fresh parsley adds color and a hint of herbal flavor. It makes your meal look great, too! For the complete recipe, check out the [Full Recipe]. Preheating the oven Start by preheating your oven to 425°F (220°C). This step is key for a crisp finish. A hot oven helps cook the chicken and potatoes evenly. Coating the potatoes In a large bowl, mix the halved baby potatoes with 2 tablespoons of olive oil. Add 1 tablespoon of garlic powder, 1 teaspoon of smoked paprika, 1 teaspoon of dried rosemary, and 1 teaspoon of dried thyme. Sprinkle in salt and pepper to taste. Toss everything until the potatoes are well coated. This adds flavor and helps them roast nicely. Arranging ingredients Take a large sheet pan and arrange the seasoned potatoes in a single layer. Make sure to leave some space in the middle for the chicken. This allows all ingredients to cook well without steaming. Seasoning the chicken Pat the chicken thighs dry with paper towels. This step is important for crispy skin. Season both sides generously with salt and pepper. Place the chicken thighs, skin side up, in the center of the pan among the potatoes. Drizzle a little olive oil over the chicken for extra flavor. You can sprinkle more herbs if you like. Cooking time and temperature Slide the sheet pan into your preheated oven. Bake for about 40-45 minutes. The chicken should be golden brown and reach an internal temperature of 165°F (75°C). The potatoes should be tender when pierced with a fork. Tips for achieving crispy skin For even crispier skin, turn on the broiler for the last 2-3 minutes of cooking. Keep a close eye on it to prevent burning. This extra step makes a big difference in texture. Now, you’re ready to enjoy a flavorful and easy dinner! For more detailed instructions, check the Full Recipe. To achieve crispy skin on your chicken, start by patting the chicken dry with paper towels. This removes moisture and helps the skin crisp up in the oven. Season the chicken well with salt and pepper. You can also drizzle a little olive oil over the skin for extra flavor and crispness. For best results, use bone-in, skin-on chicken thighs. They stay juicy and flavorful. The tenderness of your potatoes depends on size and type. Baby potatoes are great because they cook evenly and stay firm. Halving them allows the edges to crisp up nicely. If you want a different flavor, try using Yukon Gold or red potatoes. These varieties add a creamy texture. Remember to coat them well in the seasoning mix for the best taste. To elevate your dish, add a mix of herbs and spices. Rosemary and thyme are classic choices that pair well with chicken and potatoes. You can also experiment with garlic powder or smoked paprika for a smoky kick. Adding vegetables like carrots or bell peppers can create a colorful dish and boost nutrition. Toss them into the mix for a tasty twist. For the full recipe on this delightful dish, check out the full recipe. {{image_2}} You can easily change the protein in this dish. If you want to skip chicken, try pork chops or salmon. Both cook well on a sheet pan and bring nice flavors. For chicken lovers, using different cuts is great, too. Boneless chicken thighs or breasts work well. Just adjust the cooking time based on the thickness. Boneless cuts cook faster, so keep an eye on them. If you want a meat-free meal, tofu is a perfect swap. Press the tofu to remove excess moisture. Then, cut it into cubes and season well. You can also add seasonal vegetables like bell peppers, zucchini, or carrots. Mix them with the same herbs for a tasty dish. This makes the meal colorful and full of nutrition. To enhance flavor, try different marinades. A simple mix of soy sauce and honey can add a sweet and salty taste. You can also use mustard or barbecue sauce for a smoky profile. Cooking with citrus like lime or orange gives a fresh twist. Just squeeze some juice over the chicken before baking. This helps brighten the dish and adds depth. For more ideas, check out the Full Recipe for inspiration. To keep your Sheet Pan Chicken and Potatoes fresh, store leftovers right away. Let them cool for about 30 minutes first. Use airtight containers to prevent moisture loss. Glass or plastic containers work well. Label them with the date to track freshness. This meal lasts up to three days in the fridge. You can reheat your leftovers in the oven or the microwave. The oven gives the best results. Preheat it to 350°F (175°C). Place the chicken and potatoes on a baking sheet. Heat for about 15-20 minutes. This method keeps the chicken crispy. If you use the microwave, heat for 2-3 minutes. Check to avoid drying it out. Add a little water or broth to keep it moist. Freezing is a great way to save leftovers. Place chicken and potatoes in freezer-safe bags. Remove as much air as possible before sealing. You can freeze them for up to three months. To thaw, move them to the fridge overnight. Reheat them the same way as above. If they seem dry, add a splash of broth. Enjoy your delicious meal even later! Sheet pan chicken and potatoes can last about three to four days in the fridge. To keep it fresh, store it in an airtight container. This helps prevent moisture loss and keeps flavors intact. Always check for any off smells before eating leftovers. Yes, you can use boneless chicken thighs! Just adjust the cooking time. Boneless thighs cook faster, so aim for about 25-30 minutes in the oven. Check that the internal temperature reaches 165°F (75°C). This ensures your chicken is safe to eat. Adding vegetables can boost flavor and nutrition. Try carrots, bell peppers, or green beans. Cut them into similar sizes as the potatoes for even cooking. You can mix and match based on what you have at home. This dish is versatile and can be tailored to your taste! This blog post covers everything you need to know about making sheet pan chicken and potatoes. You’ve learned about the key ingredients, perfect cooking methods, and tips for the best results. Don’t forget, you can experiment with different proteins and veggies to customize your dish. With proper storage and reheating, your leftovers will taste almost as good as the first time. Enjoy making this easy meal that brings flavor and comfort to your table!

Looking for a simple yet delicious dinner idea? Try my Sheet Pan Chicken and Potatoes recipe! This dish combines juicy chicken thighs, tender baby potatoes, and a mix of savory …

Read more

Categories Dinner

Easy Summer Salad Dressing Fresh and Flavorful Recipe

July 15, 2025 by Chef Theo
To make your summer salad dressing, you need key ingredients. Here’s what you will use: - 1/4 cup fresh orange juice - 1/4 cup extra-virgin olive oil - 2 tablespoons apple cider vinegar - 1 teaspoon honey or agave syrup - 1 teaspoon Dijon mustard - 1 clove garlic, minced - 1 tablespoon fresh basil, finely chopped - 1 tablespoon fresh parsley, finely chopped - Salt and pepper to taste These ingredients bring bright flavors to your salads. Fresh orange juice adds a sweet and tangy taste. Extra-virgin olive oil gives a rich texture. Apple cider vinegar adds a nice kick. Honey balances the tanginess. Dijon mustard helps to emulsify the dressing. Garlic gives a warm and savory note. Fresh herbs like basil and parsley add color and freshness. You can enhance your dressing with some extra ingredients. Consider these add-ins: - 1 teaspoon lemon juice for more citrus flavor - A pinch of red pepper flakes for heat - 1 tablespoon finely chopped shallots for a mild onion taste - 1 teaspoon capers for a briny touch Adding these can change the flavor profile. Feel free to mix and match based on what you love. Using seasonal ingredients makes your dressing even better. Think about the following: - Fresh tomatoes for a sweeter taste - Cucumber for a refreshing crunch - Peppers for a colorful pop These ingredients can be added to your salad. They not only enhance flavor but also make the dish more interesting. For a full recipe, check out the Full Recipe for Zesty Citrus-Herb Salad Dressing. Making this zesty citrus-herb salad dressing is easy! Just follow these steps: 1. Mix: Combine juice, oil, vinegar, honey, and mustard in a bowl. 2. Add Herbs: Stir in garlic, basil, and parsley. 3. Season: Add salt and pepper to taste. 4. Chill: Let it sit in the fridge for 15-30 minutes. 1. Gather your ingredients: You need fresh orange juice, olive oil, apple cider vinegar, honey, Dijon mustard, garlic, basil, and parsley. This mix gives the dressing a bright taste. 2. Whisk together: In a medium bowl, pour in 1/4 cup of fresh orange juice. Add 1/4 cup of extra-virgin olive oil, 2 tablespoons of apple cider vinegar, 1 teaspoon of honey, and 1 teaspoon of Dijon mustard. Whisk until everything is smooth. 3. Mix in garlic and herbs: Add 1 minced clove of garlic, 1 tablespoon of finely chopped basil, and 1 tablespoon of finely chopped parsley. Whisk again until the herbs mix in well. 4. Season to taste: Add salt and pepper. Taste your dressing and adjust if needed. You can add more honey for sweetness or more vinegar for tartness. 5. Store it right: Once mixed, pour the dressing into a jar or container. Seal it well and refrigerate it for at least 15-30 minutes. This lets the flavors blend nicely. - Drizzle slowly: When adding olive oil, do it slowly while whisking. This helps the oil blend well with the juice and vinegar. - Adjust texture: If your dressing seems too thick, add a splash of water or extra orange juice. If it’s too thin, add more olive oil. - Chill for flavor: Always chill the dressing before using. It helps the flavors come alive. - Shake before serving: Give the jar a good shake before you pour it on your salad to mix everything well. This dressing is fresh and bright, perfect for all your summer salads. Enjoy! To boost flavor, use fresh herbs. You can try basil, parsley, or chives. I love adding fresh herbs to my dressings. They make every bite pop. You can also use spices like black pepper or crushed red pepper for some heat. Just a pinch can change the whole dish. Taste as you go. This lets you find your perfect blend. Fresh ingredients make a big difference. Fresh orange juice gives bright flavor to your dressing. It’s much better than bottled juice. Fresh herbs add aroma and taste that dried herbs can't match. When you pick ripe fruits and veggies, you get the best taste. Visit local markets to find the freshest options. A little care in choosing ingredients pays off in flavor. Many people skip tasting their dressings. Always taste before serving. This helps you catch any issues. Another mistake is not balancing flavors. If it’s too sweet, add a bit of vinegar. If it’s too tangy, try adding a touch of honey. Lastly, don’t skip refrigerating the dressing. Letting it chill for a bit helps the flavors meld. Remember, a great dressing can elevate your salad from basic to brilliant. {{image_2}} You can change the flavor of your summer dressings easily. For a sweet twist, try using pineapple or mango juice. This adds a tropical touch. If you want a spicy kick, add a splash of sriracha or some chopped jalapeños. These options make your salads exciting and new. Sometimes, you might not have all the ingredients. No problem! You can swap orange juice for lemon or lime juice. This gives a tangy taste. If you don’t have Dijon mustard, plain yellow mustard works fine. You can also use maple syrup instead of honey for a vegan option. These substitutions keep your dressing tasty and fun. Choosing the right dressing for your salad is key. A zesty citrus dressing goes well with mixed greens and fruits. It brightens up the flavors. For heartier salads with grains or beans, try a creamy dressing made with yogurt. This adds richness and balances the dish. Matching your dressing to your salad makes every bite special. To keep your salad dressing fresh, store it in a clean jar. Make sure the jar has a tight lid. This helps to seal in flavors and keep out air. I recommend using a glass jar. Glass does not absorb smells or flavors. It also makes it easy to see how much dressing you have left. Homemade salad dressing can last up to a week in the fridge. The best practice is to write the date on the jar. This way, you always know when you made it. Keep the dressing in the coldest part of your fridge. Avoid the door, as it can get warm. Check your dressing before using it. If you see any mold, throw it away. A bad smell is also a sign. If the dressing tastes off, do not use it. Fresh herbs may wilt or darken over time. If this happens, it is best to discard the dressing. Enjoy your fresh Zesty Citrus-Herb Salad Dressing while it lasts! The best oils for salad dressings include extra-virgin olive oil, avocado oil, and grapeseed oil. These oils add great flavor and healthy fats. Extra-virgin olive oil is my top pick. It has a rich taste that enhances any salad. You can also try nut oils. They add a unique twist to your dressings. Yes, you can make salad dressing ahead of time. This can save you prep time during busy days. I often prepare my dressings a day or two before. Just store them in a sealed jar in the fridge. This allows the flavors to blend well. Just remember to shake it well before using. Adjusting acidity is simple! If your dressing tastes too sour, add a bit of honey or sugar to balance it. For a more tangy flavor, increase the vinegar or citrus juice. Taste as you adjust. This way, you can create a dressing that fits your palate perfectly. Now you have all the tools to create a tasty summer salad dressing. We explored essential ingredients, tasty add-ins, and fresh seasonal products. You learned step-by-step how to mix zesty flavors and achieve the right thickness. We covered common mistakes and helpful tips, so you can make salads that impress. Remember, using fresh ingredients is key to great taste. Enjoy crafting your dressings and experimenting with different flavors!

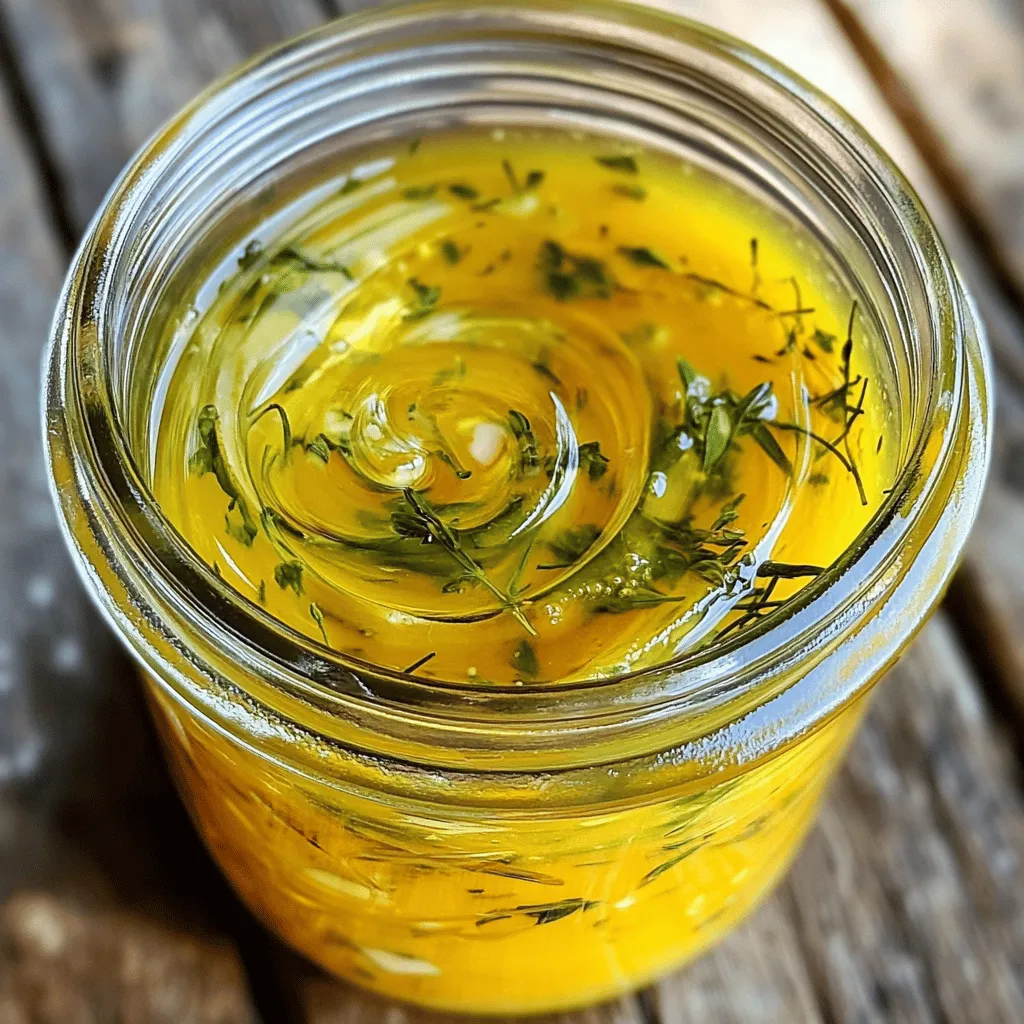
Summer is the perfect time for fresh salads, and a delicious dressing can make all the difference. In this post, I’ll share my easy summer salad dressing recipe. It’s fresh …

Read more

Categories Salads

Blackberry Basil Grilled Chicken Salad Fresh Delight

July 15, 2025 by Chef Theo
To make this fresh and tasty salad, gather these key ingredients: - 2 chicken breasts - 1 teaspoon garlic powder - 1 teaspoon onion powder - Salt and pepper to taste - 2 tablespoons olive oil - 4 cups mixed salad greens (spinach, arugula, and romaine) - 1 cup fresh blackberries - ½ cup crumbled feta cheese - ¼ cup fresh basil leaves, torn - 2 tablespoons balsamic vinegar - 1 tablespoon honey You can add fun twists to your salad with these optional ingredients: - Sliced almonds for crunch - Avocado for creaminess - Cherry tomatoes for sweetness - Grilled corn for a smoky taste This salad is not just delicious; it’s also healthy. Here’s a quick look at the nutrition: - Calories: Around 350 per serving - Protein: About 30 grams from chicken and feta - Fat: Roughly 20 grams, mostly healthy fats - Carbohydrates: About 20 grams, thanks to greens and berries - Fiber: Around 5 grams, which is great for digestion This information helps you see how balanced and wholesome this dish is. For the full recipe, check the ingredients list above. To start, gather your ingredients. You need garlic powder, onion powder, salt, pepper, and olive oil. In a small bowl, mix one teaspoon each of garlic powder and onion powder. Add salt and pepper to taste. Then, stir in two tablespoons of olive oil. This mix becomes a tasty marinade for the chicken. Rub this marinade all over the two chicken breasts. Make sure every part gets some love. Let the chicken sit for 15-20 minutes. This lets the flavors soak in. Next, it's time to grill! Preheat your grill to medium-high heat. Place the marinated chicken on the hot grill. Cook for about 6-7 minutes on one side. Flip the chicken and grill for another 6-7 minutes. You want the chicken to reach 165°F (75°C) inside. This ensures it is safe to eat. Once done, remove the chicken from the grill. Let it rest for 5 minutes. This helps keep the juices inside. After resting, slice the chicken into strips. Now, let’s make the salad! In a large bowl, combine four cups of mixed salad greens. I love using spinach, arugula, and romaine for a nice mix. Add in one cup of fresh blackberries and half a cup of crumbled feta cheese. Toss in a quarter cup of torn fresh basil leaves for extra flavor. For the dressing, whisk together two tablespoons of balsamic vinegar and one tablespoon of honey in a separate bowl. Drizzle this dressing over the salad and toss gently. Finally, arrange the sliced grilled chicken on top. You can serve this salad right away or chill it for a cool twist. Enjoy this fresh delight! For the complete recipe, check out the Full Recipe section. Grilling chicken is simple and fun. First, preheat your grill to medium-high heat. This helps the chicken cook evenly. Use a clean grill to avoid sticking. Oil the grill grates lightly before placing the chicken on it. This small step makes a big difference. Flip the chicken only once. Close the lid to keep the heat in. This helps the chicken cook faster and stay juicy. To keep your chicken juicy, start with a good marinade. Our recipe uses garlic powder, onion powder, salt, and olive oil. This mix adds flavor and moisture. Let the chicken marinate for 15 to 20 minutes. This allows the flavors to soak in. When grilling, check the temperature. Chicken should reach 165°F (75°C). Let the chicken rest for 5 minutes after grilling. This step helps the juices redistribute, making each bite tender and juicy. Using fresh, seasonal ingredients makes your salad shine. Look for ripe blackberries during summer months. They add sweetness and color. Fresh basil adds a lovely aroma and taste. Visit your local farmer's market for the best options. Choose greens like spinach or arugula, as they are in season and flavorful. This not only enhances taste but also supports local farms. For a full guide, check out the Full Recipe. {{image_2}} You can swap chicken with other tasty proteins. Grilled shrimp works well in this salad. It adds a sweet and savory flavor. You can also use grilled tofu for a plant-based option. If you like beef, try thin slices of grilled steak. Each protein brings its own unique taste and texture. Feel free to mix in seasonal veggies and fruits. Fresh corn adds a nice crunch in summer. In fall, diced apples or pears give a sweet touch. You can also add sliced cucumbers for freshness. Roasted sweet potatoes can make this salad more filling. These add-ins enhance flavor and nutrition. While the balsamic honey dressing is delightful, other dressings can shine too. A lemon vinaigrette brightens the salad with its zesty taste. You can also try a creamy avocado dressing for a rich twist. For a spicy kick, use a chipotle ranch. Each dressing changes the salad's vibe and keeps it exciting. To keep your salad fresh, store it in an airtight container. Place it in the fridge. The mixed greens and blackberries can wilt quickly, so eat leftovers within two days. Keep the dressing separate until you are ready to enjoy it again. This keeps everything crisp and tasty. When reheating grilled chicken, avoid the microwave if you can. Instead, use the oven. Preheat it to 350°F (175°C). Place the chicken in a dish and cover it with foil. Heat for about 10-15 minutes or until it warms through. This keeps your chicken juicy and prevents it from drying out. - Cooked chicken: lasts 3-4 days in the fridge. - Mixed greens: best eaten fresh but can last 1-3 days. - Blackberries: good for 3-6 days when stored properly. - Feta cheese: stays fresh for about a week after opening. - Balsamic vinegar and honey: these can last for months when stored correctly. Keeping an eye on these shelf lives helps you enjoy your Blackberry Basil Grilled Chicken Salad at its best! For the full recipe, check the earlier section of this article. Yes, you can use frozen chicken breasts. Just thaw them completely before you start. This helps ensure even cooking. If you cook them straight from frozen, they may not grill well. Cook them longer until they reach 165°F (75°C). If you don't have feta cheese, try crumbled goat cheese or ricotta. Both options add creaminess. You can also use a plant-based cheese for a dairy-free choice. This keeps the salad tasty while meeting your needs. To make this salad vegan, skip the chicken and feta. Replace these with grilled tofu or chickpeas for protein. Use a plant-based cheese if you like. This gives you a healthy, bright salad packed with flavor. For the dressing, use maple syrup instead of honey for a vegan option. You can find the Full Recipe to see all the details! This blog post explains how to create a tasty Blackberry Basil Grilled Chicken Salad. We covered the best ingredients, preparation steps, and tips to enhance flavor. I shared variations to try and storage advice for leftovers. Remember, grilling chicken correctly helps keep it juicy. Explore your options with ingredients and dressings. Enjoy making this dish with fresh, seasonal items. The flavors will keep you coming back for more.

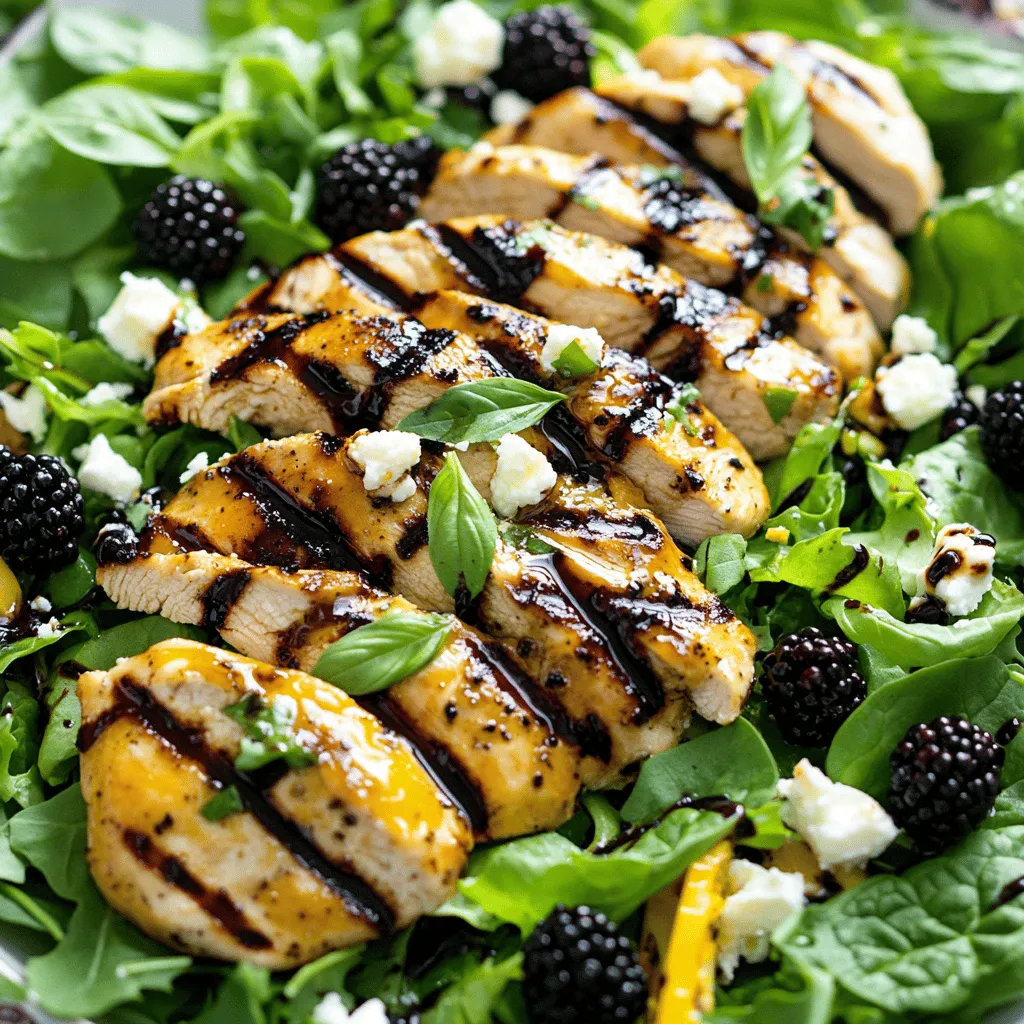
Craving a fresh and flavorful meal? Let me introduce you to my Blackberry Basil Grilled Chicken Salad. This dish bursts with bright flavors and is packed with juicy grilled chicken, …

Read more

Categories Salads

Garlic Honey Butter Green Beans Tasty Side Dish

July 15, 2025 by Chef Theo
- 1 lb fresh green beans - 3 tablespoons unsalted butter - 3 cloves garlic - 2 tablespoons honey - 1 tablespoon soy sauce - Salt and pepper to taste - Red pepper flakes (optional) - Chopped parsley for garnish The main ingredients for Garlic Honey Butter Green Beans are simple yet packed with flavor. Start with a pound of fresh green beans. They should be bright and firm for the best texture. Then, use three tablespoons of unsalted butter for a rich taste. To add that garlic kick, include three cloves of minced garlic. For the sweet and savory sauce, you’ll need two tablespoons of honey and one tablespoon of soy sauce. Adjust the salt and pepper to your liking. If you want a bit of heat, add red pepper flakes. Finally, finish with chopped parsley for a fresh touch. You can find the full recipe linked above for detailed steps. This dish is easy, quick, and perfect for any meal. - First, prepare the green beans by trimming their ends. - Next, blanch the green beans in boiling water for 3-4 minutes. Blanching makes the beans bright green and softens them just right. After blanching, drain the beans. Place them in a bowl of ice water to stop cooking. This keeps them crisp and vibrant. - In a large skillet, melt the butter over medium heat. - Sauté the minced garlic for 1-2 minutes until fragrant. Be careful not to brown the garlic. Brown garlic can taste bitter. After the garlic scents the air, stir in the honey and soy sauce. Mix well to create a smooth sauce. - Add the blanched green beans to the skillet. Toss them gently in the garlic honey butter sauce. Make sure every bean is coated well. This is where the flavor shines. Cook for an additional 2-3 minutes until the beans are heated through. - Season the green beans with salt, pepper, and red pepper flakes if you want a kick. - Finally, remove from heat and garnish with chopped fresh parsley before serving. These steps create a beautiful dish. The green beans shine with flavor and color. For the full recipe, check the details above. Enjoy your tasty side dish! How to achieve perfect blanching Blanching keeps green beans bright and crisp. Start with a big pot of boiling salted water. Add the green beans and cook for 3-4 minutes. This time makes them tender but still crunchy. Right after, plunge them into ice water. This stops the cooking and locks in the color. Ensuring the garlic doesn't burn Garlic adds flavor, but it can burn quickly. When you melt the butter, keep the heat on medium. Add minced garlic and stir it for 1-2 minutes. You want it fragrant, not brown. This way, the garlic gives a sweet taste without bitterness. Suggested spices to elevate flavor To boost the taste, think about adding spices. Try a pinch of cumin or a dash of smoked paprika. These spices add warmth and depth. Red pepper flakes can give a nice kick too. Just use them based on your heat preference. Alternative sweeteners to use instead of honey If you want to switch honey, use maple syrup or agave nectar. Both add sweetness and a unique flavor. Adjust the amount slightly, as these sweeteners can be sweeter than honey. Creative garnishes for presentation Garnishing makes your dish look fancy. Chopped fresh parsley adds color and freshness. You could also use toasted nuts, like almonds or walnuts, for crunch. A sprinkle of sesame seeds can add a nice touch too. Pairing options with other dishes Garlic honey butter green beans pair well with many meals. They go great with grilled chicken or fish. Serve them alongside rice or quinoa for a complete dish. These green beans also complement pasta and roasted meats. {{image_2}} You can change the type of beans you use. Try snap peas or asparagus for a fun twist. These swaps add new flavors and textures. You can also use butter alternatives. Olive oil or coconut oil works great. These options can make the dish lighter or give it a unique taste. Want a tangy twist? Add some lemon juice or zest. This brightens the dish and balances the sweetness. You can also mix in nuts like almonds or walnuts. The crunch adds a nice contrast to the soft beans. These changes make your Garlic Honey Butter Green Beans even more exciting. Garlic Honey Butter Green Beans pair well with many dishes. They are perfect with grilled chicken or steak. You can also serve them with rice or quinoa. This creates a balanced meal with grains and protein. Try them at your next dinner party or family meal. They will impress your guests! For the complete recipe, check out the [Full Recipe]. To store leftovers, place the green beans in an airtight container. This keeps them fresh in the fridge. Make sure to cool them to room temperature first. You can enjoy them within three days. For reheating, use a skillet on low heat. Add a splash of water or butter to keep them moist. Stir occasionally until heated through. You can also microwave them for a quick option. Just cover the dish to trap steam and heat for one to two minutes. You can freeze Garlic Honey Butter Green Beans for longer storage. First, blanch the green beans as you do in the recipe. After cooling in ice water, drain them well. Spread the beans on a baking sheet and freeze them for about an hour. Once frozen, transfer them to a freezer-safe bag. This prevents clumping. When ready to use, you can thaw the beans overnight in the fridge. For a quicker method, add frozen beans straight to your skillet. Just adjust the cooking time. Heat until they are hot and tender. In the fridge, these green beans last around three to four days. Keep an eye out for any changes. If the beans look dull or slimy, it’s time to toss them out. Also, if they smell off or sour, don’t eat them. Trust your senses; they help keep you safe! Green beans are packed with nutrients. They are low in calories and high in fiber. A one-cup serving has about 44 calories. They also contain vitamins A, C, and K. These vitamins support your immune system and help with bone health. The garlic in this recipe adds more health perks. Garlic can boost your immune system and lower blood pressure. Honey offers natural sweetness and antioxidants. Together, these ingredients create a dish that is not only tasty but good for you. Yes, you can make this dish vegan with some easy swaps. Instead of butter, use vegan butter or olive oil. For honey, try agave syrup or maple syrup. These substitutes keep the flavor great and make the dish plant-based. Using these vegan ingredients may change the taste slightly. However, the dish will still be rich and tasty. You can enjoy this delightful side dish without animal products. If you love heat, there are many ways to spice it up. You can add more red pepper flakes to the dish. Start with half a teaspoon and adjust to your liking. Another option is to mix in sliced jalapeños or crushed red pepper. These will add a nice kick. You can also use a dash of hot sauce for an extra layer of flavor. Enjoy your spicy Garlic Honey Butter Green Beans! In this post, we covered how to make Garlic Honey Butter Green Beans. We explored key ingredients, detailed cooking steps, and offered tips for flavor and storage. You learned about variations and how to make the dish your own. With simple steps and fresh ingredients, this side dish can elevate any meal. Try it out and enjoy the rich flavors! Your taste buds will thank you for this easy, delicious recipe.

Looking for a side dish that’s both simple and delicious? Try these Garlic Honey Butter Green Beans! They bring vibrant flavor and bright color to your table. With just a …

Read more

Categories Appetizers
Older posts
Newer posts
← Previous Page1 … Page28 Page29 Page30 … Page105 Next →

TOASTED RECIPES

Where ideas are warm, crisp, and ready to serve! 🍞

PAGES

Home About Contact Privacy Policy Terms & Conditions Cookie Policy GDPR Policy Copyright Policy Disclaimer

CATEGORIES

Appetizers Desserts Salads Breakfast Dinner

Contact

  • Pinterest
  • Mail
Copyright © 2025 Toasted Recipes. All rights reserved.