Skip to content
toastedrecipes.com
  • Home
  • Appetizers
  • Desserts
  • Salads
  • Breakfast
  • Dinner
  • Privacy Policy
  • Contact
  • About

Chef Theo

Maple Glazed Chicken Tasty and Simple Dinner Recipe

July 13, 2025 by Chef Theo
For a tasty Maple Glazed Chicken, you need fresh and simple ingredients. Here’s what to gather: - 4 boneless, skinless chicken breasts - 1/2 cup pure maple syrup - 2 tablespoons Dijon mustard - 2 tablespoons soy sauce (or tamari for gluten-free) - 2 cloves garlic, minced - 1 teaspoon fresh thyme, chopped (or 1/2 teaspoon dried thyme) - 1/2 teaspoon black pepper - Salt to taste - 2 tablespoons olive oil - 1/4 cup chopped green onions (for garnish) Each ingredient plays a key role. The chicken is your main star, while the maple syrup brings a sweet depth. Dijon mustard adds a nice tang, and soy sauce gives the dish umami. Garlic and thyme bring in aromatic notes. For garnishes, I love using green onions. They add color and a slight crunch. Feel free to adjust the salt to your taste. You can find the full recipe for this delightful dish in the complete article. To start, you need to prepare the marinade. In a mixing bowl, combine: - 1/2 cup pure maple syrup - 2 tablespoons Dijon mustard - 2 tablespoons soy sauce - 2 cloves garlic, minced - 1 teaspoon fresh thyme - 1/2 teaspoon black pepper - Salt to taste Whisk these ingredients together until they blend well. This mix creates a sweet and tangy glaze. Next, it's time to marinate the chicken. Place the chicken breasts in a resealable bag or a shallow dish. Pour half of the maple glaze over the chicken. Make sure to reserve the other half for later. Seal the bag or cover the dish tightly. Let the chicken marinate in the fridge for at least 30 minutes. If you have time, marinate for up to 4 hours. This step helps infuse the chicken with flavor. Now, let's cook the chicken! You can choose between grilling or skillet cooking. If you grill, preheat your grill on medium-high heat. If you use a skillet, heat it on the same setting. If using a skillet, add 2 tablespoons of olive oil. Once hot, remove the chicken from the marinade, letting any extra glaze drip off. Discard the marinade used for marinating. Cook the chicken for about 6-7 minutes on one side. Look for a nice brown color. After that, flip the chicken and brush the reserved maple glaze over the cooked side. Continue cooking for another 6-7 minutes. Use a meat thermometer to check the internal temperature. It should reach 165°F (75°C) for safety. Plating your dish is a fun part! Once cooked, remove the chicken from the heat. Let it rest for a few minutes. This helps keep the juices inside. To serve, slice the chicken and drizzle any remaining glaze over the top. For a pop of color, garnish with 1/4 cup of chopped green onions. This adds freshness and a nice crunch to your meal. Enjoy your delicious Maple Glazed Chicken! For the full recipe, refer to the earlier section. To get the best glaze, timing is key. Cook the chicken for about 6-7 minutes on each side. This helps the glaze thicken and stick to the chicken. If you want it sweeter, add more maple syrup. For a saltier taste, use extra soy sauce. Always taste as you go. When grilling, preheat the grill to medium-high. Brush the grates with oil to prevent sticking. If you use a skillet, add olive oil before placing the chicken. This ensures a nice sear. Keep the heat steady for even cooking. To avoid dry chicken, don’t overcook it. Use a meat thermometer to check. The chicken should reach 165°F (75°C). If your glaze tastes too sweet, add a splash of vinegar. This balances the flavors and makes every bite tasty. {{image_2}} You can make maple glazed chicken even better. Try adding spices or herbs. A dash of paprika gives a nice kick. Fresh rosemary or oregano adds a fragrant touch. You can also mix in fruits like apples or oranges. These fruits add sweetness and balance the dish. Just slice them thin and cook alongside the chicken. This step makes the meal burst with flavor. If you need gluten-free options, use tamari instead of soy sauce. It works just as well in the glaze. For those who want less sugar, try using agave syrup. It gives a similar taste with fewer carbs. You can also swap chicken breasts for thighs if you prefer. Thighs have a richer flavor and stay moist. This change makes for a heartier meal. You can cook this dish in several ways. If you prefer oven-baking, preheat to 400°F (200°C). Place the marinated chicken in a baking dish. Bake for about 25-30 minutes. This method gives the chicken a nice, even cook. You could also use a slow cooker. Just add the chicken and glaze, then cook on low for 4-6 hours. This option makes the chicken tender and flavorful. For the full recipe, check out the details above. To keep your maple glazed chicken fresh, store it properly. First, let the chicken cool down to room temperature. Then, place it in an airtight container. This helps prevent moisture loss and keeps the chicken tasty. Make sure to eat the leftovers within three to four days. For best results, divide the chicken into smaller portions. This way, you can reheat only what you need. You can also use freezer bags for longer storage. Just remember to label them with the date. You can freeze chicken for up to three months. When you're ready to enjoy your leftovers, there are a few ways to reheat maple glazed chicken. You can use a microwave, oven, or stovetop. For the microwave, place the chicken on a plate. Cover it with a damp paper towel to keep it moist. Heat for one to two minutes, checking often to avoid overcooking. Using the oven is great for keeping that nice texture. Preheat it to 350°F (175°C). Place the chicken on a baking sheet and cover it with foil. Heat for about 15 minutes or until warm. If you prefer stovetop, heat a skillet over medium heat. Add a splash of water or broth to keep moisture. Cook the chicken for about 5-7 minutes, flipping halfway. This method helps maintain the great flavor and juicy texture. For the best taste, drizzle some extra maple glaze on top after reheating. Enjoy your meal! To spice up Maple Glazed Chicken, add red pepper flakes or cayenne pepper. Start with a small amount, like 1/4 teaspoon. You can mix this into the glaze before marinating the chicken. If you want more kick, try adding some chopped jalapeño or a dash of hot sauce. These changes will give your dish a nice heat without losing the sweet flavor. Yes, you can use chicken thighs instead of breasts. Thighs have more fat, making them juicier and more flavorful. They also stay tender during cooking. Just adjust the cooking time. Thighs may take a few minutes longer to reach the right temperature. Aim for 170°F (77°C) for thighs. Maple Glazed Chicken pairs well with many side dishes. Here are some great options: - Roasted vegetables like carrots and Brussels sprouts - Steamed green beans or broccoli - Creamy mashed potatoes or sweet potatoes - A fresh salad with mixed greens and vinaigrette These sides balance the sweet glaze and add color to your meal. You can store leftover Maple Glazed Chicken in the fridge for up to 3 days. Make sure to place it in an airtight container. This keeps the chicken fresh and safe to eat. When you reheat it, ensure it reaches an internal temperature of 165°F (75°C) to enjoy it safely. Maple syrup can be a healthier sweetener compared to refined sugar. It contains vitamins and minerals like manganese and zinc. It also has antioxidants, which can be good for your health. However, use it in moderation. The amount in this recipe adds flavor without being overly sweet. Maple glazed chicken is a tasty dish with simple steps. We discussed the key ingredients, like chicken breasts and maple syrup, and how to marinate and cook them. I shared tips for perfecting the glaze and offered variations to suit your taste. Remember, great cooking comes down to practice and fun. Store leftovers well, and don’t hesitate to experiment with flavors. Enjoy your cooking journey!

Are you searching for an easy yet delicious dinner idea? Look no further than maple glazed chicken! This recipe combines juicy chicken breasts with a sweet and savory maple glaze …

Read more

Categories Dinner

Vegan Chocolate Zucchini Bread Rich and Moist Delight

July 13, 2025 by Chef Theo
To make Vegan Chocolate Zucchini Bread, you need these key ingredients: - 1 ½ cups grated zucchini (about 1 medium zucchini) - 1 cup all-purpose flour - ½ cup cocoa powder - 1 teaspoon baking soda - ½ teaspoon baking powder - ½ teaspoon salt - 1 cup brown sugar - ¼ cup unsweetened applesauce - ½ cup almond milk (or any plant-based milk) - 1 teaspoon vanilla extract - ½ cup vegan chocolate chips Grated zucchini adds moisture to the bread. It keeps the bread rich and tender. The cocoa powder gives you that lovely chocolate flavor. The combination of baking soda and baking powder helps the bread rise perfectly. Brown sugar adds sweetness and a touch of flavor, while applesauce acts as a binder and reduces fat. Almond milk keeps it dairy-free and light. You can customize your Vegan Chocolate Zucchini Bread with these fun add-ins: - Types of chocolate chips: Use dark, semi-sweet, or even white chocolate chips for variety. - Nuts and seeds: Add walnuts or pecans for crunch. Sunflower seeds can also add a nice texture. - Flavor enhancements: Try adding cinnamon or espresso powder to boost the chocolate flavor. These add-ins can make your bread even more exciting. You can mix and match based on what you love. For the full recipe, check out the link provided. Start by deciding if you want to grease your pan or use parchment paper. Greasing the pan lets the bread slide out easily. Parchment paper gives extra help, preventing sticking and making cleanup easier. I often choose parchment paper for a quick release. Next, preheat your oven to 350°F (175°C). This temperature ensures even baking. Preheating helps the bread rise properly. While the oven heats, prepare your loaf pan so it can be ready when your batter is mixed. Sifting the dry ingredients is key. It breaks up clumps in the flour and cocoa powder. This step ensures your dry mix is light and airy. It helps the bread rise well. When measuring your flour and cocoa powder, use a spoon to scoop. Then, level it off with a knife. This method gives you the right amount. Too much flour can make the bread dense and dry. In a separate bowl, mix the wet ingredients. You want a smooth mixture of zucchini, brown sugar, applesauce, almond milk, and vanilla extract. Stir these ingredients well. This step makes sure the flavors combine nicely. Grate your zucchini finely. It helps blend into the batter. You won’t notice it much in the final bread, but it adds moisture and nutrients. Pour the batter into your prepared loaf pan. Smooth the top with a spatula. Bake for 50-60 minutes. The bread is done when a toothpick inserted in the center comes out clean. After baking, let the bread cool in the pan for about 10 minutes. This step helps it firm up. Then, transfer it to a wire rack to cool completely. This cooling process keeps the texture perfect. For the full recipe, refer to the earlier section. Mixing too much can ruin your bread. It makes it dense and tough. When you combine wet and dry ingredients, stir gently. Only mix until the flour disappears. A few lumps are okay. This keeps your bread light and fluffy. Grate your zucchini finely. This helps it blend well into the batter. If the pieces are too big, they can make the bread soggy. Use the small holes on your grater. Squeeze out some extra moisture with a clean cloth. This step adds to the bread's great texture. You can change the sugar in this recipe. If you want less sweetness, reduce the brown sugar. Start with half a cup. Taste the batter to check. You can always add more if needed. If you prefer using natural sweeteners, try honey or agave. Use the same amount as the brown sugar. Keep in mind that honey is not vegan. Agave is a great choice if you want to keep it plant-based. A large mixing bowl is key for this recipe. Look for one that is heavy and sturdy. This helps when you mix the thick batter. Glass or stainless steel bowls work best. They do not stain and are easy to clean. Choose a 9x5-inch loaf pan for best results. Metal pans cook evenly and give a nice crust. If you prefer, use a glass one. Just remember to adjust the baking time slightly. Always grease the pan or line it with parchment paper. This makes it easy to remove your bread after baking. For a full guide on making this delicious treat, check out the Full Recipe. {{image_2}} If you want a gluten-free version of vegan chocolate zucchini bread, you can easily swap out the flour. Use almond flour or a gluten-free all-purpose blend. These work well and keep the bread moist. For texture, add a bit of xanthan gum. This will help bind the ingredients together. You can use about 1 teaspoon per cup of flour. It makes a big difference! Want to boost the flavor? You can add spices like cinnamon or nutmeg. These warm spices pair well with chocolate. A teaspoon of each can make your bread sing! You can also mix in fruits, like mashed bananas. They add sweetness and moisture. Try using half a cup of mashed bananas for a fun twist. If you need a nut-free recipe, just swap almond milk for oat or soy milk. These work great and keep the bread creamy. For a low-sugar version, reduce the brown sugar. You can cut it down to half a cup. If you still want sweetness, use mashed dates or a sugar substitute. Just keep in mind that this might change the texture a bit. For the full recipe, check out the complete instructions above! To keep your vegan chocolate zucchini bread fresh, wrap it tightly in plastic wrap. This helps retain moisture and flavor. You can also place it in an airtight container to protect it from air. Recommended container types include: - Plastic food storage containers - Glass jars with tight lids - Resealable plastic bags I usually store my bread at room temperature for up to three days. This keeps it soft and ready to enjoy. For longer storage, freezing is a great option. Allow the bread to cool completely before freezing. Then, slice it into individual pieces. Wrap each slice in plastic wrap, then place them in a freezer-safe bag. This method helps prevent freezer burn. Thawing is simple. Just remove a slice from the freezer and let it sit at room temperature for about 30 minutes. You can also microwave a slice for 15-20 seconds for a quick treat. For the full recipe, check out the complete instructions to bake your own delightful bread! Yes, you can use frozen zucchini in this recipe. Just make sure to thaw it first. To thaw, place the zucchini in the fridge overnight. If you're in a hurry, you can use the microwave. Heat it on a low setting for a few minutes. After thawing, drain any excess water. This step is key. Too much water can make your bread soggy. You can check if the bread is done with the toothpick test. Insert a toothpick into the center of the bread. If it comes out clean, the bread is ready. If you see wet batter on the toothpick, bake it a few more minutes. Keep an eye on it to avoid overbaking. A perfectly baked loaf will have a rich, moist texture. Yes, you can substitute ingredients. If you don't have applesauce, try using mashed bananas or pumpkin puree. Both will add moisture and sweetness. For almond milk, any plant-based milk works well. Soy milk or oat milk can be great alternatives. Just remember, substitutions may change the flavor slightly, but they can still work nicely. You learned to make a delicious zucchini bread using simple ingredients and easy steps. From selecting your essentials to uncovering variations and storage tips, you have the tools to succeed. Remember to mix well, watch your baking time, and have fun with flavors. Whether you choose sweet or savory, the choice is yours. Now, get in the kitchen and enjoy this tasty treat!

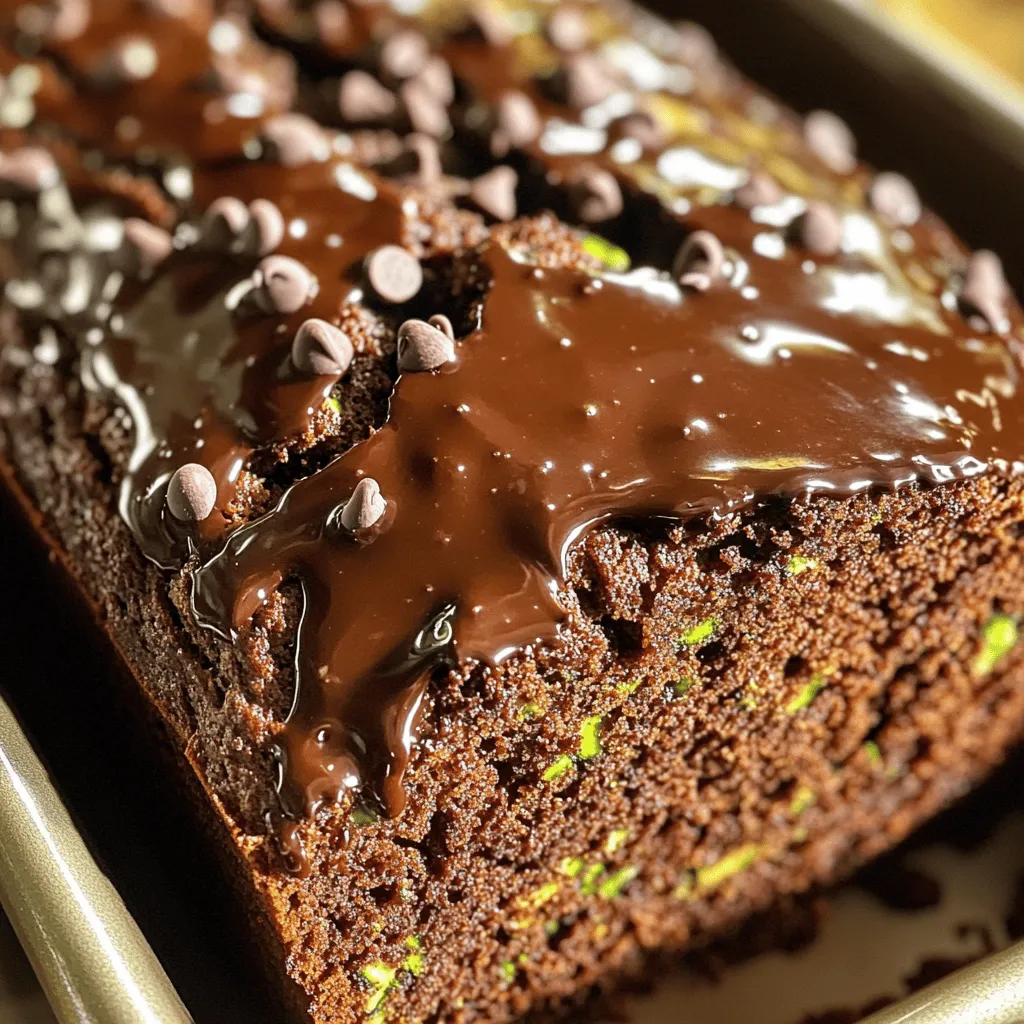
If you’re craving a sweet treat that’s both rich and healthy, you’ve found it! My Vegan Chocolate Zucchini Bread is a game changer. Packed with moistness and flavor, this bread …

Read more

Categories Desserts

Creamy Crockpot Mac and Cheese Easy Family Favorite

July 12, 2025 by Chef Theo
To make this creamy delight, you need just a few key ingredients. Here they are: - 1 lb elbow macaroni - 4 cups sharp cheddar cheese, shredded - 2 cups mozzarella cheese, shredded - 1 cup cream cheese, softened - 4 cups whole milk - 1/2 cup unsalted butter, cut into small pieces - 2 teaspoons garlic powder - 1 teaspoon onion powder - Salt and pepper to taste These ingredients work together to create a smooth and cheesy dish. The combination of cheeses adds depth and richness. The cream cheese makes it extra creamy, while the macaroni serves as the perfect base. You can easily make this dish your own. Here are some optional ingredients you might like to try: - 1/2 cup breadcrumbs (for a crunchy topping) - Fresh parsley, chopped (for garnish) - Cooked bacon or chicken (for added protein) - A dash of hot sauce (for a bit of heat) Feel free to mix and match these extras. They can enhance the flavor and texture of your mac and cheese. When cooking, it’s good to know what you’re eating. Here’s a rough idea of the nutrition per serving: - Calories: 500 - Protein: 22g - Fat: 25g - Carbohydrates: 50g This dish is rich and filling. It’s great for family meals or cozy nights in. The creamy texture and cheesy flavor make it a crowd-pleaser. For the full recipe, check the section above. To start, grab your large crockpot. Make sure it is clean and dry. Place it on a flat surface. This will help the heat spread evenly. Next, add 1 pound of elbow macaroni to the crockpot. Pour in 4 cups of whole milk. Make sure the macaroni is fully covered. Then, add 1 cup of softened cream cheese. Stir in 4 cups of shredded sharp cheddar cheese and 2 cups of shredded mozzarella cheese. Toss in 1/2 cup of unsalted butter, cut into small pieces. Finally, sprinkle in 2 teaspoons of garlic powder, 1 teaspoon of onion powder, and salt and pepper to taste. Mix everything gently to combine. Cover the crockpot and set it on low. Let it cook for about 2 to 3 hours. Stir occasionally to keep the cheese sauce creamy. When the pasta is tender, it’s almost ready. If you want a crispy top, mix 1/2 cup of breadcrumbs with melted butter. Add this on top in the last 15 minutes of cooking. Once done, stir well to coat all the pasta. Adjust the seasoning if needed. Serve hot and garnish with chopped parsley for a nice touch. For detailed instructions, check the Full Recipe. To make your mac and cheese super creamy, use full-fat dairy. Whole milk and cream cheese work best. Here are some key tips: - Use fresh cheese: Grate your cheese right before cooking. - Don’t overcook: Stir occasionally, but don’t keep the lid off too long. - Check consistency: If it seems thick, add a splash of milk. I’ve seen many people make the same errors. Avoid these common pitfalls: - Wrong pasta type: Always use elbow macaroni for the best texture. - Too much liquid: Follow the recipe; too much milk can make it soupy. - Skipping ingredients: Don’t leave out the cream cheese. It adds richness. Want to take your dish up a notch? Here’s how: - Add spices: A pinch of cayenne or smoked paprika adds a nice kick. - Mix in extras: Try adding cooked bacon or sautéed onions for depth. - Garnish well: Fresh parsley not only looks good but adds a fresh taste. For the complete recipe, check out the Full Recipe section. {{image_2}} You can boost flavor by adding proteins to your mac and cheese. Cooked chicken is a great choice. Just shred it and mix it in. Bacon also adds a nice crunch and smoky taste. Cook the bacon first, then chop it up. Stir it in before the last 15 minutes of cooking. This step makes your dish heartier and satisfying. You can make a vegan version that everyone will love. Use plant-based cheeses instead of dairy. Choose almond milk or oat milk for a creamy base. You can also add nutritional yeast for a cheesy flavor. Mix in some cooked veggies like broccoli or spinach for extra nutrients. This version keeps the comfort while being dairy-free. Switching cheeses can change the whole taste of your dish. Try gouda for a smoky flavor or pepper jack for some heat. Mixing cheeses, like cheddar and fontina, creates a rich taste. You can even mix in cream cheese for extra creaminess. Experiment with your favorite cheeses to find your perfect blend. For the complete recipe, check out the Full Recipe section. After your family enjoys the creamy crockpot mac and cheese, let it cool. Place any leftovers in an airtight container. This keeps it fresh for later. You can store it in the fridge for up to three days. To reheat, scoop a portion into a bowl. Add a splash of milk to keep it creamy. Microwave it on medium power for two to three minutes. Stir halfway through to heat evenly. You can also reheat it on the stove. Just warm it gently over low heat. You can freeze mac and cheese for up to three months. Use a freezer-safe container. Leave some space at the top, as it may expand when frozen. To thaw, move it to the fridge overnight. Reheat as mentioned above. If it seems dry, add a little milk when reheating. Enjoy your creamy meal again! For the full recipe, check out the detailed instructions provided. It takes about 2 to 3 hours to cook macaroni in a crockpot. The time can vary based on your crockpot's heat settings. I suggest checking the pasta after 2 hours. Stir it gently. You want the macaroni to be tender but not mushy. Yes, you can use gluten-free pasta in this recipe. Look for elbow macaroni made from rice or lentils. Just keep an eye on the cooking time. Gluten-free pasta often cooks faster than regular pasta. Start checking for doneness around 1.5 hours. For a dairy-free version, use plant-based cheese. Many brands offer good options now. You can also use nutritional yeast for a cheesy flavor. Another option is to blend soaked cashews with almond milk. This gives a creamy texture without dairy. If you want to make a full dairy-free dish, check the Full Recipe for more guidance. This article explored how to make creamy Crockpot mac and cheese. We discussed key ingredients, customizable options, and hands-on steps for preparation. You learned tips for a perfect texture and flavor, as well as various delicious variations. We also covered storage methods to keep your leftovers fresh. Remember, cooking should be fun and creative. Don’t hesitate to try new things. Enjoy your mac and cheese adventure!

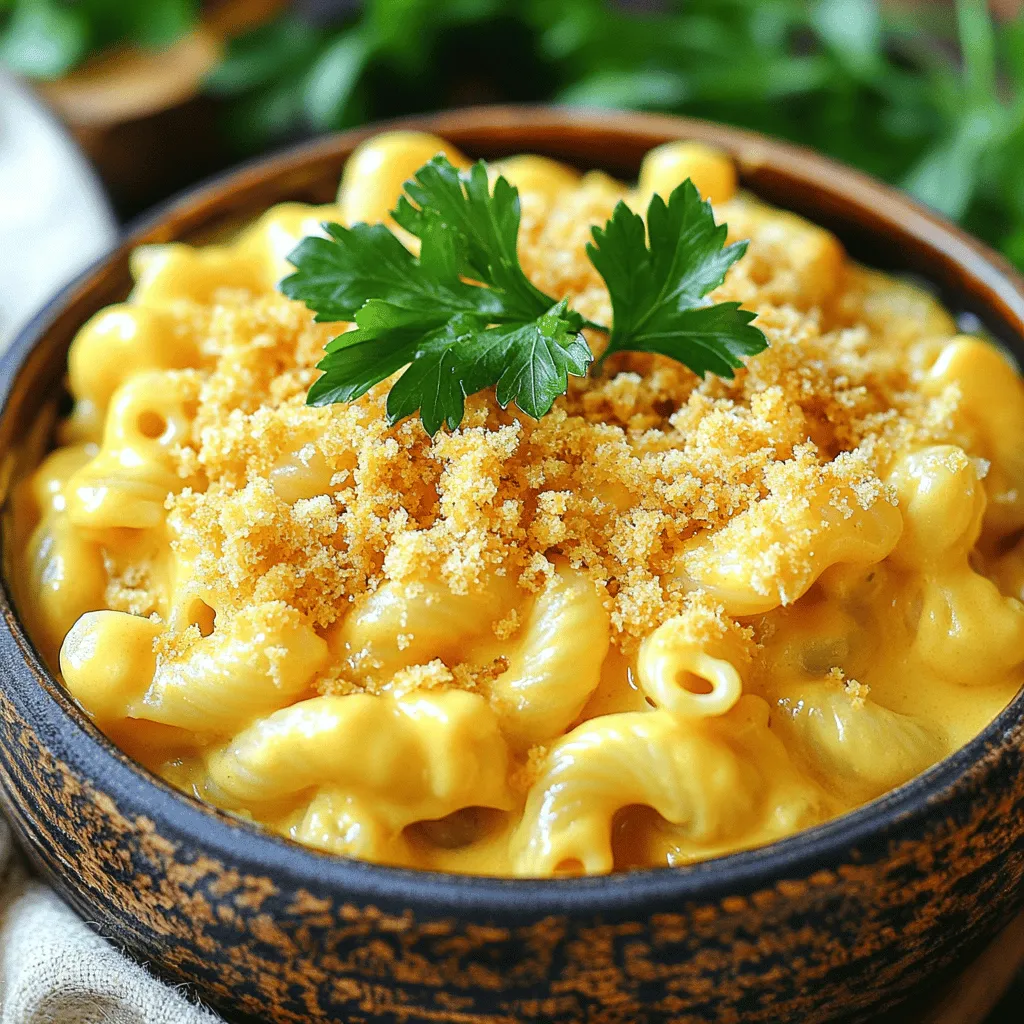
Are you ready for a dish that’s creamy, cheesy, and oh-so-easy? My Creamy Crockpot Mac and Cheese is a family favorite that you can whip up with minimal effort. Whether …

Read more

Categories Dinner

Bruschetta Recipe Simple and Flavorful Appetizer

July 12, 2025 by Chef Theo
To make classic bruschetta, gather these key ingredients: - 1 French baguette, sliced into 1/2-inch pieces - 3 ripe tomatoes, finely diced - 1/4 cup fresh basil leaves, chopped - 2 cloves garlic, minced - 2 tablespoons balsamic glaze - 1/4 teaspoon sea salt - 1/4 teaspoon freshly cracked black pepper - 3 tablespoons extra virgin olive oil - 1/2 cup fresh mozzarella balls, halved These ingredients create a fresh and tasty dish. The baguette acts as a crunchy base. The tomatoes and basil bring bright flavors, while garlic adds a nice kick. You can add a few more ingredients to spice up your bruschetta: - Red onion, finely diced - A splash of lemon juice - Crumbled feta cheese - Sliced black olives - Capers These add-ins can change the taste. For example, red onion gives a sweet crunch, while olives add a briny bite. To make bruschetta, you need some simple tools: - A sharp knife for slicing - A cutting board for prep - Mixing bowls for combining ingredients - Baking sheet for toasting the bread - A spoon for serving Having these tools makes the process easier. You’ll be ready to prepare this dish quickly and efficiently. For the full recipe, check the steps included. To start, preheat your oven to 400°F (200°C). Slice the French baguette into 1/2-inch pieces. Arrange these slices on a baking sheet in one layer. Brush one side of each slice with olive oil. This step helps them turn golden and crispy. Bake the bread for about 5-7 minutes. Keep an eye on them so they don’t burn. You want the edges to be just right. Next, grab a mixing bowl. Dice the ripe tomatoes into small pieces. You want them to mix well. Add the chopped basil leaves, minced garlic, balsamic glaze, sea salt, and black pepper. Stir everything together until it’s mixed well. This mixture brings fresh flavor to your bruschetta. Once the baguette slices are out of the oven, let them cool for a moment. Now, take a spoon and add a good amount of the tomato mixture on the toasted side of each slice. Don’t be shy! Top each bruschetta with a halved mozzarella ball. If you like, drizzle a bit more olive oil. Serve your bruschetta right away for the best taste. You can find the Full Recipe for more details. Toasting bread is key for good bruschetta. Start with a French baguette. Slice it into 1/2-inch pieces. I recommend brushing one side with olive oil. This helps it brown nicely. Preheat your oven to 400°F (200°C). Bake the slices for 5-7 minutes. Watch them closely! They should be golden and crispy but not burned. Fresh ingredients make a big difference. Look for ripe tomatoes; they should be firm and fragrant. Fresh basil should smell sweet and green. Choose garlic that is plump and firm, not sprouting. Always use fresh mozzarella for a creamy texture. Balsamic glaze adds a sweet touch. Quality olive oil really enhances the flavor. Bruschetta is fun to customize! You can add many toppings. Try diced avocado or roasted red peppers. Crumbled feta adds a salty bite. For a bit of heat, add jalapeños or red pepper flakes. You could even switch the herbs. Use parsley or arugula for a different taste. The options are endless! Check the Full Recipe for more ideas. {{image_2}} Bruschetta is fun because you can change the toppings. The classic mix is fresh tomatoes, basil, and garlic. Some people like to add mozzarella, as it adds creaminess. Others enjoy a mix of olives and artichokes for a briny kick. You can even use roasted peppers for a smoky flavor. Try different toppings to find your favorite! In Italy, bruschetta changes from region to region. In Tuscany, they often add beans and olive oil. In Naples, you might find it topped with fresh seafood. Each area uses local ingredients, making every bruschetta unique. This shows the beauty of Italian cooking. You can explore these variations to taste Italy on your plate. Don't be afraid to get creative! Add fruits like peaches or figs for sweetness. Mix goat cheese with herbs for a tangy twist. You can even try spicy toppings like jalapeños or sriracha. The Full Recipe gives you a solid base, but your imagination can take it further. Play with flavors and find new combinations that excite your taste buds! To store bruschetta leftovers, keep the bread and toppings separate. Place the toasted bread in a sealed container at room temperature. Do not refrigerate it. The bread will get soggy. For the topping, use an airtight container in the fridge. This keeps the mixture fresh and flavorful. Use the topping within two days for the best taste. To reheat bruschetta, preheat your oven to 350°F (175°C). Place the bread slices on a baking sheet. Heat for about 5 minutes. This warms the bread without making it chewy. Avoid microwaving, as it makes the bread soft. After reheating, add fresh toppings to keep your bruschetta vibrant. The fresh ingredients in bruschetta have different shelf lives. Ripe tomatoes stay good for about three to five days. Fresh basil lasts about one week. Minced garlic keeps well for two weeks in the fridge. Olive oil can last months if stored in a cool, dark place. Always check for freshness before you use ingredients. Bruschetta comes from Italy. The name comes from the word "bruscare," which means to toast. This tasty dish started in Central Italy. People used to eat it with oil and garlic. Over time, they added toppings like tomatoes and herbs. Now, bruschetta is popular worldwide. It’s a go-to starter at many Italian restaurants. You can prep bruschetta in advance, but some parts should wait. Make the tomato mixture ahead. Just store it in the fridge for a few hours. Toast the bread just before serving. This keeps it crunchy. If you top the bread too early, it may get soggy. A crisp white wine pairs best with bruschetta. Sauvignon Blanc and Pinot Grigio are great choices. They have fresh flavors that match the toppings. If you prefer red, try a light Chianti. It won’t overpower the dish. Enjoy your bruschetta with the right drink for a complete experience. For the full recipe, check out the details above! Bruschetta is easy to make with fresh, simple ingredients. You can customize it with tasty add-ins and flavors. Remember to toast the bread just right for the best bite. Store leftovers properly to enjoy later. With its roots in Italy, bruschetta brings joy to every meal. Explore different toppings to keep things fun and exciting. Now, gather your ingredients and get ready to impress everyone with your bruschetta skills!

Are you ready to impress your guests with a simple and tasty appetizer? Bruschetta is the perfect choice! This classic dish gives you fresh flavors and endless ways to customize …

Read more

Categories Appetizers

Avocado Brownies Rich and Decadent Dessert Treat

July 12, 2025 by Chef Theo
To whip up these delicious avocado brownies, gather the following ingredients: - 1 large ripe avocado, mashed - 1/2 cup almond butter - 1/2 cup maple syrup - 1 teaspoon vanilla extract - 1/3 cup unsweetened cocoa powder - 1/2 teaspoon baking soda - 1/4 teaspoon salt - 1/2 cup dark chocolate chips (dairy-free if desired) These simple items create a rich and tasty treat. The ripe avocado gives the brownies a creamy texture and a healthy twist. Why use avocado in brownies? Avocado is packed with nutrients. It provides healthy fats, fiber, and vitamins. Here are some key benefits: - Healthy Fats: Avocados contain monounsaturated fats, which are good for your heart. - Fiber: This helps keep you full and aids digestion. - Vitamins: They are rich in vitamins E, C, and B6, which support overall health. Using avocado instead of butter or oil lowers the calorie count too. This makes your dessert a little better for you without losing that decadent taste. If you have dietary restrictions or preferences, you can swap some ingredients. Here are a few ideas: - Nut Butter: Use peanut butter or cashew butter instead of almond butter. - Sweeteners: Try honey or agave syrup in place of maple syrup. - Flour Substitutes: If you want gluten-free, use almond flour or coconut flour. These changes keep the brownies tasty while meeting your needs. Now you can enjoy a treat that fits your lifestyle! For the full recipe, check below. To start, gather your ingredients. You will need: - 1 large ripe avocado, mashed - 1/2 cup almond butter - 1/2 cup maple syrup - 1 teaspoon vanilla extract - 1/3 cup unsweetened cocoa powder - 1/2 teaspoon baking soda - 1/4 teaspoon salt - 1/2 cup dark chocolate chips First, preheat your oven to 350°F (175°C). This step is key for even baking. Next, grease an 8x8 inch baking pan or line it with parchment paper. This helps the brownies come out easily. In a mixing bowl, combine the mashed avocado and almond butter. Mix until smooth and creamy. This will be your wet mixture. Now, add the maple syrup and vanilla extract to the avocado mix. Stir well until everything blends together. In a separate bowl, sift together the cocoa powder, baking soda, and salt. This helps make sure there are no lumps. Gradually add the dry mix to the wet mix. Stir gently until just combined. You want no flour pockets left. Finally, fold in the dark chocolate chips. You can save a few to sprinkle on top. Now the batter is ready. Pour the brownie batter into the prepared baking pan. Spread it evenly with a spatula. Sprinkle any reserved chocolate chips on top for a nice finish. Place the pan in your preheated oven. Bake for 20-25 minutes. Use a toothpick to check for doneness. It should come out mostly clean, with a few moist crumbs. Once baked, allow the brownies to cool in the pan for at least 10 minutes. This makes cutting easier. After cooling, cut them into squares. For a fun serving idea, dust them with cocoa powder. You can also serve them warm with a scoop of your favorite dairy-free ice cream. This adds a special touch to your dessert. Enjoy! To make your brownies fudgy, use ripe avocados. The creaminess of ripe fruit helps. You also want to mix well but not too much. Overmixing can add air and make them cakey. When you bake, keep an eye on the time. Bake just until a toothpick comes out with a few moist crumbs. This way, they stay rich and soft. One big mistake is using unripe avocados. They can make your brownies taste green and bitter. Another mistake is not measuring ingredients correctly. Always use measuring cups for precision. If you skip the cocoa powder, your brownies will lack that rich chocolate flavor. Lastly, do not open the oven door too early. This can cause the brownies to sink in the middle. You can boost the flavor of your brownies with fun add-ins. Try adding chopped nuts like walnuts or pecans for crunch. You can also mix in dried fruit for a sweet surprise. For a richer flavor, use dark chocolate chips or a sprinkle of sea salt on top. If you want a fun twist, try adding a dash of espresso powder. This will intensify the chocolate taste. Check out the Full Recipe for more ideas! {{image_2}} You can easily make these avocado brownies gluten-free and vegan. Use almond butter as your base. It’s creamy and adds a nice flavor. Instead of maple syrup, try agave syrup. This keeps the recipe vegan and sweet. Ensure your chocolate chips are dairy-free. This way, you keep it all plant-based and tasty. Want to spice things up? You can add nuts like walnuts or pecans. Chopped nuts give a nice crunch. You can also add spices like cinnamon or cayenne for warmth. These flavors mix well with chocolate. Just toss in about 1/4 cup of nuts or spices when you fold in the chocolate chips. Need to swap ingredients? No problem! For nut allergies, use sunflower seed butter instead of almond butter. If you want a sugar-free option, try stevia or erythritol. These substitutes can change the taste a bit, but they keep your brownies delicious. Just make sure to adjust the amounts as needed. For the full recipe, you can find all the details to guide your swaps. To keep your avocado brownies fresh, store them in an airtight container. This will prevent them from drying out. You can also wrap them in plastic wrap for extra protection. Make sure to place them in a cool, dry spot. Avoid direct sunlight to keep them tasty. These brownies stay fresh for up to five days at room temperature. If you want to keep them longer, freeze them. Wrap each brownie in plastic wrap and place them in a freezer bag. They will last for about three months in the freezer. When ready to eat, just thaw them in the fridge overnight. To enjoy your brownies warm, reheat them in the oven. Preheat the oven to 350°F (175°C). Place the brownies on a baking sheet and cover them with foil. Heat for about 10 minutes. You can also use a microwave. Heat for about 20 seconds, but keep an eye on them. Enjoy your rich and decadent treat! For the full recipe, refer to the section above. Yes, you can use fresh avocado. Fresh avocado gives the brownies a creamy texture. Just make sure it is ripe. A ripe avocado will mash easily. This ensures a smooth mix. If you use a hard avocado, your brownies may not be as creamy. Avocado brownies can be healthier. They use avocado instead of butter or oil. Avocados add healthy fats and fiber. They also bring a rich taste. You can also reduce sugar with maple syrup. This makes them a better choice for your diet. Plus, they can satisfy your sweet tooth without guilt. Check the brownies at 20 minutes. Insert a toothpick into the center. If it comes out with a few moist crumbs, they are ready. If it comes out wet, bake for a few more minutes. Remember, overbaking can make them dry. Let them cool for 10 minutes before cutting. This helps them set up nicely. For the full recipe, check out the earlier section. Avocado brownies offer a tasty twist on a classic treat. We explored ingredients, benefits, and alternatives. I shared step-by-step instructions for perfecting your bake. You learned tips for the best texture and flavor. We discussed gluten-free and vegan options, plus how to store brownies well. Overall, avocado brownies can fit many diets and still taste great. Enjoy experimenting with your favorite flavors. Happy baking!

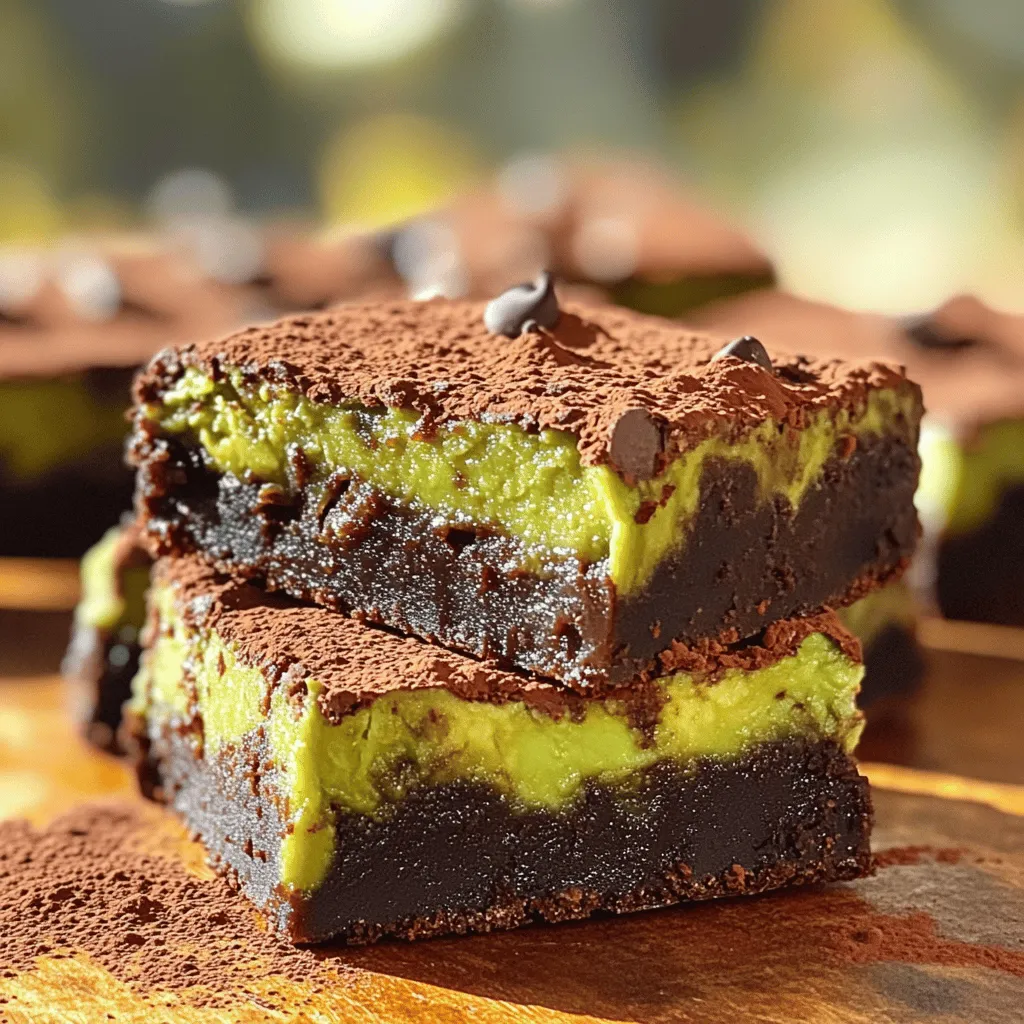
If you love brownies but want a healthier twist, you’re in the right place! I’m excited to share my recipe for rich and decadent avocado brownies. This delicious treat swaps …

Read more

Categories Desserts

Crockpot Taco Rice Soup Hearty and Flavorful Dish

July 12, 2025 by Chef Theo
- 1 pound ground turkey or beef - 1 onion, diced - 2 cloves garlic, minced These main ingredients form the heart of our soup. Ground turkey or beef gives it a rich taste. Diced onion and minced garlic add great depth and aroma. - 1 can (15 oz) black beans, drained and rinsed - 1 can (15 oz) diced tomatoes with green chilies - 1 cup corn (frozen or canned) Adding black beans boosts the protein and fiber. The diced tomatoes with green chilies bring a kick of flavor. Corn adds sweetness and texture, making each spoonful delightful. - 1 packet taco seasoning - 1 cup uncooked brown rice - Optional toppings: avocado, cilantro, shredded cheese, lime wedges The taco seasoning ties all the flavors together. Uncooked brown rice thickens the soup and adds a hearty feel. For toppings, you can choose avocado, cilantro, shredded cheese, or lime wedges. These toppings add freshness and a burst of flavor to each bowl. For the complete list of ingredients, check the Full Recipe. First, I start by browning the ground turkey or beef in a skillet. I heat the skillet over medium heat and add the meat. I stir it often until it is fully cooked. Once cooked, I drain any excess fat. This step is key for a nice texture and flavor. Next, I add all the ingredients to my crockpot. I put in the cooked meat, diced onion, minced garlic, black beans, diced tomatoes, corn, broth, taco seasoning, uncooked brown rice, diced bell pepper, and cumin. I mix everything well to ensure an even blend. This helps the flavors meld together as it cooks. Now, it’s time to cook! I cover the crockpot and set it on low for 6-8 hours or high for 4-5 hours. I check the rice for doneness after the cooking time. It should be tender and soak up all the flavors. When done, I stir the soup again and adjust the seasoning with salt and pepper if needed. For the full recipe, refer to the earlier sections. To make your Crockpot Taco Rice Soup even more tasty, add spices like paprika or chili powder. These spices give a warm kick. You can also mix in a pinch of cayenne for heat. Consider toppings to boost flavor. Fresh avocado adds creaminess. Cilantro gives a fresh taste. Shredded cheese melts nicely on top. A squeeze of lime adds zing. Prep your ingredients the night before. Chop the onion, garlic, and bell pepper ahead of time. Store them in the fridge. This makes cooking in the morning easy. If you have leftovers, store them in airtight containers. The soup stays fresh in the fridge for up to four days. Sometimes, you may want a thicker soup. To thicken it, add more rice or a bit of cornstarch. Mix the cornstarch with cold water first, then stir it in. If your soup is too thick, add more broth or water. This keeps the soup tasty and easy to eat. Adjust until it feels just right. {{image_2}} You can switch up the protein in this soup. Using chicken instead of turkey or beef works great. Just cook the chicken until it's done and shred it before adding it to the crockpot. For a vegetarian or vegan twist, try using lentils or chickpeas. They add protein and fiber, keeping the dish hearty. You don't have to stick with brown rice. You can use white rice if you prefer a softer texture. It cooks faster, too! Quinoa is another good choice. It's rich in protein and gives a nutty flavor. If you're looking for a low-carb option, try cauliflower rice. It soaks up the soup flavors well. Adjusting the spice level is easy. If your kids are eating, keep it mild. You can skip the taco seasoning or use a mild version. For spice lovers, add chopped jalapeños or a dash of hot sauce. You can also sprinkle in chili powder or cayenne pepper for extra heat. This way, everyone can enjoy a bowl that fits their taste. To keep your Crockpot Taco Rice Soup fresh, store it properly. Start by letting the soup cool down. Once cooled, place it in an airtight container. Glass or plastic containers work well. Make sure to leave some space at the top, as the soup may expand when frozen. Label your container with the date so you know when you made it. You can freeze the soup for later use. To freeze, follow the same steps as above. Place the cooled soup in a freezer-safe container. Remember to leave space for expansion. When you're ready to enjoy it again, let it thaw in the fridge overnight. To reheat, warm it on the stove over medium heat. Stir often to ensure even heating. You can also microwave it, but stir it halfway through to avoid hot spots. In the fridge, your leftovers will last about 3 to 4 days. If you freeze it, the soup will stay good for about 2 to 3 months. Always check for signs of spoilage before eating. If you see mold or notice an off smell, it’s best to throw it away. Enjoy your hearty soup safe and sound! For the full recipe, check the main article. Yes, you can easily make this soup vegetarian. Just swap the ground turkey or beef for a plant-based alternative like lentils or chickpeas. Use vegetable broth instead of chicken broth. You might also want to add more veggies, like zucchini or mushrooms, for extra flavor and texture. These swaps keep the soup hearty and delicious while meeting vegetarian needs. Cooking times can vary. If you set your crockpot on low, it will take about 6 to 8 hours. If you choose high, it will take around 4 to 5 hours. Both methods will give you tender rice and rich flavors. Just check the rice before serving to ensure it is fully cooked. This soup pairs well with a variety of sides. Try serving it with tortilla chips for crunch. A simple side salad can add freshness. You could also offer warm tortillas for wrapping. For a fun twist, serve it with cornbread or quesadillas for a filling meal. You can use instant rice, but it will change the soup's texture. Instant rice cooks faster and may get mushy if added too early. If you decide to use it, add it in the last 30 minutes of cooking. This way, it stays firm and gives you the best result. This blog post shared a simple recipe for Crockpot Taco Rice Soup. You learned the key ingredients, step-by-step cooking instructions, and helpful tips. You can adjust the recipe to your preferences with protein swaps and spice levels. Don’t forget storage tips for leftovers and freezing guidelines, too. This dish is easy to make and perfect for busy days. Enjoy creating a delicious meal that satisfies everyone at your table. Give it a try, and make it your own!

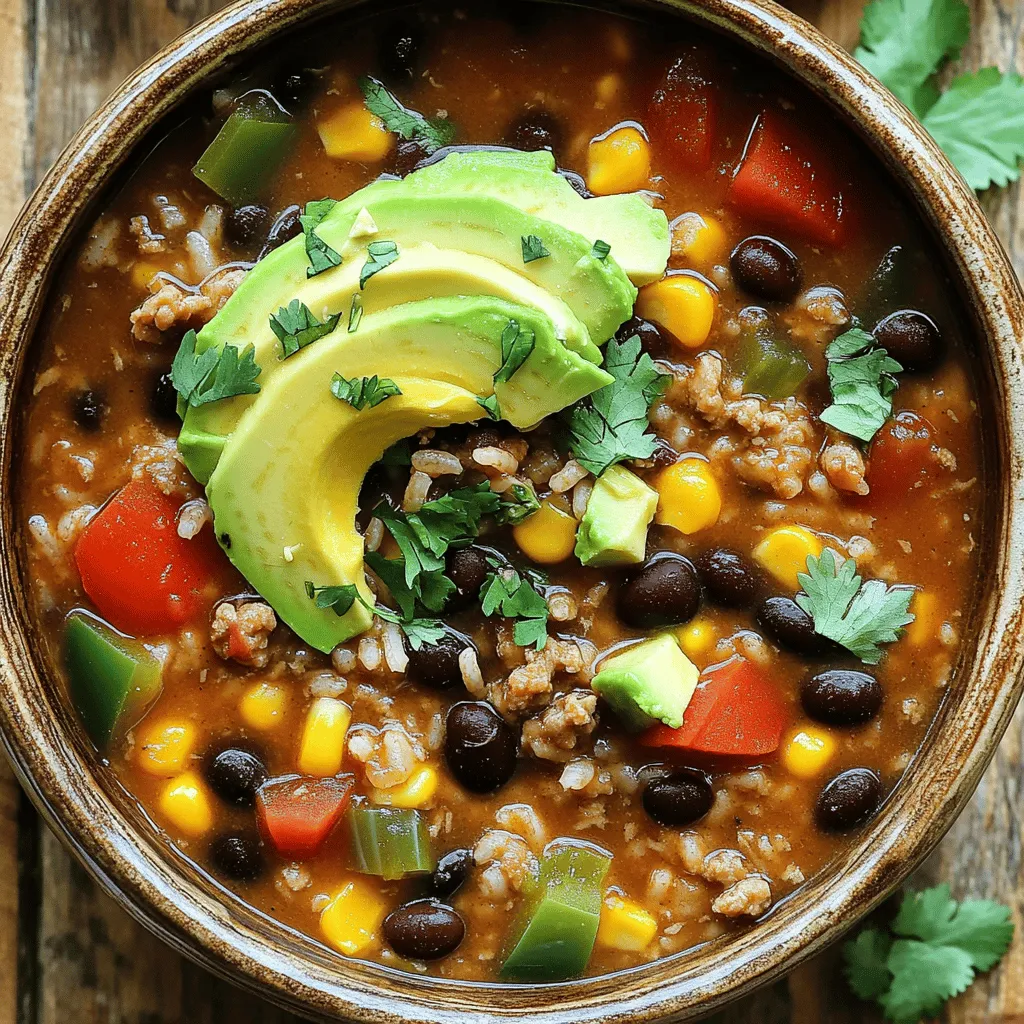
Looking for a warm, hearty meal that’s easy to make? Look no further than Crockpot Taco Rice Soup! This dish combines ground meat, beans, and rice for a filling experience …

Read more

Categories Dinner

Flourless Zucchini Brownies Delightful Recipe to Try

July 12, 2025 by Chef Theo
- 1 medium zucchini (about 1 cup, grated) - 1 cup almond butter (or any nut/seed butter you prefer) - 1/2 cup cocoa powder - 1/2 cup maple syrup (or honey) - 2 large eggs - 1 teaspoon vanilla extract - 1/2 teaspoon baking soda - 1/4 teaspoon salt - 1/2 cup dark chocolate chips (optional) The main ingredient here is zucchini. It adds moisture and makes these brownies less dense. The almond butter gives a rich flavor and creamy texture. Cocoa powder brings that deep chocolate taste we love. Maple syrup sweetens while keeping it natural. Eggs help bind everything, making the brownies rise. Vanilla adds a nice aroma. Baking soda helps with fluffiness, while salt boosts flavor. Lastly, dark chocolate chips provide extra bursts of chocolate in every bite. Each brownie has about 120 calories. It contains around 7 grams of fat, 10 grams of carbs, and 3 grams of protein. This makes it a sweet treat you can enjoy without guilt. The healthy fats from almond butter fill you up. Zucchini adds fiber, aiding digestion. If you want to make these brownies even better, consider adding nuts or seeds for extra crunch and nutrition. For more details, check out the Full Recipe. - Preheat your oven to 350°F (175°C). - Prepare a 9x9 inch baking pan by greasing it or lining it with parchment paper. - In a large mixing bowl, combine the grated zucchini and almond butter. - Stir until the mixture is smooth. - Next, add the cocoa powder, maple syrup, eggs, and vanilla extract. - Mix well until everything is fully combined and creamy. - Sprinkle the baking soda and salt over the mixture. - Gently fold them in to combine. - If you want, fold in the dark chocolate chips. - Pour the brownie batter into your prepared baking pan. - Spread it out evenly. - Bake for 25-30 minutes. - A toothpick inserted in the center should come out mostly clean with a few moist crumbs. Enjoy baking these flourless zucchini brownies! For the complete process, check the Full Recipe. To make your brownies perfect, start by managing the zucchini's moisture. Grate it finely and squeeze it in a clean cloth to remove excess water. This step helps avoid sogginess. Too much moisture can lead to brownies that fall apart. Next, mix your ingredients well. Combine the grated zucchini with almond butter until smooth. Then, add cocoa powder, maple syrup, eggs, and vanilla extract. Stir until you see a creamy mix. Don't rush this step. A well-blended batter gives you a fluffy texture. For a lovely presentation, dust your brownies with cocoa powder or powdered sugar. This simple touch makes them look fancy and inviting. You can also cut them into fun shapes for a party or event. To elevate your dessert, serve the brownies with a scoop of vanilla ice cream. The cold ice cream pairs well with warm brownies. It creates a delightful contrast of flavors and temperatures. You can also add fresh berries or a drizzle of chocolate sauce for extra flair. Check out the Full Recipe for detailed instructions and make your baking adventure a success! {{image_2}} If you want to make these brownies vegan, you can swap the eggs. Use flax eggs or chia seeds instead. To make one flax egg, mix one tablespoon of ground flaxseed with two and a half tablespoons of water. Let it sit for five minutes to thicken. For chia seeds, do the same with one tablespoon of chia seeds. This change will keep your brownies moist and tasty. You can make these brownies gluten-free easily. Instead of almond butter, try sunflower seed butter or cashew butter. Both work well and keep the flavor rich. For add-ins, look for gluten-free chocolate chips or nuts. This way, you get a delicious treat without gluten. Want to add more flavor to your brownies? You can mix in some spices or extracts. A teaspoon of espresso powder gives a deep, rich taste. Almond extract adds a nutty flavor that pairs well with chocolate. Cinnamon can also bring warmth and depth, making these brownies even more special. Experiment with flavors that you enjoy, and let your creativity shine! For the full recipe, check the details above. Store your flourless zucchini brownies at room temperature for up to three days. Keep them in an airtight container. This method keeps them soft and moist. If you live in a warm area, consider refrigerating them. In the fridge, they can last about a week. To freeze brownies, first let them cool completely. Cut them into squares. Wrap each square tightly in plastic wrap. Place the wrapped brownies in a freezer bag. They can stay frozen for up to three months. When you're ready to enjoy one, just thaw it at room temperature. These brownies taste best within three days of baking. After that, they still taste good for about a week in the fridge. If frozen, enjoy them within three months for the best flavor. Keeping track of these timelines helps you enjoy your brownies at their best! Yes, you can use other nuts or nut butters. If you have allergies, try sunflower seed butter or tahini. These options work well and add a different flavor. You can also use peanut butter or cashew butter. Each choice will change the taste a bit, so pick what you love! If your brownies crumble, they may need more moisture. Double-check that you added enough zucchini and eggs. If they seem dry, try adding a little more almond butter or maple syrup. Mixing well also helps. Make sure to bake them for the right time, too. If they bake too long, they can dry out. Look for a few signs to tell if your brownies are ready. First, check the edges. They should pull away from the pan slightly. Then, insert a toothpick in the center. If it comes out mostly clean with a few moist crumbs, it's done. If there's wet batter, bake a bit longer. Keep an eye on them towards the end! You learned how to make delicious brownies using simple ingredients. We walked through the steps, including mixing and baking. I shared tips to perfect texture and presentation. You can even try variations, like vegan options or flavor boosts. Storage tips help keep your brownies fresh longer. Enjoy experimenting with your own twists on this recipe. Baking should be fun, so savor every bite of your tasty creation.

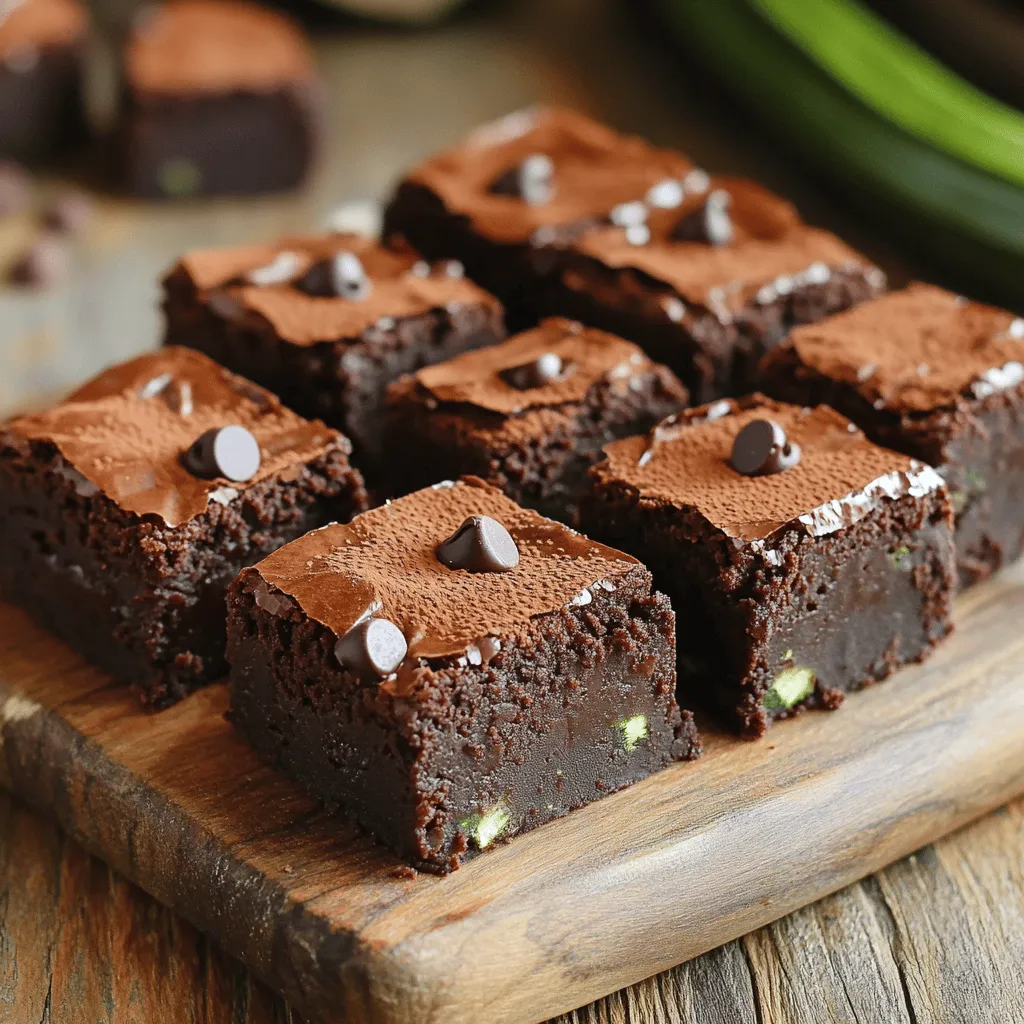
Are you ready to indulge in a treat that’s both delicious and healthy? These Flourless Zucchini Brownies will spark joy in your kitchen! Packed with rich chocolate flavor and the …

Read more

Categories Desserts

Super Moist Chocolate Cake Irresistible and Decadent

July 12, 2025 by Chef Theo
- 1 ¾ cups all-purpose flour - 3/4 cup unsweetened cocoa powder - 2 cups granulated sugar - 1 ½ teaspoons baking powder - 1 ½ teaspoons baking soda - 1 teaspoon salt - 2 large eggs - 1 cup whole milk - 1/2 cup vegetable oil - 2 teaspoons vanilla extract - 1 cup boiling water - 1 cup sour cream - Chocolate chips - Chopped dark chocolate When I make my super moist chocolate cake, I start with the dry ingredients. The flour, cocoa powder, sugar, baking powder, baking soda, and salt create a strong base. Sifting these together helps avoid lumps and ensures even mixing. Next, I mix the wet ingredients. The eggs, milk, vegetable oil, vanilla extract, and boiling water blend together beautifully. The boiling water is key. It helps the cocoa bloom, enhancing the chocolate flavor. Then, I fold in sour cream. This adds richness and keeps the cake moist. I often add chocolate chips or chopped dark chocolate for extra decadence. These melt into the cake, creating pockets of gooey goodness. You can find the full recipe to see how to combine these ingredients perfectly. This careful combination of dry and wet ingredients makes each bite of the cake rich and delightful. The balance of flavors makes it a favorite for many. - Preheat your oven to 350°F (175°C). - Grease and flour two 9-inch round cake pans or line them with parchment paper. - Sift together the dry ingredients and whisk until combined. This helps the cake rise. - In a separate bowl, combine the wet ingredients and mix until well incorporated. - Gradually pour the wet ingredients into the dry ingredients, mixing until smooth. Use a medium speed for about two minutes. - Carefully stir in the boiling water. This adds moisture to your cake. - Fold in the sour cream until fully blended. This keeps the cake soft. - Divide the batter evenly into the prepared pans and bake for 30-35 minutes. Check with a toothpick to see if it's done. Once the cakes cool, they will be rich and moist. Enjoy this super moist chocolate cake! You can find the full recipe above. Using boiling water in your batter is key. It helps the cocoa powder bloom, which brings out its rich flavor. This step ensures your cake stays moist throughout. The heat also activates the ingredients well, making a smooth batter. Sour cream plays an important role too. It adds fat, which gives the cake a soft texture. It also helps keep the cake moist. If you want a richer taste, add more sour cream. You can even mix in some yogurt if you run out. To check if your cake is done, use a toothpick. Insert it in the center; if it comes out clean, your cake is ready. If you see wet batter on the toothpick, bake it for a few more minutes. Letting the cake cool correctly is crucial. After baking, cool it in the pan for just ten minutes. Then, move it to a wire rack to cool completely. This helps avoid a soggy cake, which can happen if you leave it in the pan too long. For frosting, rich chocolate buttercream pairs perfectly with this cake. You can also try cream cheese frosting for a tangy twist. Both options enhance the cake's flavor. For a stunning finish, use chocolate shavings or fresh berries on top. Arrange them nicely for an appealing look. You can even add a dusting of powdered sugar for a touch of elegance. Enjoy this masterpiece with your loved ones! For the full recipe, check out the section above. {{image_2}} To elevate your Super Moist Chocolate Cake, consider adding a hint of coffee. Just one tablespoon can deepen the chocolate flavor. If you prefer a fruity twist, try infusing the batter with orange zest or a few drops of mint extract. Both options give your cake a unique taste that surprises and delights. The frosting can change the whole cake experience. A classic chocolate buttercream is always a favorite. Its rich and smooth texture pairs perfectly with the cake's moistness. If you want something tangy, cream cheese frosting works well too. The slight acidity cuts through the sweetness and adds a nice balance. You can make your cake even more exciting by adding some extras. Chopped nuts like walnuts or pecans add a great crunch. If you love fruit, mix in some raspberries or cherries. They bring a fresh burst of flavor and make each bite special. For the full recipe, check out the instructions above! To keep your super moist chocolate cake fresh, store it in an airtight container. This prevents it from drying out. Place the cake in the fridge if you have leftovers. Make sure to let it cool completely before refrigerating. The cake can last in the fridge for up to a week. If you want to store the cake for a longer time, freezing is the way to go. Wrap each piece tightly in plastic wrap. Then, place the wrapped pieces in a freezer bag. This keeps out air and frost. The cake can stay good in the freezer for up to three months. When you're ready to enjoy your cake again, there are easy ways to refresh it. If it's in the fridge, take it out and let it sit for about 30 minutes. This brings it back to room temperature. You can also warm individual slices in the microwave for about 10-15 seconds. To avoid dryness, don't overheat the cake. You just want it warm enough to enhance the flavors. If you froze the cake, let it thaw in the fridge overnight before reheating. You’ll have a delicious slice just like when it was fresh from the oven! To make your chocolate cake more moist, consider these tips: - Use boiling water in the batter. This adds steam and moisture. - Add sour cream, which gives richness and a soft crumb. - Incorporate vegetable oil instead of butter. Oil keeps the cake tender. - Use brown sugar instead of white sugar. Brown sugar has moisture. - Don’t overmix your batter. Mix just until combined to keep it light. Yes, you can use cake flour instead of all-purpose flour. Cake flour has a lower protein content. This means a softer cake with a finer crumb. If you use cake flour, you may need a bit less. Replace one cup of all-purpose flour with 1 cup minus 2 tablespoons of cake flour. The super moist chocolate cake lasts: - At room temperature: 3-4 days in an airtight container. - In the fridge: up to a week in a sealed container. - In the freezer: 2-3 months when wrapped well. Allow it to cool fully before wrapping. You can make this cake ahead of time. Bake the cake, then let it cool completely. Wrap it tightly in plastic wrap. Store it in the fridge for up to a week. You can also freeze it for longer storage. Just be sure to thaw it before frosting. If you don’t have sour cream, try these options: - Plain yogurt works well for a similar texture and taste. - Buttermilk can also be used, but it may change the cake's texture slightly. - Silken tofu blended until smooth can be a dairy-free option. - Cream cheese thinned with a little milk can work too. For the full recipe, refer to the earlier section. Enjoy baking! You now have all the details to make a super moist chocolate cake. We covered the right dry and wet ingredients, outlined step-by-step instructions, and shared tips for perfecting texture. Remember, using boiling water and sour cream is key to moisture. Don’t forget to explore fun variations, like adding coffee or fruits, to spice things up. With proper storing and reheating tips, you can enjoy your cake longer. Dive into baking without fear; this recipe brings tasty results! Happy baking, and may your cake be delicious!

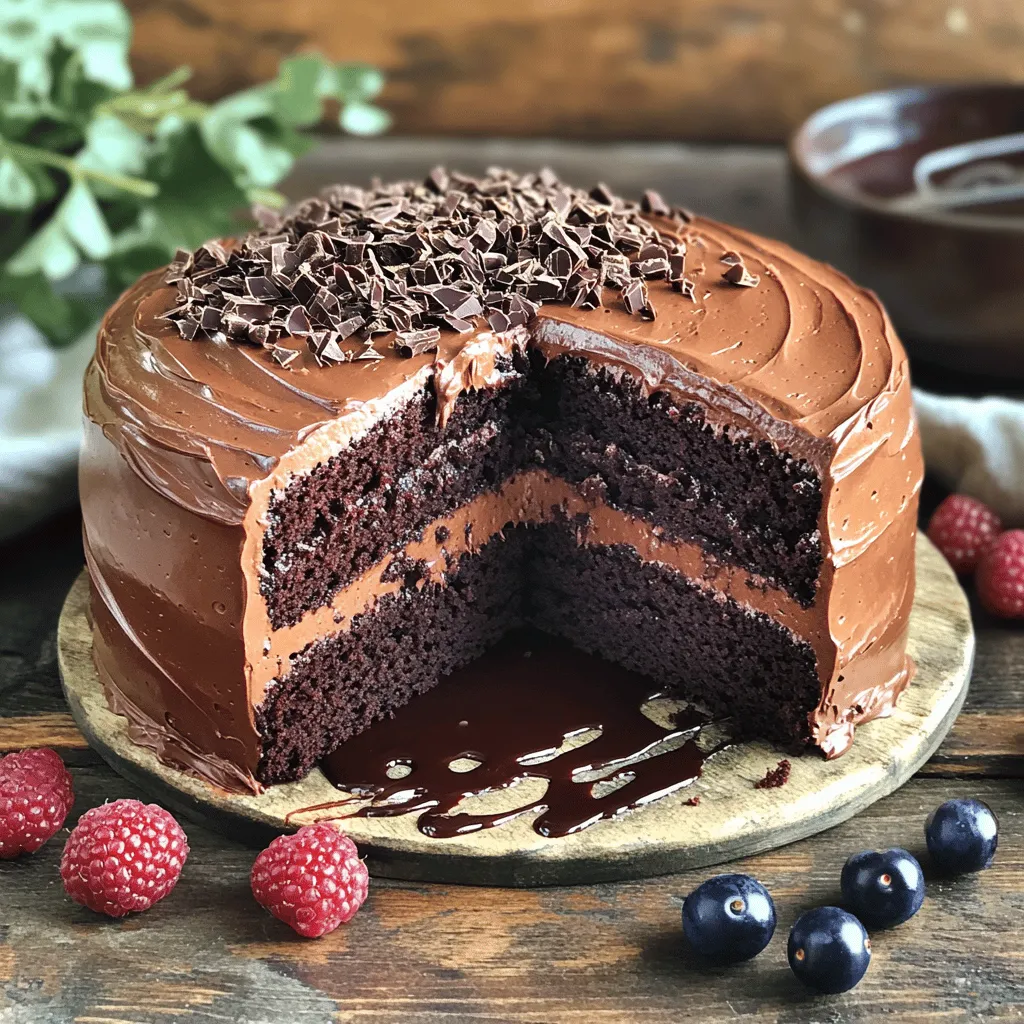
If you crave the ultimate chocolate cake, you’re in the right place! My Super Moist Chocolate Cake is a dream come true for any dessert lover. With rich cocoa and …

Read more

Categories Desserts

Easy Slow Cooker Hawaiian Chicken Delightful Recipe

July 12, 2025 by Chef Theo
- 4 boneless, skinless chicken breasts - 1 cup pineapple chunks (fresh or canned, undrained) - 1/2 cup low-sodium soy sauce - 1/3 cup honey - 2 cloves garlic, minced - 1 tablespoon minced fresh ginger - 1 red bell pepper, sliced - 1 tablespoon cornstarch (optional, for thickening) - 2 green onions, sliced (for garnish) - Cooked rice (for serving) - Additional spices (e.g., black pepper, red pepper flakes) - Other vegetables (e.g., carrots, snow peas) To create this Easy Slow Cooker Hawaiian Chicken, you need simple and fresh ingredients. Start with boneless, skinless chicken breasts. These cook perfectly in the slow cooker. Pineapple adds a sweet and tangy flavor. You can use fresh or canned pineapple; both work well. Soy sauce gives the dish a savory base. I recommend low-sodium soy sauce to keep it healthier. Honey balances the saltiness with sweetness. Minced garlic and fresh ginger add depth and warmth to the dish. For color and crunch, add a sliced red bell pepper. If you want a thicker sauce, mix in cornstarch towards the end of cooking. Finally, garnish with sliced green onions for freshness. Serve this meal over cooked rice to soak up all the delicious flavors. Feel free to get creative! Add spices like black pepper or red pepper flakes for extra heat. You can also toss in other vegetables like carrots or snow peas for added nutrition. This dish is all about your taste, so make it your own! For the complete recipe, check out the Full Recipe section. First, place the chicken breasts in the slow cooker. Make sure they lie flat and do not overlap. Next, grab a medium bowl. In this bowl, mix the pineapple chunks, soy sauce, honey, minced garlic, and ginger. Stir well until everything blends nicely. This sauce will add a sweet and tangy flavor to the chicken. Now, pour the sauce over the chicken. Make sure every piece gets a good coating. This is key for flavor! Then, add the sliced red bell pepper on top of the chicken. It will add color and crunch. You can choose how long to cook it. Set the slow cooker to low for 4-6 hours or high for 2-3 hours. The chicken should be cooked through and very tender. If you want a thicker sauce, mix cornstarch with a little water. Stir it into the sauce about 30 minutes before serving. This will give you a nice, rich sauce. Once it’s done, shred the chicken right in the slow cooker. Use two forks to mix it well with the sauce. This is a great time to serve it over cooked rice. Top with sliced green onions for a fresh touch. Enjoy your Easy Slow Cooker Hawaiian Chicken! For the complete method, check the Full Recipe. To boost the flavor of your Hawaiian chicken, you can marinate the chicken. Try mixing soy sauce, honey, and garlic for a tasty base. Let it sit for at least 30 minutes before cooking. If you want to swap ingredients for dietary needs, use coconut aminos instead of soy sauce. You can also add maple syrup instead of honey for a vegan option. To check if the chicken is done, use a meat thermometer. It should read 165°F (75°C) in the thickest part. If you have larger chicken breasts, you may need to adjust the cooking time. For bigger pieces, add 30 minutes on low or 15 minutes on high. Serving your Hawaiian chicken over rice makes a great dish. Use fluffy white rice or even brown rice for a nutty flavor. For garnishing, slice green onions and sprinkle them on top. You can also add sesame seeds for a nice touch. This not only looks good but adds extra flavor too. {{image_2}} You can switch up the protein in this dish for a new taste. Using turkey or pork works really well. Simply replace the chicken with an equal amount of turkey or pork. This change adds a different flavor that is still delicious. For a vegetarian option, try jackfruit. Jackfruit has a meaty texture and absorbs flavors well. You can use about 2 cups of canned jackfruit. Just drain and shred it before adding. It makes a great meat substitute that fits in perfectly. To change the flavor, consider adding teriyaki sauce or your favorite spices. A splash of teriyaki sauce gives a sweet, savory twist. You could also try adding black pepper or red pepper flakes for some heat. Tropical fruit variations can also elevate this dish. Try using mango or papaya instead of pineapple. These fruits add a unique sweetness that pairs well with the savory sauce. You can mix and match fruits to find your favorite flavor combo. For the full recipe, check the Easy Slow Cooker Hawaiian Chicken section above. After cooking, you may have some tasty leftovers. To store them, let the chicken cool down. Then, place it in an airtight container. This keeps the flavors fresh and safe. You can store it in the fridge for up to 3-4 days. Make sure to label your container with the date. This way, you know when to eat it by. If you want to save some for later, freezing is a great option. Divide the chicken into single portions. Use freezer-safe bags or containers for this. Squeeze out any air to prevent freezer burn. You can freeze the chicken for up to 3 months. When you’re ready to eat, thaw it in the fridge overnight. To reheat, you can use the microwave or a stovetop. If using the microwave, cover the dish to keep moisture in. Heat it in short bursts, stirring in between. If using the stovetop, add a splash of water to keep it juicy. Enjoy your Easy Slow Cooker Hawaiian Chicken again! How long does it take to cook chicken in a slow cooker? It takes about 4 to 6 hours on low heat or 2 to 3 hours on high heat. The chicken should be tender and cooked through. Cooking times may vary based on your slow cooker’s model and the thickness of the chicken breasts. Can I make this recipe without soy sauce? Yes, you can replace soy sauce with coconut aminos or a gluten-free soy sauce. Both options will give your dish a nice flavor. If you want a sweeter taste, consider adding a bit more honey. What to serve with Easy Slow Cooker Hawaiian Chicken? I recommend serving it over a bed of rice. You can also add steamed vegetables like broccoli or snap peas. A side salad with a light dressing pairs well too, adding freshness. Can I use frozen chicken? Yes, you can use frozen chicken. Just extend the cooking time by an hour or so. Ensure the chicken reaches a safe temperature of 165°F (75°C) before serving. Is it necessary to brown the chicken first? No, browning the chicken is not necessary for this recipe. Cooking the chicken directly in the slow cooker keeps it moist and flavorful. This recipe for Easy Slow Cooker Hawaiian Chicken is simple and full of flavor. You learned about the key ingredients, step-by-step cooking, and helpful tips. Variations allow you to customize the dish with different proteins or spices. Plus, you can store leftovers for later meals. Now, you can easily whip up a tasty meal everyone will enjoy. Remember, you can adapt and experiment to make it your own. Enjoy your cooking adventure!

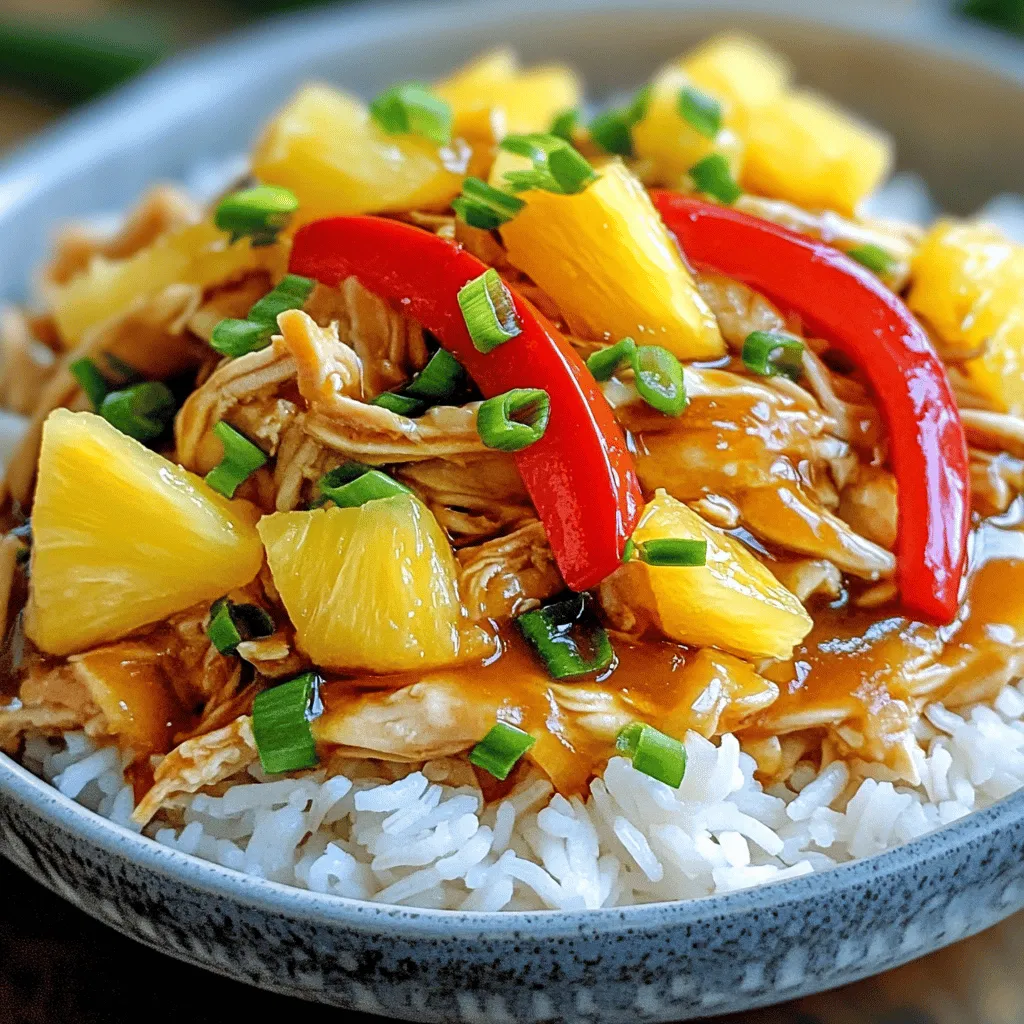
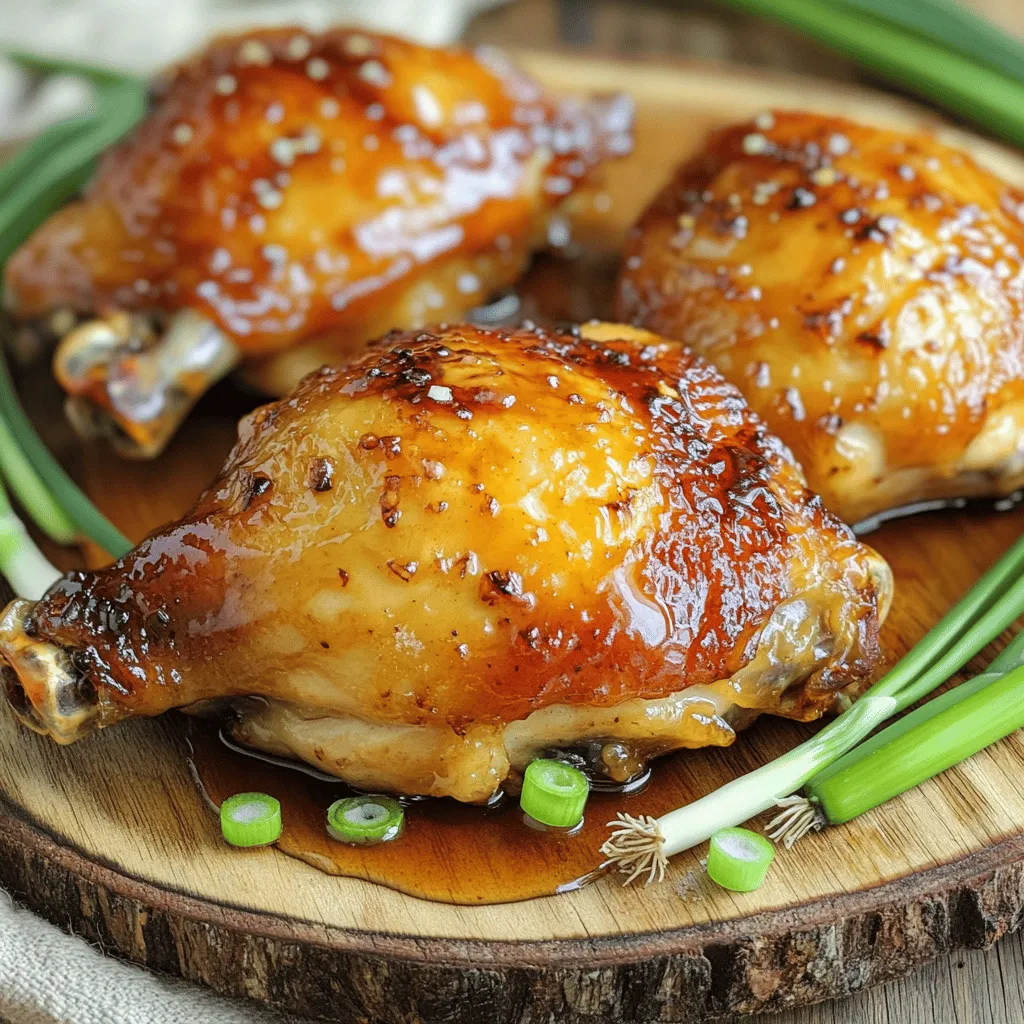
Welcome to your new favorite dish: Easy Slow Cooker Hawaiian Chicken! If you crave sweet and savory flavors in a simple recipe, you’re in the right place. This dish combines …

Read more

Categories Dinner

Garlic Ginger Green Beans Quick and Flavorful Dish

July 12, 2025 by Chef Theo
To make garlic ginger green beans, you will need: - 1 pound fresh green beans, trimmed - 3 tablespoons olive oil - 4 cloves garlic, minced - 1 tablespoon fresh ginger, minced - 1 tablespoon soy sauce (or tamari for gluten-free) - 1 teaspoon sesame oil - 1 teaspoon red pepper flakes (adjust based on heat preference) - Salt and pepper to taste - 2 tablespoons toasted sesame seeds (for garnish) - Fresh cilantro or green onions (for garnish) If you don’t have some ingredients on hand, here are a few swaps: - Olive oil can be replaced with avocado oil or vegetable oil. - Soy sauce can be substituted with coconut aminos for a low-sodium option. - Fresh ginger can be swapped with ground ginger in a pinch, but use less. - If you want less heat, skip the red pepper flakes or use paprika instead. When selecting green beans, look for these traits: - Choose bright green beans without brown spots or blemishes. - The beans should feel firm and snap easily. - Avoid limp or dull-looking beans, as they may not be fresh. - If possible, buy organic green beans to ensure better quality and taste. Using quality ingredients will make your garlic ginger green beans shine. Check out the Full Recipe to get all the details! First, we need fresh green beans. Trim the ends and rinse them. Next, bring a pot of salted water to a boil. Add the green beans and blanch them for 2 to 3 minutes. They should be bright green and tender-crisp. Drain the green beans and move them to an ice bath. This stops the cooking and keeps them crunchy. After a minute, drain them again and set them aside. Now it’s time to heat things up. In a large skillet or wok, pour in 3 tablespoons of olive oil. Turn the heat to medium-high. Once the oil is hot, add 4 minced cloves of garlic and 1 tablespoon of minced ginger. Sauté these for about 30 seconds to 1 minute. You want them fragrant but not burned. The smell will be amazing! Add the blanched green beans to the skillet. Toss them for about 3 to 5 minutes. We want them heated through and slightly tender. Now, drizzle 1 tablespoon of soy sauce and 1 teaspoon of sesame oil over the green beans. Sprinkle in 1 teaspoon of red pepper flakes, plus salt and pepper to taste. Toss everything together. Make sure the green beans are well-coated with the flavors. It’s time to serve! Transfer the green beans to a serving dish. For a finishing touch, sprinkle 2 tablespoons of toasted sesame seeds on top. You can also add fresh cilantro or sliced green onions for garnish. These green beans pair well with rice or grilled meats. Enjoy your delicious garlic ginger green beans! For the full recipe, check out the earlier section. To boost the taste, try adding a squeeze of lemon juice. This adds a bright note. You can also toss in sliced bell peppers for color and crunch. Another option is to mix in sliced mushrooms for a rich, earthy flavor. If you like nuts, add chopped almonds or cashews for a nice crunch. These additions make the dish even better. One mistake is overcooking the green beans. They should be bright green and crisp. Another error is skipping the ice bath after blanching. This keeps them vibrant and crunchy. Avoid using too much soy sauce, as it can make the dish too salty. Lastly, don't forget to taste as you cook. Adjust the seasoning to suit your taste. To cook green beans just right, start with fresh beans. Look for ones that are bright and firm. Blanch them in boiling water for 2-3 minutes. Then, quickly transfer them to an ice bath. This halts the cooking process and locks in color. When stir-frying, keep the heat high and stir often. This ensures that they cook evenly and stay crisp. For the best results, follow the Full Recipe carefully. Enjoy your tasty green beans! {{image_2}} You can easily add protein to garlic ginger green beans. Tofu or chicken works great. For tofu, use firm or extra-firm. Cut it into cubes and sauté it in the skillet before adding the garlic and ginger. This way, the tofu gets crispy and has flavor. If using chicken, cut it into bite-sized pieces. Cook the chicken until it is no longer pink, then add the garlic and ginger. This makes your dish heartier and more filling. Feel free to mix in other vegetables too. Carrots, bell peppers, or broccoli can add color and crunch. Slice the carrots thinly so they cook quickly. Bell peppers can be cut into strips for a nice texture. Broccoli florets can be blanched with the green beans. Just remember to adjust cooking time based on the veggies you choose. This not only adds variety but also boosts the dish's nutrition. You can control the heat in this dish easily. If you like it mild, skip the red pepper flakes or use less. On the other hand, if you want it spicy, add more flakes or even a dash of hot sauce. You could also try fresh chili peppers for a different flavor. Adjusting spice levels lets you cater the dish to your taste. This makes garlic ginger green beans a versatile side for any meal. Try these variations to keep your cooking exciting and fresh. For the full recipe, check out the details above. Store leftover garlic ginger green beans in an airtight container. Place them in the fridge. They will last for about 3 days. Make sure they cool down before sealing. This keeps them fresh and tasty. To reheat, use a skillet on medium heat. Add a splash of olive oil. Heat for about 3-4 minutes, stirring often. This helps retain the crunch. You can also use the microwave. Heat for 30 seconds, stir, then heat again if needed. You can freeze garlic ginger green beans for longer storage. First, blanch them for 2 minutes. Drain and cool them in ice water. After that, dry them thoroughly. Place in freezer bags and remove excess air. They can stay fresh for up to 3 months. When ready to use, thaw in the fridge overnight. Then reheat as usual. For the full recipe, check out the details above. I like to use fresh green beans. They taste better and have a nice crunch. Look for beans that are bright green and firm. Avoid beans with brown spots or wrinkles. You can use haricots verts for a more delicate flavor. Yes, you can make garlic ginger green beans ahead. Cook the beans and store them in the fridge for up to three days. When you are ready to serve, just heat them up in a skillet. This keeps them fresh and tasty. Absolutely! You can use tamari for a gluten-free option. If you want a soy-free choice, try coconut aminos. They add a nice umami flavor while keeping it vegetarian. This dish has roots in Asian cuisine, where garlic and ginger are popular. It combines simple and fresh flavors. Many cultures use green beans in stir-fries, making it a versatile dish worldwide. To spice it up, add more red pepper flakes. You can also use fresh chili peppers for an extra kick. If you like heat, try adding sriracha or chili oil when serving. Yes, you can use frozen green beans. They are quick and easy to prepare. Just thaw them and skip the blanching step. However, fresh beans will give you a better texture and flavor. For the best results, follow the [Full Recipe]. In this blog post, we explored the essential ingredients, preparation steps, and tips for cooking garlic ginger green beans. We discussed how to enhance flavors, avoid mistakes, and use different variations. Finally, I shared smart ways to store and reheat leftovers. The right approach can make your green beans shine. Try these ideas, and enjoy a tasty dish that impresses everyone at your table. Your cooking will become more fun and rewarding!

Looking for a quick and delicious way to enjoy your veggies? Garlic Ginger Green Beans are just what you need! This simple dish combines fresh green beans with zesty garlic …

Read more

Categories Dinner
Older posts
Newer posts
← Previous Page1 … Page20 Page21 Page22 … Page94 Next →

TOASTED RECIPES

Where ideas are warm, crisp, and ready to serve! 🍞

PAGES

Home About Contact Privacy Policy Terms & Conditions Cookie Policy GDPR Policy Copyright Policy Disclaimer

CATEGORIES

Appetizers Desserts Salads Breakfast Dinner

Contact

  • Pinterest
  • Mail
Copyright © 2025 Toasted Recipes. All rights reserved.