Skip to content
toastedrecipes.com
  • Home
  • Appetizers
  • Desserts
  • Salads
  • Breakfast
  • Dinner
  • Privacy Policy
  • Contact
  • About

Chef Theo

Caramel Apple Pie Bombs Delightful Fall Treats

July 20, 2025 by Chef Theo
- 2 cups Granny Smith apples, peeled and diced - 1 cup brown sugar - 1 package refrigerated crescent roll dough - 1 cup caramel sauce - 1/2 teaspoon vanilla extract - 1/4 cup chopped pecans (optional) - Powdered sugar for dusting - Cinnamon for garnish The main ingredients for caramel apple pie bombs are key to their flavor. I love using Granny Smith apples. They give a nice tartness that balances the sweet brown sugar. Brown sugar adds depth in taste. It makes the filling rich and sticky. The crescent roll dough is perfect for our bombs. It bakes up golden and flaky. It holds the filling well, creating a pocket of deliciousness. For those extra touches, we have caramel sauce. It drizzles beautifully over the top, making them even more tempting. The vanilla extract adds a hint of warmth. If you like a bit of crunch, you can add chopped pecans. They give a nice texture and nutty flavor. For the topping, we use powdered sugar. A light dusting makes everything look fancy. A sprinkle of cinnamon adds warmth and a lovely aroma. Check out the Full Recipe for all the steps to make these treats! 1. Preheat oven and prepare baking sheet Set your oven to 375°F (190°C). Line a baking sheet with parchment paper. This helps the bombs bake evenly and prevents sticking. 2. Sautéing apples with sugar and spices In a medium skillet, melt 1 tablespoon of butter over medium heat. Add 2 cups of diced Granny Smith apples, 1 cup of brown sugar, 1 teaspoon of cinnamon, and 1 tablespoon of lemon juice. Cook for 5-7 minutes. Stir often until the apples turn soft and shiny. Remove from heat, and mix in 1/2 teaspoon of vanilla extract and optional chopped pecans. Let the mixture cool a bit. 1. Preparing the crescent roll dough Unroll the refrigerated crescent roll dough. Separate it into triangles. Each triangle will form one pie bomb. 2. Stuffing the dough with apple mixture At the wide end of each triangle, place a tablespoon of the apple mixture. Drizzle a teaspoon of caramel sauce over it. This adds extra flavor and sweetness. 1. Rolling and sealing each bomb Starting from the wide end, roll the dough around the filling. Pinch the edges tightly to seal each bomb. Make sure there are no gaps where the filling can leak out. 2. Baking duration and indicators of doneness Place the rolled bombs on your prepared baking sheet, leaving space between them. Bake for 12-15 minutes or until they turn golden brown. When done, they will look puffed and lightly crisp. Follow these steps to create your caramel apple pie bombs. For the full recipe, check the detailed instructions above. Enjoy this delightful fall treat! To make the best caramel apple pie bombs, start with the right apples. I recommend using Granny Smith apples. They are tart and give a great balance to the sweet filling. Next, balance sweetness with spices. I use one teaspoon of cinnamon in the filling. It adds warmth and depth. A little lemon juice brightens the flavor too. To avoid gaps in the dough, ensure you seal the edges well. When rolling up the crescent dough, pinch any open seams tightly. This keeps the filling inside. After baking, let the bombs cool for a bit. This cooling time helps the filling set and makes them easier to serve. When it comes to serving, a warm platter looks great. Arrange the bombs nicely and add a small bowl of caramel sauce for dipping. A sprinkle of extra cinnamon on top adds a nice touch. Pair these treats with ice cream or whipped cream. The cold creaminess complements the warm, gooey bombs perfectly. For the full recipe, check out the detailed steps above. {{image_2}} You can make caramel apple pie bombs even more fun! Try adding chocolate or caramel chips for extra sweetness. You can also explore different nuts like walnuts or almonds to add a nice crunch. Each choice adds a new twist to your treats. If you want a healthier option, use whole wheat crescent rolls. They add fiber without losing taste. You can also substitute brown sugar with honey or maple syrup. These swaps give your bombs a unique flavor while keeping them sweet. For different holidays, you can modify the spices. Try adding nutmeg or ginger to bring out the Fall flavors. You can also switch up the fruit. Pears or cranberries can work great in these bombs. Each version gives a fresh take on a classic treat. For the full recipe, check out the Caramel Apple Pie Bombs section earlier in this article. To keep your caramel apple pie bombs fresh, it’s best to store leftovers in the refrigerator. Place them in an airtight container. This keeps them moist and tasty. If you want to save them for later, freezing is a great option. Wrap each bomb in plastic wrap and place them in a freezer bag. This way, they stay fresh for up to three months. When you’re ready to enjoy your treats again, reheating is key. The best way is to use an oven. Preheat it to 350°F (175°C). Place the bombs on a baking sheet for about 10 minutes. This warms them through and keeps them crispy. If you’re in a rush, you can use a microwave. Heat them for 15-20 seconds, but this may make them soft. In the fridge, your caramel apple pie bombs last about four days. Look for signs of spoilage, like mold or a sour smell. If you see any, it’s best to toss them. Always check your treats before enjoying them again to ensure they are safe to eat. What is the best way to peel apples for this recipe? To peel apples, use a sharp peeler. Start at the top and work your way down. Make sure to remove all the skin. This helps the apples cook evenly in your bombs. Can I make these ahead of time? Yes, you can prepare the filling a day before. Store it in the fridge. When you're ready, just assemble and bake the bombs fresh. Can I use different types of dough? Absolutely! You can use puff pastry or biscuit dough. Each will give a different texture but will still taste great. What can I use instead of brown sugar? If you don’t have brown sugar, try white sugar mixed with a bit of molasses. You can also use honey or maple syrup for a different flavor. What can I serve with caramel apple pie bombs? These bombs taste amazing with vanilla ice cream. You could also serve them with whipped cream or extra caramel sauce. They are perfect for a cozy fall dessert. How do I enhance the caramel flavor? To boost the caramel flavor, add a pinch of sea salt to the sauce. You could also drizzle more caramel on top right before serving. In this article, we explored how to make delicious caramel apple pie bombs. We covered the key ingredients, including Granny Smith apples and crescent roll dough. I shared step-by-step instructions for preparation, baking, and tips to enhance flavor. You can also try fun variations or healthier options. Remember to store your leftovers properly for later enjoyment. Baking can be simple and fun, and these treats are perfect for any occasion. Enjoy making this tasty dessert with your own unique twist!

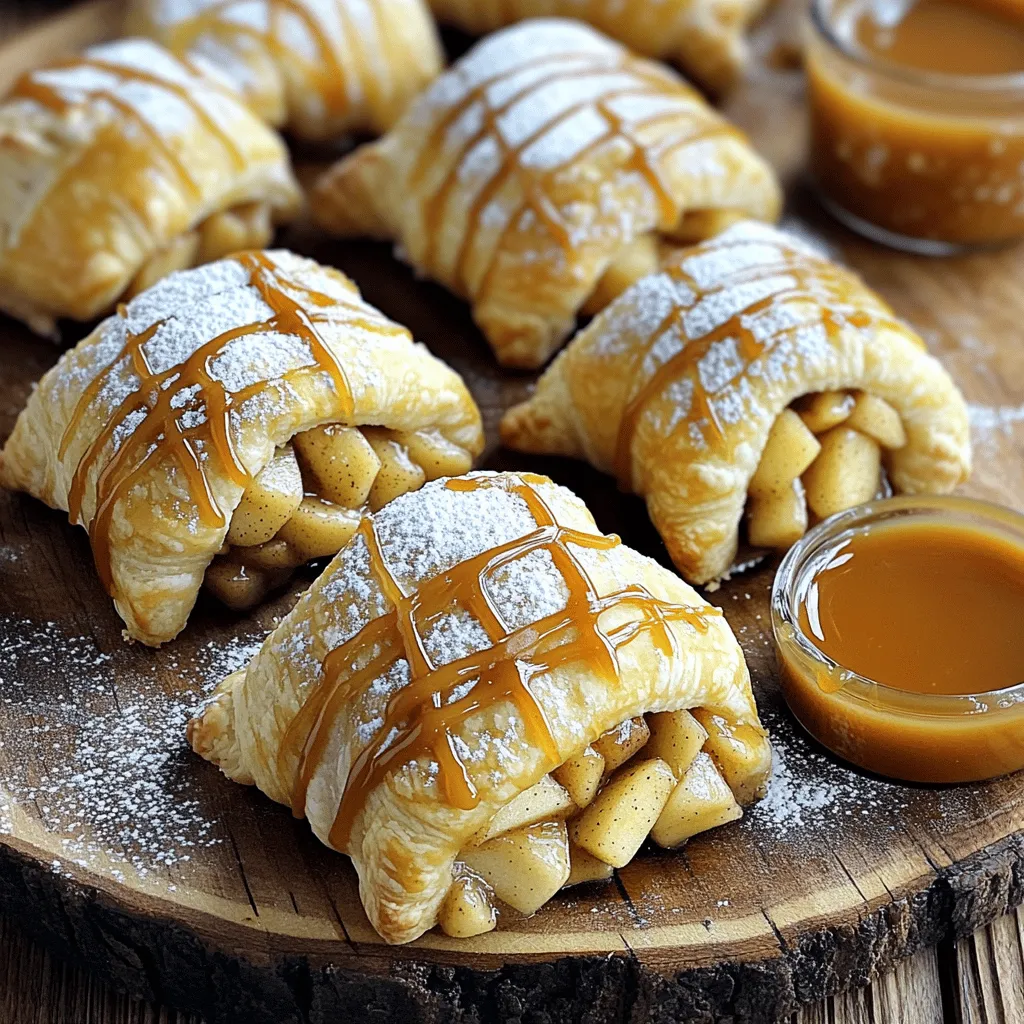
Get ready to enjoy fall with Caramel Apple Pie Bombs! These delicious treats pack the flavors of sweet Granny Smith apples, rich caramel, and crunchy pecans, all wrapped in flaky …

Read more

Categories Desserts

Mini Pumpkin Bread with Cinnamon Swirl Delight

July 20, 2025 by Chef Theo
- 1 cup canned pumpkin puree - 1/2 cup vegetable oil - 3/4 cup brown sugar - 1/4 cup granulated sugar - 2 large eggs - 1 teaspoon vanilla extract These main ingredients set the base for the mini pumpkin bread. Canned pumpkin puree brings a warm, rich flavor and moisture. Vegetable oil keeps the bread tender and soft. Brown sugar adds depth, while granulated sugar gives a nice sweetness. Eggs help bind everything together, and vanilla extract brings a lovely aroma. - 1 1/2 cups all-purpose flour - 1 teaspoon baking powder - 1/2 teaspoon baking soda - 1 teaspoon ground cinnamon - 1/2 teaspoon ground nutmeg - 1/4 teaspoon ground ginger - 1/4 teaspoon salt The dry ingredients are just as important. All-purpose flour provides structure. Baking powder and baking soda help the bread rise. Ground cinnamon, nutmeg, and ginger add warm spices that create a cozy feel. Salt boosts flavor and balances the sweetness. - 1/4 cup granulated sugar - 2 teaspoons ground cinnamon The cinnamon swirl components make this bread special. Mixing granulated sugar with ground cinnamon creates a sweet and spicy layer. This swirl adds a beautiful marbled effect and a burst of flavor in every bite. For the full recipe, check out the [Full Recipe]. Enjoy making this delightful mini pumpkin bread! - Preheat oven to 350°F (175°C). - Prepare mini loaf pan by greasing it or lining it with parchment paper. - In a mixing bowl, combine: - 1 cup canned pumpkin puree - 1/2 cup vegetable oil - 3/4 cup brown sugar - 1/4 cup granulated sugar - 2 large eggs - 1 teaspoon vanilla extract - Whisk these together until smooth. - In a separate bowl, whisk together: - 1 1/2 cups all-purpose flour - 1 teaspoon baking powder - 1/2 teaspoon baking soda - 1 teaspoon ground cinnamon - 1/2 teaspoon ground nutmeg - 1/4 teaspoon ground ginger - 1/4 teaspoon salt - Make sure they mix evenly. - Gently fold the dry mixture into the wet mixture. - Stir until just combined; some lumps are okay. - In a small bowl, mix: - 1/4 cup granulated sugar - 2 teaspoons ground cinnamon - This creates a sweet swirl for your bread. - Pour half of the pumpkin batter into the prepared pan. - Sprinkle half of the cinnamon-sugar mix over the batter. - Pour the rest of the batter on top. - Then, add the remaining cinnamon-sugar mix. - Use a knife to swirl the mix into the batter in a figure-eight motion. - Place the loaf pan in the oven and bake for 25-30 minutes. - Check with a toothpick; it should come out clean. For the full recipe, please refer to the previous sections. To keep your mini pumpkin bread moist, do not overmix. Mixing too much can create tough bread. When you add the dry mix to the wet mix, stir gently. A few lumps in the batter are okay. This will help maintain a light and fluffy texture. Swirling the cinnamon mix is key to a beautiful look. After layering the batter and cinnamon sugar, use a knife. Gently swirl in a figure-eight motion. This creates the perfect marbled effect. Avoid going too deep, or you might mix it all together. Focus on the top layer to keep the swirl visible. To check if your bread is done, use a toothpick. Insert it in the center; it should come out clean. If the toothpick has wet batter, bake a few more minutes. Keep an eye on the time, as different ovens may bake unevenly. Adjust your bake time if needed. Enjoy your perfectly baked mini pumpkin bread! {{image_2}} You can make this mini pumpkin bread even more fun. Adding chocolate chips or nuts gives a nice crunch. Use about 1/2 cup of your favorite nuts or chips. Mix them in just before pouring the batter into the pan. You can also try different spices like allspice or cloves. These can add warmth and depth to the flavor. If you want a healthier treat, switch the sugars. Use honey or maple syrup instead of brown and granulated sugar. You can replace the vegetable oil with applesauce for a lighter option. This keeps the bread moist while cutting down on fat. For those who need gluten-free options, you have choices! You can use a gluten-free all-purpose flour mix. Make sure it has a good binding agent like xanthan gum. This will help the bread hold together well. You might also try almond flour or coconut flour for different flavors. Each flour gives a unique taste and texture to your mini pumpkin bread. For the full recipe, check out the detailed instructions above. To keep your mini pumpkin bread fresh at room temperature, place it in an airtight container. This helps retain moisture and flavor. Make sure to cool the bread completely before sealing it up. It can last for about 3 to 4 days. If you want to enjoy it longer, store it in the fridge. Just know that it may dry out a bit faster. If you want to save some mini pumpkin bread for later, freezing is a great option. Wrap each loaf tightly in plastic wrap or aluminum foil. Then, place the wrapped loaves in a freezer bag. Label the bag with the date for easy tracking. You can freeze the bread for up to 3 months. When you're ready to enjoy it, simply remove a loaf from the freezer and let it thaw in the fridge overnight. To warm up your mini pumpkin bread, preheat your oven to 350°F (175°C). Remove the bread from its wrapping and place it on a baking sheet. Heat it for about 10 to 15 minutes or until warm throughout. If you're in a hurry, a microwave works too! Just heat a slice for about 15 to 20 seconds. Enjoy it fresh and warm for the best taste! Mini pumpkin bread lasts about 3 to 5 days at room temperature. Store it in an airtight container. If you want it to last longer, you can freeze it. In the freezer, it can last up to 3 months. Just make sure to wrap it well before freezing. Yes, you can use fresh pumpkin! Roast the pumpkin until soft, then puree it. Make sure to drain any excess water. This keeps the bread from being too wet. Fresh pumpkin gives a nice, bright flavor to the bread. Mini pumpkin bread is great on its own or with spreads. I love cream cheese or butter. You can also serve it with a hot drink. Coffee or tea pairs well with the warm spices. It makes a lovely breakfast or snack. Yes, you can substitute eggs if needed. Use 1/4 cup of applesauce or mashed banana for each egg. This keeps the bread moist. You can also use flaxseed meal mixed with water. Just mix 1 tablespoon of flaxseed with 2.5 tablespoons of water. Let it sit for a few minutes before adding it to the mix. Absolutely! Doubling the recipe is easy. Just multiply each ingredient by two. Keep the baking time the same, but check for doneness. Larger loaves may take a few extra minutes to bake. If you don’t have a mini loaf pan, use a regular loaf pan. Just adjust the baking time. You can also use muffin tins to make pumpkin muffins. Each muffin will bake faster, about 15 to 20 minutes. Check them with a toothpick for doneness. For the full recipe, click here. This blog post covered how to make delicious mini pumpkin bread. We explored the key ingredients, including pumpkin puree, sugars, and spices. You learned step-by-step instructions, from prepping the oven to baking. Tips helped ensure moisture and perfect swirling. Variations offered creative ideas, while storage advice lets you enjoy it later. Mini pumpkin bread is easy to make and so tasty. Try different flavors and have fun! Your baking journey starts now!

Get ready to fall in love with baking! My Mini Pumpkin Bread with Cinnamon Swirl Delight is the perfect treat for autumn. With a blend of warm spices and a …

Read more

Categories Desserts

Chewy Pumpkin Snickerdoodle Cookies Easy Treat Recipe

July 20, 2025 by Chef Theo
- 1 cup unsalted butter, softened - 1 cup packed brown sugar - 1/2 cup granulated sugar - 1/2 cup pumpkin puree - 2 large eggs - 3 cups all-purpose flour - 2 teaspoons cream of tartar - 1 teaspoon baking soda - 1/2 teaspoon salt - 1 tablespoon ground cinnamon - 1/2 teaspoon nutmeg - 1/4 teaspoon ground ginger - 1/4 teaspoon allspice - 1/3 cup granulated sugar (for rolling) - 2 teaspoons cinnamon (for rolling) When I make these chewy pumpkin snickerdoodle cookies, I love using fresh, quality ingredients. The unsalted butter gives a rich taste. Brown sugar adds a cozy sweetness, while granulated sugar helps the cookies spread just right. Pumpkin puree makes the cookies soft and moist. It also adds a lovely fall flavor. I use large eggs to bind everything together. Three cups of all-purpose flour create the perfect structure for the cookies. Cream of tartar is important for that classic snickerdoodle tang. Baking soda makes them rise, while salt adds balance. Ground cinnamon, nutmeg, ginger, and allspice bring warmth and spice to each bite. Finally, the cinnamon-sugar mix for rolling gives a beautiful finish. It also adds extra sweetness. For the full recipe, check the details provided above. You’ll enjoy baking and sharing these delightful cookies! 1. Preheat the oven to 350°F (175°C). 2. Line your baking sheets with parchment paper. 1. In a large bowl, cream together the softened butter, brown sugar, and granulated sugar. 2. Mix until it becomes light and fluffy, about 3-4 minutes. 3. Add the pumpkin puree and mix until everything is well combined. 4. Beat in the eggs one at a time. Make sure each egg is mixed in before adding the next. 1. In another bowl, whisk together the flour, cream of tartar, baking soda, salt, cinnamon, nutmeg, ginger, and allspice. 2. Gradually mix the dry ingredients into the wet ingredients. Mix only until combined; do not overmix. 1. In a small bowl, combine 1/3 cup granulated sugar and 2 teaspoons of cinnamon for rolling. 2. Scoop out tablespoon-sized portions of dough and roll them into balls. 3. Roll each ball in the cinnamon sugar mix until fully coated. 4. Place the dough balls on the prepared baking sheets, spacing them about 2 inches apart. 1. Bake for 10-12 minutes or until the edges are lightly golden. The centers will look soft. 2. Allow the cookies to cool on the baking sheets for about 5 minutes. 3. Transfer them to wire racks to cool completely. For the full recipe, check the detailed instructions above. Enjoy your baking! - Measure ingredients accurately. Use a scale for best results. - Avoid overmixing the dough. This keeps cookies chewy and soft. - Let cookies cool on wire racks. This allows air to circulate around them. - Store cookies in an airtight container. This keeps them fresh for longer. - Stack cookies on a decorative plate. It makes for a pretty display. - Pair cookies with tea or coffee. This makes a cozy snack time. These tips will help you create delightful chewy pumpkin snickerdoodle cookies every time. For the full recipe, check the section above! {{image_2}} You can make your cookies fit your needs with simple swaps. If you want a dairy-free option, use coconut oil instead of butter. This gives the cookies a nice flavor and texture. For gluten-free cookies, substitute all-purpose flour with gluten-free flour. This keeps the cookies chewy and tasty. Want to mix it up? Stir in chocolate chips or chopped pecans for extra texture. This adds a fun crunch. If you like more flavor, add a splash of vanilla extract. It brings out the warmth of the spices and makes your cookies even better. You can enhance the fall vibes by adding other spices like cloves. This will deepen the flavor. Another great idea is to top the cookies with cream cheese frosting. It adds a sweet and creamy layer that feels festive. Try these ideas to make your chewy pumpkin snickerdoodle cookies even more special. You can find the Full Recipe above. To keep your chewy pumpkin snickerdoodle cookies fresh, store them in an airtight container at room temperature. This keeps them soft and chewy. If you place them in the fridge, they may get a bit hard. So, I recommend avoiding the fridge for best results. You can freeze both unbaked dough and baked cookies. To freeze unbaked dough, scoop out the dough balls and place them on a baking sheet. Freeze them until solid, then transfer them to a freezer bag. This keeps them fresh for up to three months. For baked cookies, let them cool completely first. Then, place them in an airtight container or a freezer bag. They also last for about three months this way. When you’re ready to enjoy, thaw them at room temperature or warm them slightly in the oven. For the full recipe, refer back to the main article. Can I use canned pumpkin puree? Yes, you can use canned pumpkin puree. It saves time and works great. Just make sure it’s pure pumpkin and not pumpkin pie filling. How long can I store these cookies? You can store these cookies for about a week. Keep them in an airtight container. They stay fresh and tasty for several days. What can I do if the cookies spread too much while baking? If your cookies spread too much, try chilling the dough for 30 minutes before baking. This helps keep their shape. Also, make sure you measure your flour correctly. Can I double the recipe? Yes, you can double the recipe easily. Just make sure you have enough space on your baking sheets. You may need to bake in batches. How do I achieve a softer cookie? To get softer cookies, do not overbake them. Take them out when the edges are golden but the center looks soft. They will firm up as they cool. You now have everything needed to make these chewy pumpkin snickerdoodle cookies. We started with the right ingredients and followed each simple step. Remember, accurate measuring and gentle mixing are key for the best texture. You can try fun variations to make them your own. Store your cookies properly to maintain their freshness and enjoy them with a hot drink. Baking these cookies is a warm way to celebrate the season. Now, it’s time to enjoy your delicious creations!

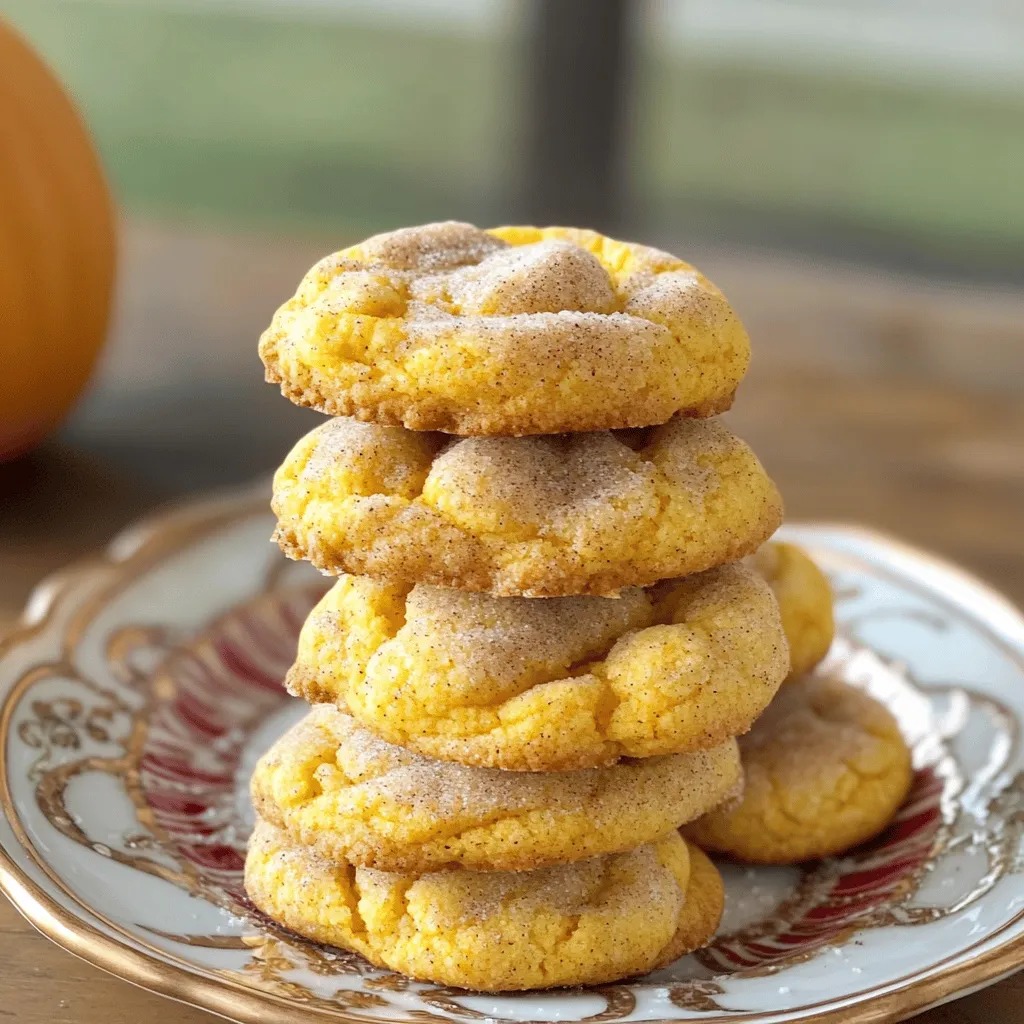
Fall is the perfect time to indulge in delicious treats, and these chewy pumpkin snickerdoodle cookies are a must-try! With their warm spices and sweet pumpkin flavor, you can impress …

Read more

Categories Desserts

Cowboy Stew Hearty Meal for Gathering Family Together

July 20, 2025 by Chef Theo
When making Cowboy Stew, it is key to gather fresh and simple ingredients. This stew is hearty and full of flavor, perfect for sharing with family. Here’s what you need: - 1 lb (450g) ground beef - 1 cup onion, diced - 2 cloves garlic, minced - 2 cups diced potatoes - 1 can (15 oz) diced tomatoes - 1 can (15 oz) black beans, drained and rinsed - 1 cup corn (frozen or fresh) - 2 cups beef broth - 1 tablespoon chili powder - 1 teaspoon cumin - Salt and pepper to taste - 1 tablespoon olive oil - Fresh cilantro, chopped (for garnish) These ingredients blend well to create a warm, filling stew. The ground beef adds richness, while the beans and corn give it a nice texture. The spices, like chili powder and cumin, bring warmth and depth to the dish. You can find this full recipe for Cowboy Stew in other sections of this guide. Remember, using fresh ingredients makes a big difference in taste. Enjoy cooking! 1. Start by heating the olive oil in a large pot over medium heat. 2. Add the diced onions and sauté them until they turn soft, about 5 minutes. 3. Next, toss in the minced garlic and cook for one more minute. This brings out a great aroma. 4. Now, add the ground beef to the pot. Break it apart as it cooks. Brown it for about 6-8 minutes. Drain any extra fat. 1. Time to add the heart of the stew! Toss in the diced potatoes, canned tomatoes with their juice, black beans, and corn. 2. Pour in the beef broth. This will give your stew a rich flavor. 3. Add the chili powder, cumin, salt, and pepper. Stir everything well to mix the flavors. Make sure the potatoes are covered by the liquid. 1. Bring the mixture to a boil over high heat. This is when the magic starts! 2. Once it boils, lower the heat to a simmer. Cover the pot and let it cook for about 30-35 minutes. 3. Check the potatoes for tenderness. Stir occasionally to keep them from sticking. 4. Taste the stew. Adjust the seasoning if needed. Enjoy the warmth of a meal made with love. For detailed cooking guidance, check the Full Recipe. To make your Cowboy Stew shine, start with the spices. You can adjust them to fit your taste. If you want more heat, add extra chili powder or toss in some cayenne pepper. For a smoky flavor, consider smoked paprika. Simmering time is also key. Letting your stew simmer for at least 30 minutes allows flavors to blend. The longer it cooks, the more the taste develops. Just be sure to stir it every so often to avoid sticking. Using a Dutch oven gives you the best results. Its thick walls retain heat well. This helps to cook the stew evenly. If you use a regular pot, keep an eye on the heat to avoid burning. Stirring is important, too. As your stew simmers, stir it gently. This keeps the ingredients from sticking to the bottom. It also helps mix the flavors throughout. Pair your Cowboy Stew with simple sides. Cornbread is a classic choice. It adds a sweet touch and soaks up the stew nicely. A fresh green salad is also great. It brings a crisp contrast to the warm stew. For garnishing, fresh cilantro works wonders. Sprinkle some on top right before serving. You can also add a dollop of sour cream for creaminess. If you love cheese, shredded cheddar adds a nice finish. For the full recipe, check the earlier section. {{image_2}} You can easily switch out the ground beef for turkey or a plant-based option. Ground turkey gives a lighter taste while still keeping it hearty. If you want a meat-free dish, try using lentils or beans instead. They add protein and fiber. You can also add different vegetables to your stew. Bell peppers and carrots bring in great color and taste. You can even toss in zucchini or green beans for added texture. Feel free to experiment with what you have on hand. To spice things up, consider adding jalapeños. They provide a nice kick that warms you up. You can adjust the amount based on your spice level preference. If you want a richer flavor, use homemade broth. It adds depth that store-bought broth may lack. Cowboy Stew tastes great in a bread bowl. The bread soaks up the juices and adds a nice crunch. You can also top your stew with cheese for creaminess or sour cream for tang. Fresh cilantro as a garnish adds a burst of color and flavor. These small changes can make your Cowboy Stew unique. Enjoy the process of creating your version with these simple swaps and enhancements! After you enjoy your Cowboy Stew, store any leftovers properly. Place the stew in an airtight container. It can last in the fridge for about 3 to 4 days. Make sure it cools down before sealing. This helps keep it fresh and tasty. If you have more than you can eat, freezing is a great option. You can freeze your Cowboy Stew for up to 3 months. Use freezer-safe containers or bags. Leave some space for expansion when it freezes. Label the containers with the date for easy tracking. When it’s time to enjoy your leftovers, reheating correctly is key. The best method is to use the stove. Pour the stew into a pot and heat it over medium heat. Stir often to prevent sticking. You can also use a microwave. Place the stew in a microwave-safe bowl and cover it. Heat it for 2-3 minutes, stirring halfway. This keeps the flavor intact. Cowboy Stew is perfect for meal prep. You can make it in advance and serve it later. Cook a big batch on a Sunday. Divide it into portions for the week. Just warm it up when you’re ready to eat. This saves time and makes weeknight dinners easy. Plus, you’ll always have a hearty meal ready to go! For the full recipe, check out the Cowboy Stew section above. Cowboy Stew is a hearty dish that brings comfort and warmth. It has roots in the American West, where cowboys needed filling meals. This stew is simple and uses ingredients that are easy to find. People often share it during family gatherings, making it a symbol of togetherness. The mix of ground beef, beans, and vegetables makes it not just filling but also tasty. You can find many versions across the U.S., reflecting local flavors and traditions. Yes, you can easily adapt Cowboy Stew for a slow cooker. Start by browning the ground beef and sautéing the onions and garlic on the stovetop. After that, add all the ingredients to your slow cooker. Here are some tips for slow cooking: - Use the low setting for 6-8 hours or the high setting for 3-4 hours. - If you like a thicker stew, remove the lid for the last hour of cooking to let some liquid evaporate. - Stir occasionally, if possible, to help flavors blend. Making Cowboy Stew vegetarian is simple and fun. You can swap the ground beef for several meat substitutes. Here are some options: - Use lentils or black beans for protein. - Crumbled tempeh or tofu also works well. - For broth, swap beef broth with vegetable broth for a lighter taste. - Add more vegetables like bell peppers or mushrooms for extra flavor. Cowboy Stew pairs well with many sides. Here are some popular choices: - Cornbread is a classic and adds a sweet touch. - A simple green salad can balance the meal. - You might also enjoy rice or mashed potatoes on the side. - For a fun twist, serve the stew in a bread bowl. This hearty meal is perfect for gatherings and is sure to please everyone. For the full recipe, check the earlier section! Cowboy Stew is a hearty dish packed with flavor and nutrition. We covered the ingredients, from ground beef to fresh cilantro. I shared step-by-step instructions for crafting this tasty stew, plus tips to enhance its flavor. You can also experiment with ingredient swaps and cooking techniques. Remember to store leftovers properly to enjoy later. With these insights, you can create a warm meal that satisfies your taste buds and fills your belly. Enjoy making it your own!

If you’re seeking a warm, hearty dish to bring your family together, look no further than Cowboy Stew! Packed with rich flavors and wholesome ingredients, this recipe promises satisfaction in …

Read more

Categories Dinner

Butternut Squash Pasta Sauce Simple and Flavorful Meal

July 20, 2025 by Chef Theo
- 1 medium butternut squash, peeled and cubed - 1 tablespoon olive oil - 1 small onion, finely chopped - 2 garlic cloves, minced - 1 teaspoon fresh sage, chopped (or ½ teaspoon dried) - ½ teaspoon ground nutmeg - 1 cup vegetable broth - ½ cup heavy cream (or coconut cream for a vegan option) - Salt and pepper to taste - ¼ cup grated Parmesan cheese (optional, or nutritional yeast for vegan) - Fresh parsley, for garnish - Cooked pasta of your choice (about 12 oz) These ingredients create a rich and tasty sauce. The butternut squash gives a sweet and nutty flavor. Olive oil adds richness, while onion and garlic bring depth. Feel free to play with the flavors. You can add: - Red pepper flakes for heat - Thyme or rosemary for earthy notes - Lemon juice for brightness - Spinach for extra greens Using these optional ingredients can make your sauce unique. When it comes to pasta, choose what you love. Some great choices are: - Spaghetti for a classic feel - Penne for easy mixing - Fettuccine for a hearty bite - Gluten-free pasta for a lighter option Pairing the sauce with the right pasta makes each bite enjoyable. For the full recipe, check out Butternut Bliss Pasta Sauce. First, preheat your oven to 400°F (200°C). Take your medium butternut squash, peel it, and cube it into small pieces. This helps it cook evenly. Spread the cubed squash on a baking sheet. Drizzle it with olive oil and sprinkle with salt and pepper. Toss it to coat the cubes well. Roast the squash in the oven for about 25 to 30 minutes. It should be tender and slightly caramelized when done. While the squash roasts, let’s prepare the aromatics. Heat a tablespoon of olive oil in a large skillet over medium heat. Add in your finely chopped onion. Sauté it until it turns translucent, which takes about 5 minutes. Next, add the minced garlic, chopped fresh sage, and ground nutmeg. Cook everything for about one minute until it smells amazing. This step builds a great base for your sauce. Once your butternut squash is ready, add it to the skillet with the onion and garlic. Pour in one cup of vegetable broth and bring this mixture to a simmer. Now, we need to blend it. You can use an immersion blender or transfer everything to a regular blender. If using a blender, be very careful of the hot steam. Blend until the sauce is nice and smooth. Return the blended sauce to the skillet and stir in half a cup of heavy cream (or coconut cream for a vegan touch). If you like, add grated Parmesan cheese for extra flavor. Cook this on low heat for about 5 minutes to let all the flavors meld together. Taste and add salt and pepper as needed. Finally, toss your cooked pasta in the sauce until it’s well coated. If the sauce is too thick, add a little more vegetable broth to get it just right. For the full recipe, check the complete guide above. To boost the flavor of your butternut squash sauce, think about adding herbs. Fresh sage is a great start. You can also try thyme or rosemary for a nice twist. A pinch of cinnamon adds warmth, too. For a kick, red pepper flakes work well. Remember, taste as you go. This helps you find the perfect balance. When picking pasta, think about shape and texture. I love using whole wheat or gluten-free pasta for added nutrition. Shapes like penne or rigatoni hold the sauce well. If you want a delicate touch, try angel hair or fettuccine. Just make sure to cook the pasta al dente. This gives it a nice bite and helps it hold up in the sauce. If your sauce seems too thick, don’t worry. You can simply add more vegetable broth. Start with a little and mix well, then check the texture. If you want creaminess, use heavy cream or coconut cream. This gives a rich feel without overpowering the squash. For a lighter sauce, try using just vegetable broth and a splash of lemon juice. This keeps it fresh and bright. For the complete recipe, check out the Butternut Bliss Pasta Sauce. {{image_2}} If you want a vegan option, use coconut cream instead of heavy cream. This gives the sauce a rich taste without any dairy. You can also swap out Parmesan cheese for nutritional yeast. Nutritional yeast adds a cheesy flavor, making it perfect for vegan diets. For those who need gluten-free meals, choose gluten-free pasta. Many brands offer great options made from rice, quinoa, or lentils. The butternut squash sauce pairs well with any gluten-free pasta. Just make sure to check the label for gluten-free certification. To boost the protein in the sauce, you can add cooked lentils or chickpeas. Both options mix well and add a hearty texture. You can also stir in shredded chicken or cooked sausage for meat lovers. This way, you create a filling meal that’s still packed with flavor. For the full recipe, check out Butternut Bliss Pasta Sauce. Store your leftover butternut squash pasta sauce in an airtight container. Make sure it cools before sealing. This helps keep it fresh. In the fridge, it lasts for about 3 to 5 days. Always check for any off smells or changes in color before using it again. You can freeze the sauce for longer storage. Pour it into freezer-safe bags or containers. Leave some space at the top, as the sauce will expand. Label each bag with the date. It can stay in the freezer for up to 3 months. When you’re ready to use it, just thaw in the fridge overnight. To reheat, warm the sauce on the stove over low heat. Stir it often to heat it evenly. If it’s too thick, add a splash of vegetable broth. You can also microwave it in a safe dish. Heat in short bursts, stirring in between. This keeps the flavor fresh and delicious. Check out the Full Recipe for more tips! To make your butternut squash pasta sauce creamy, add heavy cream or coconut cream. This will give it a rich texture. You can also use a bit of grated Parmesan cheese for added creaminess. Blend the sauce until smooth before adding the cream. This helps mix everything well. If you want a lighter sauce, use vegetable broth instead of cream. Yes, you can use frozen butternut squash. Make sure to thaw it first and drain any excess water. Frozen squash is often pre-cooked, which can save you time. Adjust your cooking time, as frozen squash may need less time to cook down. This butternut squash pasta sauce pairs well with various pasta types. I recommend using: - Fettuccine - Penne - Rigatoni - Farfalle These shapes hold the sauce well. You can also try it with whole wheat or gluten-free pasta for a healthy twist. Don’t forget to toss your pasta in the sauce for a delicious meal. For the full recipe, check the link above. Butternut squash pasta sauce is easy and fun to make. We explored main ingredients and ways to customize your dish. I shared step-by-step instructions to prepare and blend the sauce. You learned tips to enhance flavor and select the right pasta. We also discussed variations, storage methods, and answers to common questions. This sauce is friendly for all diets. Experiment with flavors, and enjoy your meals!

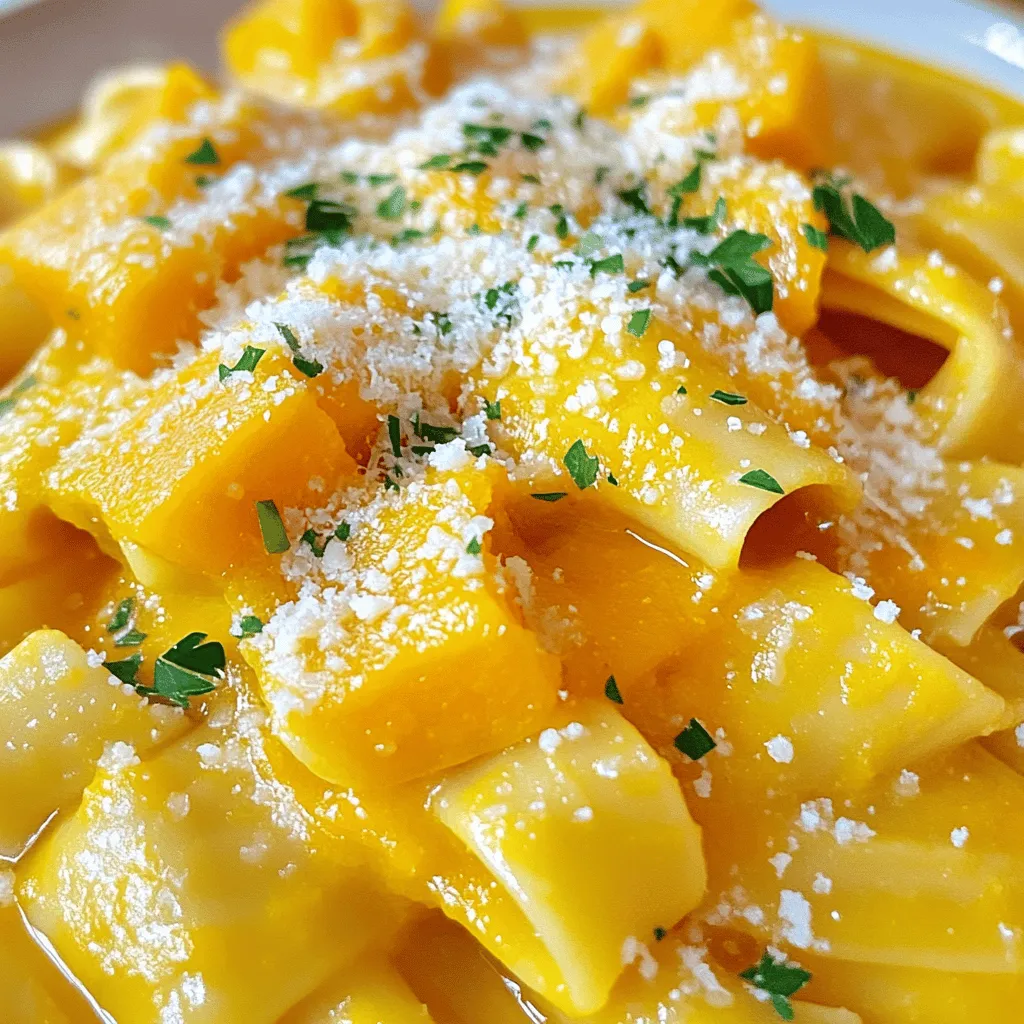
If you’re looking for a tasty and easy meal, try butternut squash pasta sauce. This creamy, flavorful sauce will impress anyone at your table. Using fresh ingredients, you can whip …

Read more

Categories Dinner

Pumpkin Whipped Feta Dip Creamy and Flavorful Treat

July 20, 2025 by Chef Theo
- 1 cup pumpkin puree - 4 oz feta cheese, crumbled - 1/2 cup cream cheese, softened - 2 tablespoons Greek yogurt The main ingredients create the base of the dip. Pumpkin puree gives it a nice creamy texture. Feta cheese adds a salty flavor that balances the sweet pumpkin. Cream cheese makes the dip rich and smooth. Greek yogurt adds a tangy taste, which brightens the mix. - 1 tablespoon olive oil - 1 teaspoon garlic powder - 1 teaspoon smoked paprika - 1/2 teaspoon salt - 1/4 teaspoon black pepper - Optional: toasted pumpkin seeds, fresh parsley Seasonings are key to making this dip pop. Olive oil adds richness and helps the flavors blend. Garlic powder gives a nice savory note. Smoked paprika adds warmth and a hint of smokiness. Salt and black pepper enhance all the flavors. To make it extra special, add toasted pumpkin seeds and chopped parsley. They give a nice crunch and fresh look. For the full recipe, you can check the original source. To make the pumpkin whipped feta dip, start by combining the base ingredients. In a medium mixing bowl, add the pumpkin puree, crumbled feta cheese, softened cream cheese, and Greek yogurt. These ingredients create a smooth and flavorful base. Next, blend the mixture to achieve creaminess. You can use a hand mixer or a food processor. Blend until the mix is smooth and fluffy. This step is key for the perfect texture. Now it's time to adjust the seasoning for flavor. Drizzle in the olive oil, then add garlic powder, smoked paprika, salt, and black pepper. Blend again until everything is well mixed. Taste the dip and adjust the seasoning as needed. If you want a bolder taste, feel free to add more smoked paprika. Garnishing the dish makes it more appealing. Transfer the whipped feta dip to a serving bowl. Top it with toasted pumpkin seeds and chopped parsley. This adds extra texture and a pop of color. For pairing options, this dip is great with pita chips, fresh veggies, or crusty bread. Each option brings a different flavor and crunch that complements the creamy dip. Enjoy this treat at your next gathering or snack time. For the full recipe, check the [Full Recipe]. To make your dip smooth, use a food processor. This tool blends everything well. If you don’t have one, a hand mixer works too. Start with the cream cheese. Softened cream cheese is key for a creamy texture. Leave it out for 30 minutes before mixing. This small step makes a big difference. You can boost the flavor with spices. Try adding a pinch of cayenne for heat. A dash of cinnamon adds warmth too. Fresh herbs like thyme or chives can brighten up the dip. Just chop them finely before mixing. These small tweaks can elevate your pumpkin whipped feta dip to a new level. For the full recipe, check out the details above. {{image_2}} If you want to switch things up, there are great options. You can use goat cheese instead of feta. Goat cheese gives a tangy taste that pairs well with pumpkin. Creamy ricotta is another alternative for feta. It makes the dip light and fluffy. For a non-dairy option, try cashew cream. Blend soaked cashews with a bit of water. This will give you a smooth and creamy texture. You can also use tofu cream cheese for a dairy-free choice. It has a mild flavor and takes on the taste of other ingredients well. You can create sweet or savory versions of this dip. For a sweet twist, add maple syrup or honey. This makes a great spread for toast or bagels. You might also mix in cinnamon or nutmeg for warmth. For savory flavors, think about adding fresh herbs. Chopped thyme or rosemary can elevate the taste. You can also use chili flakes for a spicy kick. Seasonal adaptations are fun too! During the holidays, try adding cranberries for a festive touch. This adds color and a nice tartness. You can find the full recipe to get started on this tasty dip! To keep your Pumpkin Whipped Feta Dip fresh, store it in an airtight container. This helps to lock in the flavors and keep the dip creamy. Use glass or plastic containers with tight-fitting lids. Avoid using bowls that are not sealed well, as air can dry out the dip. In the fridge, this dip lasts about 5 days. Make sure to keep it cold and check for any signs of spoilage before serving. If you want to save it for later, you can freeze the dip too. Just place it in a freezer-safe container, leaving some space at the top for expansion. It can last up to 3 months in the freezer. When ready to use, thaw it overnight in the fridge. Re-blend it before serving to regain that smooth texture. Yes, you can make this dip ahead of time. Store it in the fridge. Put it in an airtight container. It will stay fresh for up to three days. The flavors will blend and taste even better. Just give it a good stir before serving. You have many options to serve with this dip. Here are some tasty ideas: - Pita chips - Fresh veggies like carrots and cucumbers - Crusty bread - Tortilla chips - Sliced apples or pears These pairings add crunch and freshness. You can also use it as a spread on sandwiches. Yes, fresh pumpkin can be used. First, cut the pumpkin into pieces. Remove the seeds and skin. Then, steam or roast the pieces until soft. After that, blend it until smooth. This process takes more time, but fresh pumpkin adds a nice flavor. This blog post covered how to make a delicious Pumpkin Whipped Feta Dip. We started with the key ingredients and flavors you'll need. Then, I walked you through simple steps for preparation. I shared tips for creaminess and flavor too. Lastly, we explored ways to store and enjoy your dip. I hope you feel excited to try this tasty recipe. It’s easy to make and share. You can adapt it to match your taste, ensuring everyone enjoys it. Happy dipping!

Looking for a delicious dip that screams comfort and flavor? Try my Pumpkin Whipped Feta Dip! This creamy treat combines pumpkin, feta, and just the right spices for a tasty …

Read more

Categories Appetizers

Frozen Chocolate Strawberry Cake Delightful Dessert Recipe

July 18, 2025 by Chef Theo
To make a Frozen Chocolate Strawberry Cake, you need simple yet delightful ingredients. Each one adds flavor and texture to this dessert. Here’s what you will need: - 1 cup crushed chocolate wafers - 1/2 cup unsalted butter, melted - 1 cup fresh strawberries, hulled and sliced - 2 cups heavy whipping cream - 1 cup powdered sugar - 1 teaspoon vanilla extract - 1 cup semi-sweet chocolate chips, melted - 1/2 cup strawberry puree (made from blended strawberries) - Fresh strawberries and chocolate shavings for garnish These ingredients come together to create a rich and satisfying dessert. The chocolate wafers form a tasty crust. The heavy cream gives a light and fluffy texture. Fresh strawberries add a burst of flavor and color. Don't forget to check out the Full Recipe for step-by-step instructions. This way, you can see how to use these ingredients effectively for a perfect treat. To start, mix 1 cup of crushed chocolate wafers with 1/2 cup of melted butter. Stir well until the mixture looks like wet sand. Next, press this mixture firmly into the bottom of a 9-inch springform pan. Make sure it is even and packed tightly. Place the pan in the freezer to help it set while you work on the filling. In a large bowl, pour in 2 cups of heavy whipping cream. Use an electric mixer to beat the cream until soft peaks form. This should take about 3 to 5 minutes. Slowly add 1 cup of powdered sugar and 1 teaspoon of vanilla extract. Keep mixing until stiff peaks appear. This creamy base is key to your cake's texture. In a separate bowl, take half of your whipped cream. Gently fold in 1 cup of melted semi-sweet chocolate until it blends smoothly. In another bowl, fold 1/2 cup of strawberry puree into the remaining whipped cream. This will give you two lovely flavors: chocolate and strawberry. Now it's time to layer! Start by spreading the chocolate whipped cream evenly over the crust. Next, add a layer of sliced strawberries (1 cup). After that, spread the strawberry whipped cream on top of the strawberries. Smooth it out nicely, making it look pretty. Cover your springform pan with plastic wrap or a lid. Place it in the freezer for at least 4 hours. This allows the cake to freeze and firm up properly. You can also freeze it overnight if you want to prepare it ahead of time. Once the cake is fully set, carefully remove it from the springform pan. To make this easier, run a knife around the edges first. Garnish the top with fresh strawberries and chocolate shavings for an extra special touch. Slice the cake into wedges using a warm knife for cleaner cuts. Enjoy this delightful frozen treat! For the full recipe, refer to the instructions above. To make great whipped cream, you need stiff peaks. Here are some tips: - Use cold cream: Always start with very cold heavy whipping cream. This helps it whip faster. - Choose the right bowl: A metal or glass bowl works best. It holds the cold better than plastic. - Whip at high speed: Use an electric mixer on high speed. This adds air and helps create volume. - Stop at the right time: Watch closely as you whip. Stop when the cream holds its shape but is not grainy. Common mistakes include: - Over-whipping: This can turn cream into butter. Be careful and stop when you see stiff peaks. - Adding sugar too soon: Add powdered sugar only after soft peaks form. This helps the cream thicken well. Freezing your cake properly keeps it fresh and tasty. Here’s how to cover and store it: - Use plastic wrap: After you finish layering the cake, wrap it tightly with plastic wrap. This keeps out air and prevents freezer burn. - Use an airtight container: If you have one, place the wrapped cake in a container. This adds another layer of protection. - Label the cake: Write the date on the wrap or container. This helps you remember when you made it. Slicing a frozen cake can be tricky. Use this method for neat cuts: - Warm the knife: Run a sharp knife under hot water. Wipe it dry before slicing. - Cut slowly: Press down gently without sawing. This helps keep the layers intact. This method makes each slice look great and keeps the layers from mixing. Enjoy your Frozen Chocolate Strawberry Cake! For the full recipe, check the previous sections. {{image_2}} You can change the flavor of your Frozen Chocolate Strawberry Cake easily. Try using different fruits like bananas, raspberries, or blueberries. Each fruit brings its own special taste. If you want a twist, swap out the semi-sweet chocolate. Use dark chocolate for a richer flavor or white chocolate for a sweeter touch. These changes keep the cake fun and exciting. If you want a lighter version, consider low-fat whipping cream. It cuts down on calories while still giving great taste. For sugar, try using honey, agave, or a sugar substitute. This way, you can enjoy a sweet treat without the extra guilt. Need a gluten-free option? Use gluten-free chocolate wafers for the crust. You won’t lose any flavor or texture. For vegan adaptations, replace the heavy cream with coconut cream. You can also swap the butter for coconut oil. This makes the cake dairy-free and still delicious. Enjoy this lovely dessert while meeting your dietary needs. To keep your Frozen Chocolate Strawberry Cake fresh, store it in the freezer. Wrap the cake tightly in plastic wrap. This helps prevent freezer burn. You can also use an airtight container. Make sure it's sealed well to keep out air. For the best taste and texture, freeze the cake for up to three months. After this time, the flavor may fade. It may still be safe to eat after three months, but it won’t be as good. So, mark your calendar to enjoy it within this time frame. When you're ready to enjoy the cake, take it out of the freezer. Place it in the fridge for about four hours. This slow thawing keeps the cake's texture nice. If you're in a hurry, you can set it at room temperature for 30 minutes. Just don’t leave it out too long, or it may melt too much. Once it's thawed, slice and serve! You can find the Full Recipe to help guide you in making this delightful treat. The cake needs at least 4 hours in the freezer. This time helps to set the layers right. If you want a firmer cake, freeze it overnight. The longer it freezes, the better the texture. Yes, you can prepare this cake a day or two in advance. Just keep it covered in the freezer. This way, it stays fresh and ready to serve when guests arrive. If you don't have chocolate wafers, use crushed graham crackers or Oreo cookies. Both options work well for a tasty crust. They give a nice flavor and good texture to the cake. Absolutely! This cake is perfect for birthdays, anniversaries, or holidays. Its rich flavors and beautiful layers impress guests. You can even add candles for a birthday celebration or serve it at a summer picnic. You can get creative with toppings! Try whipped cream, crushed nuts, or fresh mint. You can also use other fruits like raspberries or blueberries. These additions make the cake even more special and fun. For the full recipe, check out the details provided earlier. This recipe combines bright strawberries and rich chocolate for a delightful treat. You learned how to make the crust, cream, and layers. I shared helpful tips for freezing, slicing, and flavor variations. Remember, you can mix and match ingredients to fit your taste. It's a fun dessert to make and share. Enjoy creating your unique version of this frozen cake masterpiece!

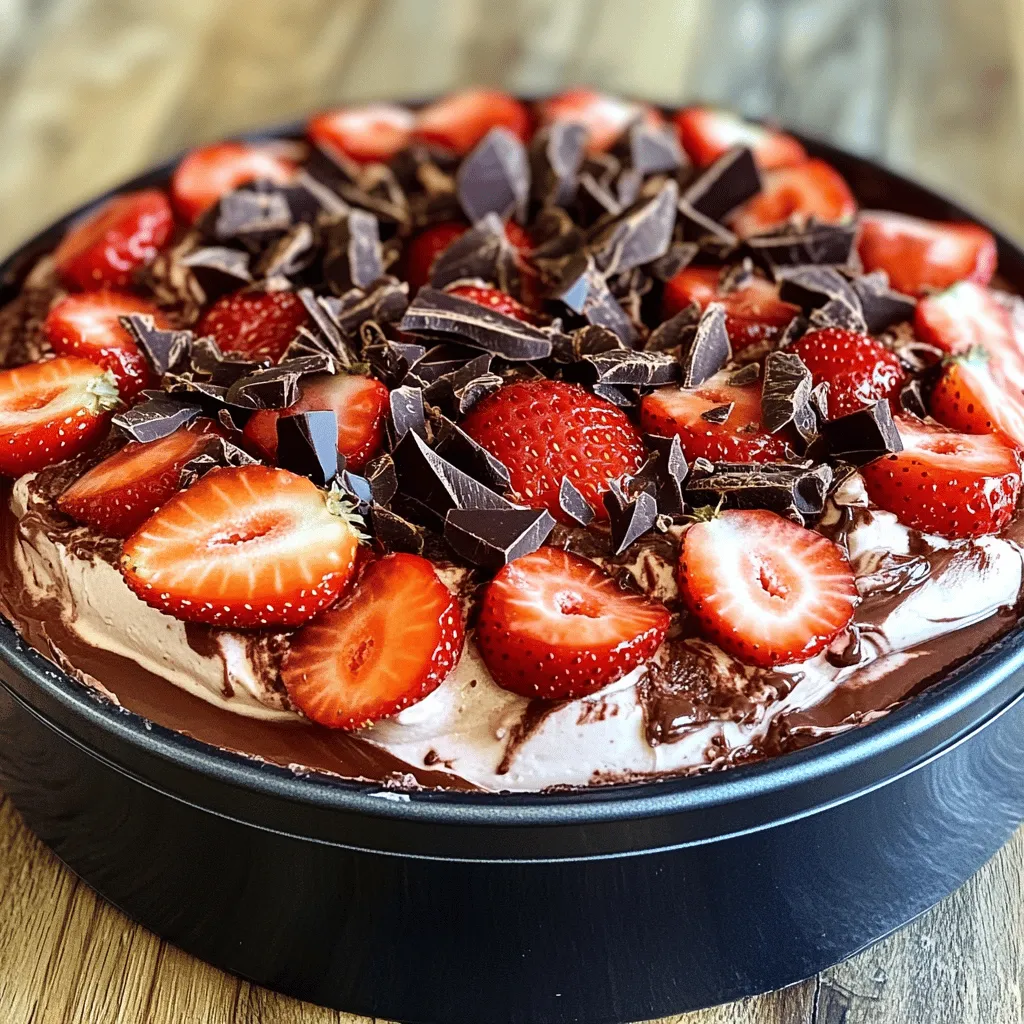
Are you ready to wow your friends and family with a dessert that shines? This Frozen Chocolate Strawberry Cake packs rich chocolate and fresh strawberries into every bite. It’s cool, …

Read more

Categories Desserts

Moist Sour Cream Zucchini Brownies Delightful Treat

July 18, 2025 by Chef Theo
To make Moist Sour Cream Zucchini Brownies, you need the following ingredients: - 1 cup grated zucchini (about 1 medium zucchini, drained) - 1 cup all-purpose flour - 1/2 cup unsweetened cocoa powder - 1 teaspoon baking soda - 1/2 teaspoon baking powder - 1/4 teaspoon salt - 1/2 cup granulated sugar - 1/2 cup brown sugar, packed - 1/4 cup sour cream - 1/4 cup vegetable oil - 1 teaspoon vanilla extract - 2 large eggs - 1/2 cup chocolate chips (optional) Grated zucchini is the secret to moisture in these brownies. It blends well into the batter. Use a medium-sized zucchini for about one cup. Make sure to drain it to avoid excess water. All-purpose flour gives the brownies their structure. Unsweetened cocoa powder adds rich flavor. Baking soda and baking powder help the brownies rise. Salt enhances sweetness and balances the chocolate. Granulated and brown sugar work together for sweetness and depth. Sour cream keeps the brownies moist and adds a slight tang. Vegetable oil ensures a tender texture. Vanilla extract adds warmth and flavor. Eggs bind the ingredients and provide lift. You can add chocolate chips for extra chocolatey goodness. For the full recipe, check out the detailed instructions. Enjoy making these delightful treats! - Preheating the Oven Start by preheating your oven to 350°F (175°C). This step helps the brownies bake evenly. - Mixing Dry Ingredients In a medium bowl, whisk together the following dry ingredients: - 1 cup all-purpose flour - 1/2 cup unsweetened cocoa powder - 1 teaspoon baking soda - 1/2 teaspoon baking powder - 1/4 teaspoon salt This mix adds structure and flavor to your brownies. - Combining Wet Ingredients In a large bowl, mix these wet ingredients: - 1/2 cup granulated sugar - 1/2 cup brown sugar, packed - 1/4 cup sour cream - 1/4 cup vegetable oil Stir them well until smooth. This step brings sweetness and moisture. - Incorporating Dry into Wet Gradually add the dry mixture to the wet ingredients. Stir until just combined. Avoid overmixing; this keeps the brownies light and tender. - Folding in Zucchini and Chocolate Chips Gently fold in: - 1 cup grated zucchini (about 1 medium zucchini, drained) - 1/2 cup chocolate chips (optional) This adds moisture and a tasty surprise in each bite. - Pouring Batter into Baking Pan Pour the brownie batter into a greased 9x9-inch baking pan. Spread it evenly. This ensures every piece bakes well. - Baking Time and Cooling Bake for 25-30 minutes. Check for doneness with a toothpick. It should come out with a few moist crumbs. After baking, let the brownies cool for about 10 minutes. Then, transfer them to a wire rack. This cooling step helps them set perfectly. To make moist sour cream zucchini brownies, proper zucchini prep is key. Start by grating your zucchini. Then, drain it well. Too much water makes your brownies soggy. You want just enough moisture to keep them rich and tender. Sour cream plays a big role too. It adds creaminess and helps keep the brownies moist. The fat in sour cream gives your brownies a soft texture. Plus, it adds a slight tang that balances the sweetness. Avoiding overmixing is crucial. When you combine wet and dry ingredients, mix just until you see no flour. Overmixing can make your brownies tough instead of soft. Checking for doneness is simple. Use a toothpick and insert it into the center. If it comes out with a few moist crumbs, your brownies are ready. Make sure not to leave them in too long. You want that perfect, fudgy center. For the full recipe, check the original post. Happy baking! {{image_2}} Gluten-Free Options You can use gluten-free flour in place of all-purpose flour. Look for a blend that works well in baking. This swap keeps your brownies soft and moist. You won’t lose any flavor or texture. Dairy-Free Alternatives For a dairy-free version, replace sour cream with a plant-based yogurt. Almond or coconut yogurt works well. You can also swap vegetable oil for coconut oil for added taste. Adding Nuts or Spices Chopped nuts like walnuts or pecans add a nice crunch. You can also sprinkle in cinnamon or nutmeg for extra warmth. These small changes can really enhance the flavor. Different Types of Chocolate Chips Feel free to mix different chocolate chips. Dark chocolate, milk chocolate, or even white chocolate can work great. Each type adds its unique touch to the brownies. You can even use flavored chips, like mint or peanut butter, for a fun twist. For the complete recipe, check out the Full Recipe. Enjoy making your brownies unique! Storing your brownies correctly keeps them fresh and tasty. You can keep them at room temperature for up to three days. Place them in an airtight container. This helps lock in moisture. If you want to store them longer, use the fridge. In the fridge, they last for a week. Just remember to seal them well to avoid drying out. To enjoy your brownies warm, you can reheat them. Use a microwave for quick heating. Heat them for about 10-15 seconds. Check if they are warm enough. If not, add a few more seconds. You can also use an oven. Preheat it to 350°F (175°C) and warm them for about 5-10 minutes. This way, they stay soft and delicious. Always cover them with foil to keep them moist. For the best taste, enjoy them fresh after reheating! For the full recipe, check out the earlier section. Yes, you can freeze these brownies. They freeze very well. To freeze, first, let them cool completely. Cut them into squares. Wrap each piece in plastic wrap. Then place the wrapped brownies in a freezer bag. This helps keep them fresh. When you want to eat them, take them out of the freezer. Let them thaw at room temperature. You can also warm them up in the oven for a few minutes. This brings back their soft texture. The best way to check for doneness is with a toothpick. Insert the toothpick into the center of the brownies. If it comes out with a few moist crumbs, they are done. If it comes out wet, give them more time. Brownies should look set around the edges. They may still look slightly soft in the middle. This means they will firm up as they cool. Zucchini is a great ingredient for many other desserts. You can make zucchini bread, muffins, or cakes. Zucchini adds moisture and a mild flavor. It works well in savory dishes too. You can use it in casseroles, stir-fries, or salads. If you want more ideas, try zucchini fritters or zucchini noodles. Each recipe highlights zucchini's versatility and taste. Check the Full Recipe for more ways to enjoy zucchini in your cooking! These moist sour cream zucchini brownies are a delightful treat. We covered essential ingredients, easy steps, and helpful tips. Remember to prep your zucchini well to ensure a light texture. Feel free to explore variations, from gluten-free options to exciting flavor additions. Proper storage keeps your brownies fresh longer. With these insights, you can bake confidently and enjoy delicious results. Dive into your kitchen and whip up a batch today!

If you crave a dessert that’s rich, moist, and full of flavor, you’re in the right place! These Moist Sour Cream Zucchini Brownies are a delightful treat packed with hidden …

Read more

Categories Desserts

Neapolitan Ice Cream Cake Delightful Homemade Treat

July 18, 2025 by Chef Theo
To make a Neapolitan ice cream cake, you need the following ingredients: - 1 box of chocolate cake mix (plus ingredients required for mixing) - 2 cups vanilla ice cream, softened - 2 cups strawberry ice cream, softened - 2 cups chocolate ice cream, softened - 1 jar chocolate fudge sauce - 1 jar strawberry sauce - 1 cup whipped cream - Fresh strawberries for garnish - Chocolate shavings for garnish You can swap ingredients to suit your taste. Here are some ideas: - Use a different cake mix, like vanilla or red velvet, for a twist. - Try other ice cream flavors, like mint or cookies and cream. - Replace whipped cream with whipped coconut cream for a dairy-free option. To create this delicious cake, you will need: - Two 9-inch round cake pans - Mixing bowl - Spatula - Plastic wrap - Wire rack for cooling - Serving plate for assembly With these ingredients and tools, you're ready to make a delightful Neapolitan ice cream cake. Be sure to check the Full Recipe for detailed steps on putting it all together! First, preheat your oven to 350°F (175°C). Grab your chocolate cake mix and follow the package instructions. Mix well and divide the batter into two round 9-inch cake pans. Bake them for the time stated on the box. Check if they are done by inserting a toothpick into the center. If it comes out clean, they are ready. Let the cakes cool completely on a wire rack before moving on. Now, for the fun part! Once your cakes are cool, line the bottom of one cake pan with plastic wrap. Start with the vanilla ice cream. Spoon it into the pan and use a spatula to flatten it. Freeze this layer for about 30 minutes. After that, remove the pan and add the strawberry ice cream on top of the vanilla layer. Smooth it out and freeze it again for another 30 minutes. Finally, add the chocolate ice cream layer and smooth it down. Freeze the whole thing for at least one hour until it’s solid. After your ice cream layers are frozen, take the second chocolate cake out of its pan. Place it on a serving plate. Carefully remove the ice cream layer from the pan by peeling off the plastic wrap. Gently place it on the first cake layer. Drizzle the chocolate fudge sauce evenly over the ice cream. It should coat the sides a bit. Now, place the last chocolate cake layer on top of the fudge and press down lightly. Cover the entire cake with whipped cream and smooth it out for a nice finish. Freeze the whole cake for 2-3 hours to set all the layers properly. For a finishing touch, before serving, garnish with fresh strawberries and sprinkle chocolate shavings on top. Cut into slices and enjoy your delightful homemade treat! To make your ice cream layers perfect, start with softened ice cream. This makes it easier to spread. Use a spatula to smooth the ice cream evenly in the pan. Freeze each layer for at least 30 minutes. This helps each flavor stay distinct. If you freeze too long, the ice cream may harden too much. So, keep an eye on it! For decoration, whipped cream is a great choice. Spread a thick layer on top and sides. You can add fresh strawberries for a pop of color. Chocolate shavings add a nice touch, too. Try to create a fun pattern with the fudge sauce. You can even drizzle some on the plate for a fancy look! One common mistake is not allowing the cake layers to cool fully. If they are warm, the ice cream will melt. Another mistake is not freezing the ice cream long enough. If the layers are soft, they will not hold up when you stack them. Lastly, don’t skip the garnish! It makes your cake look more appealing and adds extra flavor. {{image_2}} You can switch things up with different flavors for your Neapolitan ice cream cake. Instead of the classic chocolate, vanilla, and strawberry, try these fun combos: - Mint Chocolate Chip: Use mint ice cream and add chocolate fudge for a fresh twist. - Coffee Ripple: Swap vanilla for coffee ice cream and drizzle with caramel sauce. - Fruit Medley: Use mango, raspberry, and coconut ice creams for a tropical vibe. Mixing flavors keeps it exciting. Get creative and find your favorite! You can make a tasty vegan Neapolitan ice cream cake too! Use plant-based ice creams and a vegan cake mix. Here’s what to consider: - Ice Cream: Look for coconut, almond, or cashew-based ice creams. - Cake Mix: Choose a vegan chocolate cake mix, or make your own using flax eggs. - Frosting: Use whipped coconut cream instead of dairy cream for a fluffy topping. This way, everyone can enjoy a slice! If you need a gluten-free cake, it’s easy to adapt. Follow these steps: - Cake Mix: Choose a gluten-free chocolate cake mix from your favorite brand. - Ice Cream: Most ice creams are gluten-free, but always double-check labels to be sure. - Garnishes: Fresh fruit and chocolate shavings are gluten-free and add a nice touch. Now, you can enjoy this delightful treat without worry! To keep your Neapolitan ice cream cake fresh, freeze it right after you make it. Make sure to wrap the cake tightly in plastic wrap. You can also use aluminum foil for extra protection. This prevents freezer burn and keeps the flavors strong. If you have leftover slices, place them in an airtight container. Avoid leaving the cake out at room temperature for too long. When you're ready to enjoy your cake, take it out of the freezer. Let it sit at room temperature for about 10 to 15 minutes. This helps soften the ice cream without melting it. If you want to speed things up, you can place the cake in the fridge for about 30 minutes. This method thaws the cake evenly, so you get nice, clean slices. Your Neapolitan ice cream cake can last in the freezer for about two weeks. After that time, the ice cream may lose its texture and flavor. If you keep the cake wrapped well, it might last a bit longer. Always check for any ice crystals before serving, as they can affect the taste. Enjoy your delightful homemade treat while it's fresh! For the full recipe, refer to the earlier section. To make Neapolitan ice cream cake from scratch, you need a few key steps. First, bake the chocolate cake using a box mix. Once the cake cools, layer it with softened ice creams. Use vanilla, strawberry, and chocolate ice cream for that classic flavor. Follow the [Full Recipe] for specific amounts and instructions. The result is a stunning cake that everyone will love. Yes, you can use homemade ice cream! This adds a personal touch and lets you choose flavors. Make sure your homemade ice cream is soft enough to spread easily. If it’s too hard, let it sit out for a bit before layering. This way, you’ll create smooth layers that freeze well together. Cutting an ice cream cake can be tricky. First, let the cake sit at room temperature for a few minutes. This softens the cake and ice cream. Use a warm knife to slice through the layers. Dip the knife in hot water, wipe it dry, and then cut. This method helps you get clean slices without melting the ice cream too much. Enjoy your delicious cake! In this post, we covered making a delicious Neapolitan ice cream cake. We discussed the key ingredients, equipment, and helpful tips. You learned how to bake the cake and layer ice cream. Variations, like vegan or gluten-free options, offer tasty choices. Proper storage helps keep your cake fresh longer. Enjoy the sweet rewards of your work, and have fun with different flavors!

Are you ready to whip up a fun and tasty dessert? My Neapolitan Ice Cream Cake is an easy and delightful treat to make at home. This cake combines rich …

Read more

Categories Desserts

Perfect Roasted Brussels Sprouts Simple and Delicious Recipe

July 18, 2025 by Chef Theo
- 1 lb Brussels sprouts, trimmed and halved - 3 tablespoons olive oil - 2 tablespoons balsamic vinegar - 1 tablespoon maple syrup - 1 teaspoon garlic powder - Salt and pepper to taste - ¼ cup chopped walnuts - 2 tablespoons grated Parmesan cheese (optional) - Fresh parsley, chopped for garnish To get the best flavor, fresh Brussels sprouts are key. Look for bright green sprouts with no yellow leaves. They should feel firm and heavy in your hand. For the olive oil, use extra virgin for a rich taste. The balsamic vinegar adds a nice tang, so pick a good quality one. Maple syrup brings a sweet touch, but you can adjust it to your taste. Garlic powder gives a warm flavor. If you like a crunch, add walnuts. Lastly, Parmesan cheese adds richness, but it’s optional. If you don’t have Brussels sprouts, try cauliflower or broccoli instead. Instead of olive oil, you can use avocado oil. If you want to skip the balsamic vinegar, lemon juice works well too. Honey can replace maple syrup if you prefer a different sweetener. You can also use onion powder instead of garlic powder if you want another flavor. For the nuts, any chopped nut will work, like pecans or almonds. To make perfect roasted Brussels sprouts, follow these steps closely. First, preheat your oven to 400°F (200°C). This temperature gives the sprouts a nice, crispy finish. Next, line a large baking sheet with parchment paper. This keeps the sprouts from sticking and makes cleanup easy. Now, grab your mixing bowl. Combine the halved Brussels sprouts, olive oil, balsamic vinegar, maple syrup, garlic powder, salt, and pepper. Toss everything together until the sprouts are fully coated. This mix adds flavor and helps with caramelization. Spread the sprouts in a single layer on the baking sheet. Place them cut side down. This step is key for getting that beautiful golden brown color. Roast them in the oven for 20 minutes. After this, stir the sprouts and add the chopped walnuts to the pan. Walnuts add crunch and flavor. Roast for another 10-15 minutes. You want them golden brown and crispy. When they are done, take them out of the oven. If you like, sprinkle grated Parmesan cheese on top. Toss everything to mix it well. Finally, garnish with fresh parsley before serving. Start by trimming the Brussels sprouts. Cut off the stem end and remove any yellow leaves. Then, halve each sprout from top to bottom. This helps them cook evenly. Make sure to wash the sprouts well under cold water. Dry them thoroughly with a clean towel. Moisture can cause steaming instead of roasting. For the best texture, space the Brussels sprouts out on the baking sheet. Crowding them makes them steam, not roast. This can lead to soggy sprouts. Also, remember to flip the sprouts halfway through cooking. This helps them brown evenly. If you want extra crispiness, leave them in a bit longer. Just watch closely to prevent burning. By following these steps, you’ll achieve perfectly roasted Brussels sprouts every time. For the full recipe, check below. When picking Brussels sprouts, look for bright green color. The sprouts should feel firm. Avoid any that are yellow or have brown spots. Smaller sprouts tend to be sweeter and more tender. You can often find fresh Brussels sprouts on the stalk. If you do, choose ones with tightly packed leaves. Your oven type can change cook times. If you use a conventional oven, stick to the recipe's time. For convection ovens, reduce the time by about 5 minutes. Convection ovens cook food faster and more evenly. Always check the sprouts at the lowest time to avoid burning. Roasted Brussels sprouts shine on any plate. Serve them as a side with meats or grains. They pair well with chicken, pork, or quinoa. Add some lemon juice for brightness. Top with toasted nuts for crunch. A sprinkle of cheese gives a nice finish, too. For a twist, mix them into a salad. They add flavor and texture to any meal. For a complete experience, don’t forget to try the full recipe! {{image_2}} You can change the taste of your Brussels sprouts easily. Try adding herbs like thyme or rosemary. They bring a nice earthy taste. You might also enjoy red pepper flakes for some heat. A sprinkle of smoked paprika adds a deep flavor. Don't be afraid to mix and match your favorite spices! Making this dish vegan is simple. Just skip the Parmesan cheese or use a vegan version. You can also replace maple syrup with agave syrup for a different sweetness. Olive oil is great, but try avocado oil for a richer taste. These swaps keep the dish tasty without any dairy. Adding other veggies makes this dish even better. Carrots, sweet potatoes, or parsnips roast well with Brussels sprouts. Just cut them to match the size of the sprouts. This way, they cook evenly. You can also toss in red onions for a sweet touch. This adds color and flavor to your meal. For the full recipe, check out the Crunchy Caramelized Brussels Sprouts. Enjoy your cooking! Once you enjoy your roasted Brussels sprouts, store any leftovers in an airtight container. This keeps them fresh. Place the container in the fridge. They can stay good for about 3 to 5 days. If you use a glass container, it is easier to see your food. To reheat your Brussels sprouts, use the oven. This helps maintain their crunch. Preheat the oven to 350°F (175°C). Spread the sprouts on a baking sheet. Heat them for about 10 to 15 minutes. You can also use a skillet. Just warm them over medium heat for a few minutes. This way, they will taste almost as good as when you first made them. You can freeze roasted Brussels sprouts for later use. Start by letting them cool completely. Then, place them in a freezer-safe bag. Remove as much air as possible to prevent freezer burn. They can last for about 2 to 3 months in the freezer. When you are ready to use them, thaw in the fridge overnight. Reheat in the oven or skillet for best results. Enjoy your delicious Brussels sprouts anytime! The best temperature for roasting Brussels sprouts is 400°F (200°C). This heat gives them a nice crisp while cooking through. At this temperature, they caramelize well and develop a rich flavor. I always use this setting when I want perfect sprouts. To get Brussels sprouts to brown, spread them cut side down on the baking sheet. This helps them make good contact with the hot surface. Tossing them in oil also aids browning. The oil helps them crisp up and develop that golden color. Don't overcrowd the pan; give each sprout space to breathe. Yes, you can make this recipe ahead of time. You can prep the Brussels sprouts and toss them in oil and seasonings. Store them in the fridge for up to 24 hours. When ready to roast, simply spread them out on the baking sheet and cook. They will still taste great! For the full recipe, check out the Crunchy Caramelized Brussels Sprouts section. You learned about the key ingredients and tips for cooking Brussels sprouts perfectly. I shared step-by-step instructions and helpful tricks for choosing fresh sprouts. We also explored tasty variations and proper storage methods. In short, these methods can elevate your dish. With these insights, you can enjoy delicious, roasted Brussels sprouts anytime. Now, it’s your turn to get cooking and impress everyone at your table!

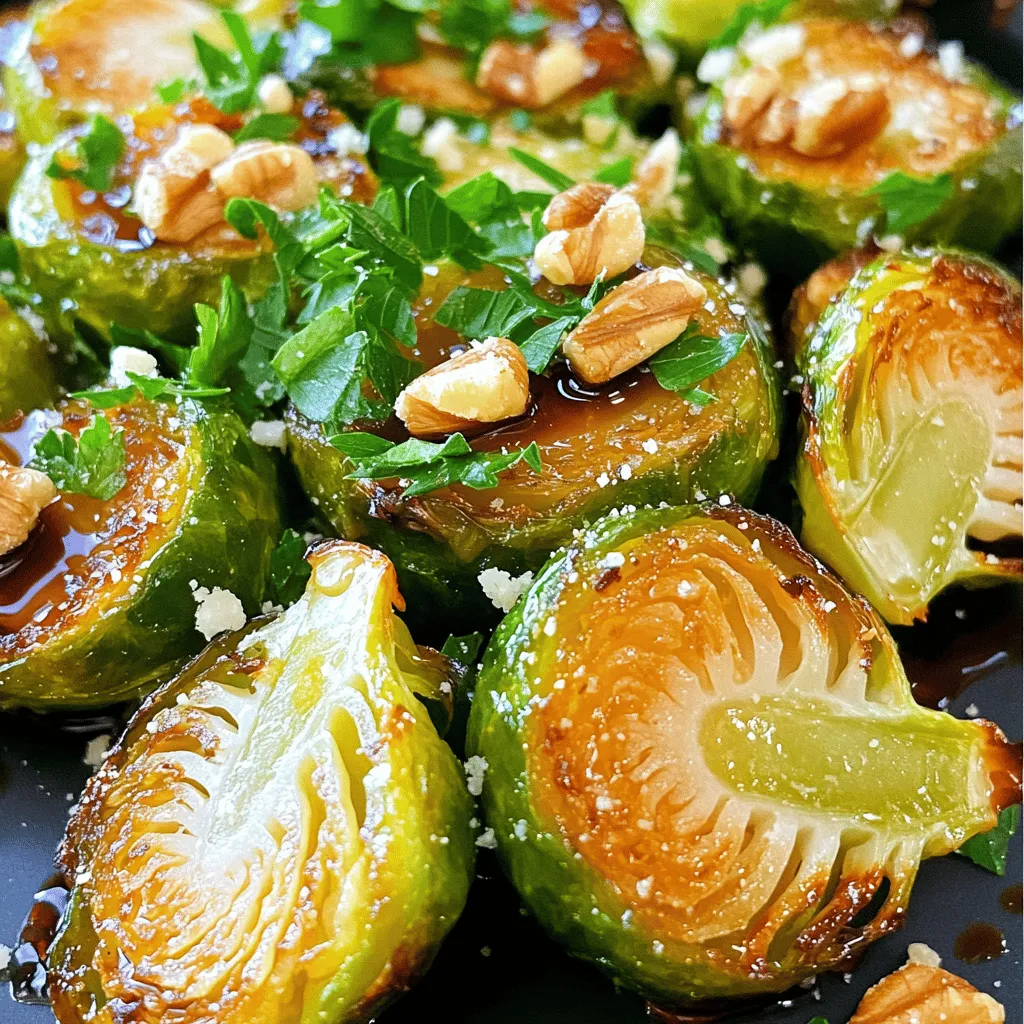
Do you want to elevate your vegetable game? Perfectly roasted Brussels sprouts are your answer! In this simple and delicious recipe, I’ll show you how to transform these little cabbages …

Read more

Categories Dinner
Older posts
Newer posts
← Previous Page1 … Page14 Page15 Page16 … Page94 Next →

TOASTED RECIPES

Where ideas are warm, crisp, and ready to serve! 🍞

PAGES

Home About Contact Privacy Policy Terms & Conditions Cookie Policy GDPR Policy Copyright Policy Disclaimer

CATEGORIES

Appetizers Desserts Salads Breakfast Dinner

Contact

  • Pinterest
  • Mail
Copyright © 2025 Toasted Recipes. All rights reserved.