Pumpkin Cake Pops Delightful Fall Treat Recipe

WANT TO SAVE THIS RECIPE?

Looking for a fun and tasty way to celebrate fall? These Pumpkin Cake Pops are the perfect treat! I’ll guide you through every step, from gathering your ingredients to decorating these delightful bites. With easy instructions and helpful tips, you’ll have delicious, pumpkin-spiced cake pops ready in no time. Let’s dive into this cozy fall recipe that will impress your family and friends!

Ingredients

List of Ingredients for Pumpkin Cake Pops

For your pumpkin cake pops, gather these simple ingredients:

– 1 cup canned pumpkin puree

– 1 cup all-purpose flour

– 1/2 cup granulated sugar

– 1/2 cup brown sugar, packed

– 1/2 teaspoon baking powder

– 1/2 teaspoon baking soda

– 1 teaspoon ground cinnamon

– 1/2 teaspoon ground nutmeg

– 1/4 teaspoon ground ginger

– 1/4 teaspoon salt

– 1/2 cup vegetable oil

– 2 large eggs

– 1 teaspoon vanilla extract

– 1 cup white chocolate chips (for coating)

– 1 tablespoon coconut oil (for thinning the chocolate)

– Sprinkles (for decoration)

Ingredient Substitutions

If you need to swap some items, here are great options:

– Use almond flour for a gluten-free version.

– Replace vegetable oil with melted coconut oil for a richer taste.

– Maple syrup can replace granulated sugar for a natural sweet touch.

– Instead of white chocolate chips, you can use dark chocolate for a twist.

Nutritional Information

Each pumpkin cake pop has about:

– Calories: 150

– Total Fat: 7g

– Saturated Fat: 3.5g

– Carbohydrates: 20g

– Sugars: 10g

– Protein: 2g

– Fiber: 1g

This snack brings a cozy flavor and a fun treat for fall! Enjoy making these with your family and friends.

Step-by-Step Instructions

Detailed Baking Directions

1. Preheat the Oven: Start by preheating your oven to 350°F (175°C). Grease a 9×9 inch baking dish or line it with parchment paper.

2. Mix the Dry Ingredients: In a large bowl, whisk together the flour, granulated sugar, brown sugar, baking powder, baking soda, cinnamon, nutmeg, ginger, and salt. Make sure everything is well blended.

3. Combine Wet Ingredients: In another bowl, mix the pumpkin puree, vegetable oil, eggs, and vanilla extract. Whisk until smooth.

4. Combine Mixtures: Slowly add the wet mix to the dry ingredients. Stir until just combined. Avoid over-mixing.

5. Bake the Cake: Pour the batter into your prepared dish. Spread it evenly. Bake for 25 to 30 minutes. Check with a toothpick; it should come out clean. Allow it to cool completely.

Tips for Achieving Perfect Cake Texture

Don’t Over-Mix: This can make your cake tough. Mix just enough until combined.

Use Fresh Spices: Fresh spices give a stronger flavor. Check your spice jars!

Room Temperature Ingredients: Ensure your eggs and oil are at room temp. This helps blend better.

How to Properly Cool and Crumble Cake

1. Cooling the Cake: Once baked, let the cake cool in the dish for about 10 minutes. Then, transfer it to a wire rack to cool completely.

2. Crumbling the Cake: Once cool, crumble the cake into a large bowl using your hands or a fork. Aim for fine crumbs. This ensures even coating later.

These steps will help you create a delicious base for your pumpkin cake pops. Enjoy the process!

Tips & Tricks

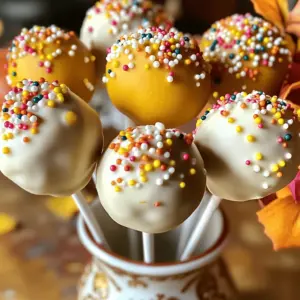
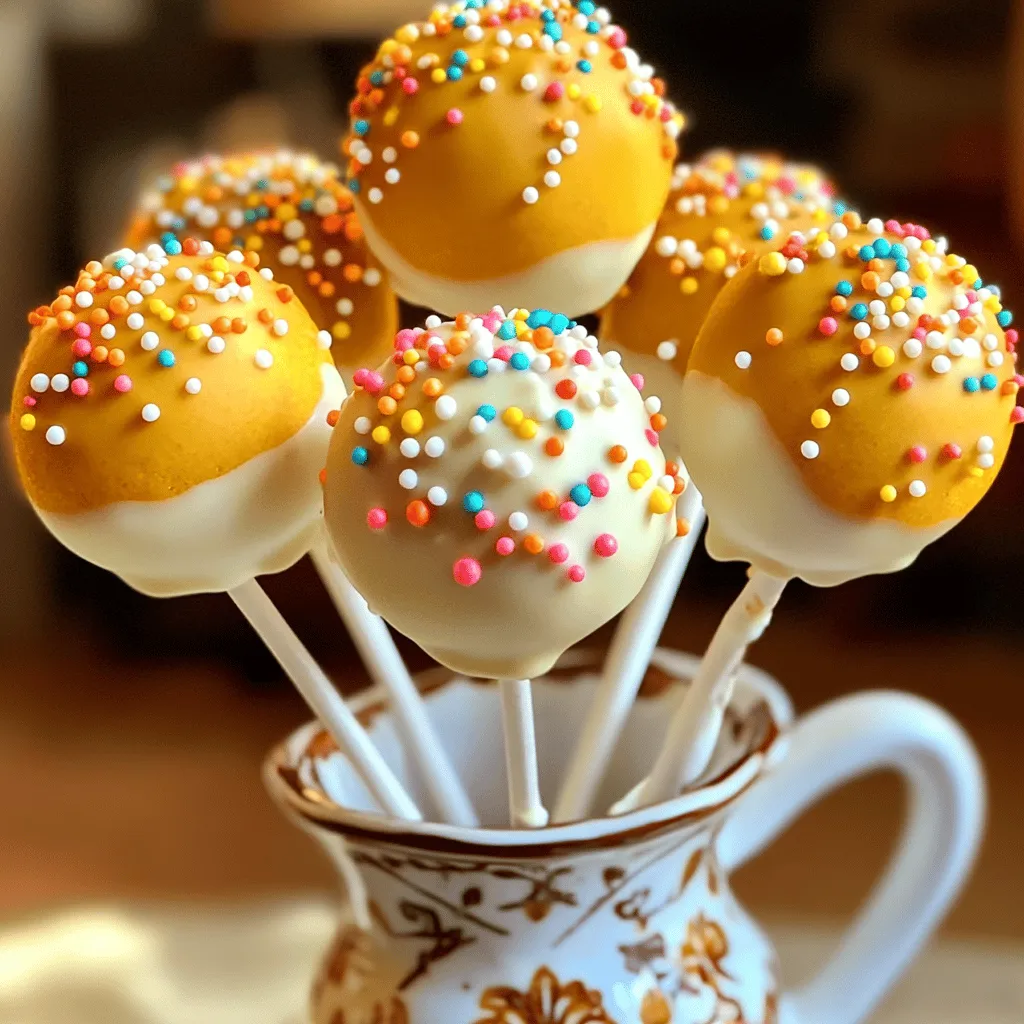
Decorating Ideas for Cake Pops

You can make your pumpkin cake pops look great with a few easy ideas.

– Use festive sprinkles. Try orange and yellow for a fall vibe.

– Drizzle melted chocolate on top for an extra touch.

– Add small candy eyes to make them fun and cute.

– Use edible glitter for a sparkly finish.

– Place them in colorful cups or sticks for a fun display.

Common Mistakes to Avoid

When making cake pops, a few mistakes can happen. Here are some to watch out for:

– Don’t over-mix the cake batter. This can make the pops tough.

– Make sure to chill the cake balls before dipping. This helps them hold shape.

– If your chocolate is too thick, it won’t coat well. Use coconut oil to thin it out.

– Don’t skip the sprinkles while the chocolate is wet. They won’t stick if the chocolate is hard.

Best Practices for Melting Chocolate

Melting chocolate can be tricky. Follow these tips for the best results:

– Use a microwave-safe bowl to heat the chocolate.

– Heat in short bursts of 30 seconds. Stir well in between to avoid burning.

– Adding coconut oil helps make the chocolate smooth and easy to dip.

– If the chocolate gets too hot, let it cool slightly before dipping.

– Stir until smooth to ensure even coating on the cake pops.

Variations

Flavor Alternatives

You can change the cake pop flavor easily. Try using chocolate or red velvet cake mix instead of pumpkin. For chocolate cake pops, use cocoa powder in place of some flour. For red velvet, add cocoa and a touch of red food coloring. These variations keep the fun alive!

Dietary Adjustments

If you need gluten-free cake pops, replace regular flour with almond or coconut flour. For a vegan version, use flax eggs instead of regular eggs. This means mixing one tablespoon of flaxseed meal with three tablespoons of water. Let it sit for five minutes until it thickens. Substitute coconut oil for vegetable oil, and use dairy-free chocolate chips for coating.

Seasonal Variations

Get creative with decorations! Use colored sprinkles for Halloween or Thanksgiving. For Christmas, dip them in dark chocolate and add crushed peppermint on top. You can even make themed cake pops for birthdays with fun colors and shapes. Each season offers a reason to try something new!

Storage Info

Best Ways to Store Cake Pops

To keep your pumpkin cake pops fresh, store them in an airtight container. Place a layer of parchment paper in between layers of cake pops. This keeps them from sticking together. Store the container in a cool, dry place. If you want them to last longer, the fridge works too. They stay fresh in the fridge for about a week.

Freezing Instructions

Freezing is a great option if you want to enjoy cake pops later. First, place the cake pops in a single layer on a baking sheet. Freeze them for about an hour until solid. Then, wrap each cake pop in plastic wrap. After that, place them in a freezer-safe bag or container. They can stay in the freezer for up to three months. When you’re ready to eat, let them thaw in the fridge overnight before enjoying.

How to Revive Stale Cake Pops

If your cake pops lose their freshness, don’t worry! You can bring them back to life. First, dip them in melted chocolate again. This adds moisture and covers any dry spots. Let them set after dipping for a few minutes. You can also add a sprinkle of fresh decorations to make them look new. With these tips, your cake pops will stay enjoyable even after a few days!

FAQs

How long do Pumpkin Cake Pops last?

Pumpkin cake pops last about 5 days at room temperature. You should store them in an airtight container. If you keep them in the fridge, they can last up to a week. The cold can help them stay fresh longer.

Can I make these ahead of time?

Yes, you can make these cake pops ahead of time. You can bake and crumble the cake a day or two before. Just chill the cake balls as needed. Then, wait to coat them in chocolate until you are ready to serve. This helps keep the coating smooth and fresh.

What can I use instead of white chocolate for coating?

If you don’t have white chocolate, you can use milk chocolate or dark chocolate. You can also try candy melts. They come in many colors and flavors, adding fun to your cake pops. Just make sure to melt them carefully, so they stay smooth.

In this article, we covered how to make delicious pumpkin cake pops. We shared ingredients and tips for baking, cooling, and decorating. You learned about fun variations and how to store your treats.

Remember, the key to great cake pops is texture and creativity. With these steps, you can create tasty bites that impress everyone. Enjoy baking and exploring new flavors!

For your pumpkin cake pops, gather these simple ingredients: - 1 cup canned pumpkin puree - 1 cup all-purpose flour - 1/2 cup granulated sugar - 1/2 cup brown sugar, packed - 1/2 teaspoon baking powder - 1/2 teaspoon baking soda - 1 teaspoon ground cinnamon - 1/2 teaspoon ground nutmeg - 1/4 teaspoon ground ginger - 1/4 teaspoon salt - 1/2 cup vegetable oil - 2 large eggs - 1 teaspoon vanilla extract - 1 cup white chocolate chips (for coating) - 1 tablespoon coconut oil (for thinning the chocolate) - Sprinkles (for decoration) If you need to swap some items, here are great options: - Use almond flour for a gluten-free version. - Replace vegetable oil with melted coconut oil for a richer taste. - Maple syrup can replace granulated sugar for a natural sweet touch. - Instead of white chocolate chips, you can use dark chocolate for a twist. Each pumpkin cake pop has about: - Calories: 150 - Total Fat: 7g - Saturated Fat: 3.5g - Carbohydrates: 20g - Sugars: 10g - Protein: 2g - Fiber: 1g This snack brings a cozy flavor and a fun treat for fall! Enjoy making these with your family and friends. 1. Preheat the Oven: Start by preheating your oven to 350°F (175°C). Grease a 9x9 inch baking dish or line it with parchment paper. 2. Mix the Dry Ingredients: In a large bowl, whisk together the flour, granulated sugar, brown sugar, baking powder, baking soda, cinnamon, nutmeg, ginger, and salt. Make sure everything is well blended. 3. Combine Wet Ingredients: In another bowl, mix the pumpkin puree, vegetable oil, eggs, and vanilla extract. Whisk until smooth. 4. Combine Mixtures: Slowly add the wet mix to the dry ingredients. Stir until just combined. Avoid over-mixing. 5. Bake the Cake: Pour the batter into your prepared dish. Spread it evenly. Bake for 25 to 30 minutes. Check with a toothpick; it should come out clean. Allow it to cool completely. - Don’t Over-Mix: This can make your cake tough. Mix just enough until combined. - Use Fresh Spices: Fresh spices give a stronger flavor. Check your spice jars! - Room Temperature Ingredients: Ensure your eggs and oil are at room temp. This helps blend better. 1. Cooling the Cake: Once baked, let the cake cool in the dish for about 10 minutes. Then, transfer it to a wire rack to cool completely. 2. Crumbling the Cake: Once cool, crumble the cake into a large bowl using your hands or a fork. Aim for fine crumbs. This ensures even coating later. These steps will help you create a delicious base for your pumpkin cake pops. Enjoy the process! You can make your pumpkin cake pops look great with a few easy ideas. - Use festive sprinkles. Try orange and yellow for a fall vibe. - Drizzle melted chocolate on top for an extra touch. - Add small candy eyes to make them fun and cute. - Use edible glitter for a sparkly finish. - Place them in colorful cups or sticks for a fun display. When making cake pops, a few mistakes can happen. Here are some to watch out for: - Don’t over-mix the cake batter. This can make the pops tough. - Make sure to chill the cake balls before dipping. This helps them hold shape. - If your chocolate is too thick, it won’t coat well. Use coconut oil to thin it out. - Don’t skip the sprinkles while the chocolate is wet. They won't stick if the chocolate is hard. Melting chocolate can be tricky. Follow these tips for the best results: - Use a microwave-safe bowl to heat the chocolate. - Heat in short bursts of 30 seconds. Stir well in between to avoid burning. - Adding coconut oil helps make the chocolate smooth and easy to dip. - If the chocolate gets too hot, let it cool slightly before dipping. - Stir until smooth to ensure even coating on the cake pops. {{image_2}} You can change the cake pop flavor easily. Try using chocolate or red velvet cake mix instead of pumpkin. For chocolate cake pops, use cocoa powder in place of some flour. For red velvet, add cocoa and a touch of red food coloring. These variations keep the fun alive! If you need gluten-free cake pops, replace regular flour with almond or coconut flour. For a vegan version, use flax eggs instead of regular eggs. This means mixing one tablespoon of flaxseed meal with three tablespoons of water. Let it sit for five minutes until it thickens. Substitute coconut oil for vegetable oil, and use dairy-free chocolate chips for coating. Get creative with decorations! Use colored sprinkles for Halloween or Thanksgiving. For Christmas, dip them in dark chocolate and add crushed peppermint on top. You can even make themed cake pops for birthdays with fun colors and shapes. Each season offers a reason to try something new! To keep your pumpkin cake pops fresh, store them in an airtight container. Place a layer of parchment paper in between layers of cake pops. This keeps them from sticking together. Store the container in a cool, dry place. If you want them to last longer, the fridge works too. They stay fresh in the fridge for about a week. Freezing is a great option if you want to enjoy cake pops later. First, place the cake pops in a single layer on a baking sheet. Freeze them for about an hour until solid. Then, wrap each cake pop in plastic wrap. After that, place them in a freezer-safe bag or container. They can stay in the freezer for up to three months. When you're ready to eat, let them thaw in the fridge overnight before enjoying. If your cake pops lose their freshness, don’t worry! You can bring them back to life. First, dip them in melted chocolate again. This adds moisture and covers any dry spots. Let them set after dipping for a few minutes. You can also add a sprinkle of fresh decorations to make them look new. With these tips, your cake pops will stay enjoyable even after a few days! Pumpkin cake pops last about 5 days at room temperature. You should store them in an airtight container. If you keep them in the fridge, they can last up to a week. The cold can help them stay fresh longer. Yes, you can make these cake pops ahead of time. You can bake and crumble the cake a day or two before. Just chill the cake balls as needed. Then, wait to coat them in chocolate until you are ready to serve. This helps keep the coating smooth and fresh. If you don't have white chocolate, you can use milk chocolate or dark chocolate. You can also try candy melts. They come in many colors and flavors, adding fun to your cake pops. Just make sure to melt them carefully, so they stay smooth. In this article, we covered how to make delicious pumpkin cake pops. We shared ingredients and tips for baking, cooling, and decorating. You learned about fun variations and how to store your treats. Remember, the key to great cake pops is texture and creativity. With these steps, you can create tasty bites that impress everyone. Enjoy baking and exploring new flavors!

Pumpkin Cake Pops

Indulge in the festive flavors of fall with these delightful Pumpkin Spice Cake Pops! This tasty treat combines the warmth of pumpkin puree with spices like cinnamon and nutmeg, all wrapped in a sweet white chocolate coating. Perfect for gatherings or a cozy snack, these cake pops are easy to make and look adorable too! Click through to explore the full recipe and impress your friends with this seasonal delight!

Ingredients
  

1 cup canned pumpkin puree

1 cup all-purpose flour

1/2 cup granulated sugar

1/2 cup brown sugar, packed

1/2 teaspoon baking powder

1/2 teaspoon baking soda

1 teaspoon ground cinnamon

1/2 teaspoon ground nutmeg

1/4 teaspoon ground ginger

1/4 teaspoon salt

1/2 cup vegetable oil

2 large eggs

1 teaspoon vanilla extract

1 cup white chocolate chips (for coating)

1 tablespoon coconut oil (for thinning the chocolate)

Sprinkles (for decoration)

Instructions
 

Preheat the Oven: Preheat your oven to 350°F (175°C) and grease a 9x9 inch baking dish or line it with parchment paper.

    Mix the Dry Ingredients: In a large bowl, whisk together the flour, sugars, baking powder, baking soda, cinnamon, nutmeg, ginger, and salt until well combined.

      Combine Wet Ingredients: In another mixing bowl, combine the pumpkin puree, vegetable oil, eggs, and vanilla extract. Whisk until the mixture is smooth.

        Combine Mixtures: Gradually add the wet mixture to the dry ingredients, mixing until just combined. Be careful not to over-mix.

          Bake the Cake: Pour the batter into the prepared baking dish and spread it evenly. Bake for 25-30 minutes or until a toothpick inserted in the center comes out clean. Allow it to cool completely.

            Crumble the Cake: Once cooled, crumble the cake into a large bowl using your hands or a fork until it resembles fine crumbs.

              Form Cake Balls: Using your hands, form small balls from the crumbled cake, about 1 inch in diameter. Place them on a baking sheet lined with parchment paper.

                Chill the Cake Balls: Refrigerate the cake balls for about 30 minutes until firm.

                  Prepare Chocolate Coating: In a microwave-safe bowl, combine the white chocolate chips and coconut oil. Microwave in 30-second intervals, stirring in between until melted and smooth.

                    Coat the Cake Pops: Dip the end of a lollipop stick into the melted chocolate, then stick it into the center of each cake ball. Dip each cake ball into the melted chocolate, submerging it fully, and let the excess chocolate drip off.

                      Decorate: While the chocolate is still wet, sprinkle with decorative sprinkles. Place the cake pops upright in a styrofoam block or a cup to harden.

                        Let Set: Allow the chocolate to harden completely at room temperature or in the refrigerator for about 15 minutes.

                          Prep Time: 20 mins | Total Time: 1 hr 30 mins | Servings: 12-15 cake pops

                            - Presentation Tips: Arrange the cake pops in a decorative vase or on a cake stand for an appealing display. Add a sprinkle of cinnamon on top for an extra festive touch!

                              WANT TO SAVE THIS RECIPE?