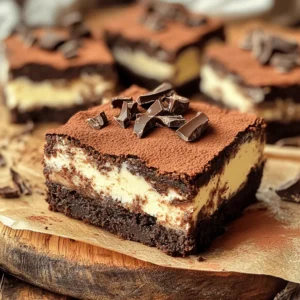
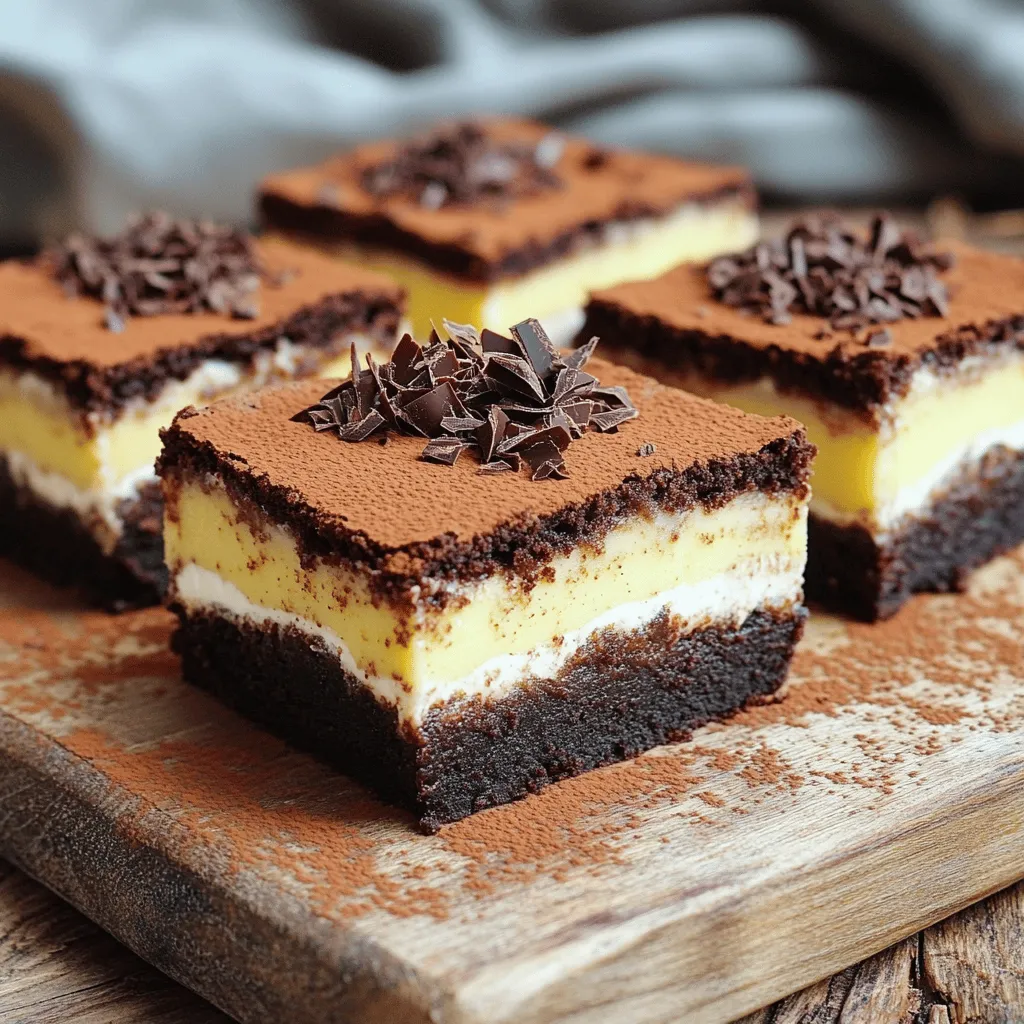
Tiramisu brownies combine deep chocolate goodness with rich coffee flavors for a dream treat! If you love classic brownies and the indulgent taste of tiramisu, you’re in for a delight. In this article, I’ll guide you through each step, from gathering your ingredients to baking the perfect batch. Get ready to impress your friends and family with this easy-to-make, coffee-infused dessert. Let’s dive into this sweet adventure!
Ingredients
When making Tiramisu brownies, you need quality ingredients for the best taste. Here’s what you will need:
– 1 cup unsalted butter, melted
– 1 cup granulated sugar
– 1 cup brown sugar, packed
– 4 large eggs
– 1 teaspoon vanilla extract
– 1 ½ cups all-purpose flour
– ¾ cup unsweetened cocoa powder
– 1 teaspoon baking powder
– ½ teaspoon salt
– 1 cup strong brewed coffee, cooled
– 1 cup mascarpone cheese
– 2 tablespoons powdered sugar
– 1 teaspoon coffee extract (optional)
– Unsweetened cocoa powder for dusting
– Dark chocolate shavings for garnish (optional)
These ingredients blend well to create a rich and creamy treat. The butter adds moisture, while the sugars give it sweetness. The eggs bind everything together, and the chocolate brings depth. Coffee enhances the flavor, making each bite amazing.
For the cream layer, mascarpone adds that classic tiramisu touch. You can dust the top with cocoa powder for a beautiful finish. Dark chocolate shavings make it look even more special.
If you want to dive deeper into the recipe, check out the Full Recipe.
Step-by-Step Instructions
Prepping the Oven and Baking Dish
Start by preheating your oven to 350°F (175°C). This step is key. A hot oven helps the brownies bake evenly. Next, grease a 9×13 inch baking pan. Use butter or non-stick spray. This prevents sticking and makes serving easier.
Mixing the Brownie Batter
In a large mixing bowl, combine the melted butter, granulated sugar, and brown sugar. Mix until smooth. Add in the eggs one by one, stirring well after each. Now, stir in the vanilla extract for flavor. In another bowl, whisk together the flour, cocoa powder, baking powder, and salt. Gradually add this dry mix to the wet ingredients. Mix just until combined. Don’t overdo it; a few lumps are okay.
Layering and Baking
Now it’s time to prepare the mascarpone mixture. In a separate bowl, whisk the mascarpone cheese, powdered sugar, brewed coffee, and the coffee extract if you want. This creates a creamy layer. Pour half of the brownie batter into the prepared pan. Spread it evenly. Next, add the mascarpone mixture on top, spreading it gently. Finally, dollop the remaining brownie batter on top. Swirl it to make a marbled effect. Bake in the oven for 25-30 minutes. Use a toothpick to check if it’s done. It should come out with a few moist crumbs. After baking, let the brownies cool in the pan for at least 30 minutes. This makes slicing easier. Dust with unsweetened cocoa powder and add dark chocolate shavings for a fancy touch. For the full recipe, check the details above.
Tips & Tricks
Achieving the Perfect Texture
To get smooth, fudgy Tiramisu brownies, start with your ingredients at room temperature. This helps the butter mix well with the sugars and eggs. Cold ingredients can make mixing hard.
Avoid overmixing the batter. Mix just until combined. Overmixing can lead to tough brownies. A light hand is key for soft, chewy results.
Enhancing Flavor
Choose a strong coffee for your brownies. Dark roast coffee works best. It gives a rich flavor without overpowering the chocolate. If you like, try cold brew coffee for a smoother taste.
You can also mix in chocolate chips or nuts. These add texture and extra flavor. If you want something different, swap out the chocolate for caramel or hazelnut spread.
Presentation Suggestions
Dusting with cocoa powder adds a nice touch. Use a fine sieve to sprinkle it evenly. This creates a beautiful, restaurant-style finish.
For a special touch, garnish with dark chocolate shavings. They add elegance and extra chocolate flavor. Simply use a vegetable peeler on a chocolate bar for thin curls.
For the full recipe, check the earlier section. Enjoy your baking!
Variations
Flavor Variations
You can add new flavors to your Tiramisu brownies. A splash of Kahlúa makes them richer. This coffee liqueur enhances the coffee taste and adds depth. You could also use other flavored liqueurs like Amaretto or Frangelico for a twist.
Nuts or chocolate chunks can change the texture of your brownies. Walnuts or hazelnuts add crunch. Dark chocolate chunks can make each bite extra special. Just mix them into the batter before baking.
Dietary Adjustments
If you need gluten-free brownies, use almond or coconut flour instead. These flours keep the taste while making them safe for gluten-free diets. You can also try a mix of gluten-free flour blends for the best results.
For vegan options, replace eggs with flaxseed meal or applesauce. Use plant-based milk and vegan butter in place of dairy. Silken tofu can also work well as a substitute for mascarpone cheese. These swaps keep your brownies tasty and friendly for everyone.
Serving Suggestions
Tiramisu brownies taste great on their own, but you can elevate them! Serve warm with a scoop of vanilla ice cream. The warm brownies melt the ice cream just right.
Whipped cream adds a light touch, too. Dollop it on top for an elegant look. You can serve them cold as well. The flavors meld together nicely when chilled, making each bite a delight.
For the full recipe, check out the guide above.
Storage Info
Best Storage Practices
To keep your Tiramisu Brownies fresh, use an airtight container. This step keeps them moist and tasty. Store them in the fridge for the best results. A cool environment helps the flavors develop.
Freezing Instructions
You can freeze Tiramisu Brownies for longer storage. Cut them into pieces before freezing. Wrap each piece tightly in plastic wrap. Place them in a freezer-safe bag or container. When you’re ready to eat, simply thaw them in the fridge. This method keeps the texture nice and creamy.
Shelf Life
Tiramisu Brownies can last up to one week in the fridge. After that, they may start to lose their flavor. Watch for signs of spoilage like an off smell or dry texture. If you notice these signs, it’s time to let them go. Enjoy them while they are fresh for the best taste!
FAQs
What makes Tiramisu brownies different from regular brownies?
Tiramisu brownies combine layers of coffee flavor and creamy mascarpone. Unlike regular brownies, these have a rich, coffee-infused filling. The cocoa powder adds depth, while the mascarpone cheese gives a smooth texture. The coffee flavor makes these brownies unique. They taste like a dessert blend of brownies and tiramisu.
Can I make Tiramisu brownies ahead of time?
Yes, you can prepare Tiramisu brownies in advance. Make the brownies and cool them completely. Store them in an airtight container at room temperature for up to three days. If you want to keep them longer, refrigerate them for up to a week. Just remember to dust them with cocoa powder before serving.
How do I know when Tiramisu brownies are done baking?
To check if Tiramisu brownies are done, use the toothpick test. Insert a toothpick into the center. If it comes out with a few moist crumbs, they are ready. The edges should look set, and the center may look slightly underbaked. This helps keep them fudgy.
What can I substitute for mascarpone cheese?
If you don’t have mascarpone cheese, you can use cream cheese. Just soften it first to get a creamy texture. Another option is ricotta cheese, but it may not be as smooth. You can mix the ricotta with a bit of heavy cream to mimic mascarpone.
Are Tiramisu brownies suitable for special diets?
Tiramisu brownies can be made for some special diets. For gluten-free options, use almond flour or a gluten-free flour blend. If you need dairy-free brownies, try using a vegan cream cheese alternative. These swaps make it easier for everyone to enjoy this treat.
Tiramisu brownies combine rich flavors and unique ingredients for a delightful treat. You learned about key ingredients, step-by-step baking, and tips for the ideal texture and presentation. Variations allow for personal touches, while storage tips help keep them fresh. With these insights, you can create mouthwatering brownies that impress everyone. Enjoy experimenting and sharing this sweet treat with friends and family! Your baking skills can shine with this tasty recipe.