Indulging in a creamy dessert doesn’t get easier than these Easy Chocolate Mousse Cups. Made with just a few simple ingredients, you can whip these up in no time. I’ll show you how to melt chocolate, whip the cream, and create light, fluffy cups that taste heavenly. They’re perfect for any occasion! Let’s dive into this simple recipe that will delight your taste buds and impress your guests.
Ingredients
Ingredient List
– Heavy cream
– Semi-sweet chocolate chips
– Powdered sugar
– Vanilla extract
– Sea salt
– Optional garnishes
To make easy chocolate mousse cups, you need just a few simple ingredients. First, gather 1 cup of heavy cream. This gives the mousse its rich and creamy texture. Next, grab 1/2 cup of semi-sweet chocolate chips. These provide the delicious chocolate flavor we all love.
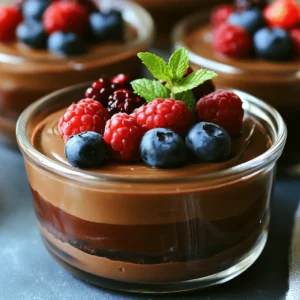
You will also need 1/4 cup of powdered sugar. This sweetens the mousse without adding grit. For a touch of warmth, add 1 teaspoon of vanilla extract. A small amount of sea salt enhances the chocolate taste. Lastly, you can choose optional garnishes like fresh berries or mint leaves to make the dessert look pretty.
With these ingredients, you can create a smooth, rich, and delightful chocolate mousse. For the full recipe, check out the details above. You’ll enjoy every creamy spoonful!
Step-by-Step Instructions
Preparation Process
1. Melting the chocolate
Start with the semi-sweet chocolate chips. Place them in a microwave-safe bowl. Heat in 30-second intervals, stirring each time. This ensures the chocolate melts evenly. Once smooth, let it cool for a few minutes.
2. Whipping the cream
Next, pour the heavy cream into a mixing bowl. Use a hand mixer or a whisk. Beat until you see soft peaks. This takes about 2 to 4 minutes. You want the cream to be thick but not too stiff.
3. Folding the mixtures together
Now, take a small amount of whipped cream and mix it with the melted chocolate. This lightens the chocolate. Then gently fold the chocolate mixture into the rest of the whipped cream. Use a spatula and be careful not to deflate it.
4. Spoon or pipe into cups
Once combined, scoop or pipe the mousse into individual cups. Try to make them look nice. This will be the base for your delicious treat.
Chilling Time and Setting
– Recommended chilling duration
Chill the mousse cups in the fridge for at least 1 hour. This helps the mousse set properly. It allows the flavors to blend well too.
– Importance of proper setting
Setting the mousse is key. It gives the mousse its light and airy texture. If you skip this step, the mousse may not hold its shape when served. Enjoy it after the wait!
Tips & Tricks
Achieving Perfect Texture
To make the best mousse, you need to know about peaks. There are two types: soft peaks and stiff peaks. Soft peaks form when you whip cream just enough. The cream should hold a gentle shape but still droop over. Stiff peaks form when the cream is whipped longer. This cream stands tall and keeps its shape.
Avoid overmixing when you add the powdered sugar and vanilla. Overmixing can make your mousse grainy. When you fold in the chocolate, do it gently. Use a spatula and lift the mixture from the bottom. This helps keep the mousse light and airy.
Enhancing Flavor and Presentation
Garnishes can add fun and flair to your mousse cups. Fresh berries like raspberries or strawberries work great. They add color and a tasty bite. Mint leaves are another nice touch. They add a fresh scent that brightens the dish.
You can also switch up the chocolate. Use dark chocolate for a richer taste. Or, try white chocolate for a sweeter flavor. If you want to add a twist, think about adding coffee or orange zest. These small changes can make your mousse even more special. For the full recipe, check out the instructions above.

Variations
Customizing the Recipe
You can make your chocolate mousse cups even more fun by adding flavors. For a coffee kick, mix in a teaspoon of instant coffee or espresso powder. This adds a rich depth that pairs well with chocolate. If you like citrus, try adding a bit of orange zest. It gives a bright note that cuts through the sweetness.
You can also change the type of chocolate you use. Dark chocolate gives a richer taste. Milk chocolate is sweeter and creamier. You can even experiment with white chocolate for a unique twist. Each type will change the flavor and texture of your mousse.
Dietary Adjustments
If you want a vegan option, use coconut cream instead of heavy cream. It whips up nicely and adds a light coconut flavor. For the chocolate, choose a dairy-free chocolate. You can find many brands that are both tasty and vegan-friendly.
For those looking to cut sugar, you can swap out the powdered sugar. Try using a sugar-free sweetener like stevia or erythritol. Just keep in mind that sweetness levels can vary, so adjust to your taste. This way, you can enjoy your mousse without the added sugar.
Storage Info
Best Practices for Storing Mousse Cups
To keep your chocolate mousse cups fresh, store them in the fridge. Use an airtight container or plastic wrap to cover them. This helps prevent any odors from the fridge from affecting the mousse.
How long does the mousse last? If stored correctly, the mousse remains good for up to three days. After that, the texture may change, and it might not taste as fresh.
Reusing Leftovers
If you have leftover mousse, don’t throw it away! You can use it in several fun ways. Here are some ideas:
– Layered Desserts: Create a parfait by layering mousse with fruits and granola.
– Filling for Cakes: Use it as a rich filling between cake layers.
– Topping for Pancakes or Waffles: Spread it on your breakfast for a sweet treat.
With these tips, you can enjoy every last bit of your chocolate mousse cups. For the complete recipe, check out the Full Recipe.
FAQs
Can I use whipped topping instead of heavy cream?
You can use whipped topping, but it changes the texture. Heavy cream gives a rich, creamy mousse. Whipped topping is lighter and sweeter. If you want a lighter mousse, it’s a good option. Just remember, it may not taste as rich.
How do I make chocolate mousse ahead of time?
You can make this mousse up to two days ahead. Just follow the recipe and chill it well. Store it in the fridge in an airtight container. When ready to serve, garnish with berries and mint. This keeps it fresh and tasty.
What is the difference between chocolate mousse and chocolate pudding?
Chocolate mousse is light and airy, while chocolate pudding is thick and creamy. Mousse uses whipped cream for fluffiness. Pudding often uses cornstarch for thickness. This makes mousse a dessert that feels more special and elegant.
In this blog post, we explored how to make chocolate mousse. We covered the key ingredients, from heavy cream to semi-sweet chocolate chips. Each step, from melting chocolate to chilling time, is crucial for great results. I shared tips to help you achieve the perfect texture and enhance flavor. You can also customize the recipe to fit your taste. Finally, proper storage tips ensure your mousse stays fresh. Remember, making chocolate mousse is fun and easy. Enjoy your delicious creation!