![- 2 cups cooked chicken, shredded - 1 cup shredded mozzarella cheese - 1/2 cup cream cheese, softened - 2 cloves garlic, minced For these cheesy garlic chicken wraps, start with the main ingredients. Use cooked chicken that you’ve shredded. This keeps the wraps tender. Next, add shredded mozzarella cheese for flavor and gooeyness. Cream cheese adds creaminess and binds everything together. Minced garlic gives a strong, tasty kick. - Sriracha or hot sauce for extra kick - Fresh spinach leaves - Grated Parmesan cheese You can spice things up with Sriracha or hot sauce. This adds heat to the wraps. Fresh spinach leaves add crunch and color. Grated Parmesan cheese gives a salty bite, enhancing the flavors. - Alternative proteins (e.g., turkey, tofu) - Dairy-free options for cheese - Choosing different seasonings If you want a change, use turkey or tofu instead of chicken. For cheese, look for dairy-free options to keep it vegan. Experiment with different seasonings like paprika or cumin to change the flavor profile. For the full recipe, refer to the beginning of this article. To start, you need shredded chicken. You can use leftover chicken or rotisserie chicken. If you use raw chicken, cook it first. To shred, use two forks or your fingers when it's warm. This makes it easy to pull apart. For the cream cheese, it can be hard to soften. To speed up the process, cut it into small pieces. Let it sit at room temperature for about 10 minutes. You can also microwave it for 10 seconds. Just avoid melting it! Now, let’s cook the Cheesy Garlic Chicken Wraps. First, heat a skillet over medium heat. Add olive oil and minced garlic. Cook for about one minute until it smells great. Then, in a bowl, mix the shredded chicken, mozzarella cheese, cream cheese, Italian seasoning, salt, and pepper. Stir it until all ingredients blend well. Next, grab your tortillas. Place a scoop of the chicken mixture in the center of each tortilla. Add fresh spinach and sprinkle some grated Parmesan cheese on top. Now, fold the sides of the tortilla inwards. Roll it up tightly from the bottom. Heat a non-stick skillet over medium heat. Place the wraps seam-side down. Cook for 2-3 minutes on each side until they turn golden and crispy. Take them out and let them cool for one minute. Slice each wrap in half diagonally before serving. If you like spice, drizzle some Sriracha or hot sauce on top! For cooking, you will need: - A non-stick skillet - Mixing bowls - Forks for shredding chicken These wraps taste great with sides. Consider serving them with a simple salad or some crunchy veggies. You can also add sweet potato fries or chips for a fun crunch. For presentation, slice the wraps neatly. Arrange them on a plate and garnish with fresh herbs. This makes the dish look inviting and colorful. Enjoy your delicious Cheesy Garlic Chicken Wraps! For the full recipe, check the details above. To avoid soggy wraps, use fresh tortillas. Warm them slightly before filling. This helps them stay firm. Drain excess moisture from any veggies you add. This keeps the wrap dry and tasty. For a crispy exterior, cook the wraps seam-side down first. This helps seal them. Use medium heat for even cooking. If you want extra crispiness, brush the wraps with olive oil before cooking. This gives them a golden color. To elevate the flavor, add spices like paprika or cumin. Fresh herbs like cilantro or parsley can also boost taste. You can mix in some diced jalapeños for a spicy kick. For gooey cheese, grate it fresh from a block. Pre-shredded cheese often has anti-caking agents. These can prevent gooey melting. Layer different cheeses for even more flavor. Try combining mozzarella with cheddar for a rich taste. Cooking time may change based on the thickness of your wraps. Thicker wraps may need a few extra minutes. Always check for a golden color before taking them off the heat. If you use an air fryer, set it to 375°F (190°C). Cook for about 8-10 minutes. This method gives you a crispy finish without oil. A skillet takes about 2-3 minutes per side. Choose the method that fits your taste and time. For the full recipe, check out the recipe section. {{image_2}} You can change up this recipe in fun ways. If you want a vegetarian option, skip the chicken. Use mushrooms, bell peppers, and zucchini instead. Sauté them with garlic and seasonings. This leads to a tasty wrap that even meat lovers will enjoy. For a spicy twist, consider adding jalapeños. Chop them up and mix them into the cheesy mixture. This adds heat and a nice crunch. You can also layer some pickled jalapeños inside your wrap. This gives a zesty kick that can wake up your taste buds. While mozzarella is the star in this recipe, you can try other cheeses too. Cheddar cheese brings a sharp taste. You can mix mozzarella and cheddar for a delightful combo. Provolone or gouda also work well. They add unique flavors to your wraps. Combining cheeses can enhance your wrap's taste. Use a mix of cream cheese and feta for a creamy texture. This makes the wraps rich and indulgent. Experiment with different cheeses to find what you love most. For those who need gluten-free options, use gluten-free tortillas. They are widely available and work just as well. You can also use lettuce leaves instead of tortillas. This creates a low-carb, fresh wrap that’s crunchy and light. If you want to cut carbs, opt for low-carb wraps or tortillas made with almond flour. They taste great while keeping your meal lighter. These simple swaps help everyone enjoy Cheesy Garlic Chicken Wraps in their own way. You can explore the [Full Recipe] for details on making these modifications. After you enjoy your cheesy garlic chicken wraps, store any leftovers right away. Wrap them tightly in plastic wrap or place them in an airtight container. This helps keep them fresh. If you want to save them for longer, freezing is a great option. Just wrap each wrap in foil or freezer paper. Then, place them in a freezer-safe bag. This prevents freezer burn and keeps them tasty. Reheating your wraps can be tricky. You want them warm and crispy, not soggy. I recommend using a skillet for reheating. Heat the skillet over medium heat. Place the wraps seam-side down and cook for about 2-3 minutes on each side. This keeps the outside crispy. You can also use an oven or air fryer to reheat them. Just make sure to wrap them in foil to keep moisture in. Knowing how long your wraps last is key. When stored in the fridge, they stay good for about 3-4 days. If you freeze them, they can last up to 3 months. Check for signs of spoilage. If you see any mold or if the wraps smell bad, it’s best to toss them. Always trust your senses when it comes to food safety. Cheesy Garlic Chicken Wraps last about 3 to 4 days in the fridge. To store them, wrap each one in plastic wrap or foil. This helps keep them fresh. Make sure your fridge is at the right temperature, around 40°F (4°C). If you notice any strange smells or colors, it’s best to throw them out. Yes, you can make these wraps ahead of time! Prepare them and store them in the fridge. Just keep them wrapped well to prevent drying out. You can also fill them and freeze them. If you freeze them, they last about 2 to 3 months. Thaw in the fridge overnight before cooking. You can serve a variety of sides with these wraps. Here are some tasty options: - Fresh salad: A crisp salad adds a nice crunch. - Sweet potato fries: They are a great, sweet contrast. - Veggie sticks: Carrots and celery are fun to dip. - Fruit salad: A refreshing side that pairs well. - Cold drinks: Lemonade or iced tea complement the flavors. Yes, these wraps are great for kids! They love cheesy, flavorful food. You can make them even more kid-friendly by: - Choosing mild cheese: Use a less strong cheese if needed. - Adding favorite veggies: Include bell peppers or cucumbers. - Dipping sauces: Serve with ranch or ketchup for dipping. Kids can help in the kitchen too! Let them assemble their own wraps for fun. For the full recipe, check out the main recipe section. In this article, we explored how to make Cheesy Garlic Chicken Wraps. You learned about the essential ingredients, clear cooking steps, and some tasty tips to elevate your dish. Remember, you can switch ingredients based on your diet or preferences. These wraps offer a fun way to enjoy meals that the whole family can love. With proper storage and reheating, you'll keep leftovers delicious. Try these ideas, and I bet they will become a new favorite in your home!](https://toastedrecipes.com/wp-content/uploads/2025/05/106b5120-c351-4b5b-b5fe-6431f3d3a8a1.webp)
Looking for a quick and tasty dinner idea? Cheesy Garlic Chicken Wraps are just the answer! With a mix of shredded chicken, creamy cheese, and a punch of garlic, these wraps are hard to resist. I’ll show you how to make them easy and delicious, whether you’re cooking for a family meal or a cozy night in. Let’s dive into this mouthwatering recipe that will impress everyone!
Ingredients
Main Ingredients
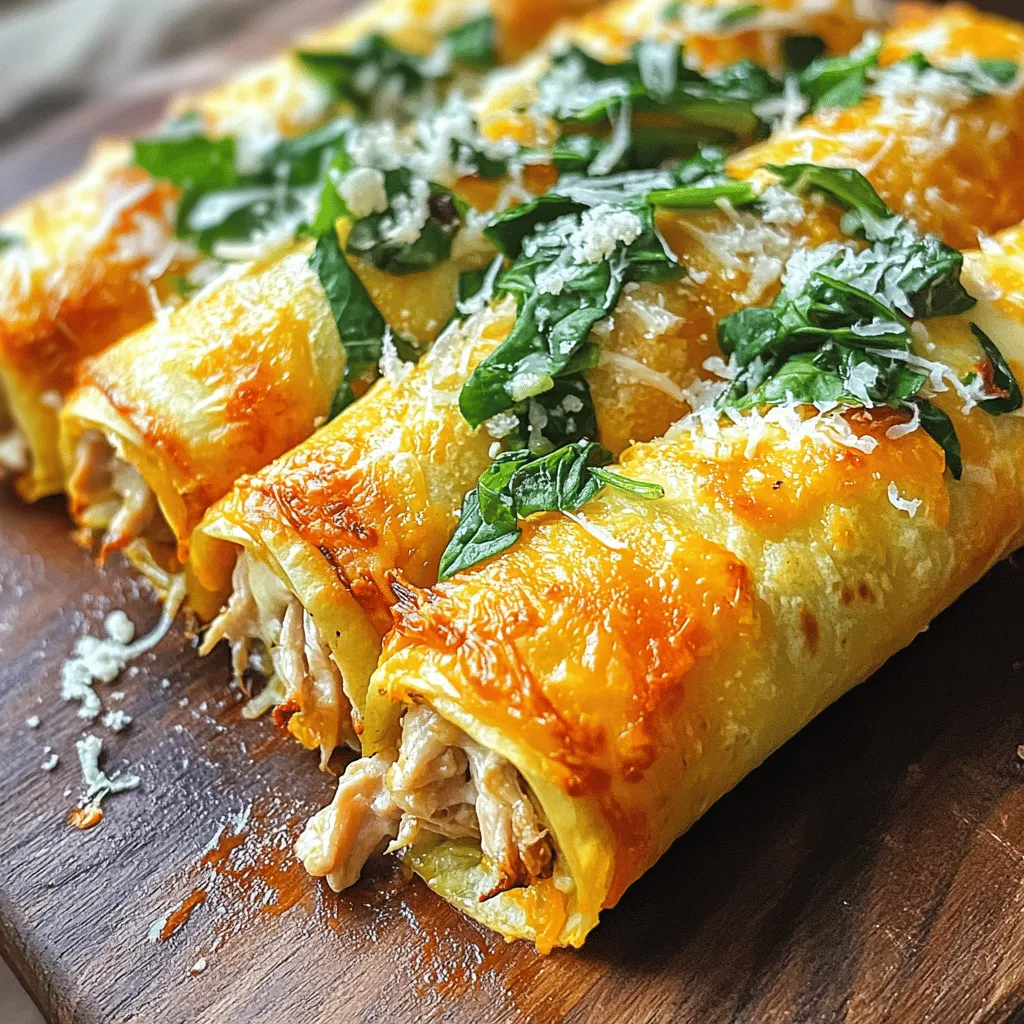
– 2 cups cooked chicken, shredded
– 1 cup shredded mozzarella cheese
– 1/2 cup cream cheese, softened
– 2 cloves garlic, minced
For these cheesy garlic chicken wraps, start with the main ingredients. Use cooked chicken that you’ve shredded. This keeps the wraps tender. Next, add shredded mozzarella cheese for flavor and gooeyness. Cream cheese adds creaminess and binds everything together. Minced garlic gives a strong, tasty kick.
Optional Ingredients
– Sriracha or hot sauce for extra kick
– Fresh spinach leaves
– Grated Parmesan cheese
You can spice things up with Sriracha or hot sauce. This adds heat to the wraps. Fresh spinach leaves add crunch and color. Grated Parmesan cheese gives a salty bite, enhancing the flavors.
Ingredient Substitutions
– Alternative proteins (e.g., turkey, tofu)
– Dairy-free options for cheese
– Choosing different seasonings
If you want a change, use turkey or tofu instead of chicken. For cheese, look for dairy-free options to keep it vegan. Experiment with different seasonings like paprika or cumin to change the flavor profile. For the full recipe, refer to the beginning of this article.
Step-by-Step Instructions
Preparation
To start, you need shredded chicken. You can use leftover chicken or rotisserie chicken. If you use raw chicken, cook it first. To shred, use two forks or your fingers when it’s warm. This makes it easy to pull apart.
For the cream cheese, it can be hard to soften. To speed up the process, cut it into small pieces. Let it sit at room temperature for about 10 minutes. You can also microwave it for 10 seconds. Just avoid melting it!
Cooking Process
Now, let’s cook the Cheesy Garlic Chicken Wraps. First, heat a skillet over medium heat. Add olive oil and minced garlic. Cook for about one minute until it smells great. Then, in a bowl, mix the shredded chicken, mozzarella cheese, cream cheese, Italian seasoning, salt, and pepper. Stir it until all ingredients blend well.
Next, grab your tortillas. Place a scoop of the chicken mixture in the center of each tortilla. Add fresh spinach and sprinkle some grated Parmesan cheese on top. Now, fold the sides of the tortilla inwards. Roll it up tightly from the bottom.
Heat a non-stick skillet over medium heat. Place the wraps seam-side down. Cook for 2-3 minutes on each side until they turn golden and crispy. Take them out and let them cool for one minute. Slice each wrap in half diagonally before serving. If you like spice, drizzle some Sriracha or hot sauce on top!
For cooking, you will need:
– A non-stick skillet
– Mixing bowls
– Forks for shredding chicken
Serving Suggestions
These wraps taste great with sides. Consider serving them with a simple salad or some crunchy veggies. You can also add sweet potato fries or chips for a fun crunch.
For presentation, slice the wraps neatly. Arrange them on a plate and garnish with fresh herbs. This makes the dish look inviting and colorful. Enjoy your delicious Cheesy Garlic Chicken Wraps! For the full recipe, check the details above.
Tips & Tricks
Making the Perfect Wrap
To avoid soggy wraps, use fresh tortillas. Warm them slightly before filling. This helps them stay firm. Drain excess moisture from any veggies you add. This keeps the wrap dry and tasty.
For a crispy exterior, cook the wraps seam-side down first. This helps seal them. Use medium heat for even cooking. If you want extra crispiness, brush the wraps with olive oil before cooking. This gives them a golden color.
Flavor Enhancements
To elevate the flavor, add spices like paprika or cumin. Fresh herbs like cilantro or parsley can also boost taste. You can mix in some diced jalapeños for a spicy kick.
For gooey cheese, grate it fresh from a block. Pre-shredded cheese often has anti-caking agents. These can prevent gooey melting. Layer different cheeses for even more flavor. Try combining mozzarella with cheddar for a rich taste.
Cooking Time Adjustments
Cooking time may change based on the thickness of your wraps. Thicker wraps may need a few extra minutes. Always check for a golden color before taking them off the heat.
If you use an air fryer, set it to 375°F (190°C). Cook for about 8-10 minutes. This method gives you a crispy finish without oil. A skillet takes about 2-3 minutes per side. Choose the method that fits your taste and time.
For the full recipe, check out the recipe section.
Variations
Different Types of Wraps
You can change up this recipe in fun ways. If you want a vegetarian option, skip the chicken. Use mushrooms, bell peppers, and zucchini instead. Sauté them with garlic and seasonings. This leads to a tasty wrap that even meat lovers will enjoy.
For a spicy twist, consider adding jalapeños. Chop them up and mix them into the cheesy mixture. This adds heat and a nice crunch. You can also layer some pickled jalapeños inside your wrap. This gives a zesty kick that can wake up your taste buds.
Using Different Cheeses
While mozzarella is the star in this recipe, you can try other cheeses too. Cheddar cheese brings a sharp taste. You can mix mozzarella and cheddar for a delightful combo. Provolone or gouda also work well. They add unique flavors to your wraps.
Combining cheeses can enhance your wrap’s taste. Use a mix of cream cheese and feta for a creamy texture. This makes the wraps rich and indulgent. Experiment with different cheeses to find what you love most.
Dietary Modifications
For those who need gluten-free options, use gluten-free tortillas. They are widely available and work just as well. You can also use lettuce leaves instead of tortillas. This creates a low-carb, fresh wrap that’s crunchy and light.
If you want to cut carbs, opt for low-carb wraps or tortillas made with almond flour. They taste great while keeping your meal lighter. These simple swaps help everyone enjoy Cheesy Garlic Chicken Wraps in their own way. You can explore the [Full Recipe] for details on making these modifications.
Storage Info
Proper Storage Methods
After you enjoy your cheesy garlic chicken wraps, store any leftovers right away. Wrap them tightly in plastic wrap or place them in an airtight container. This helps keep them fresh. If you want to save them for longer, freezing is a great option. Just wrap each wrap in foil or freezer paper. Then, place them in a freezer-safe bag. This prevents freezer burn and keeps them tasty.
Reheating Guidelines
Reheating your wraps can be tricky. You want them warm and crispy, not soggy. I recommend using a skillet for reheating. Heat the skillet over medium heat. Place the wraps seam-side down and cook for about 2-3 minutes on each side. This keeps the outside crispy. You can also use an oven or air fryer to reheat them. Just make sure to wrap them in foil to keep moisture in.
Shelf Life
Knowing how long your wraps last is key. When stored in the fridge, they stay good for about 3-4 days. If you freeze them, they can last up to 3 months. Check for signs of spoilage. If you see any mold or if the wraps smell bad, it’s best to toss them. Always trust your senses when it comes to food safety.
FAQs
How long do Cheesy Garlic Chicken Wraps last in the fridge?
Cheesy Garlic Chicken Wraps last about 3 to 4 days in the fridge. To store them, wrap each one in plastic wrap or foil. This helps keep them fresh. Make sure your fridge is at the right temperature, around 40°F (4°C). If you notice any strange smells or colors, it’s best to throw them out.
Can I make these wraps ahead of time?
Yes, you can make these wraps ahead of time! Prepare them and store them in the fridge. Just keep them wrapped well to prevent drying out. You can also fill them and freeze them. If you freeze them, they last about 2 to 3 months. Thaw in the fridge overnight before cooking.
What can I serve with Cheesy Garlic Chicken Wraps?
You can serve a variety of sides with these wraps. Here are some tasty options:
– Fresh salad: A crisp salad adds a nice crunch.
– Sweet potato fries: They are a great, sweet contrast.
– Veggie sticks: Carrots and celery are fun to dip.
– Fruit salad: A refreshing side that pairs well.
– Cold drinks: Lemonade or iced tea complement the flavors.
Are Cheesy Garlic Chicken Wraps suitable for kids?
Yes, these wraps are great for kids! They love cheesy, flavorful food. You can make them even more kid-friendly by:
– Choosing mild cheese: Use a less strong cheese if needed.
– Adding favorite veggies: Include bell peppers or cucumbers.
– Dipping sauces: Serve with ranch or ketchup for dipping.
Kids can help in the kitchen too! Let them assemble their own wraps for fun. For the full recipe, check out the main recipe section.
In this article, we explored how to make Cheesy Garlic Chicken Wraps. You learned about the essential ingredients, clear cooking steps, and some tasty tips to elevate your dish. Remember, you can switch ingredients based on your diet or preferences. These wraps offer a fun way to enjoy meals that the whole family can love. With proper storage and reheating, you’ll keep leftovers delicious. Try these ideas, and I bet they will become a new favorite in your home!
![- 2 cups cooked chicken, shredded - 1 cup shredded mozzarella cheese - 1/2 cup cream cheese, softened - 2 cloves garlic, minced For these cheesy garlic chicken wraps, start with the main ingredients. Use cooked chicken that you’ve shredded. This keeps the wraps tender. Next, add shredded mozzarella cheese for flavor and gooeyness. Cream cheese adds creaminess and binds everything together. Minced garlic gives a strong, tasty kick. - Sriracha or hot sauce for extra kick - Fresh spinach leaves - Grated Parmesan cheese You can spice things up with Sriracha or hot sauce. This adds heat to the wraps. Fresh spinach leaves add crunch and color. Grated Parmesan cheese gives a salty bite, enhancing the flavors. - Alternative proteins (e.g., turkey, tofu) - Dairy-free options for cheese - Choosing different seasonings If you want a change, use turkey or tofu instead of chicken. For cheese, look for dairy-free options to keep it vegan. Experiment with different seasonings like paprika or cumin to change the flavor profile. For the full recipe, refer to the beginning of this article. To start, you need shredded chicken. You can use leftover chicken or rotisserie chicken. If you use raw chicken, cook it first. To shred, use two forks or your fingers when it's warm. This makes it easy to pull apart. For the cream cheese, it can be hard to soften. To speed up the process, cut it into small pieces. Let it sit at room temperature for about 10 minutes. You can also microwave it for 10 seconds. Just avoid melting it! Now, let’s cook the Cheesy Garlic Chicken Wraps. First, heat a skillet over medium heat. Add olive oil and minced garlic. Cook for about one minute until it smells great. Then, in a bowl, mix the shredded chicken, mozzarella cheese, cream cheese, Italian seasoning, salt, and pepper. Stir it until all ingredients blend well. Next, grab your tortillas. Place a scoop of the chicken mixture in the center of each tortilla. Add fresh spinach and sprinkle some grated Parmesan cheese on top. Now, fold the sides of the tortilla inwards. Roll it up tightly from the bottom. Heat a non-stick skillet over medium heat. Place the wraps seam-side down. Cook for 2-3 minutes on each side until they turn golden and crispy. Take them out and let them cool for one minute. Slice each wrap in half diagonally before serving. If you like spice, drizzle some Sriracha or hot sauce on top! For cooking, you will need: - A non-stick skillet - Mixing bowls - Forks for shredding chicken These wraps taste great with sides. Consider serving them with a simple salad or some crunchy veggies. You can also add sweet potato fries or chips for a fun crunch. For presentation, slice the wraps neatly. Arrange them on a plate and garnish with fresh herbs. This makes the dish look inviting and colorful. Enjoy your delicious Cheesy Garlic Chicken Wraps! For the full recipe, check the details above. To avoid soggy wraps, use fresh tortillas. Warm them slightly before filling. This helps them stay firm. Drain excess moisture from any veggies you add. This keeps the wrap dry and tasty. For a crispy exterior, cook the wraps seam-side down first. This helps seal them. Use medium heat for even cooking. If you want extra crispiness, brush the wraps with olive oil before cooking. This gives them a golden color. To elevate the flavor, add spices like paprika or cumin. Fresh herbs like cilantro or parsley can also boost taste. You can mix in some diced jalapeños for a spicy kick. For gooey cheese, grate it fresh from a block. Pre-shredded cheese often has anti-caking agents. These can prevent gooey melting. Layer different cheeses for even more flavor. Try combining mozzarella with cheddar for a rich taste. Cooking time may change based on the thickness of your wraps. Thicker wraps may need a few extra minutes. Always check for a golden color before taking them off the heat. If you use an air fryer, set it to 375°F (190°C). Cook for about 8-10 minutes. This method gives you a crispy finish without oil. A skillet takes about 2-3 minutes per side. Choose the method that fits your taste and time. For the full recipe, check out the recipe section. {{image_2}} You can change up this recipe in fun ways. If you want a vegetarian option, skip the chicken. Use mushrooms, bell peppers, and zucchini instead. Sauté them with garlic and seasonings. This leads to a tasty wrap that even meat lovers will enjoy. For a spicy twist, consider adding jalapeños. Chop them up and mix them into the cheesy mixture. This adds heat and a nice crunch. You can also layer some pickled jalapeños inside your wrap. This gives a zesty kick that can wake up your taste buds. While mozzarella is the star in this recipe, you can try other cheeses too. Cheddar cheese brings a sharp taste. You can mix mozzarella and cheddar for a delightful combo. Provolone or gouda also work well. They add unique flavors to your wraps. Combining cheeses can enhance your wrap's taste. Use a mix of cream cheese and feta for a creamy texture. This makes the wraps rich and indulgent. Experiment with different cheeses to find what you love most. For those who need gluten-free options, use gluten-free tortillas. They are widely available and work just as well. You can also use lettuce leaves instead of tortillas. This creates a low-carb, fresh wrap that’s crunchy and light. If you want to cut carbs, opt for low-carb wraps or tortillas made with almond flour. They taste great while keeping your meal lighter. These simple swaps help everyone enjoy Cheesy Garlic Chicken Wraps in their own way. You can explore the [Full Recipe] for details on making these modifications. After you enjoy your cheesy garlic chicken wraps, store any leftovers right away. Wrap them tightly in plastic wrap or place them in an airtight container. This helps keep them fresh. If you want to save them for longer, freezing is a great option. Just wrap each wrap in foil or freezer paper. Then, place them in a freezer-safe bag. This prevents freezer burn and keeps them tasty. Reheating your wraps can be tricky. You want them warm and crispy, not soggy. I recommend using a skillet for reheating. Heat the skillet over medium heat. Place the wraps seam-side down and cook for about 2-3 minutes on each side. This keeps the outside crispy. You can also use an oven or air fryer to reheat them. Just make sure to wrap them in foil to keep moisture in. Knowing how long your wraps last is key. When stored in the fridge, they stay good for about 3-4 days. If you freeze them, they can last up to 3 months. Check for signs of spoilage. If you see any mold or if the wraps smell bad, it’s best to toss them. Always trust your senses when it comes to food safety. Cheesy Garlic Chicken Wraps last about 3 to 4 days in the fridge. To store them, wrap each one in plastic wrap or foil. This helps keep them fresh. Make sure your fridge is at the right temperature, around 40°F (4°C). If you notice any strange smells or colors, it’s best to throw them out. Yes, you can make these wraps ahead of time! Prepare them and store them in the fridge. Just keep them wrapped well to prevent drying out. You can also fill them and freeze them. If you freeze them, they last about 2 to 3 months. Thaw in the fridge overnight before cooking. You can serve a variety of sides with these wraps. Here are some tasty options: - Fresh salad: A crisp salad adds a nice crunch. - Sweet potato fries: They are a great, sweet contrast. - Veggie sticks: Carrots and celery are fun to dip. - Fruit salad: A refreshing side that pairs well. - Cold drinks: Lemonade or iced tea complement the flavors. Yes, these wraps are great for kids! They love cheesy, flavorful food. You can make them even more kid-friendly by: - Choosing mild cheese: Use a less strong cheese if needed. - Adding favorite veggies: Include bell peppers or cucumbers. - Dipping sauces: Serve with ranch or ketchup for dipping. Kids can help in the kitchen too! Let them assemble their own wraps for fun. For the full recipe, check out the main recipe section. In this article, we explored how to make Cheesy Garlic Chicken Wraps. You learned about the essential ingredients, clear cooking steps, and some tasty tips to elevate your dish. Remember, you can switch ingredients based on your diet or preferences. These wraps offer a fun way to enjoy meals that the whole family can love. With proper storage and reheating, you'll keep leftovers delicious. Try these ideas, and I bet they will become a new favorite in your home!](https://toastedrecipes.com/wp-content/uploads/2025/05/106b5120-c351-4b5b-b5fe-6431f3d3a8a1-300x300.webp)