Are you ready for a meal that brings flavor and ease together? In this blog post, I’ll guide you through making Cheesy Garlic Chicken Wraps that are not just tasty but simple to prepare. With fresh chicken, creamy cheese, and a few fun add-ins, you can whip up a delightful dish in no time. Let’s dive in and discover how to make your new favorite wrap!
Ingredients
Main Ingredients for Cheesy Garlic Chicken Wraps
To make Cheesy Garlic Chicken Wraps, you need a few key items:
– 1 lb (450g) chicken breast, cooked and shredded
– 1 cup shredded mozzarella cheese
– 1/2 cup cream cheese, softened
– 1/4 cup sour cream
– 3 cloves garlic, minced
– 1 teaspoon dried oregano
– 1 teaspoon garlic powder
– 1/2 teaspoon smoked paprika
– Salt and pepper to taste
– 4 large flour tortillas
– Fresh spinach leaves (optional)
– Olive oil for cooking
These ingredients create a creamy and cheesy filling that makes the wraps so tasty.
Optional Ingredients and Add-Ins
You can add some optional ingredients to make your wraps even better:
– Fresh herbs like parsley or basil for garnish
– Sliced jalapeños for a spicy kick
– Diced tomatoes or bell peppers for extra crunch
– Avocado slices for creaminess
Feel free to mix and match these add-ins based on your taste.
Recommended Cooking Tools
You will need some basic tools to prepare these wraps:
– Large mixing bowl for combining ingredients
– Skillet for cooking the wraps
– Spatula for flipping them
– Knife for slicing the wraps after cooking
With these tools and ingredients, you’re ready to make Cheesy Garlic Chicken Wraps. For the full recipe, check out the detailed instructions. Enjoy!
Step-by-Step Instructions
Preparation of Chicken Mixture
To start, gather your ingredients. In a large bowl, add the cooked, shredded chicken. Next, mix in the shredded mozzarella and the softened cream cheese. Then, add the sour cream, minced garlic, and dried oregano. Sprinkle in the garlic powder, smoked paprika, salt, and pepper. Mix everything until it becomes creamy and well-combined. This cheesy chicken mixture is rich and full of flavor.
Assembling the Wraps
Now, grab the large flour tortillas. Lay them flat on a clean surface. If you want, place a few fresh spinach leaves in the center of each tortilla. This adds a nice crunch and color. Next, spoon an equal amount of the cheesy chicken mixture onto each tortilla. Make sure to keep it centered and leave some space around the edges. Fold the sides of the tortilla in, then roll it up tightly from the bottom to the top. This secures the filling inside, so it won’t spill out while cooking.
Cooking the Wraps
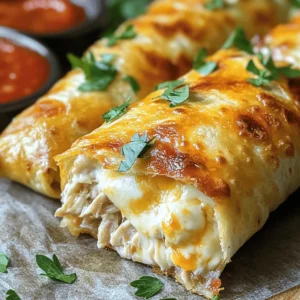
It’s time to cook! Preheat a skillet over medium heat and add a splash of olive oil. Place the wraps seam-side down in the skillet. Cook for about 3-4 minutes until they turn golden and crispy. Flip the wraps and cook the other side for another 3-4 minutes. Once both sides are golden brown and the cheese is melted, take the wraps out of the skillet. Let them cool for a moment before slicing them in half. This makes them easier to eat and look great on a plate. For the full recipe, check out the detailed instructions above.
Tips & Tricks
How to Achieve the Perfect Crispy Texture
To get that nice crispy texture, use enough olive oil. Heat the skillet to medium. This heat level cooks the wraps well without burning them. Place the wraps seam-side down. Cook for 3-4 minutes until golden brown. Flip and cook the other side the same way. This method gives you a crunchy outside and a warm cheesy inside.
Common Mistakes to Avoid
One common mistake is using too much filling. Overstuffing makes it hard to roll and can cause spills. Another is not letting the skillet heat up. If the pan is cold, the wraps won’t brown nicely. Also, be careful not to skip the olive oil. It helps with browning and adds flavor.
Serving Suggestions and Pairings
For a fun meal, serve the wraps with marinara sauce or ranch dressing. You can also add fresh herbs like parsley or basil on top. These herbs not only look great but also add fresh flavor. Pair your wraps with a simple salad or some roasted veggies for a balanced meal. For the full recipe, check the earlier section.

Variations
Substitutions for Dietary Preferences (Gluten-Free, Dairy-Free)
You can easily adapt these cheesy garlic chicken wraps for special diets. For a gluten-free option, use corn or rice tortillas. They hold up well and taste great. If you need a dairy-free version, swap the cream cheese and mozzarella for vegan cheese. Look for brands that melt well. You can also use dairy-free sour cream for creaminess. These changes keep the wraps tasty and satisfying for everyone.
Flavor Enhancements (Spices and Herbs)
To make your wraps burst with flavor, try adding spices and herbs. Fresh herbs like cilantro or basil add brightness. You can mix in some red pepper flakes for heat. If you like a smoky flavor, use smoked paprika or chipotle powder. Adding a squeeze of lemon juice brings a nice zing. Experiment with your favorite spices to find the perfect mix for your taste.
Alternative Protein Options
Chicken is a classic choice, but you can switch it up. Try shredded beef or pork for a different twist. If you want a meat-free option, use cooked lentils or chickpeas. They add protein and fiber. You can also use shrimp or fish for a seafood version. Each option brings a unique taste to the wraps and keeps them exciting. For the full recipe, check out the instructions above!
Storage Info
How to Store Leftovers
To store leftovers, let the cheesy garlic chicken wraps cool down first. Then, place them in an airtight container. This keeps them fresh and tasty. You can store them in the fridge for up to three days. Always label your container with the date. This helps you know when to eat them.
Reheating Instructions
Reheating is simple. You can use a microwave or a skillet. If using a microwave, place the wrap on a plate and cover it with a damp paper towel. Heat for 1-2 minutes. Check if it’s hot all the way through. If you prefer a crispy wrap, use a skillet. Heat it on medium for 3-4 minutes per side. This makes the outside crispy again.
Freezing Tips for Longer Storage
Freezing is a great option for longer storage. Wrap each cheesy garlic chicken wrap tightly in plastic wrap. Then, place the wrapped wraps in a freezer bag. Remove as much air as possible. Store them in the freezer for up to three months. When you’re ready to eat, thaw them in the fridge overnight. Then, reheat as mentioned earlier. This keeps the flavor and texture great! For the full recipe, check out the previous sections.
FAQs
Can I use pre-cooked chicken for this recipe?
Yes, you can use pre-cooked chicken. It saves time and still tastes great. Just shred the chicken and mix it with the other ingredients. This way, you get a quick meal without losing flavor.
What type of cheese works best in these wraps?
I love using mozzarella cheese for its melty texture. It blends well with the cream cheese and adds a nice stretch. You can also try cheddar or Monterey Jack for a different taste. Each cheese brings its own unique flair to the wraps.
How can I make these wraps spicier?
To add some heat, mix in chopped jalapeños or red pepper flakes. You can also use pepper jack cheese instead of mozzarella. For an extra kick, try a dash of hot sauce in the chicken mixture. These tweaks will give your wraps a bold flavor.
For the full recipe, check out the detailed steps to make these tasty wraps!
Cheesy garlic chicken wraps are a tasty treat easy to make. We covered the key ingredients, cooking tools, and step-by-step instructions. I shared useful tips to get that perfect crispy texture and avoid common mistakes. You also learned about variations for different diets and how to store leftovers.
In conclusion, try these wraps for a simple meal that everyone loves. Experiment with flavors and ingredients to make them your own. Enjoy your cooking adventure!